微软azure 容器服务
After building a Raspberry Pi Kubernetes Cluster, I wanted to see how quickly I could get up to speed on Kubernetes in Azure.
构建了Raspberry Pi Kubernetes集群之后,我想看看我能以多快的速度适应Azure中的Kubernetes。
I installed the Azure CLI (Command Line Interface) in a few minutes - works on Windows, Mac or Linux.
我在几分钟内安装了Azure CLI(命令行界面),可在Windows,Mac或Linux上运行。
- I also remembered that I don't really need to install anything locally. I could just use the Azure Cloud Shell directly from within VS Code. I'd get a bash shell, Azure CLI, and automatically logged in without doing anything manual. 我还记得我真的不需要在本地安装任何东西。 我可以直接在VS Code中直接使用Azure Cloud Shell。 我将得到一个bash shell,Azure CLI,并且无需任何手动操作即可自动登录。
Anyway, while needlessly installing the Azure CLI locally, I read up on the Azure Container Service (AKS) here. There's walkthrough for creating an AKS Cluster here. You can actually run through the whole tutorial in the browser with an in-browser shell.
无论如何,在不必要的本地安装Azure CLI的同时,我在这里阅读了Azure容器服务(AKS) 。 这里有创建AKS集群的演练。 实际上,您可以使用浏览器内Shell在浏览器中浏览整个教程。
After logging in with "az login" I made a new resource group to hold everything with "az group create -l centralus -n aks-hanselman." It's in the centralus and it's named aks-hanselman.
使用“ az login ”登录后,我创建了一个新的资源组以使用“ az group create -l centralus -n aks-hanselman ”保存所有内容。 它位于中央,名为aks-hanselman。
Then I created a managed container service like this:
然后,我创建了一个托管容器服务,如下所示:
Then I created a managed container service like this:C:\Users\scott\Source>az aks create -g aks-hanselman -n hanselkube --generate-ssh-keys
/ Running ...然后,我创建了一个托管容器服务,如下所示: C:\ Users \ scott \ Source> az aks create -g aks-hanselman -n hanselkube --generate-ssh-keys /运行中...
This runs for a few minutes while creating, then when it's done, I can get ahold of the credentials I need with
在创建时,它会运行几分钟,然后完成后,我可以使用所需的凭据
This runs for a few minutes while creating, then when it's done, I can get ahold of the credentials I need with C:\Users\scott\Source>az aks get-credentials --resource-group aks-hanselman --name hanselkube
Merged "hanselkube" as current context in C:\Users\scott\.kube\config它在创建时会运行几分钟,然后完成后,我可以使用C:\ Users \ scott \ Source> az aks get-credentials --resource-group aks-hanselman --name hanselkube获取所需的凭据。 将“ hanselkube”合并为C:\ Users \ scott \ .kube \ config中的当前上下文
I can install Kubenetes CLI "kubectl" easily with "az aks install-cli"
我可以使用“ az aks install-cli ”轻松安装Kubenetes CLI“ kubectl”
Then list out the nodes that are ready to go!
然后列出准备就绪的节点!
C:\Users\scott\Source>kubectl get nodes
NAME STATUS ROLES AGE VERSION
aks-nodepool1-13823488-0 Ready agent 1m v1.7.7
aks-nodepool1-13823488-1 Ready agent 1m v1.7.7
aks-nodepool1-13823488-2 Ready agent 1m v1.7.7C:\ Users \ scott \ Source> kubectl获取节点名称状态角色年龄版本aks-nodepool1-13823488-0就绪代理1m v1.7.7 aks-nodepool1-13823488-1就绪代理1m v1.7.7 aks-nodepool1-13823488-2就绪代理1m v1.7.7
A year ago, Glenn Condron and I made a silly web app while recording a Microsoft Virtual Academy. We use it for demos and to show how even old (now over a year) containers can still be easily and reliably deployed. It's up at https://hub.docker.com/r/glennc/fancypants/.
一年前,我和Glenn Condron在录制Microsoft Virtual Academy时制作了一个愚蠢的Web应用程序。 我们将其用于演示并展示如何仍然可以轻松,可靠地部署即使是旧的(现在已经超过一年)的容器。 它位于https://hub.docker.com/r/glennc/fancypants/ 。
I'll deploy it to my new Kubernetes Cluster up in Azure by making this yaml file:
通过制作以下yaml文件,将其部署到Azure中的新Kubernetes群集中:
apiVersion: apps/v1beta1
kind: Deployment
metadata:
  name: fancypants
spec:
  replicas: 1
  template:
    metadata:
      labels:
        app: fancypants
    spec:
      containers:
      - name: fancypants
        image: glennc/fancypants:latest
        ports:
        - containerPort: 80
---
apiVersion: v1
kind: Service
metadata:
  name: fancypants
spec:
  type: LoadBalancer
  ports:
  - port: 80
  selector:
    app: fancypants
I saved it as fancypants.yml, then run kubectl create -f fancypants.yml.
我将其保存为fancypants.yml,然后运行kubectl create -f fancypants.yml 。
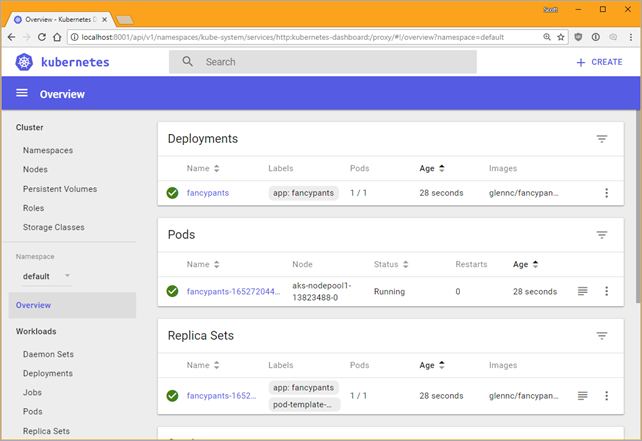
I can run kubectl proxy and then hit http://localhost:8001/api/v1/namespaces/kube-system/services/http:kubernetes-dashboard:/proxy/#!/overview?namespace=default to look at the Kubernetes Dashboard, proxyed locally, but all running in Azure.
我可以运行kubectl代理,然后点击http:// localhost:8001 / api / v1 / namespaces / kube-system / services / http:kubernetes-dashboard:/ proxy /#!/ overview?namespace = default来查看Kubernetes仪表板,在本地代理,但全部在Azure中运行。

When fancypants is created and deployed, then I can find out its external IP with:
创建并部署了幻想式开发人员后,我可以使用以下命令找到其外部IP:
C:\Users\scott\Sources>kubectl get service
NAME         TYPE           CLUSTER-IP     EXTERNAL-IP     PORT(S)        AGE
fancypants   LoadBalancer   10.0.116.145   52.165.232.77   80:31040/TCP   7m
kubernetes   ClusterIP      10.0.0.1       <none>          443/TCP        18m
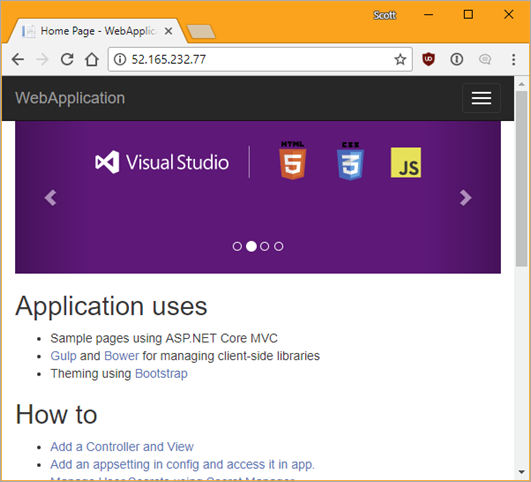
There's my IP, I hit it and boom, I've got fancypants in the managed cloud. I only have to pay for the VMs I'm using, and not for the VM that manages Kubernetes. That means the "kube-system" namespace is free, I pay for other namespaces like my "default" one.
有我的IP,我一见如故,我在托管云中充满了幻想。 我只需要为正在使用的VM付费,而不必为管理Kubernetes的VM付费。 这意味着“ kube-system”命名空间是免费的,我为“我的默认”命名空间支付其他费用。

Best part? When I'm done, I can just delete the resource group and take it all away. Per minute billing.
最好的部分? 完成后,我可以删除资源组并将其全部删除。 每分钟计费。
C:\Users\scott\Sources>az group delete -n aks-hanselman --yes
Super fun and just took about 30 min to install, read about, try it out, write this blog post, then delete. Try it yourself!
超级好玩,只花了30分钟即可安装,阅读,试用,撰写此博文,然后删除。 自己尝试!
微软azure 容器服务


 767
767

 被折叠的 条评论
为什么被折叠?


