


1.创建XML并写入数据

 在Form1窗体里面拖进去button1,如图

双击button1,在其点击事件里面写代码:
 private void button1_Click(object sender, EventArgs e) //生成
        {
            //创建XmlDocument对象
            XmlDocument document = new XmlDocument();
            //xml文档的声明部分
            XmlDeclaration declaration = document.CreateXmlDeclaration("1.0", "UTF-8", "");//xml文档的声明部分
            document.AppendChild(declaration);//添加至XmlDocument对象中
            //创建用户对象
            User xrz = new User() { ID = "1", Name = "cxt"
              , Age = "23", Explain = "student" };
            //创建根节点User
            XmlElement User = document.CreateElement("User");//CreateElement(节点名称)
            //设置根节点的属性
            User.SetAttribute("Type", "员工");
            //创建子节点ID
            XmlElement ID = document.CreateElement("ID");
            ID.InnerText = xrz.ID; //设置其值
            XmlElement Name = document.CreateElement("Name");
            Name.InnerText = xrz.Name;
            XmlElement Age = document.CreateElement("Age");
            Age.InnerText = xrz.Age;
            XmlElement Explain = document.CreateElement("Explain");
            Explain.InnerText = xrz.Explain;
            //添加至父节点User中
            User.AppendChild(ID);
            User.AppendChild(Name);
            User.AppendChild(Age);
            User.AppendChild(Explain);
            //将根节点添加至XML文档中
            document.AppendChild(User);
            //保存输出路径
            document.Save(@"E:\" + xrz.ID + xrz.Name + ".xml");

            ///>
            ///注意要把根节点添加至XML文档中
            ///多层级只需要在其子节点使用AppendChild再次添加即可
            ///使用XmlElement对象的SetAttribute方法设置其属性
            ///在保存路径的时候最好使用异常处理
        }
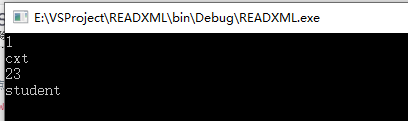
查看生成的XML文档:

2.读取XML文件(XmlDocument)
创建控制台程序READXML,读取上面创建的xml程序 1cxt.xml 文件复制放在了bin/debug目录下
using System;
using System.Collections.Generic;
using System.Linq;
using System.Text;
using System.Threading.Tasks;
using System.Xml;

namespace READXML
{
    internal class Program
    {
        static void Main(string[] args)
        {
            //创建XML文档类
            XmlDocument xmlDoc = new XmlDocument();
            //加载xml文件
            xmlDoc.Load("1cxt.xml"); //从指定的位置加载xml文档
            //获取根节点
            XmlElement xmlRoot = xmlDoc.DocumentElement; //DocumentElement获取文档的跟
            //遍历节点
            foreach (XmlNode node in xmlRoot.ChildNodes)
            {
                //根据节点名称查找节点对象
                Console.WriteLine(node.InnerText);

            }
            Console.ReadKey();
        }
    }
}
运行程序:
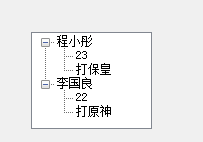
3.根据XML文件生成TreeView
新建项目
 Student.xml
<?xml version="1.0" encoding="UTF-8"?>
<Student>
 <A>
   <Name>程小彤</Name>
   <Age>23</Age>
   <Hobby>打保皇</Hobby>
 </A>
 <A>
   <Name>李国良</Name>
   <Age>22</Age>
   <Hobby>打原神</Hobby>
 </A>
</Student>
添加按钮和树控件,运行代码:
 private void button1_Click(object sender, EventArgs e) //填充
        {
            XmlDocument xmlDoc = new XmlDocument();
            xmlDoc.Load("files/Student.xml");
            XmlElement xmlnode = xmlDoc.DocumentElement;
            foreach (XmlNode node in xmlnode.ChildNodes)
            {
                this.treeView1.Nodes.Add(node["Name"].InnerText); //添加根节点
                for (int i = 0; i < this.treeView1.Nodes.Count; i++) //遍历根节点确认为其添加子节点
                {
                    if (this.treeView1.Nodes[i].Text.Equals(node["Name"].InnerText))
                    {
                        this.treeView1.Nodes[i].Nodes.Add(node["Age"].InnerText);
                        this.treeView1.Nodes[i].Nodes.Add(node["Hobby"].InnerText);
                    }
                }
            }
        }
运行结果:


 856
856


 被折叠的 条评论
为什么被折叠?
被折叠的 条评论
为什么被折叠?
 到【灌水乐园】发言


