


在android中截屏是一种很常用的功能,现在来实现一下android的截屏。
布局文件:
<RelativeLayout xmlns:android="http://schemas.android.com/apk/res/android"
    xmlns:tools="http://schemas.android.com/tools"
    android:layout_width="match_parent"
    android:layout_height="match_parent"
    android:paddingBottom="@dimen/activity_vertical_margin"
    android:paddingLeft="@dimen/activity_horizontal_margin"
    android:paddingRight="@dimen/activity_horizontal_margin"
    android:paddingTop="@dimen/activity_vertical_margin"
    android:id="@+id/rootLayout"
    tools:context=".MainActivity" >

    <TextView
        android:layout_width="fill_parent"
        android:layout_height="wrap_content"
        android:text="@string/hello_world" />

    <Button
        android:id="@+id/my_button"
        android:layout_width="fill_parent"
        android:layout_height="wrap_content"
        android:layout_alignParentBottom="true"
        android:text="截屏方式二" >
    </Button>

    <Button
        android:id="@+id/button1"
        android:layout_width="wrap_content"
        android:layout_height="wrap_content"
        android:layout_above="@+id/my_button"
        android:layout_centerHorizontal="true"
        android:text="截屏方式一" />

</RelativeLayout>
因为截屏得到的图片保存在sd卡上,因此要加上以下权限:
<uses-permission android:name="android.permission.WRITE_EXTERNAL_STORAGE"/>
第一种方法截屏:
 bt1=(Button) findViewById(R.id.button1);
        bt1.setOnClickListener(new Button.OnClickListener() {

            @Override
            public void onClick(View v) {
                    // TODO Auto-generated method stub
                    //Context context = getApplicationContext();
                    View rootView = findViewById(R.id.rootLayout);

                    Bitmap newb = Bitmap.createBitmap( 320, 480, Config.ARGB_8888 );

                    Canvas canvas = new Canvas(newb);

                    rootView.draw(canvas);

                    File file = new File(Environment.getExternalStorageDirectory().getPath()+ "/" + "1.png");

                    FileOutputStream f = null;
                    try {
                            f = new FileOutputStream(file);
                    } catch (FileNotFoundException e) {
                            // TODO Auto-generated catch block
                            e.printStackTrace();
                    }
                    boolean b = newb.compress(Bitmap.CompressFormat.PNG, 100, f);

                    if(b){
                            //截图成功
                    	Toast.makeText(MainActivity.this, "截图成功", 1).show();

                    }
            }
    });
截图效果:
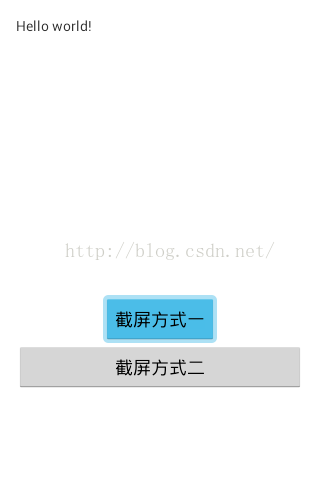
这种方法截屏是没有截取标题栏的,并且中间的白色部分根本就没显示出来,都是透明色的。
第二种方法截屏:
this.button = (Button) this.findViewById(R.id.my_button);

        this.button.setOnClickListener(new Button.OnClickListener(){
        	public void onClick(View v){
        		SimpleDateFormat sdf = new SimpleDateFormat("yyyy-MM-dd_HH-mm-ss", Locale.US);
        		//String fname ="/sdcard/"+sdf.format(new Date()) + ".png";
        		String fname =Environment.getExternalStorageDirectory().getPath()+"/"+sdf.format(new Date()) + ".png";

        		View view = v.getRootView();
        		view.setDrawingCacheEnabled(true);
        		view.buildDrawingCache();
        		Bitmap bitmap = view.getDrawingCache();
        		if(bitmap!= null){
        			try{
        				FileOutputStream  out = new FileOutputStream(fname);
        				bitmap.compress(Bitmap.CompressFormat.PNG,100, out);
        				Toast.makeText(MainActivity.this, "截图成功", 1).show();
        			}catch(Exception e) {
        				e.printStackTrace();
        			}
        		}else{
        			Toast.makeText(MainActivity.this, "截图失败", 1).show();
        		}
        	}
        	});
截图效果:
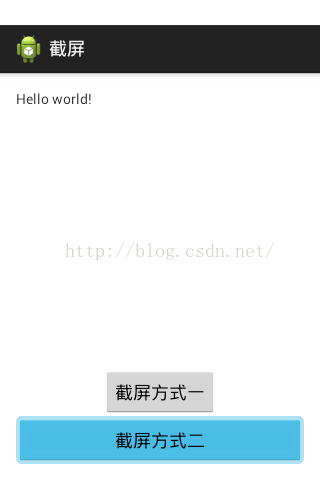
这种方法截屏把标题栏也截取进去了
运行代码后再sd卡上生成以下文件:

观察上面的生成的文件的大小,发现第一种方法生成的文件比较小(没有截取标题栏),若对内存要求比较高的可以选择第一种方法截图。
源代码下载地址:http://download.csdn.net/detail/dangnianmingyue_gg/9092983


 3100
3100

 被折叠的 条评论
为什么被折叠?
被折叠的 条评论
为什么被折叠?
 到【灌水乐园】发言


