


前言
我们PointNet或者PointNet++理解为用于图像分类任务中的ResNet等CNN网络。不同的是,ResNet等用来提取图片的特征,而PointNet用来提取3D点云的特征。
今天要解析的是用于3D物体检测任务的VoxelNet,也就是要给检测出来的ROI(Region of Interest)套上一个Bounding box了。
该网络和PointNet的关系,就类似YOLO 和ResNet的关系,一个用于检测位置,一个用来提取特征。
VoxelNet的论文地址为:https://arxiv.org/abs/1711.06396
Pytorch的代码实现为:skyhehe123/VoxelNet-pytorch
VoxelNet 的网络结构
顾名思义,VoxelNet就是将3D点云数据看做一个个的Voxel(立体块)进行处理。总的来说,VoxelNet的网络结构分为三部分,分别为(1)特征学习网络(2)中部卷积层(3)RPN层,如下图所示。
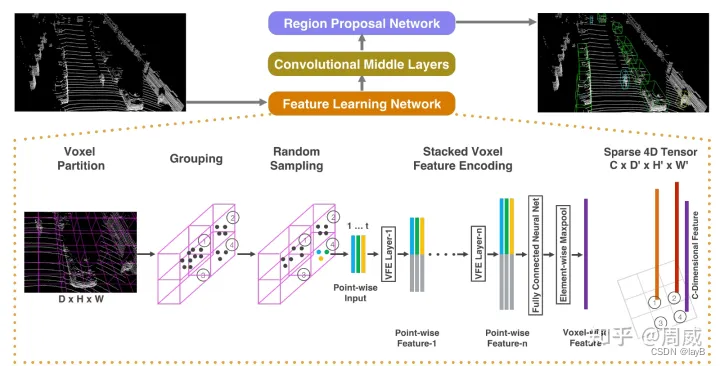
特征学习网络
特征学习网络是VoxelNet中最重要的一个网络,也是创新点最足的一个网络。
可以具体分解为:
(1)Voxel Partition: 也就是将空间划分为一个个堆叠的、相同大小的Voxel
(2)Grouping: 上面将空间划分为一个个的Voxel了,Grouping这一步的作用就是将3D点云数据装进这一个个的Voxel中,实现分组。
(3)Random Sampling: 3D点云的数据量往往都是10万以上的。要是直接在这个数量级上进行特征提取,是非常消耗计算资源的,而且可能会引发检测偏差(bias the detection)。所以作者提出了随机采样方法,将点云数量超过 T T T 的Voxel中的点云数量降至 T T T 。
(4)Stacked Voxel Feature Encoding:这一步是最重要的一步。作者在这一步提出了VFE层(VFE= Voxel Feature Encoding)。我相信作者提出这个层,应该是受到了PointNet的启发。这里我们给出这个层的实现图,如下图所示。
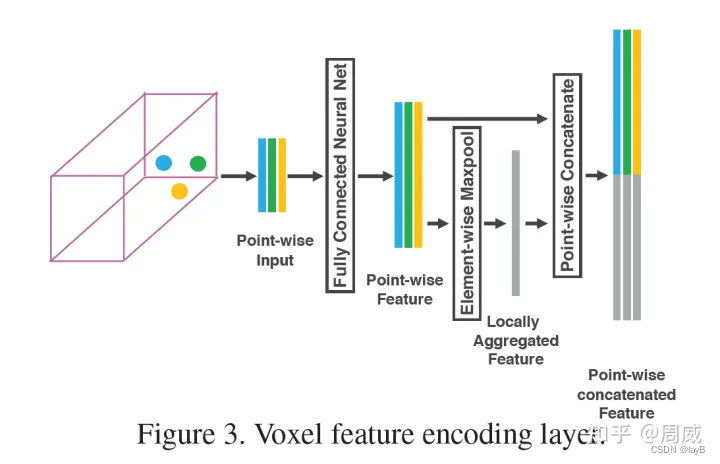
上图中Voxel有3个点云数据。作者先用一个FCN层(印象中FCN指的是全卷积层,但这里指的是全连接层)提取这3个点云数据的特征,获得3个Point-wise Feature。
因为这个操作是逐点运算的,并没有引入点与点之间的关系,也就是local feature。作者在此基础上引入Element-wise maxpool,获得Locally Aggregated Feature。Locally Aggregated Feature反应了这些点的一个局部关系。
作者将Point-wise Feature和Locally Aggregated Feature进行了简单的堆叠融合,作为下一个VFE层的输入。
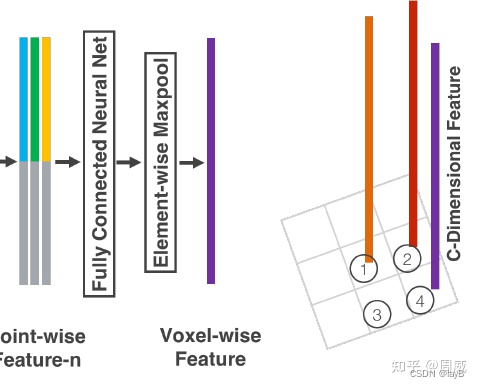
这样连续堆叠几次VFE层后,就获得更丰富的特征表示。最后,使用一个Element-wise maxpool获得最后的一个Voxel-wise Feature,也就是图1中的
具体代码实现非常简单,如下:
(1)全连接层FCN
# Fully Connected Network
class FCN(nn.Module):

    def __init__(self,cin,cout):
        super(FCN, self).__init__()
        self.cout = cout
        self.linear = nn.Linear(cin, cout)
        self.bn = nn.BatchNorm1d(cout)

    def forward(self,x):
        # KK is the stacked k across batch
        kk, t, _ = x.shape
        x = self.linear(x.view(kk*t,-1))
        x = F.relu(self.bn(x))
        return x.view(kk,t,-1)
(2)VFE层
这里指的注意的是,下面代码中有个mask参数,这个mask参数作者是这样说的:
After the voxel input buffer is constructed, the stacked VFE only involves point level and voxel level dense operations which can be computed on a GPU in parallel. Note that, after concatenation operations in VFE, we reset the features corresponding to empty points to zero such that they do not affect the computed voxel features.
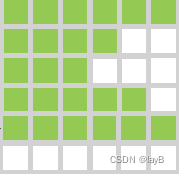
这里看下下图,其中T是一个Voxel允许的最多的点,K为Voxel的个数,7是一个点云的特征:
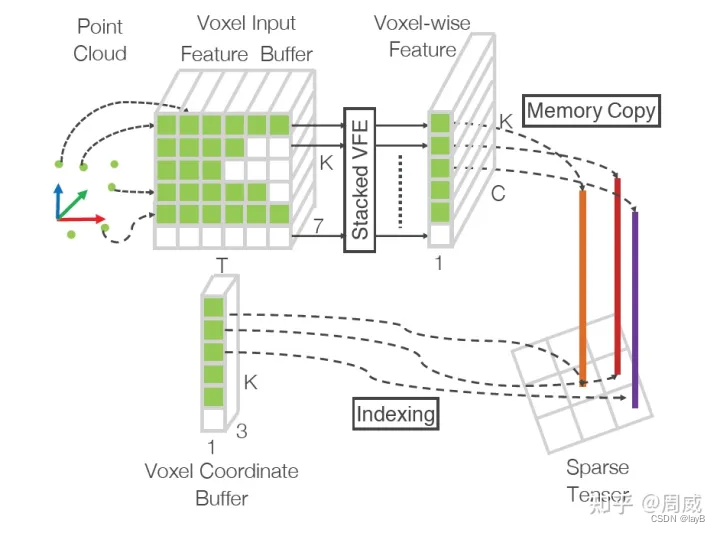
那么这个上图中的绿色区域就是mask,也就是
# Voxel Feature Encoding layer
class VFE(nn.Module):

    def __init__(self,cin,cout):
        super(VFE, self).__init__()
        assert cout % 2 == 0
        self.units = cout // 2
        self.fcn = FCN(cin,self.units)

    def forward(self, x, mask):
        # point-wise feauture
        pwf = self.fcn(x)
        #locally aggregated feature
        laf = torch.max(pwf,1)[0].unsqueeze(1).repeat(1,cfg.T,1)
        # point-wise concat feature
        pwcf = torch.cat((pwf,laf),dim=2)
        # apply mask
        mask = mask.unsqueeze(2).repeat(1, 1, self.units * 2)
        pwcf = pwcf * mask.float()

        return pwcf
(3)Stacked Voxel Feature Encoding

# Stacked Voxel Feature Encoding
class SVFE(nn.Module):

    def __init__(self):
        super(SVFE, self).__init__()
        self.vfe_1 = VFE(7,32)
        self.vfe_2 = VFE(32,128)
        self.fcn = FCN(128,128)
    def forward(self, x):
        mask = torch.ne(torch.max(x,2)[0], 0)
        x = self.vfe_1(x, mask)
        x = self.vfe_2(x, mask)
        x = self.fcn(x)
        # element-wise max pooling
        x = torch.max(x,1)[0]
        return x
(3)Stacked Voxel Feature Encoding
# Stacked Voxel Feature Encoding
class SVFE(nn.Module):

    def __init__(self):
        super(SVFE, self).__init__()
        self.vfe_1 = VFE(7,32)
        self.vfe_2 = VFE(32,128)
        self.fcn = FCN(128,128)
    def forward(self, x):
        mask = torch.ne(torch.max(x,2)[0], 0)
        x = self.vfe_1(x, mask)
        x = self.vfe_2(x, mask)
        x = self.fcn(x)
        # element-wise max pooling
        x = torch.max(x,1)[0]
        return x
中间卷积层
点云数据通过特征学习网络后可以被表示成一个稀疏的4D张量,维度记做 ( C C C, D ′ D' D′, H ′ H' H′, W ′ W' W′)。其中, C C C 为Voxel-wise Feature的向量维度(也就是图3中向量的高度), D ′ D' D′, H ′ H' H′, W ′ W' W′ 为空间的深度、高度和宽度(单位为Voxel数量)。
因为张量是4维的,作者就用3D卷积来构建这个中间卷积层。目的显然是为了扩大感受野,增加更多的信息描述。
因为比较简单,这里我直接贴出代码实现:
# Convolutional Middle Layer
class CML(nn.Module):
    def __init__(self):
        super(CML, self).__init__()
        self.conv3d_1 = Conv3d(128, 64, 3, s=(2, 1, 1), p=(1, 1, 1))
        self.conv3d_2 = Conv3d(64, 64, 3, s=(1, 1, 1), p=(0, 1, 1))
        self.conv3d_3 = Conv3d(64, 64, 3, s=(2, 1, 1), p=(1, 1, 1))

    def forward(self, x):
        x = self.conv3d_1(x)
        x = self.conv3d_2(x)
        x = self.conv3d_3(x)
        return x
RPN层
RPN层在2D物体检测中层出不穷,早在Faster-RCNN中就被提出来了。RPN层主要用来根据学习到的特征,并结合Anchor,在原图中找到物体所在检测框和对应的类别。
一般而言,RPN层有两个分支,一个用来输出类别的概率分布(通常叫做Score Map),一个用来输出Anchor到真实框的变化过程(通常叫做 Regression Map)。
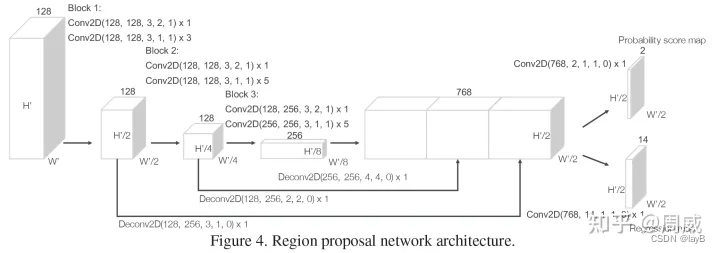
作者提出的RPN层的结构如下图所示。该网络以中间卷积层的输出特征图为输入,分别经过三次下采样(每次stride=2)获得三个不同维度的特征图。作者将这个三个特征图缩放至同一维度后进行拼接,有点FPN(特征金字塔网络)的感觉。最后,拼接的特征被映射成两个输出特征图。
具体代码实现如下:
# Region Proposal Network
class RPN(nn.Module):
    def __init__(self):
        super(RPN, self).__init__()
        self.block_1 = [Conv2d(128, 128, 3, 2, 1)]
        self.block_1 += [Conv2d(128, 128, 3, 1, 1) for _ in range(3)]
        self.block_1 = nn.Sequential(*self.block_1)

        self.block_2 = [Conv2d(128, 128, 3, 2, 1)]
        self.block_2 += [Conv2d(128, 128, 3, 1, 1) for _ in range(5)]
        self.block_2 = nn.Sequential(*self.block_2)

        self.block_3 = [Conv2d(128, 256, 3, 2, 1)]
        self.block_3 += [nn.Conv2d(256, 256, 3, 1, 1) for _ in range(5)]
        self.block_3 = nn.Sequential(*self.block_3)

        self.deconv_1 = nn.Sequential(nn.ConvTranspose2d(256, 256, 4, 4, 0),nn.BatchNorm2d(256))
        self.deconv_2 = nn.Sequential(nn.ConvTranspose2d(128, 256, 2, 2, 0),nn.BatchNorm2d(256))
        self.deconv_3 = nn.Sequential(nn.ConvTranspose2d(128, 256, 1, 1, 0),nn.BatchNorm2d(256))

        self.score_head = Conv2d(768, cfg.anchors_per_position, 1, 1, 0, activation=False, batch_norm=False)
        self.reg_head = Conv2d(768, 7 * cfg.anchors_per_position, 1, 1, 0, activation=False, batch_norm=False)

    def forward(self,x):
        x = self.block_1(x)
        x_skip_1 = x
        x = self.block_2(x)
        x_skip_2 = x
        x = self.block_3(x)
        x_0 = self.deconv_1(x)
        x_1 = self.deconv_2(x_skip_2)
        x_2 = self.deconv_3(x_skip_1)
        x = torch.cat((x_0,x_1,x_2),1)
        return self.score_head(x),self.reg_head(x)
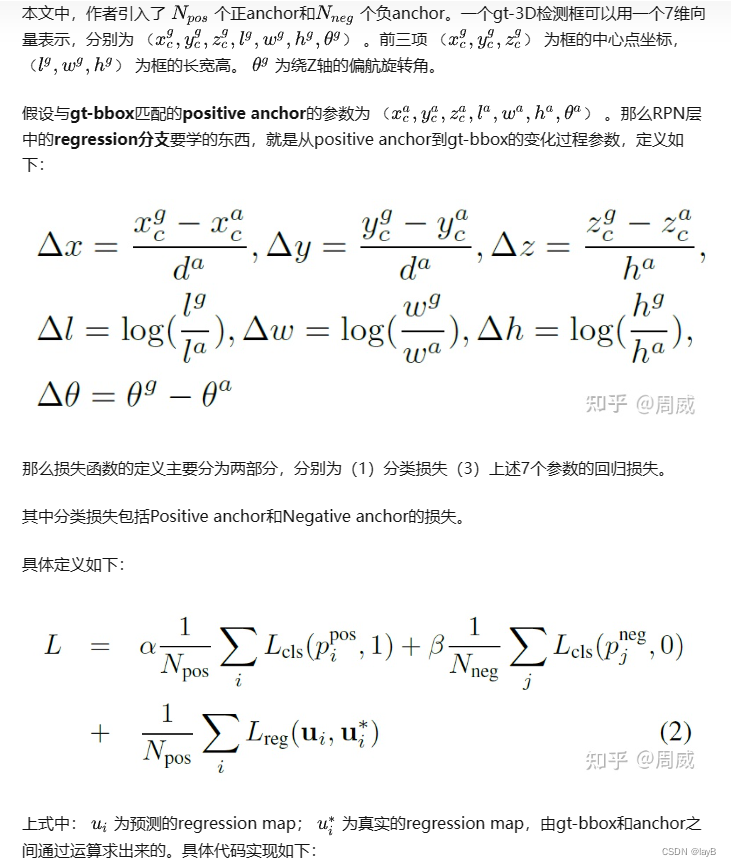
损失函数
class VoxelLoss(nn.Module):
    def __init__(self, alpha, beta):
        super(VoxelLoss, self).__init__()
        self.smoothl1loss = nn.SmoothL1Loss(size_average=False)
        self.alpha = alpha
        self.beta = beta

    def forward(self, rm, psm, pos_equal_one, neg_equal_one, targets):

        p_pos = F.sigmoid(psm.permute(0,2,3,1))
        rm = rm.permute(0,2,3,1).contiguous()
        rm = rm.view(rm.size(0),rm.size(1),rm.size(2),-1,7)
        targets = targets.view(targets.size(0),targets.size(1),targets.size(2),-1,7)
        pos_equal_one_for_reg = pos_equal_one.unsqueeze(pos_equal_one.dim()).expand(-1,-1,-1,-1,7)

        rm_pos = rm * pos_equal_one_for_reg
        targets_pos = targets * pos_equal_one_for_reg

        cls_pos_loss = -pos_equal_one * torch.log(p_pos + 1e-6)
        cls_pos_loss = cls_pos_loss.sum() / (pos_equal_one.sum() + 1e-6)

        cls_neg_loss = -neg_equal_one * torch.log(1 - p_pos + 1e-6)
        cls_neg_loss = cls_neg_loss.sum() / (neg_equal_one.sum() + 1e-6)

        reg_loss = self.smoothl1loss(rm_pos, targets_pos)
        reg_loss = reg_loss / (pos_equal_one.sum() + 1e-6)
        conf_loss = self.alpha * cls_pos_loss + self.beta * cls_neg_loss
        return conf_loss, reg_loss


 1万+
1万+


 被折叠的 条评论
为什么被折叠?
被折叠的 条评论
为什么被折叠?
 到【灌水乐园】发言


