


一、JS和TS
JavaScript
一、变量
//一、变量
let i=0;
const j =1;
i += 1;
console.log(i,j);

const a=111;
const b='666';
const c=[0,12,16];
const d={
	xxx:1,
	xxx1:'666'
};
const e=(a,b)=>{		//函数
	return a+b;
}
console.log(a,b,c,d,e(1,2));
二、循环 分支
//二、循环 分支
for(let i=0;i<5;i++){
	console.log(i);
}

let i = 6;
switch(i){
	case 6:console.log("is 6");break;
	case 7:console.log("is 7");break;
	default:
}

let i=8;
while(i--){
	console.log(i);
}

if (1===2){
	console.log("911");
}else if(1!=2){
	console.log("912");
}else{
	console.log("913");
}
三、数组的常用方法
//三、数组的常用方法

const arr = [4,2,1,5];
console.log(arr);
console.log(arr.sort((a,b)=>{return a-b;}));
console.log(arr.sort((a,b)=>(b-a)));	//省略的写法
console.log(arr.map(v=>v*2));
四、字符串拼接
//四、字符串拼接
const a='111';
const b='222';
//const c=a+b;
const c=`这是a: ${a},这是b: ${b}`;//这里请注意引号
console.log(c);
//这里类似c语言中的复制数组首地址
 const arr1=arr;
const arr2=arr.map(v=>v);//简单复制
array.slice(start, end),切出一个新数组,start是开始下标,end是结束下标
const arr3=arr.slice(0);
arr[1]=999;

console.log(arr);
console.log(arr1);
console.log(arr2);
console.log(arr3);
五、关于Object(对象)
//五、关于Object
const aObject = {
	a:1,
	b:2,
	c:3,
	func:(a,b)=>{
		return a*3+b;
	}
}

aObject.k = '';
aObject['k']='777';
aObject.k=90;
console.log(aObject);
console.log(aObject.func(aObject.a,aObject.c));
六、将函数作为另一个函数的入参,类似c中函数指针的用法
//六、将函数作为另一个函数的入参,类似c中函数指针的用法
const func = (a,b)=>{
	return a(b);
}

const add=(a)=>{
	return a+2;
}

console.log(func(add,6));
TypeScript
一、与 CocosCreate 相关的语法
import{_decorator,Component,Node,Vec2} from 'cc';
const {ccclass,property}=_decorator;

@ccclass('learn')
export class learn extends Component{
     start(){}

}
二、类型检测
//可以将ts理解为js加上了类型,运行时会转换成js进行运行
//数据类型
//这里类似c中的typedef
type myType = number | string | object;
type myObj={
    a:number;
    b:string;
}

{
    const i: string='999'
    const a: number=6;
    const c: any[]=[1,2,3]; //any代表都可以的类型
    const c1: number[]=[1,2,3];
    const d: (string|number)[]=[1,3,'9'];
    const e: 1 | 2 = 2;//对数据的输入进行限制

    console.log(i);

    const ee: string='999'
    const e:myObj={
        a:1,
        b:'999'
    }
    console.log(e);
}
三、类相关操作
//类
class MyVec2{
    x:number;
    y:number;
    private _name:string;//要加 下划线

    set name(val:string){
        this._name=val;
        console.log('11111111');
    }

    get name(){
        console.log('2222222');
        return this._name;
    }

    constructor(x:number,y:number){
        this.x=x;
        this.y=y;
    }

    add(other:MyVec2){
        const x=this.x + other.x;
        const y=this.y + other.y;
        return new MyVec2(x,y);//返回一个新对象
    }
}

//复制引用与新建对象
const didi:MyVec2=new MyVec2(1,2);
didi.x=100;
didi.y=200;
didi.name="992"
const didi2=didi.add(new MyVec2(2,1));

console.log(didi);
console.log(didi2);

//set 与 get
didi.name="666";
const xm=didi.name;
console.log(didi);
console.log(xm);
注: node 是脱离浏览器运行JavaScript 的工具
node 的下载地址:https://nodejs.org/dist
npm node.js的安装工具
运行:node filename1.js
tsc filename2.ts
node filename2.js
四、其他
1、写数组
定义
let numbers: number[] = [1, 2, 3, 4, 5];
let numbers: Array = [1, 2, 3, 4, 5];
let names: string[] = [];
赋值
names.push("Alice");
names.push("Bob");
names[0]="LS"

获取数组长度
fruits.length;
清空数组
fruits.length=0;
2、随机数
const randomIndex = Math.floor(Math.random()*5); //获取到一个0-4的整数
3、字符串
let i:number = 0;
const str1:string = `xxxx:${i+1}`
4、枚举
enum MouseStatus {
    LeftButton = 0,
    MiddleButton = 1,
    RightButton = 2,
    None = 3
}
二、CocosCreate的简单介绍
1、界面:
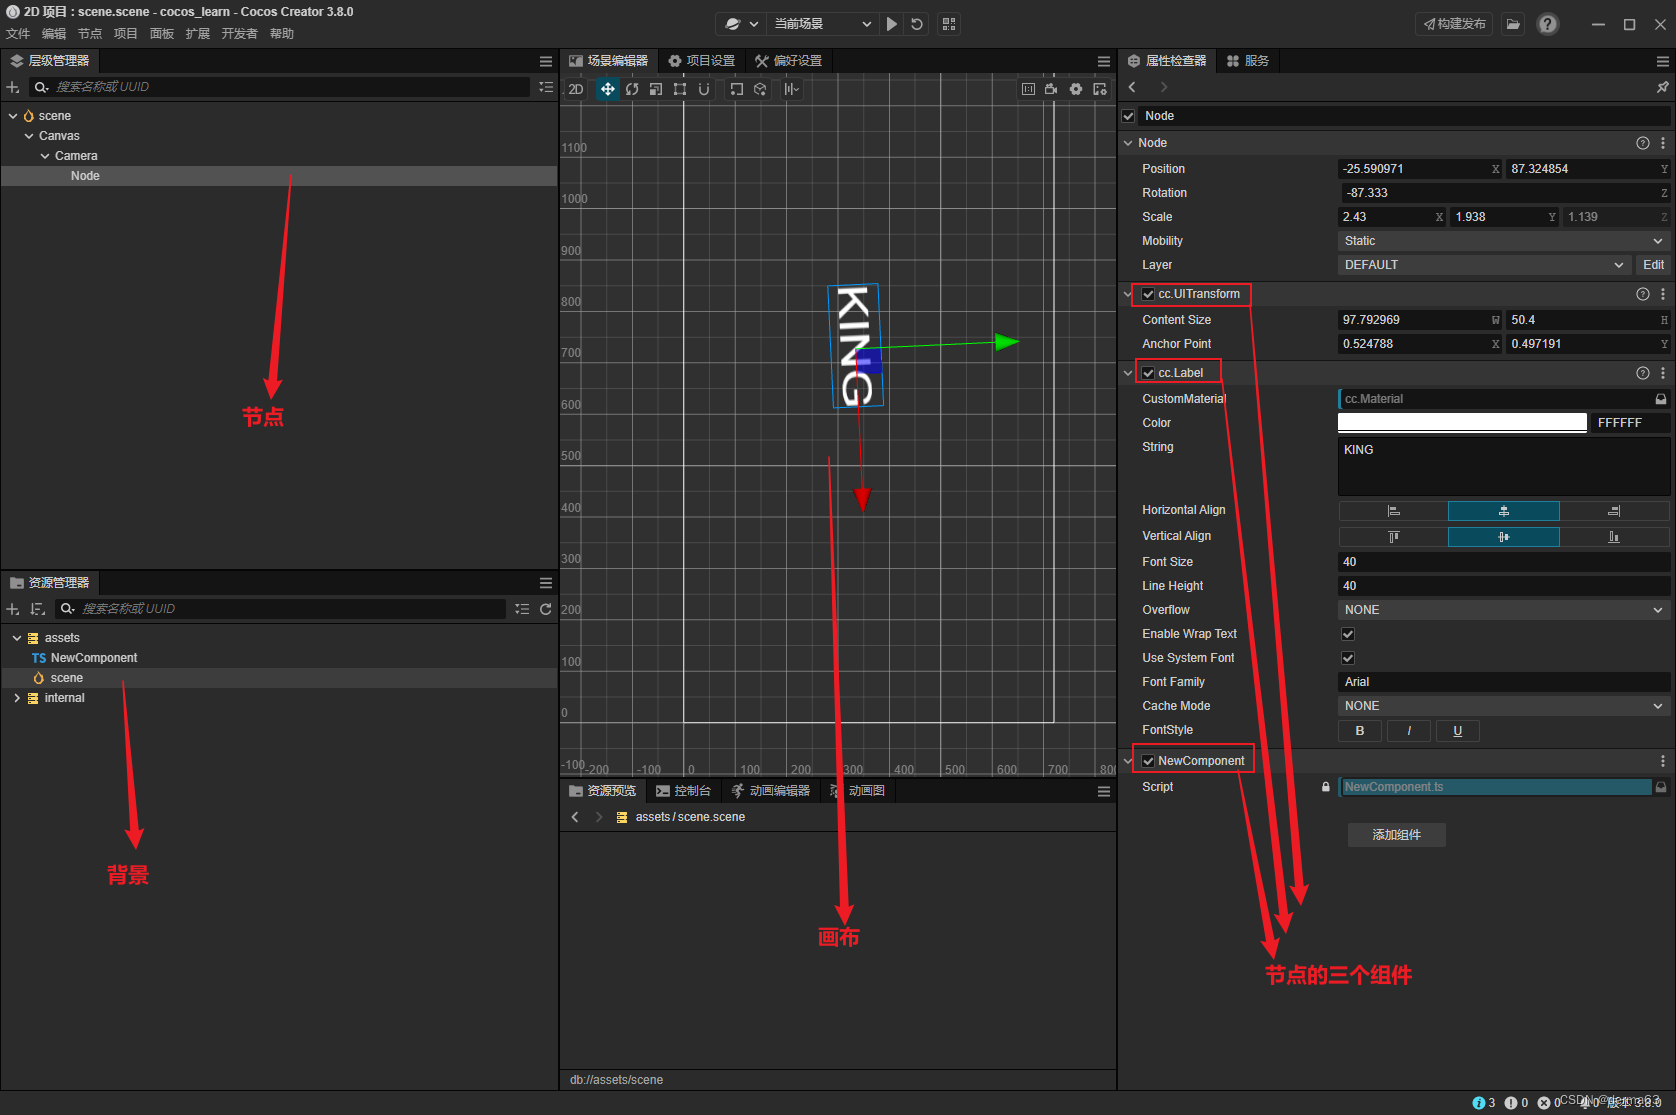
基本逻辑: CocosCreate是节点间的相互作用在进行游戏的。node在代码中就是实例化的一个类。node上有很多属性,这些属性用于表象图形的状态。
2、脚本:

3、官方文档:
https://docs.cocos.com
三、CocosCreate的一些具体操作
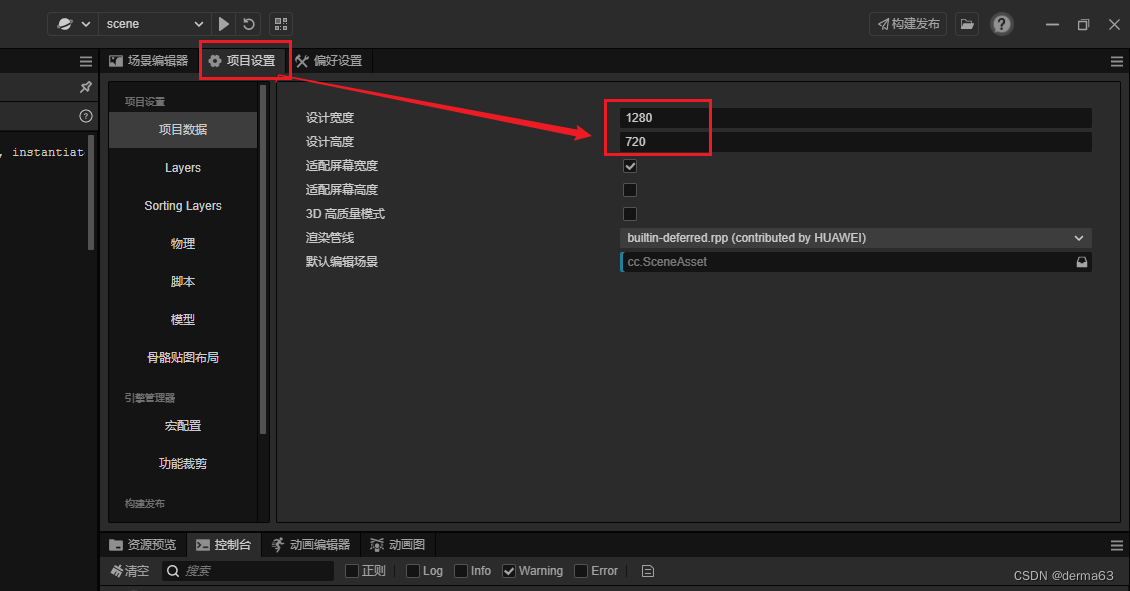
0、修改画布尺寸:
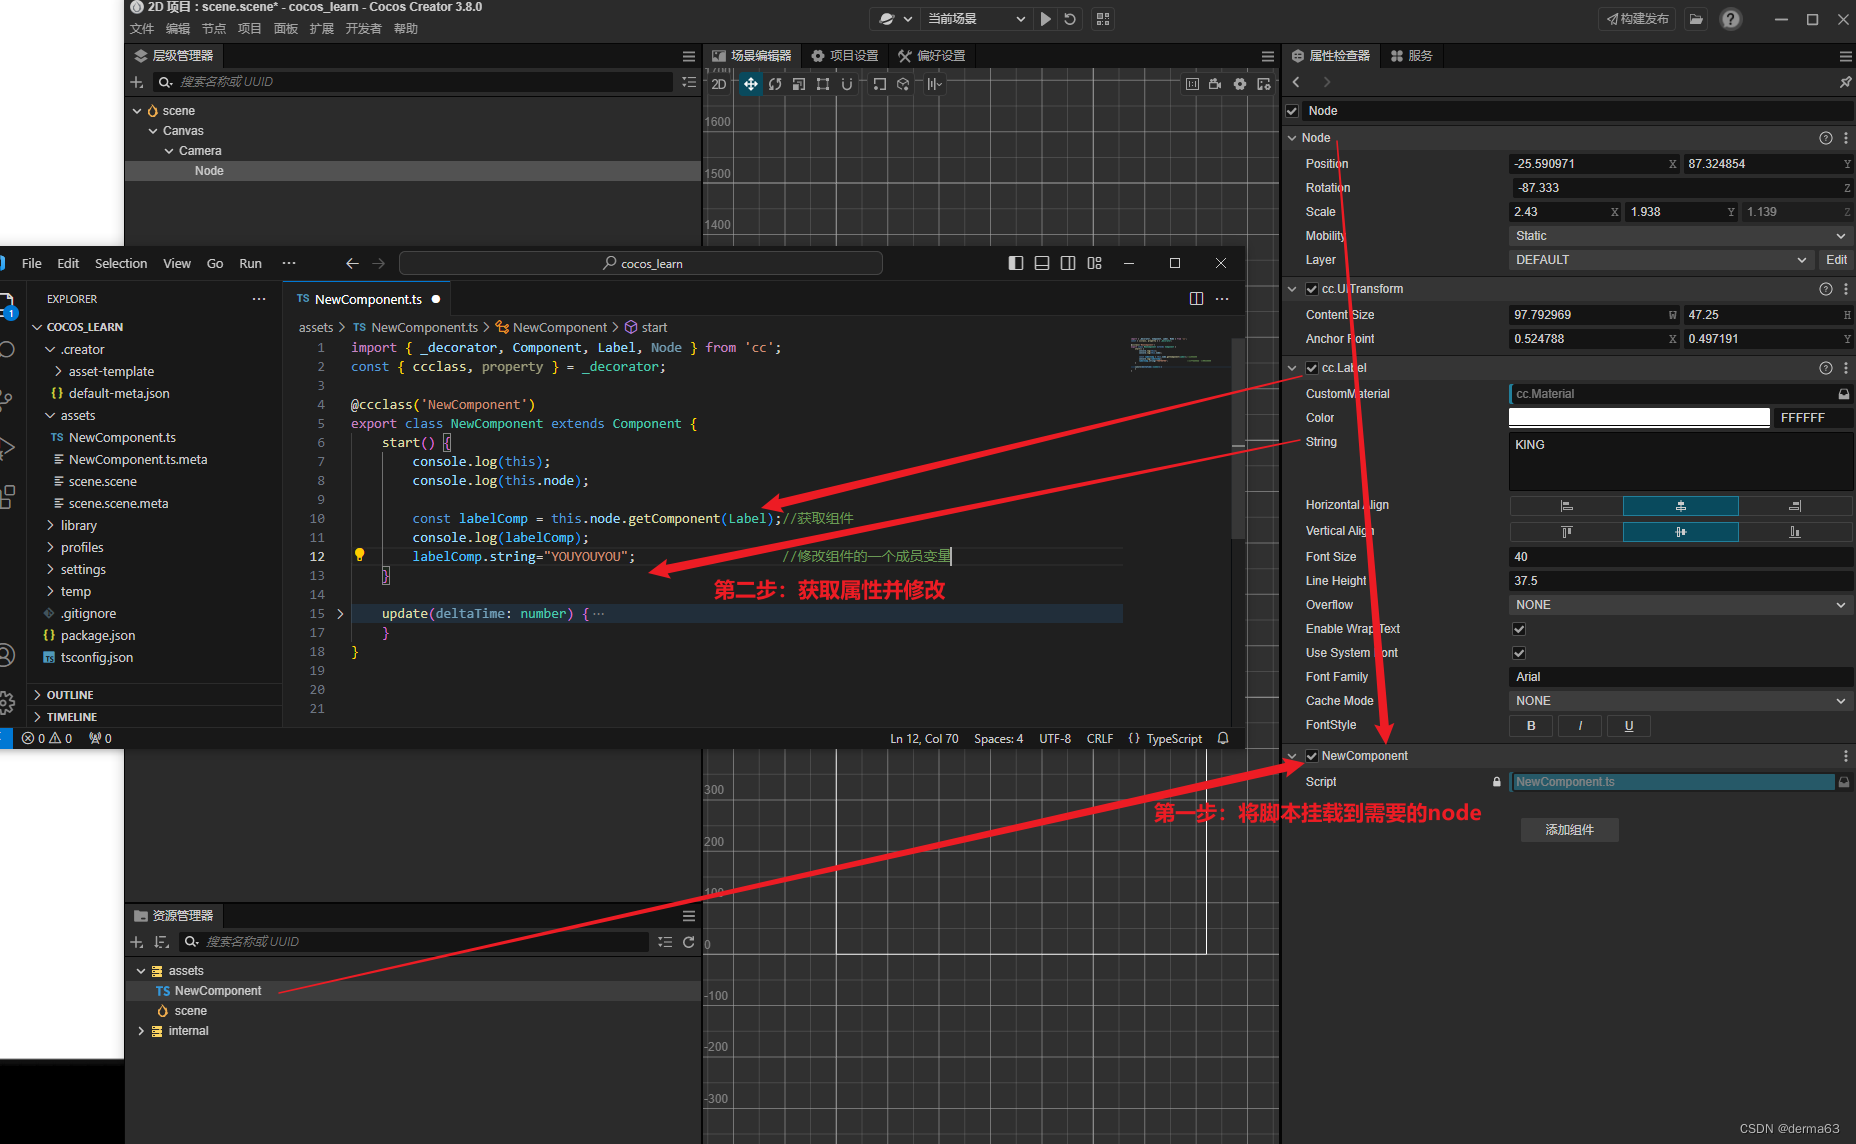
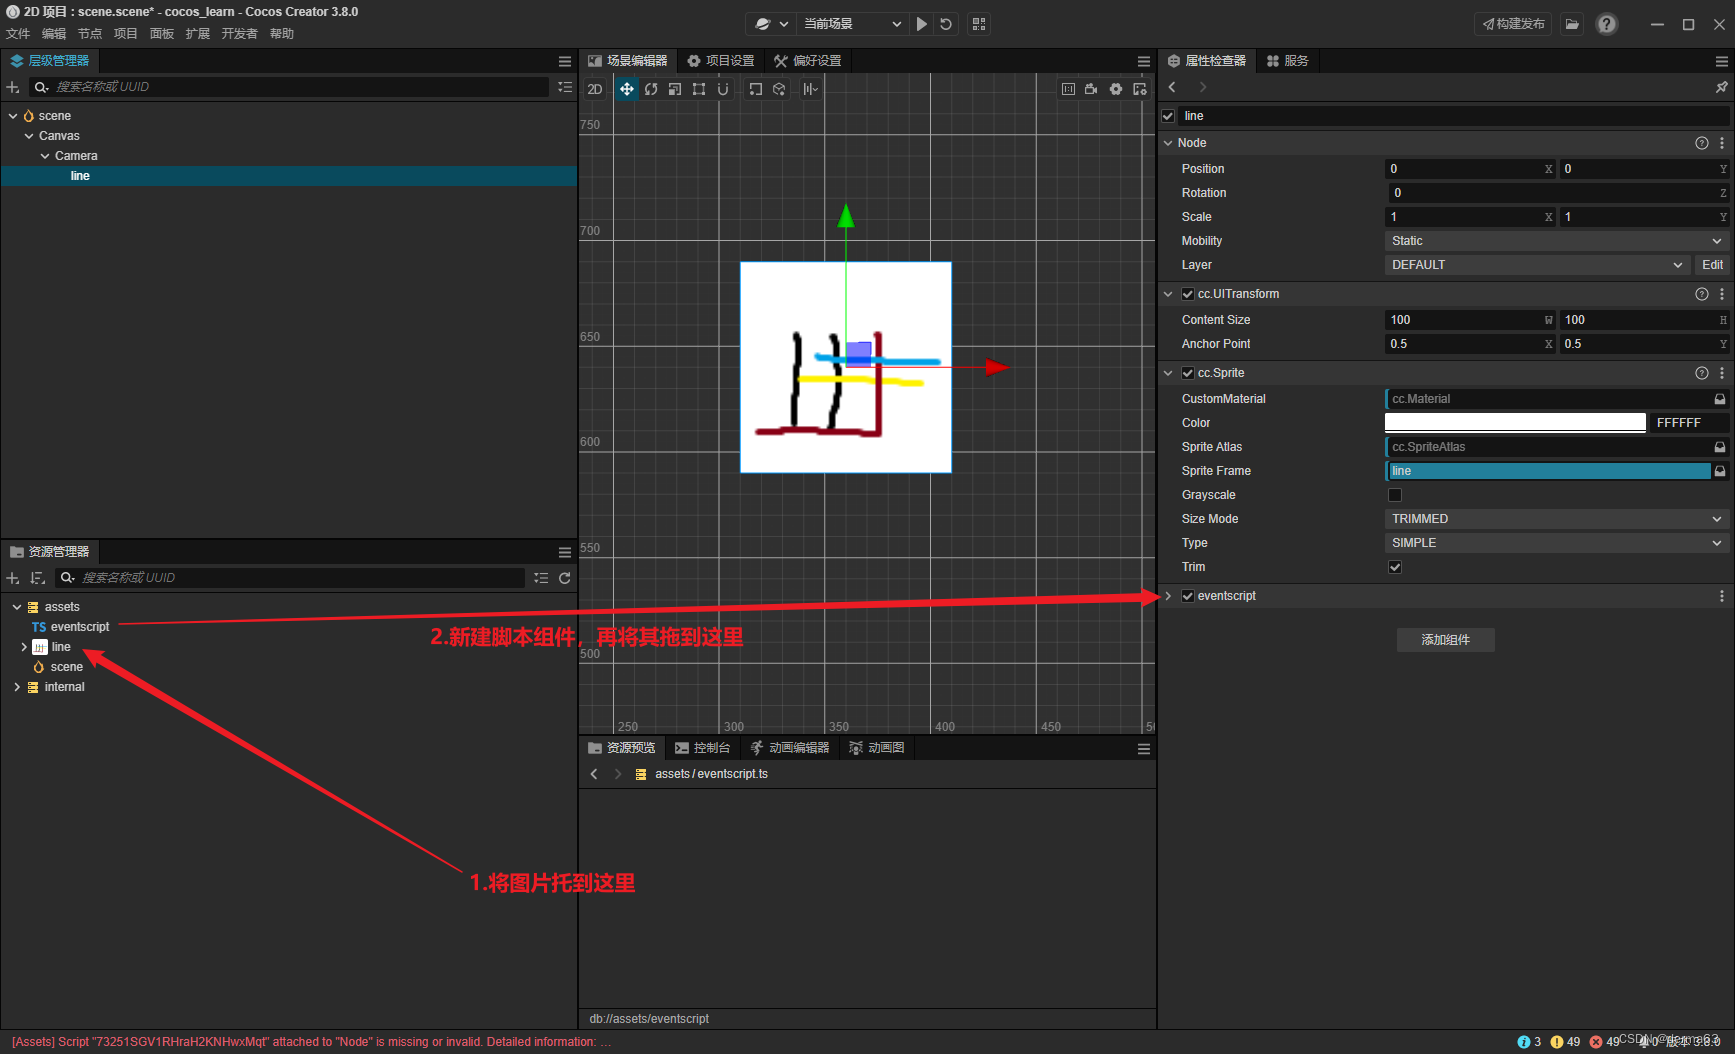
1、通过脚本获取node,从而改变node的中组件的属性
1.获取相关的属性
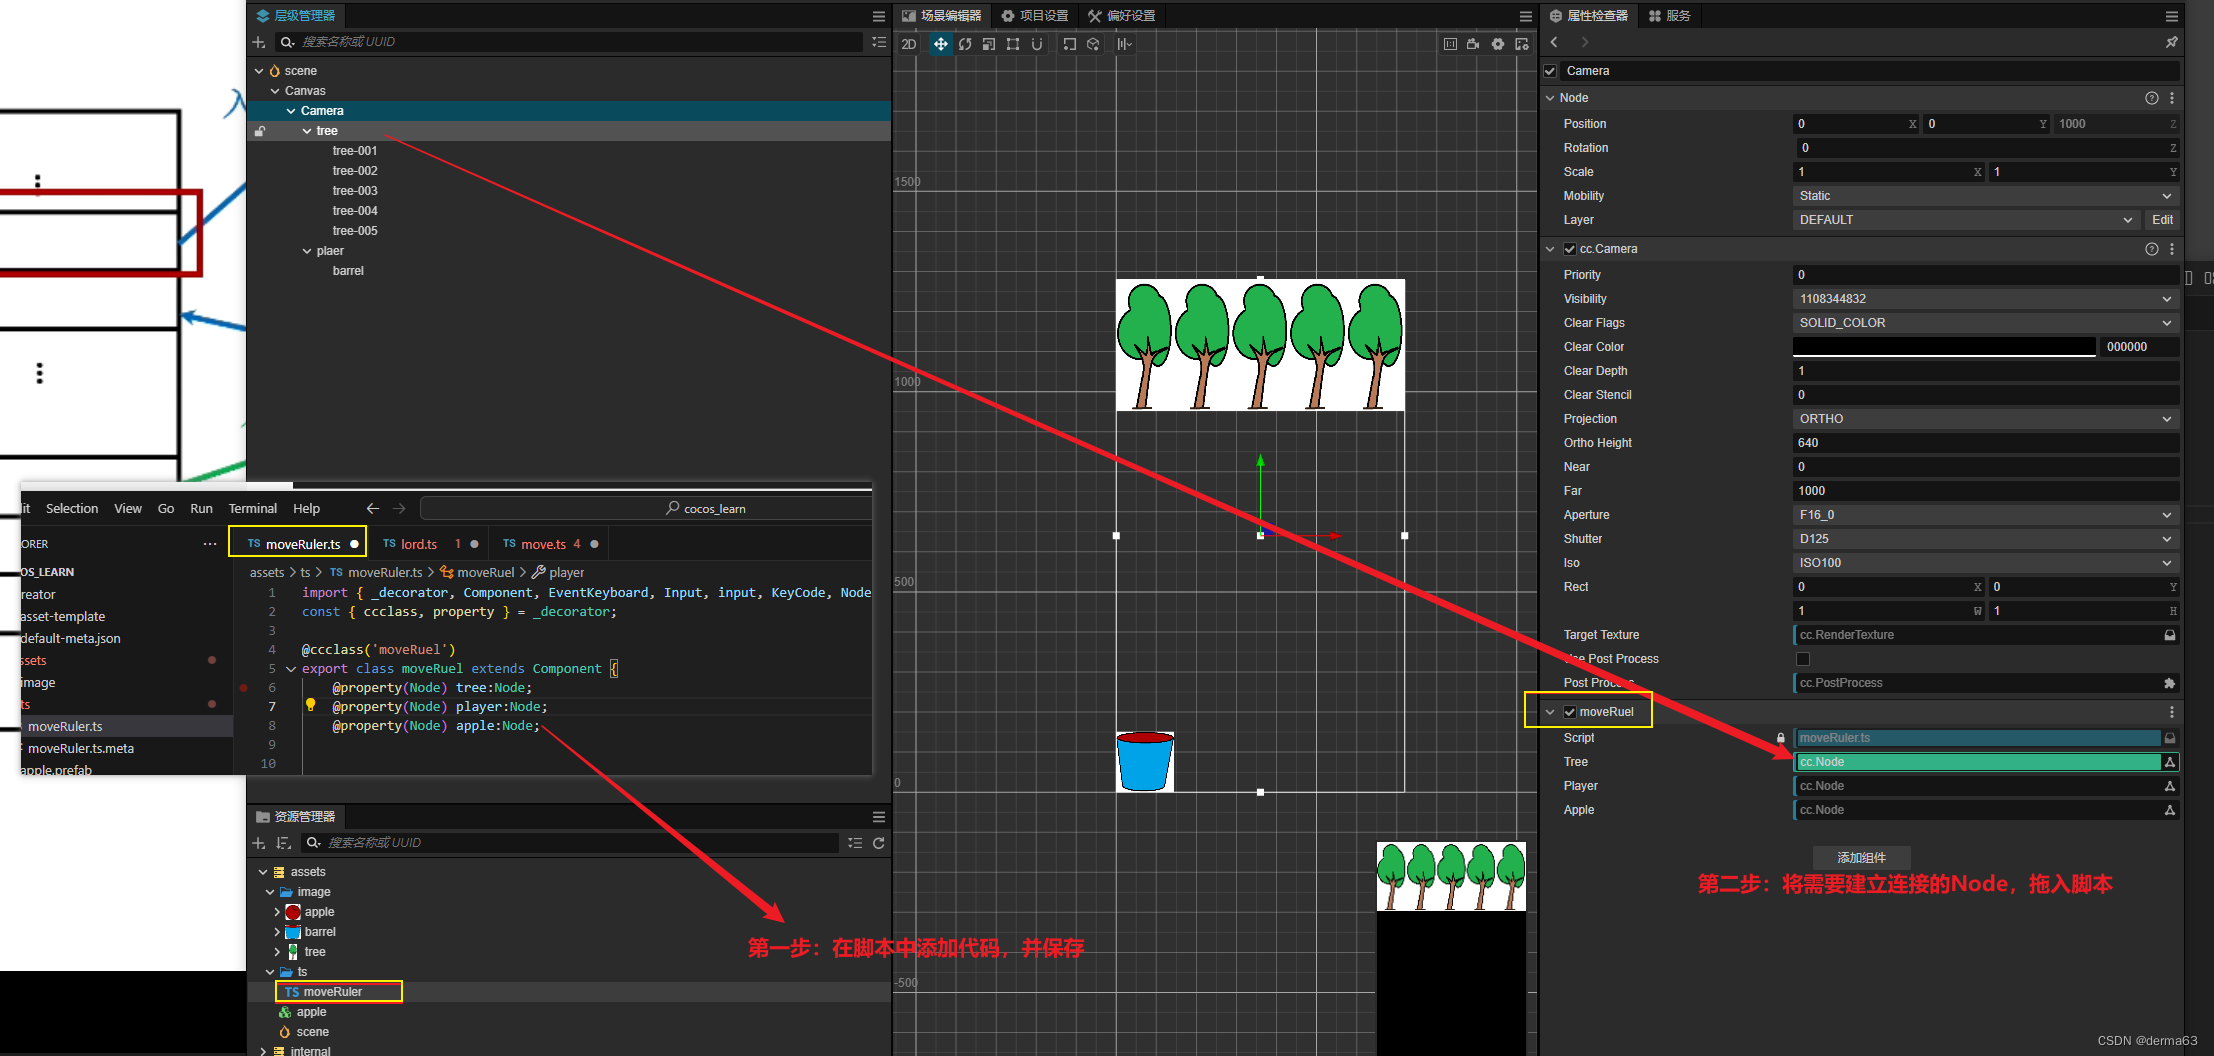
2添加脚本中的其他引用(将不相关的组件建立引用关系):
2、节点的位移:
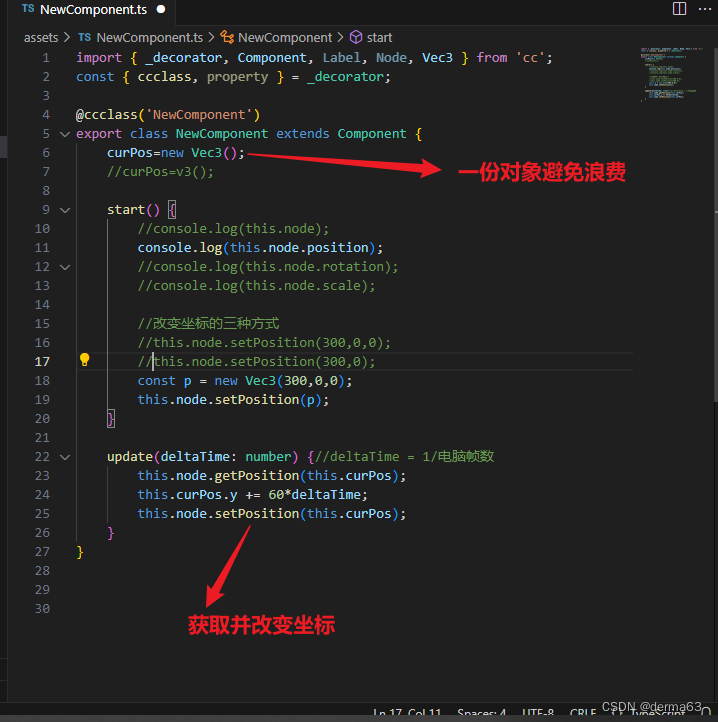
注释:使用deltaTime是为了统一各个平台的游戏帧率(普通设备的刷新频率不同)。
移动、旋转、缩放
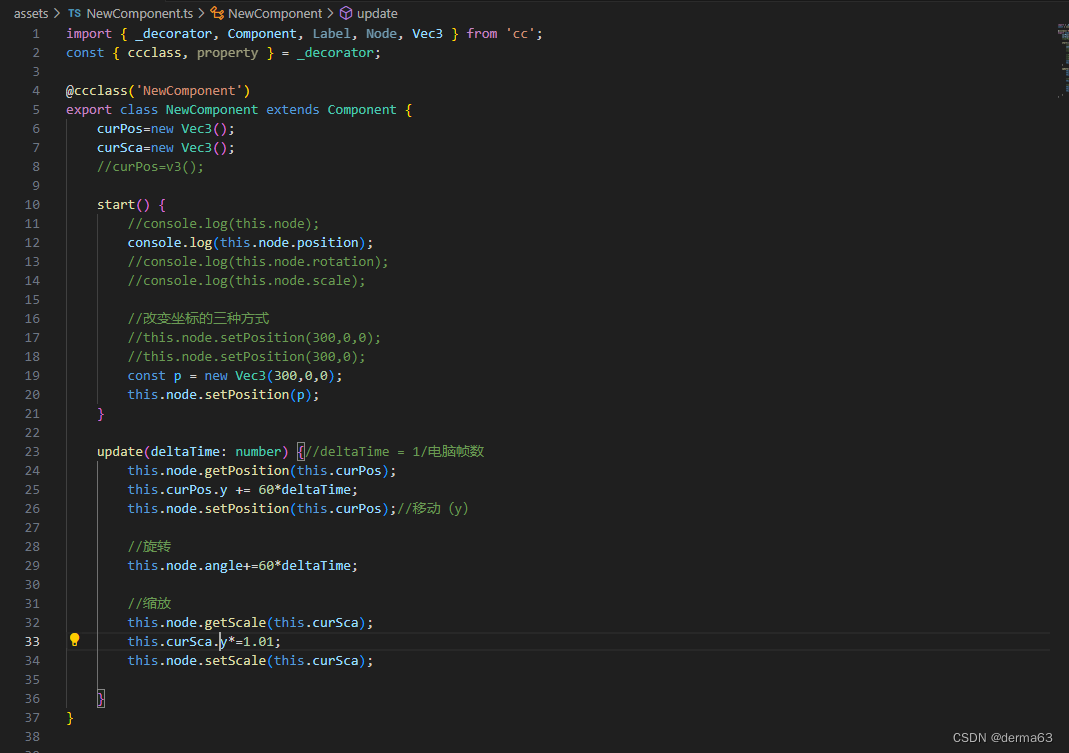
旋转的其他设置方法:
this.block.setRotation(new Quat(0,0,45))
脚本:
import { _decorator, Component, Label, Node, Vec3 } from 'cc';
const { ccclass, property } = _decorator;

@ccclass('NewComponent')
export class NewComponent extends Component {
    curPos=new Vec3();
    curSca=new Vec3();
    //curPos=v3();

    start() {
        //console.log(this.node);
        console.log(this.node.position);
        //console.log(this.node.rotation);
        //console.log(this.node.scale);

        //改变坐标的三种方式
        //this.node.setPosition(300,0,0);
        //this.node.setPosition(300,0);
        const p = new Vec3(300,0,0);
        this.node.setPosition(p);
    }

    update(deltaTime: number) {//deltaTime = 1/电脑帧数
        this.node.getPosition(this.curPos);
        this.curPos.y += 60*deltaTime;
        this.node.setPosition(this.curPos);//移动(y)

        //旋转
        this.node.angle+=60*deltaTime;

        //缩放
        this.node.getScale(this.curSca);
        this.curSca.y*=1.01;
        this.node.setScale(this.curSca);

        this.node.setPosition()

    }
}
3、点击和键盘 以及鼠标(点击、滑轮) 事件:
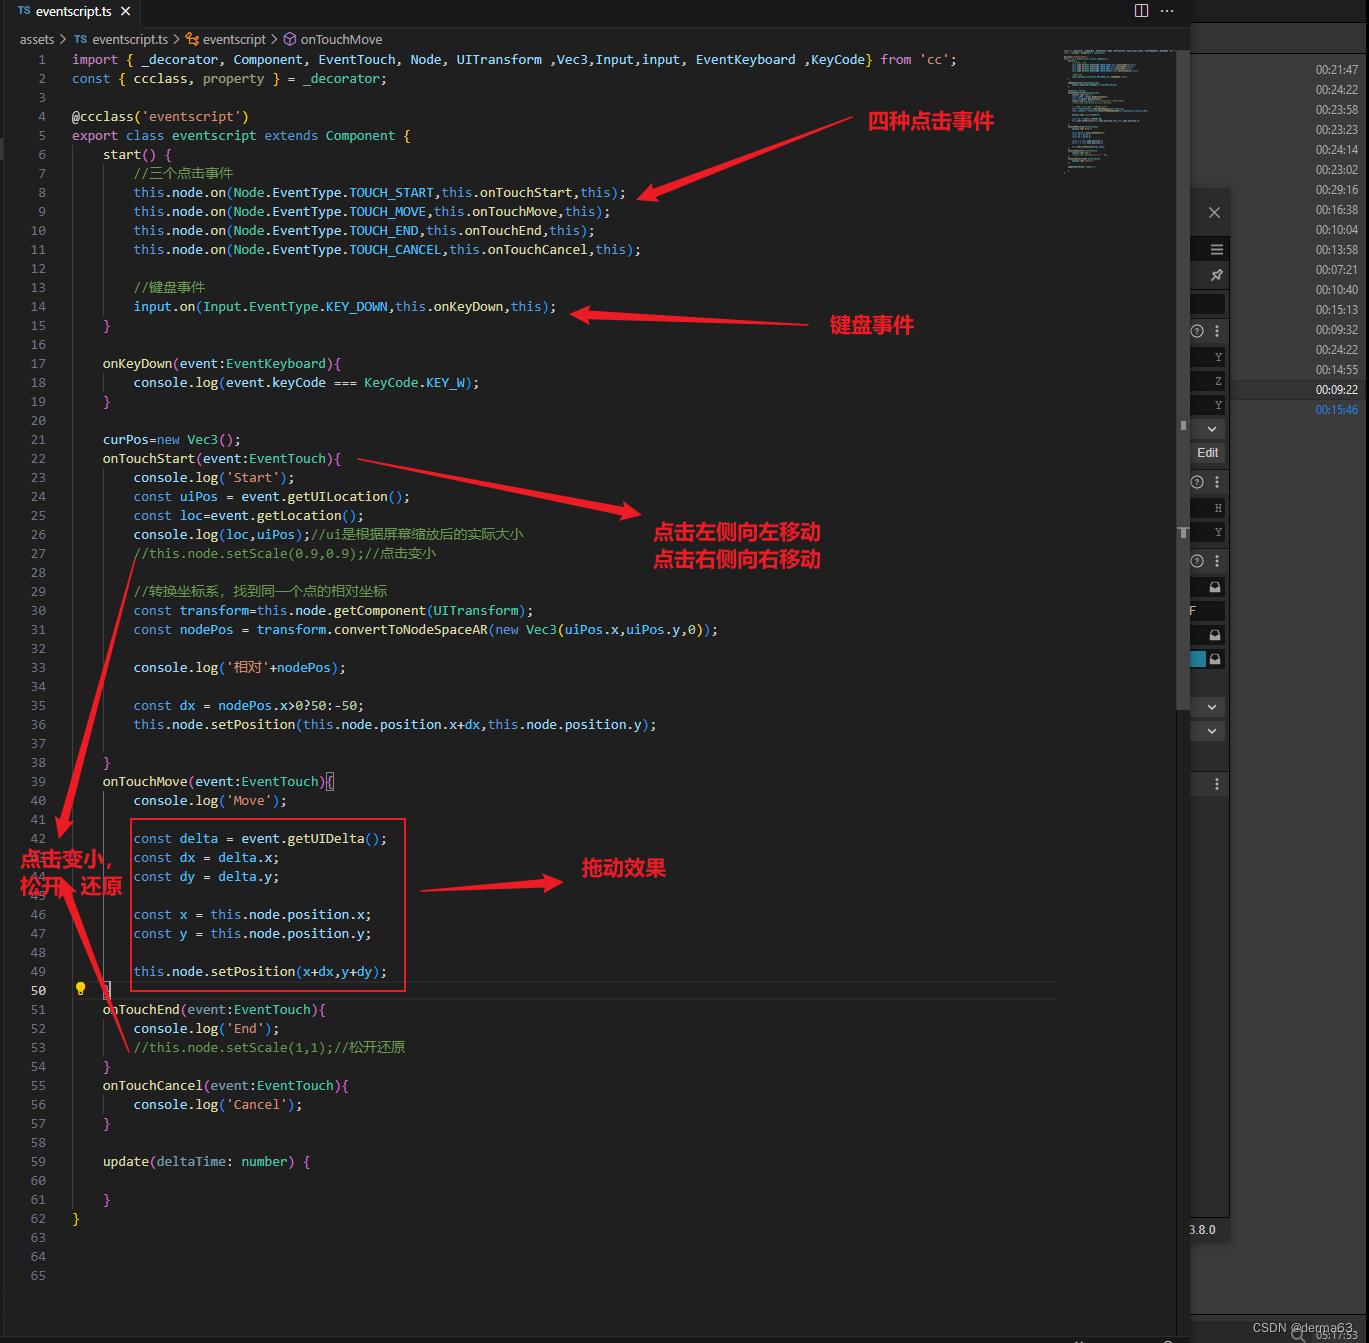
注:
1、const nodePos = transform.convertToNodeSpaceAR(new Vec3(uiPos.x,uiPos.y,0));
这个函数的作用是将一个全局的点,转换成局部的坐标点;从左下角为(0,0),变为中心为(0,0).
2、getUILocation和getLocation的区别是UI会找到缩放后的大小。
3、注册的最后的this 是指当前的脚本,不传的话在事件函数中就访问不到本脚本中的内容
脚本:
import { _decorator, Component, EventTouch, Node, UITransform ,Vec3,Input,input, EventKeyboard ,KeyCode} from 'cc';
const { ccclass, property } = _decorator;

@ccclass('eventscript')
export class eventscript extends Component {
    start() {
        //三个点击事件
        this.node.on(Node.EventType.TOUCH_START,this.onTouchStart,this);
        this.node.on(Node.EventType.TOUCH_MOVE,this.onTouchMove,this);
        this.node.on(Node.EventType.TOUCH_END,this.onTouchEnd,this);
        this.node.on(Node.EventType.TOUCH_CANCEL,this.onTouchCancel,this);

        //键盘事件
        input.on(Input.EventType.KEY_DOWN,this.onKeyDown,this);
    }

    onKeyDown(event:EventKeyboard){
        console.log(event.keyCode === KeyCode.KEY_W);
    }

    curPos=new Vec3();
    onTouchStart(event:EventTouch){
        console.log('Start');
        const uiPos = event.getUILocation();
        const loc=event.getLocation();
        console.log(loc,uiPos);//ui是根据屏幕缩放后的实际大小
        //this.node.setScale(0.9,0.9);//点击变小

        //转换坐标系,找到同一个点的相对坐标
        const transform=this.node.getComponent(UITransform);
        const nodePos = transform.convertToNodeSpaceAR(new Vec3(uiPos.x,uiPos.y,0));

        console.log('相对'+nodePos);

        const dx = nodePos.x>0?50:-50;
        this.node.setPosition(this.node.position.x+dx,this.node.position.y);

    }
    onTouchMove(event:EventTouch){
        console.log('Move');

        const delta = event.getUIDelta();
        const dx = delta.x;
        const dy = delta.y;

        const x = this.node.position.x;
        const y = this.node.position.y;

        this.node.setPosition(x+dx,y+dy);
    }
    onTouchEnd(event:EventTouch){
        console.log('End');
        //this.node.setScale(1,1);//松开还原
    }
    onTouchCancel(event:EventTouch){
        console.log('Cancel');
    }

    update(deltaTime: number) {

    }
}
鼠标事件:
    this.node.on(Node.EventType.MOUSE_WHEEL, this.big_small, this);  //滑鼠标中键
    this.node.on(Node.EventType.MOUSE_DOWN, this.mouse_down, this);  //按下鼠标按键
    this.node.on(Node.EventType.MOUSE_UP, this.mouse_up, this);      //按下鼠标按键
    this.node.on(Node.EventType.MOUSE_MOVE, this.mouse_move, this);  //移动鼠标
    this.node.on(Node.EventType.MOUSE_LEAVE, this.mouse_leave, this); //鼠标移出节点区域

    big_small(event: EventMouse) {
        let scrollY = event.getScrollY();
        if (scrollY < 0) {
        } else if (scrollY > 0) {
        }
    }
    mouse_up(){
        //console.log("up")

    }
    mouse_leave(){
        //console.log('leave')
    }
    mouse_move(event: EventMouse){
        //console.log("move")
    }
    mouse_down(event: EventMouse){
        //console.log(event.getButton())
        if (event.getButton() === 0) {//左键
            this.current_mouse_staus=MouseStatus.LeftButton;
            this.change_current_local_point_is_death(event);
        } else if(event.getButton() === 2){//右键
            this.current_mouse_staus=MouseStatus.RightButton;
        }else if(event.getButton() === 1){//中键
            this.current_mouse_staus=MouseStatus.MiddleButton;
        }
    }
4、缓动系统的使用:
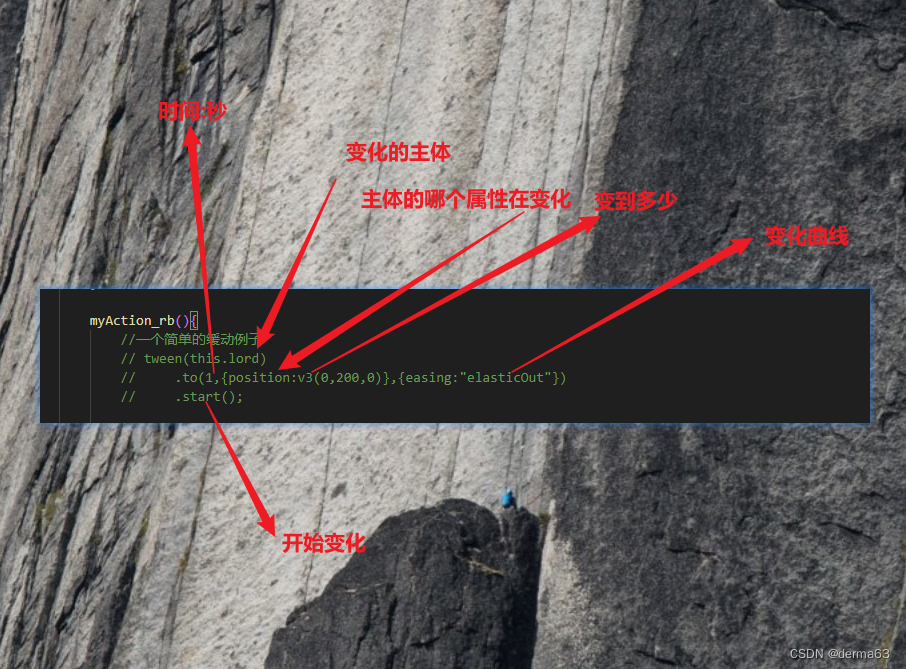
1、一个简单的缓动:
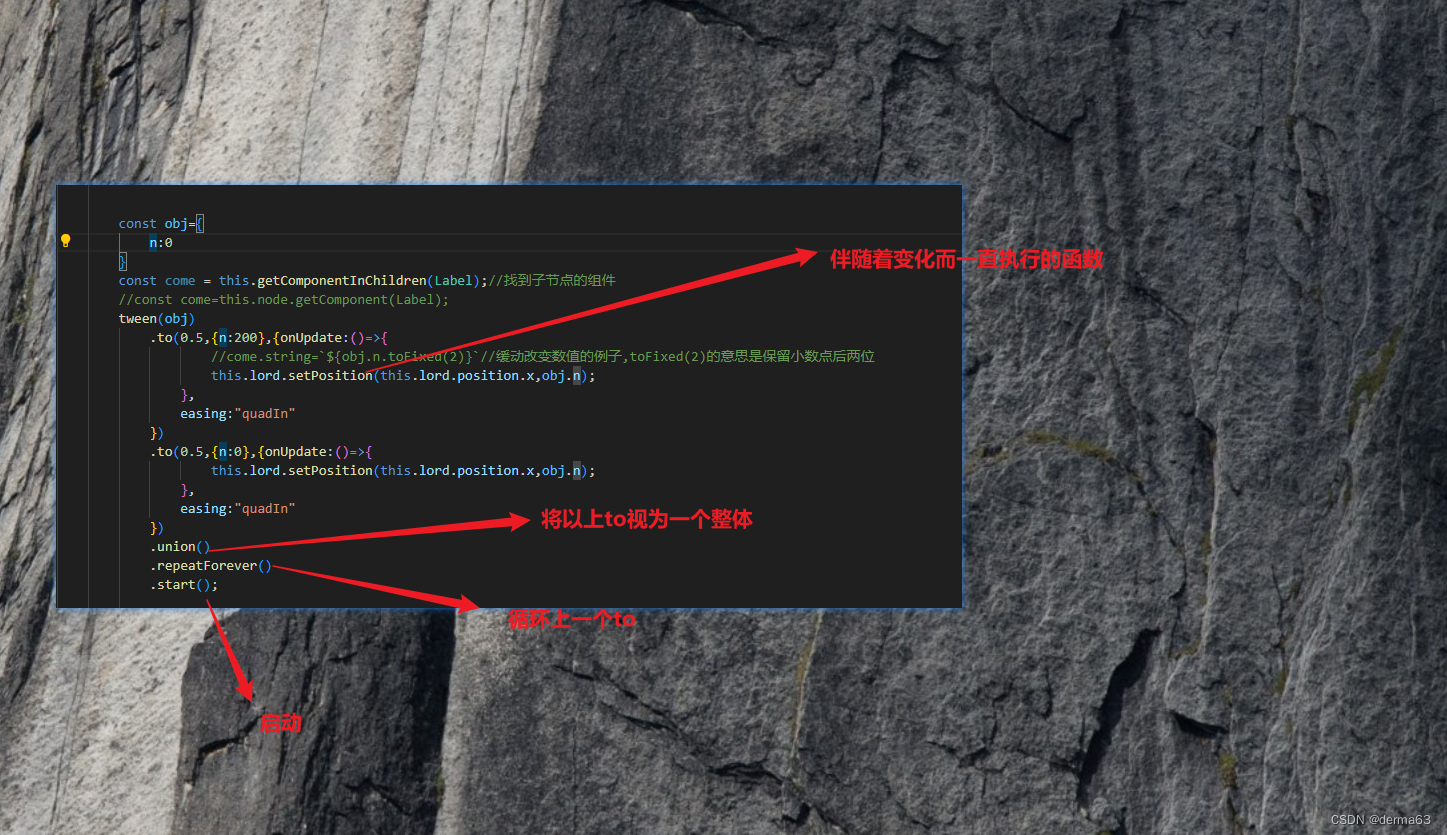
2、伴随变化而一直执行的函数(数据驱动变化)
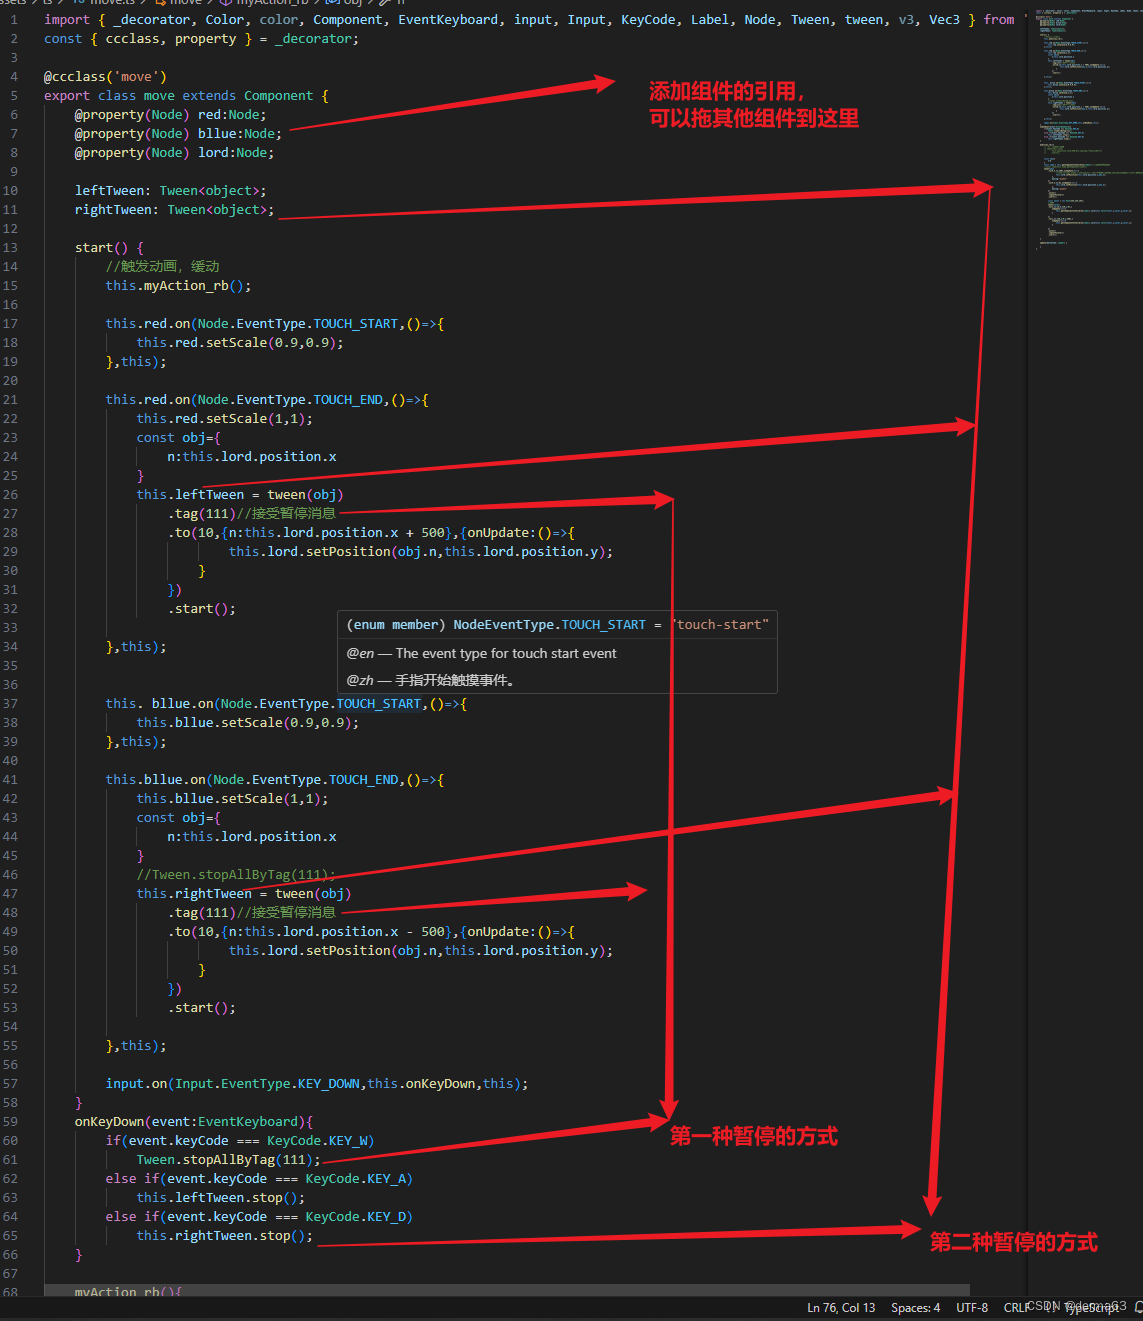
3、两种暂停方式:
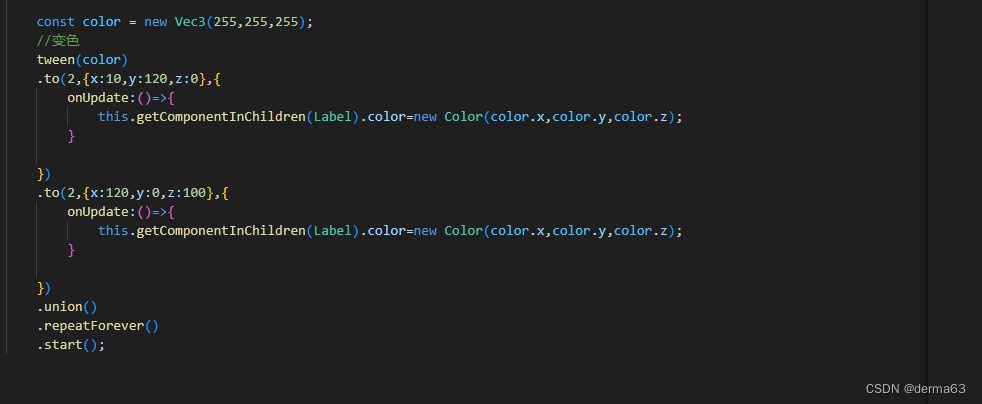
4、使用缓动做变色效果:
5.循环执行缓动操作:
.forever() //在.start前添加这个方法
脚本:
import { _decorator, Color, color, Component, EventKeyboard, input, Input, KeyCode, Label, Node, Tween, tween, v3, Vec3 } from 'cc';
const { ccclass, property } = _decorator;

@ccclass('move')
export class move extends Component {
    @property(Node) red:Node;
    @property(Node) bllue:Node;
    @property(Node) lord:Node;

    leftTween: Tween<object>;
    rightTween: Tween<object>;

    start() {
        //触发动画,缓动
        this.myAction_rb();

        this.red.on(Node.EventType.TOUCH_START,()=>{
            this.red.setScale(0.9,0.9);
        },this);

        this.red.on(Node.EventType.TOUCH_END,()=>{
            this.red.setScale(1,1);
            const obj={
                n:this.lord.position.x
            }
            this.leftTween = tween(obj)
                .tag(111)//接受暂停消息
                .to(10,{n:this.lord.position.x + 500},{onUpdate:()=>{
                        this.lord.setPosition(obj.n,this.lord.position.y);
                    }
                })
                .start();

        },this);


        this. bllue.on(Node.EventType.TOUCH_START,()=>{
            this.bllue.setScale(0.9,0.9);
        },this);

        this.bllue.on(Node.EventType.TOUCH_END,()=>{
            this.bllue.setScale(1,1);
            const obj={
                n:this.lord.position.x
            }
            //Tween.stopAllByTag(111);
            this.rightTween = tween(obj)
                .tag(111)//接受暂停消息
                .to(10,{n:this.lord.position.x - 500},{onUpdate:()=>{
                        this.lord.setPosition(obj.n,this.lord.position.y);
                    }
                })
                .start();

        },this);

        input.on(Input.EventType.KEY_DOWN,this.onKeyDown,this);
    }
    onKeyDown(event:EventKeyboard){
        if(event.keyCode === KeyCode.KEY_W)
            Tween.stopAllByTag(111);
        else if(event.keyCode === KeyCode.KEY_A)
            this.leftTween.stop();
        else if(event.keyCode === KeyCode.KEY_D)
            this.rightTween.stop();
    }

    myAction_rb(){
        //一个简单的缓动例子
        // tween(this.lord)
        //     .to(1,{position:v3(0,200,0)},{easing:"elasticOut"})
        //     .start();


        const obj={
            n:0
        }
        const come = this.getComponentInChildren(Label);//找到子节点的组件
        //const come=this.node.getComponent(Label);
        tween(obj)
            .to(0.5,{n:200},{onUpdate:()=>{
                    //come.string=`${obj.n.toFixed(2)}`//缓动改变数值的例子,toFixed(2)的意思是保留小数点后两位
                    this.lord.setPosition(this.lord.position.x,obj.n);
                },
                easing:"quadIn"
            })
            .to(0.5,{n:0},{onUpdate:()=>{
                    this.lord.setPosition(this.lord.position.x,obj.n);
                },
                easing:"quadIn"
            })
            .union()
            .repeatForever()
            .start();

            const color = new Vec3(255,255,255);
            //变色
            tween(color)
            .to(2,{x:10,y:120,z:0},{
                onUpdate:()=>{
                    this.getComponentInChildren(Label).color=new Color(color.x,color.y,color.z);
                }

            })
            .to(2,{x:120,y:0,z:100},{
                onUpdate:()=>{
                    this.getComponentInChildren(Label).color=new Color(color.x,color.y,color.z);
                }

            })
            .union()
            .repeatForever()
            .start();

    }

    update(deltaTime: number) {

    }
}
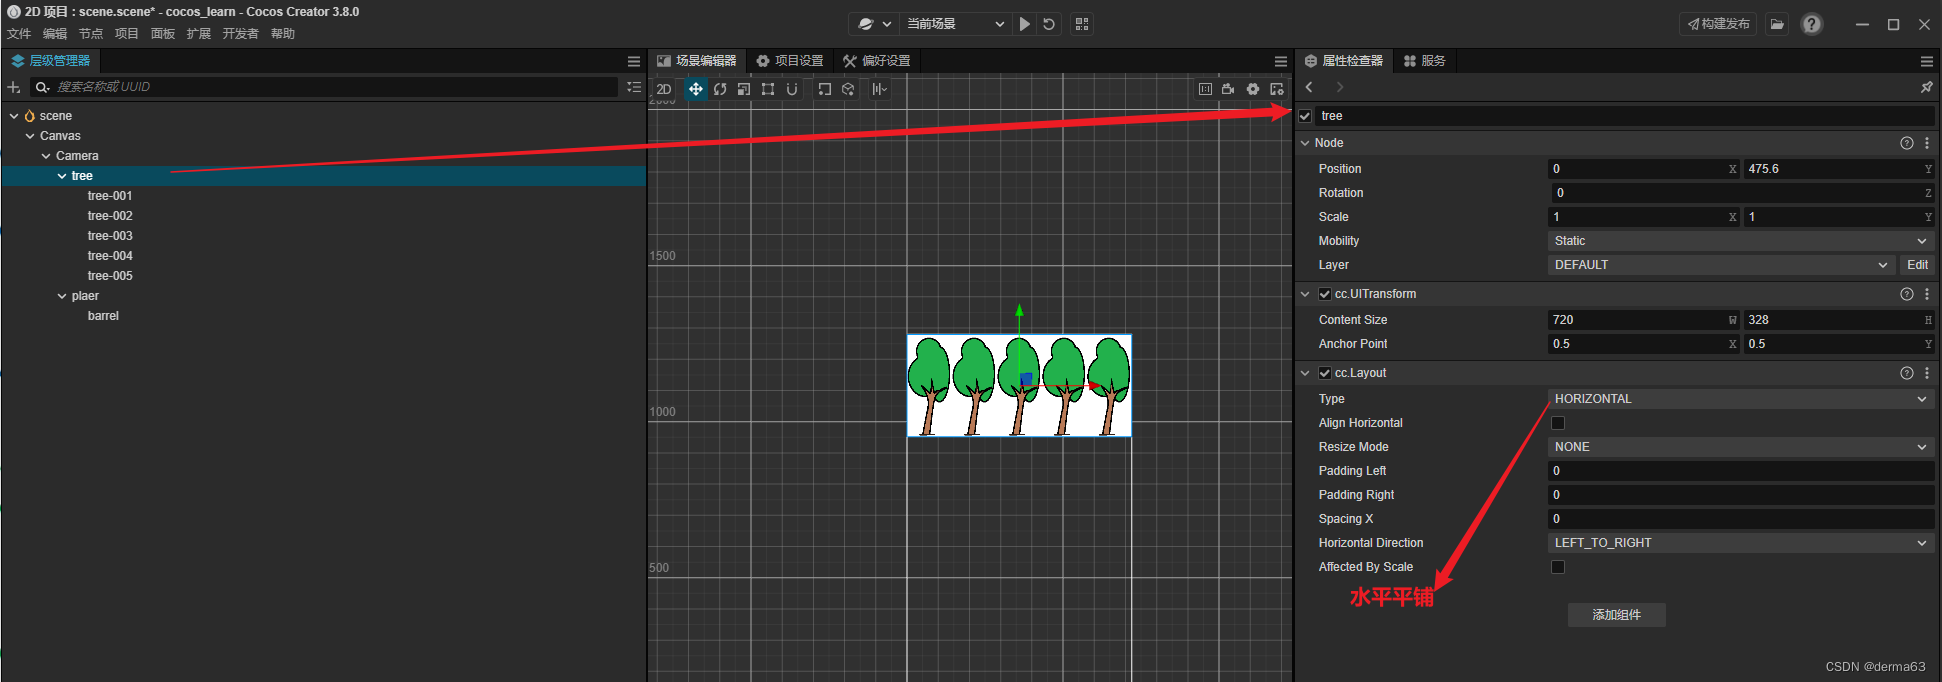
5、Widget和Layout节点
是用来布局的
1、layout组件:
可以设置节点内的图片平铺
6、求子节点个数:
this.node.children.length;
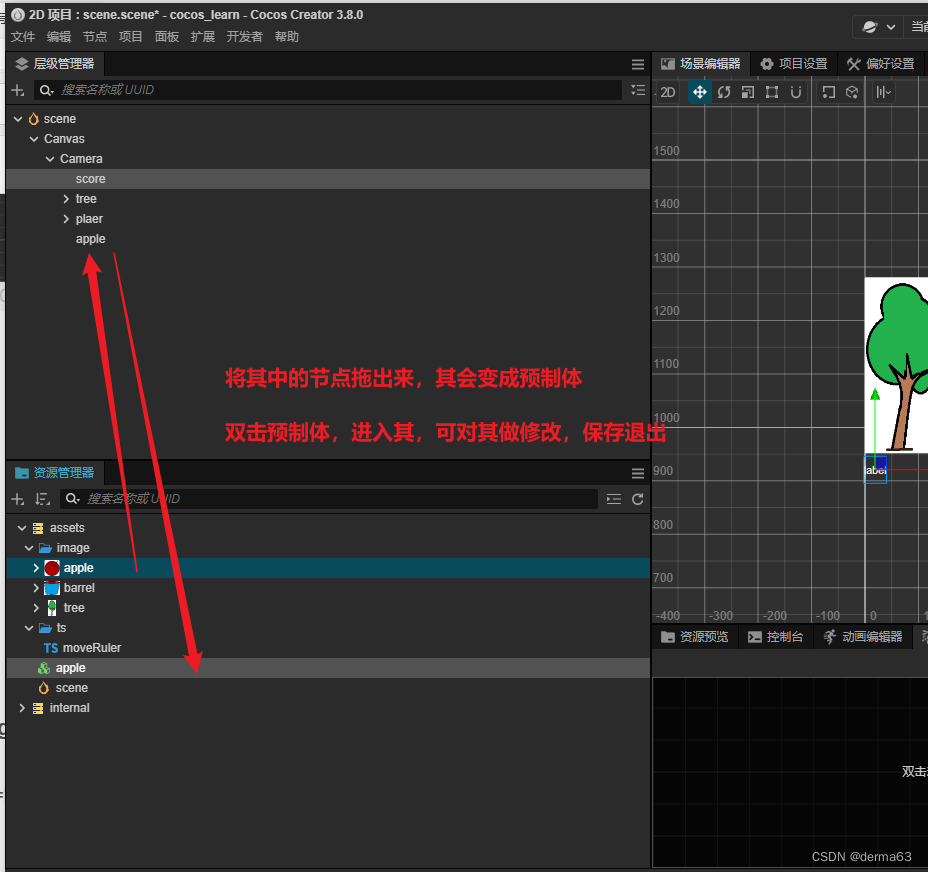
7、预制体的创建销毁(节点的销毁)及定时器:
创建:
使用:
注:如何想在节点销毁的地方执行一个些操作可以的在 ondestroy方法中。
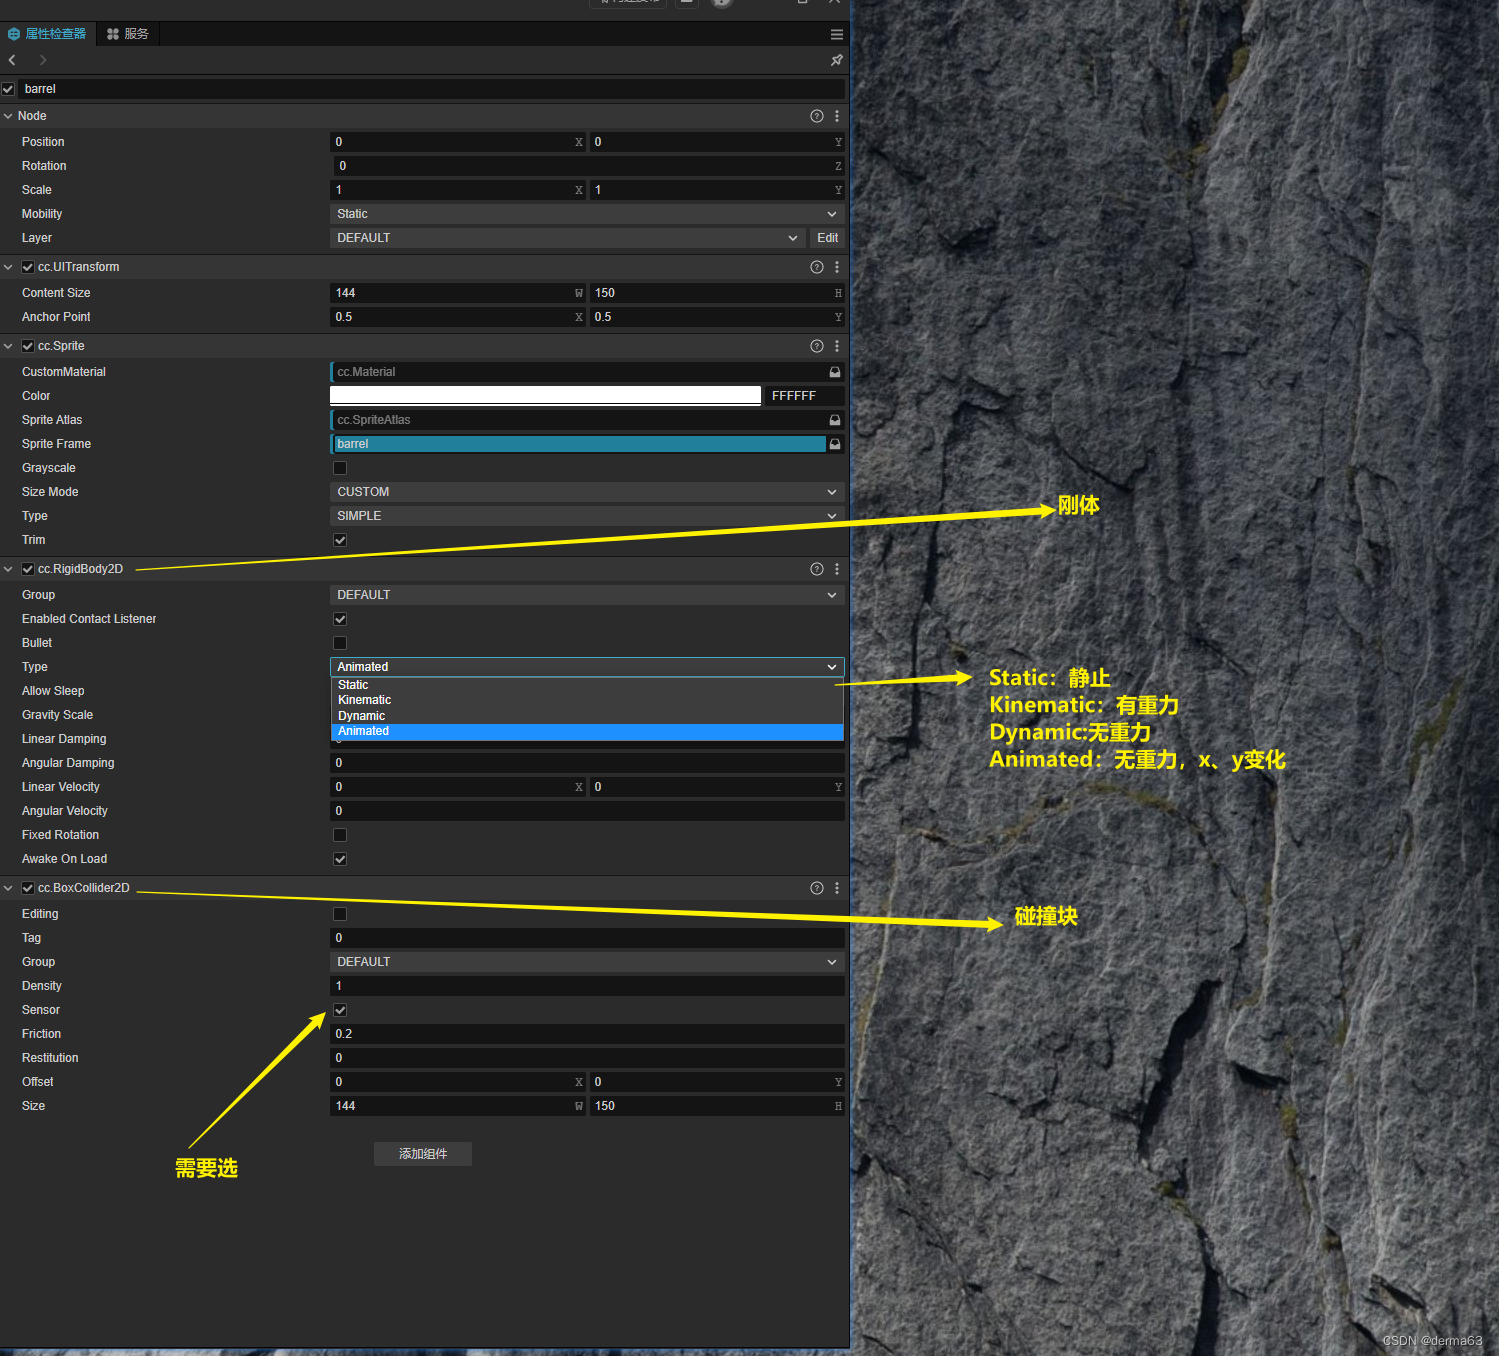
8、刚体——碰撞(写碰撞事件):
需要碰撞检测的两个节点都需要添加 刚体、碰撞块 这两个组件:
具体写法:

9、获得子节点的Label组件,并修改其中的String:
this.node.getChildByName(“score”).getComponent(Label).string=${this.cur_score}分;
5-9的脚本:
import { _decorator, Collider2D, Component, Contact2DType, director, Director, EventKeyboard, Input, input, instantiate, IPhysics2DContact, KeyCode, Label, Node, Prefab, v3, Vec3 } from 'cc';
const { ccclass, property } = _decorator;
@ccclass('moveRuel')
export class moveRuel extends Component {
@property(Node) tree:Node;
@property(Node) player:Node;
@property(Node) apples:Node;
@property(Prefab) apple:Prefab;
//@property(Label) score:Label;
barrel_postion: number[] = [];
player_cur_poston:number;
cur_score:number;
start() {
this.initData();
this.openInputEvent();
this.startCreateApple();
this.openCollider2DEvent();
}
openCollider2DEvent(){
const comp = this.player.getChildByName("barrel").getComponent(Collider2D);
comp.on(Contact2DType.BEGIN_CONTACT,(selfCollider:Collider2D,otherCollider:Collider2D,contact:IPhysics2DContact|null)=>{
//碰撞后销毁对象(碰到桶的苹果)
director.once(Director.EVENT_AFTER_PHYSICS,()=>{
otherCollider.node.destroy();
},this);
//console.log("666666666");
++this.cur_score;//接到苹果,分数加一
this.flash_score();
},this);
}
flash_score(){
//this.score.getComponent(String)=cur_score;
//this.getChildByName("score").getComponent(Label)="100";
//let i;
this.node.getChildByName("score").getComponent(Label).string=`${this.cur_score}分`;
//this.score.string=`${this.cur_score}分`
}
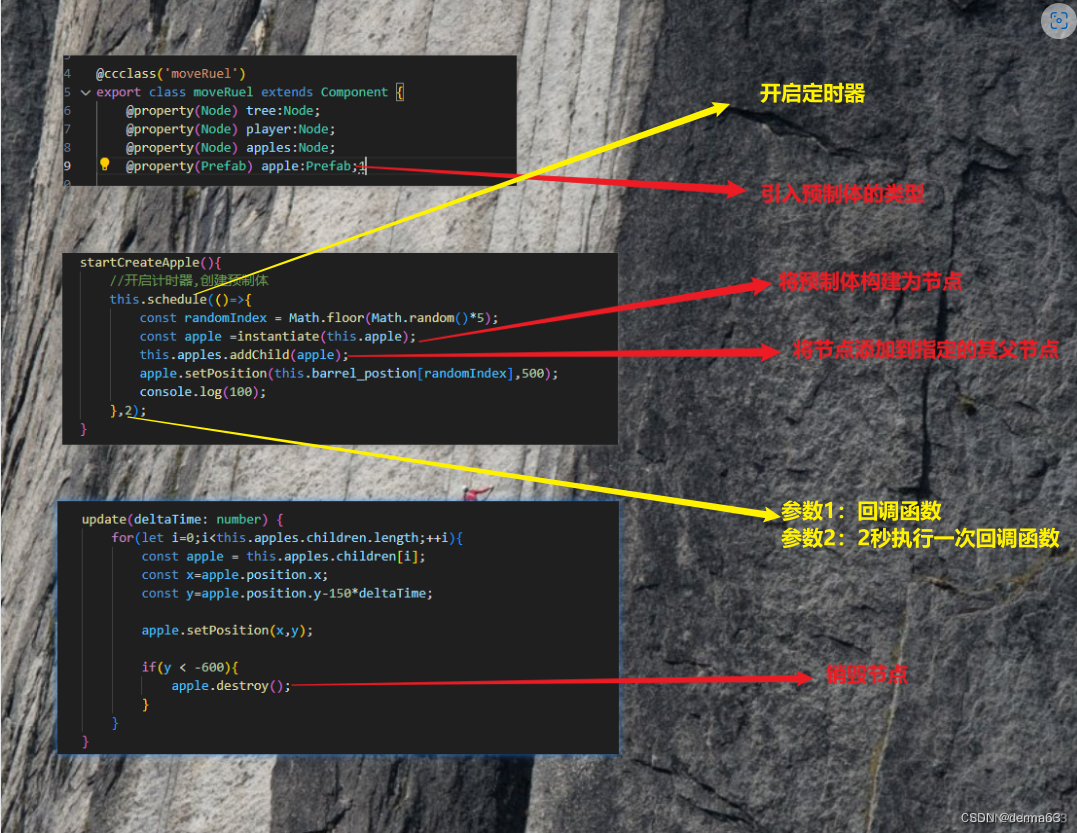
startCreateApple(){
//开启计时器,创建预制体
this.schedule(()=>{
const randomIndex = Math.floor(Math.random()*5);
const apple =instantiate(this.apple);
this.apples.addChild(apple);
apple.setPosition(this.barrel_postion[randomIndex],500);
console.log(100);
},2);
}
initData(){
this.cur_score = 0;
this.flash_score();
let v = v3();
for(let i:number = 0;i<this.tree.children.length;++i){
this.tree.getChildByName(`tree-00${i+1}`).getPosition(v);
this.barrel_postion[i]=v.x;
}
//初始化玩家位置
this.player_cur_poston=0;
this.player.setPosition(this.barrel_postion[this.player_cur_poston],-550);
console.log(this.barrel_postion);
}
openInputEvent(){
input.on(Input.EventType.KEY_DOWN,this.onKeyDown,this);
}
onKeyDown(event: EventKeyboard){
switch(event.keyCode){
case KeyCode.KEY_A:
if(0 === this.player_cur_poston)
return;
--this.player_cur_poston;
this.player.setPosition(this.barrel_postion[this.player_cur_poston],-550);
break;
case KeyCode.KEY_D:
if(4 === this.player_cur_poston)
return;
++this.player_cur_poston;
this.player.setPosition(this.barrel_postion[this.player_cur_poston],-550);
break;
}
}
update(deltaTime: number) {
for(let i=0;i<this.apples.children.length;++i){
const apple = this.apples.children[i];
const x=apple.position.x;
const y=apple.position.y-150*deltaTime;
apple.setPosition(x,y);
if(y < -600){
apple.destroy();
}
}
}
}
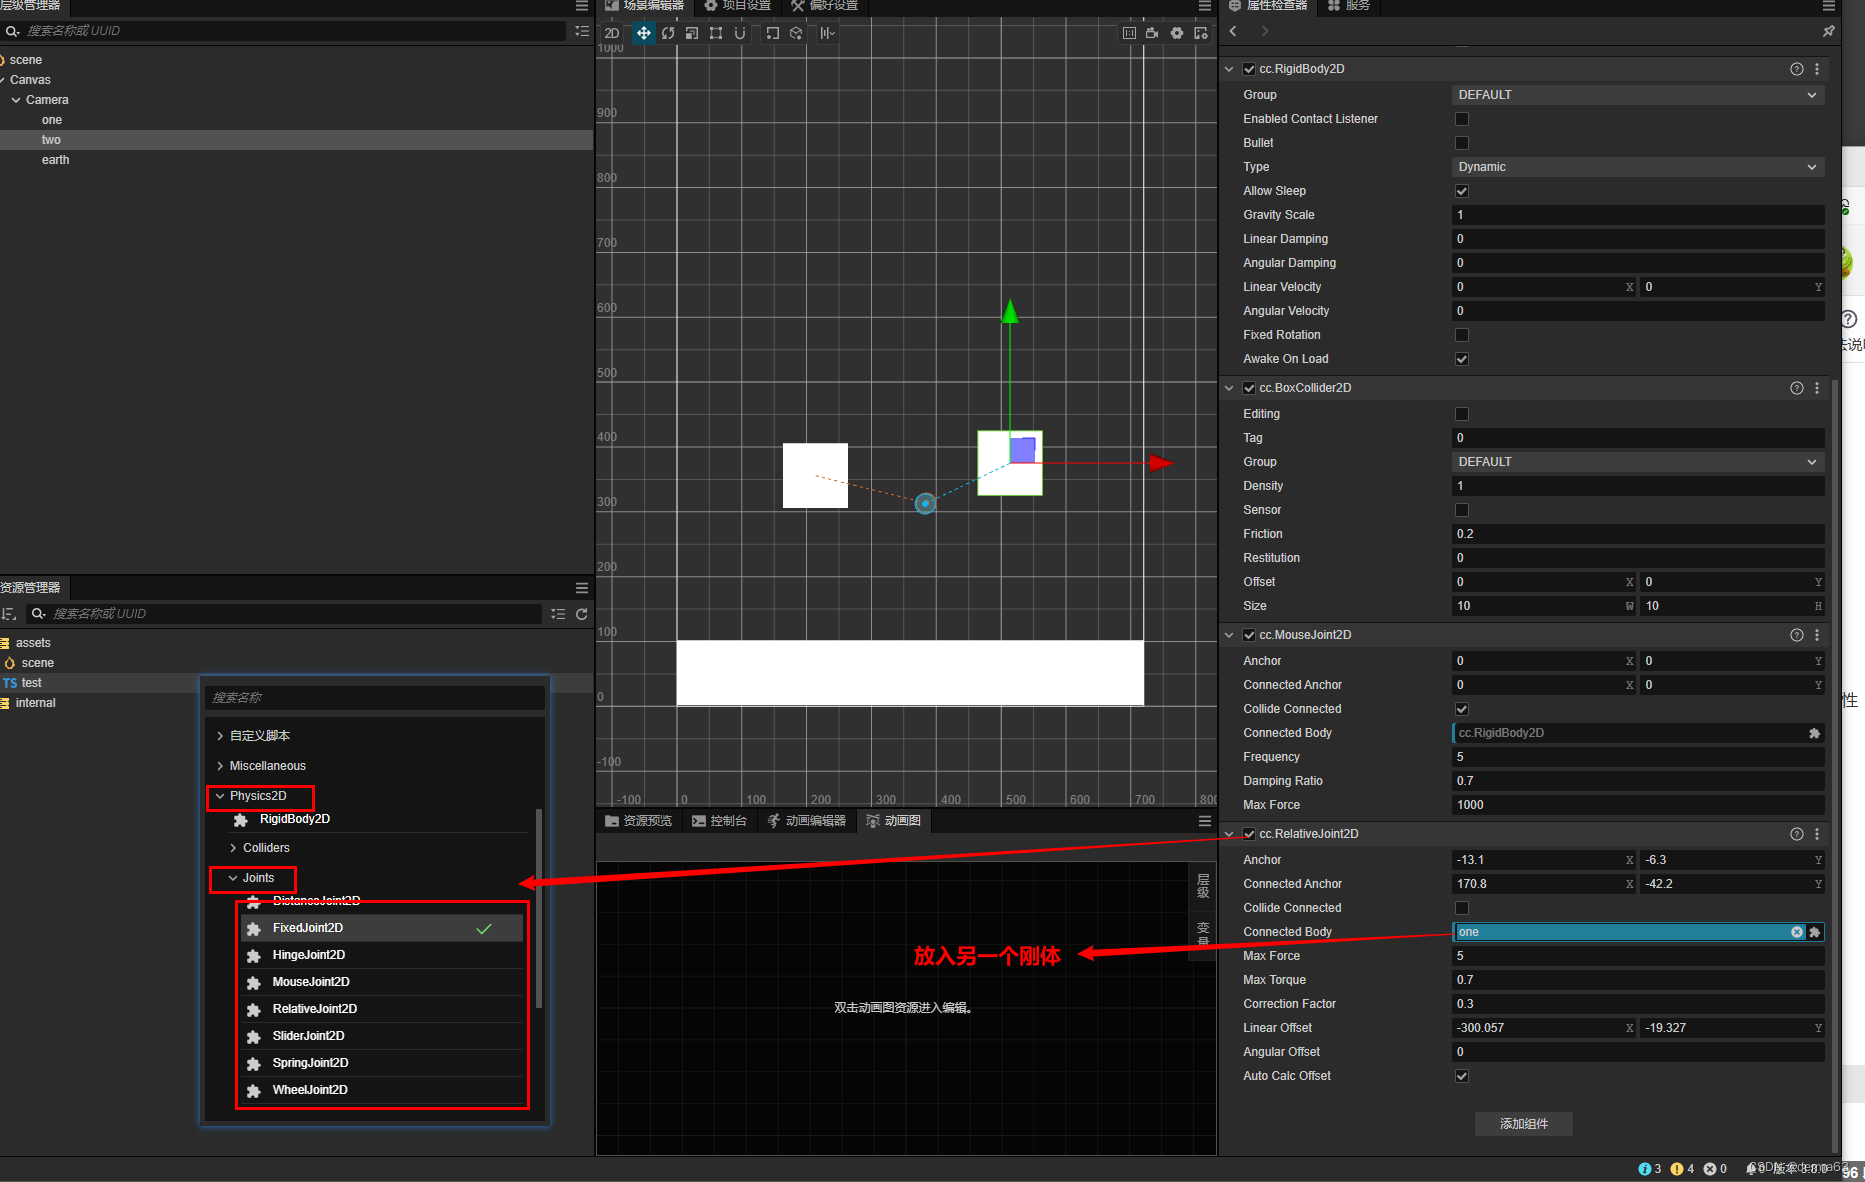
10、物理系统——关节组件
首先需要给节点添加 刚体和碰撞和两个组件(RigidBody2D、BoxCollider2D)
1、绘制碰撞信息:

物理关节
连个刚体的相互作用的一种约束:
11、暂停/恢复节点接受事件
// 获取节点
let yourNode = cc.find("YourNodePath");  // 替换成你节点的路径

// 暂停节点上的系统事件
yourNode.pauseSystemEvents(true);

// 在一段时间后恢复事件
let delayTime = 2; // 2 秒后恢复事件,可以根据实际情况调整
setTimeout(() => {
    yourNode.resumeSystemEvents(true);
}, delayTime * 1000);
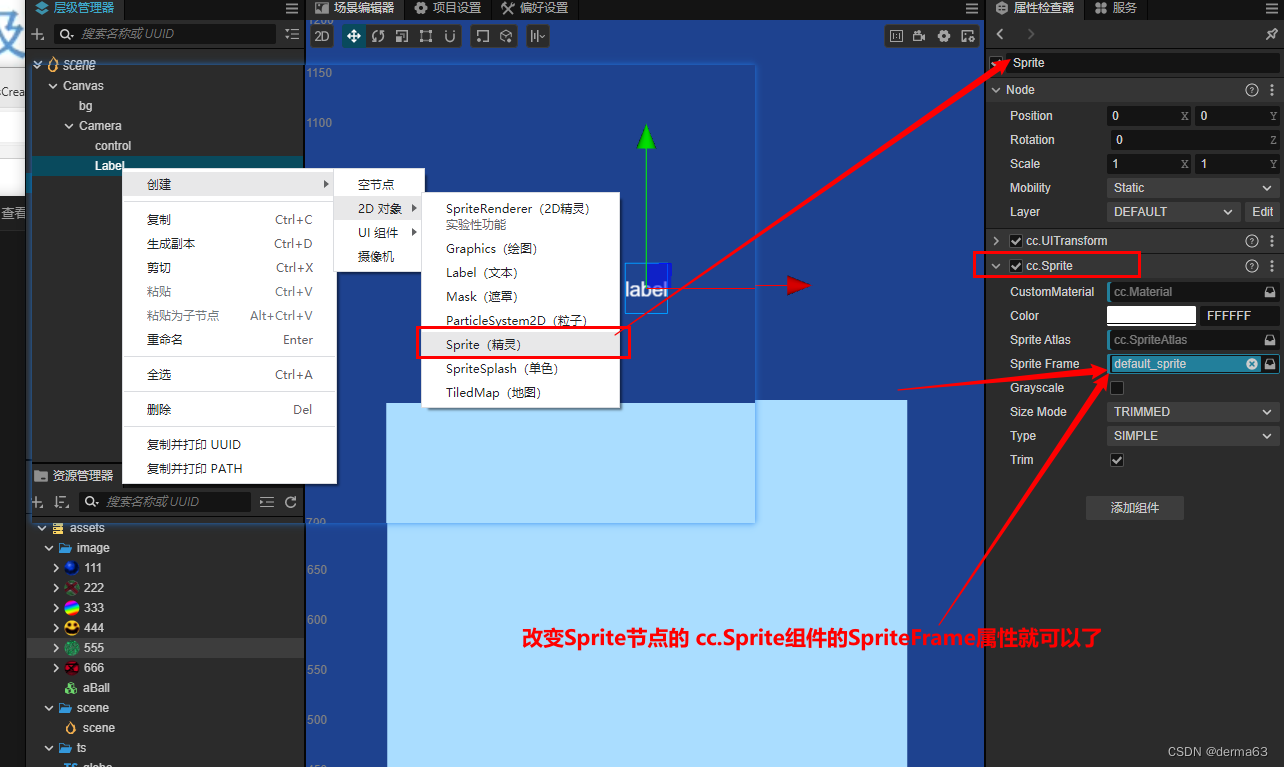
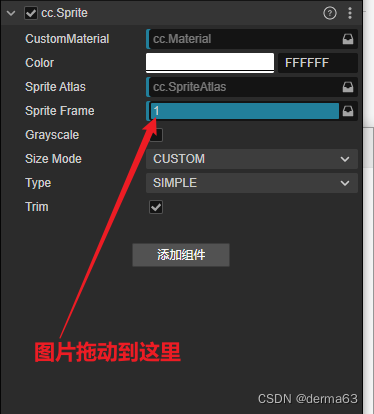
12、更换图片(Sprite节点)
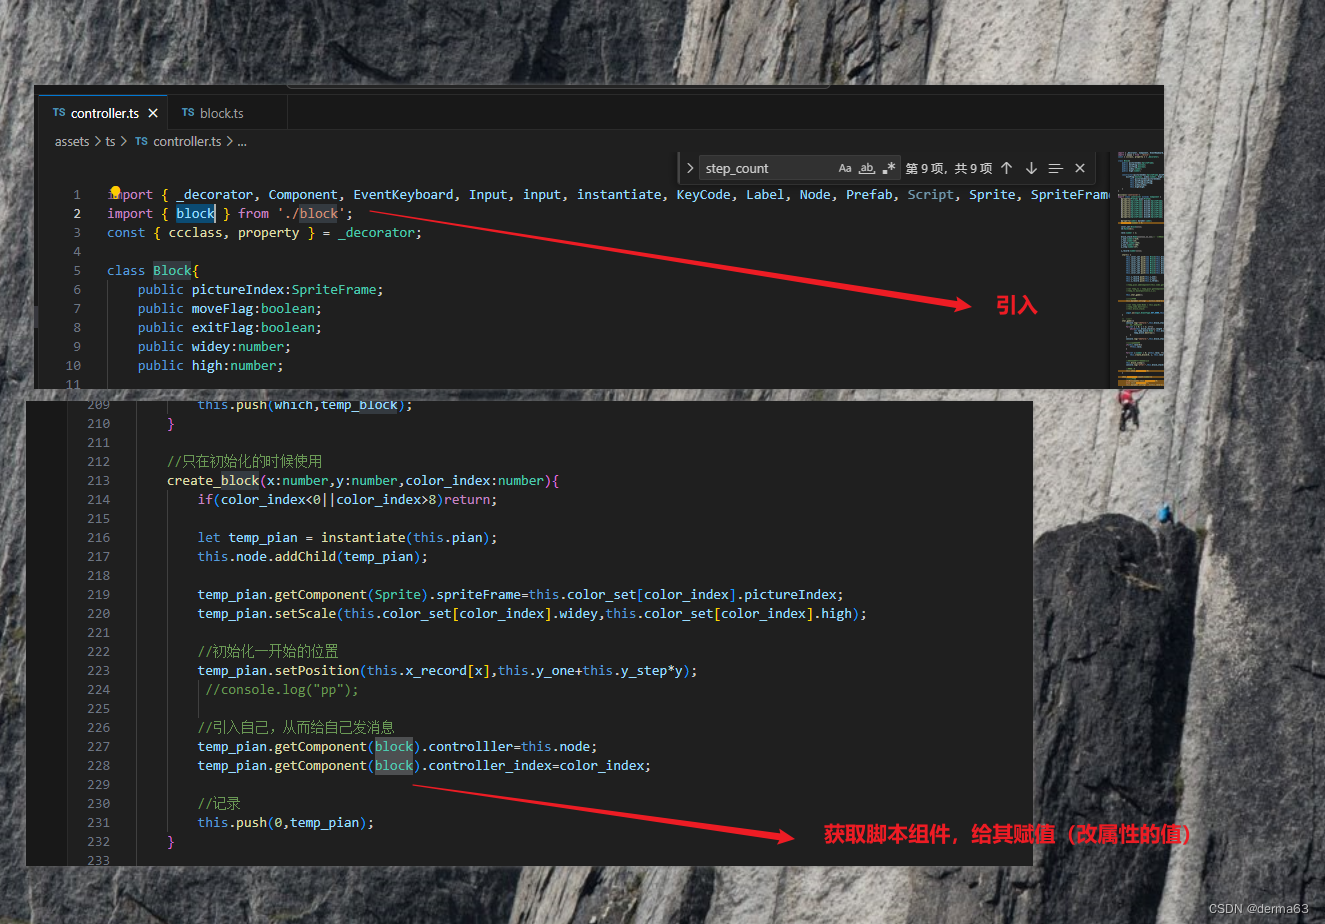
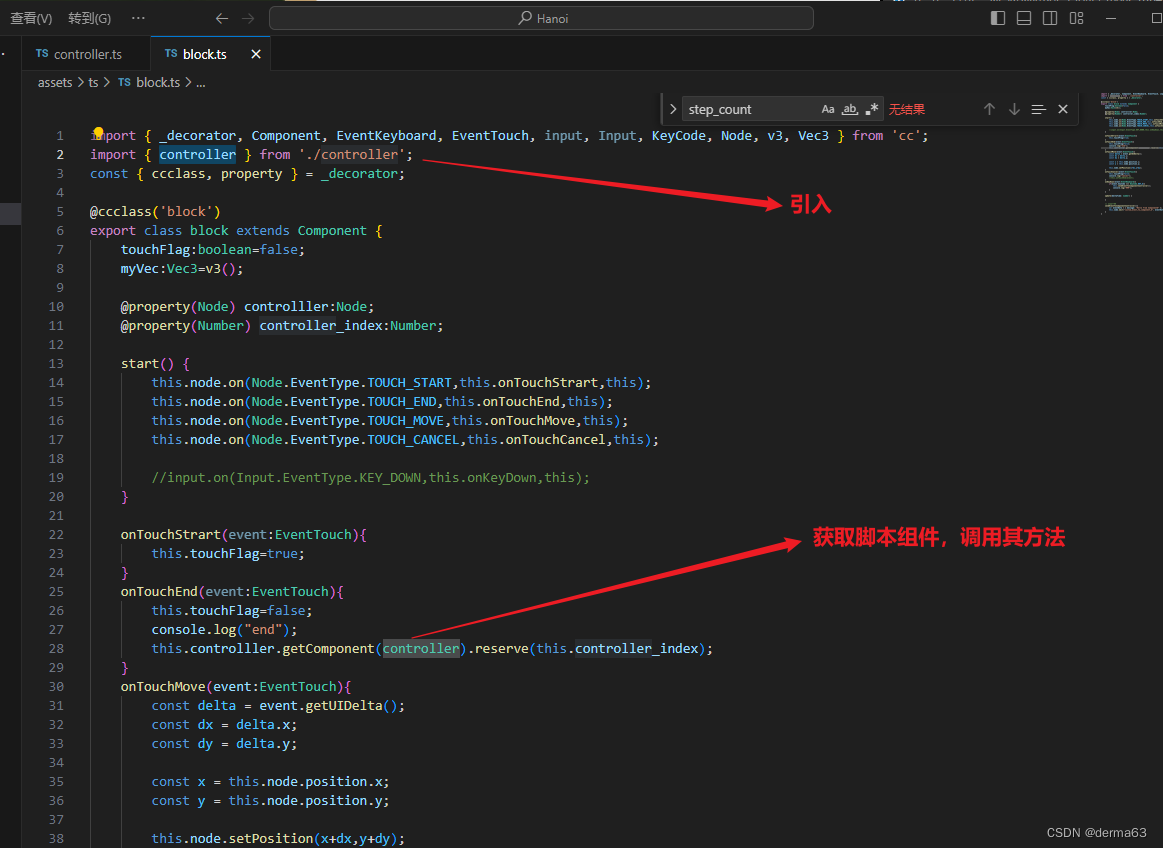
14、组件将调用脚本中的方法,组件间通信(与预制体)
15、加载新的场景
// 导入 cc 模块
const { ccclass, property } = cc._decorator;

// 创建一个脚本
@ccclass
export default class SceneSwitcher extends cc.Component {

    // 添加一个按钮点击事件(例如,您可以在编辑器中创建一个按钮,并将该方法绑定到按钮的点击事件)
    onButtonClick() {
        // 切换到新场景
        cc.director.loadScene("YourNextSceneName");
    }
}
16、打包注意点
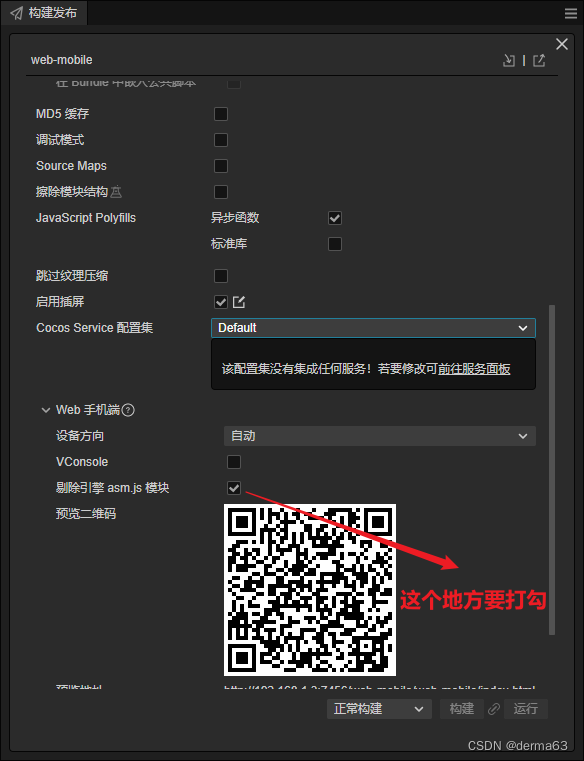
注:如果是手机端可以选择横屏
17、修改背景颜色
当前节点存在组件Sprite,
	array_bg_color = ["#9ACA79","#79CACA","#8C79CA","#9D79CA","#CA79B0","#A83535"] //背景颜色
	this.getComponent(Sprite).color = new Color(this.array_bg_color[1])
18、动态加载/释放资源
/*
	load 第一个参数:资源地址
		第二个参数:资源类型
		第三个参数:回调函数,serr是报错信息,asset是加载到的资源的引用
*/
	this.asset=null;

	......

    //动态加载资源
    resources.load("source/0/spriteFrame", SpriteFrame, (serr, asset) => {
        this.asset=asset;
        this.node.getChildByName("thumbnail").getComponent(Sprite).spriteFrame = this.asset;
    });

	//克隆资源
    this.newsprite = this.asset.clone();// 创建一个新的SpriteFrame对象

	//释放资源
	if(null!==this.asset){  //ts中的不相等写为:!==
        assetManager.releaseAsset(this.asset);
        this.asset=null;
    }
注: 1、注意资源记载的异步的 (load),所以在回调里使用可以保证资源已被加载完成了
2、这里的asset是一个引用,如果引用复制多分修改一处,其他地方会被一同修改,如何需要不同的处理可以进行克隆操作
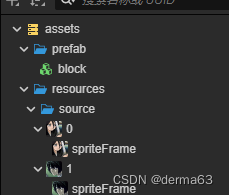
3、资源需要放在 resources文件夹下,例如:资源的地址是: assets/resources/source/0/spriteFrame ,则 load 函数的第一个参数字应写为: source/0/spriteFrame
4、Sprite组件的SpriteFrame一旦被赋值,擅自将其置空或将其资源释放,时候报错的
19、图层置顶操作
this.node.setSiblingIndex(this.node.parent.children.length-1);
20、父子节点的脚本间的相互其----函数/变量
实际的操作:

1、父节点的脚本调用子节点脚本中的方法,只用将子节点作为一个预制体放入父节点的脚本中就可以了。
2、相反的:
子节点调用父节点这个操作也是可以完成的,只不过子节点调用父节点的脚本组件中的方法时, vs code是会报错的(强行这么写是可以运行的)。
但是这么操作容易引发混乱,
如:
子节点调用父节点的方法,但父节点的方法里有释放或修改子字节资源的操作,这样就可能会出bug.
21、父子节点事件捕获的顺序
在 Cocos Creator 3.x 中,父子节点事件的捕获顺序是根据事件流的冒泡机制来确定的。具体来说,事件首先从最内层的子节点开始,然后向外层父节点传播。这意味着子节点上的事件处理程序会在父节点上的事件处理程序之前被调用。
例如,如果你点击了一个子节点,那么会先调用子节点上的事件处理程序,然后是它的父节点上的事件处理程序,然后是父节点的父节点,以此类推,直到根节点。
这个事件流的机制使得你可以在子节点和父节点之间方便地控制事件的传递和处理,从而实现更灵活的交互逻辑。
22、延时 / 循环 函数的写法
延时:
isRunning = false;
//延时调用函数的写法
function(){
    //防止函数被重入
     if (this.isRunning) {
         return;
     }
     this.isRunning = true;

	setTimeout(() => {
	   // 在这里添加你的代码
	   //......

	    this.isRunning = false;//这样下次就可再次进入这个函数
	}, 200);  // 延迟 0.2 秒

}
注:
1、如果想想延时函数中传入变量(当前脚本的this默认是没有传进去的),可以使用bind
2、延时函数在未来执行时被取消----使用函数 clearTimeout
            this.object_mode_slider.node.on('slide', (event) => {
                console.log('Slider 滑动中...');
                if(null==this.slideTimeout){
                    this.slideTimeout=setTimeout(this.onSlide.bind(this), 100);		//传入参数 this(当前脚本)
                }
                else{
                    clearTimeout(this.slideTimeout)									//取消延时函数的执行
                    this.slideTimeout=setTimeout(this.onSlide.bind(this), 100);
                }

            });
循环:
//定时循环执行
@ccclass('game')
export class game extends Component {
    // ...

    start() {
        this.init();
        this.schedule(this.myFunction, 2); // 每两秒调用一次myFunction方法
    }

    myFunction() {
        // 这里是你的代码
        console.log('This function is called every 2 seconds');
    }

    // ...
}
在update中进行延时的循环操作:
private accumulator: number = 0;//用于计时

update(deltaTime: number) {
        this.accumulator+=deltaTime
        if(this.accumulator>=0.1){
            // 要执行的函数
            this.Reproduction();
            // 重置累积器
            this.accumulator = 0;
        }
}
23、button组件 (之类的) 的使用
1、button:
	// 改变 Button 组件的显示名字
	this.next_button.node.getChildByName('Label').getComponent(Label).string = '新的名字';

	// 改变 Button 组件是否可以被点击
	this.next_button.interactable = false; // 设置为 false 使 Button 不可点击

	// 设置 Button 组件被点击时所触发的函数
	this.next_button.node.on(Button.EventType.CLICK, this.yourClickFunction, this);

	......
	yourClickFunction(){
		//需要在点击时进行的操作
		//......
	}
2、Slider:
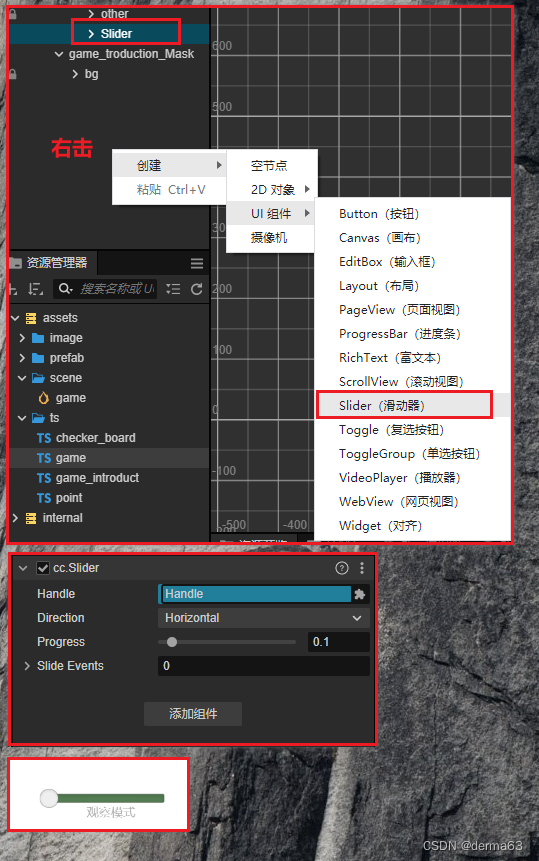
得到滑块当前位置
sliderNode.on('slide', (event) => {
    // 处理滑动事件
    console.log('Slider 滑动中...');
});
制作成开关(捕获滑块结束滑动的事件)
    start() {
            //初始化滑块
            this.object_mode_slider.node.on('slide', (event) => {
                console.log('Slider 滑动中...');
                if(null==this.slideTimeout){
                    this.slideTimeout=setTimeout(this.onSlide.bind(this), 100);
                }
                else{
                    clearTimeout(this.slideTimeout)
                    this.slideTimeout=setTimeout(this.onSlide.bind(this), 100);
                }
            });
    }


    //滑块发生了移动
    onSlide(event:EventTouch) {
        if(this.object_mode_slider.progress>=0.5){
            this.object_mode_slider.progress=1;
            this.object_mode_slider.node.getComponent(Sprite).color=new Color(Green);
            this.checketboard.getComponent(checker_board).mobile_is_click_point_life_death_enable = true;
        }
        else {
            this.object_mode_slider.progress=0;
            this.object_mode_slider.node.getComponent(Sprite).color=new Color(Red);
            this.checketboard.getComponent(checker_board).mobile_is_click_point_life_death_enable = false;
        }

        this.slideTimeout=null
    }
24、sprit 组件的使用
这个组件用于展示图片
25、区分移动端和pc端代码:
if (sys.isMobile) {
    // 执行移动设备上的代码
    console.log('mobile');
} else {
    // 执行桌面设备上的代码
    console.log('pc');
}
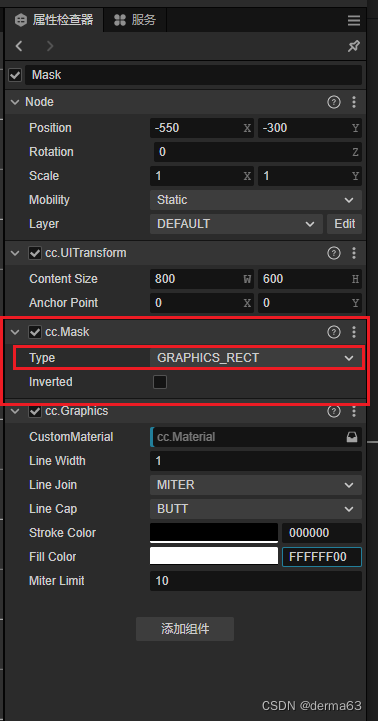
26、遮罩的使用(可以用于场景切换)
遮罩作用于它的子节点
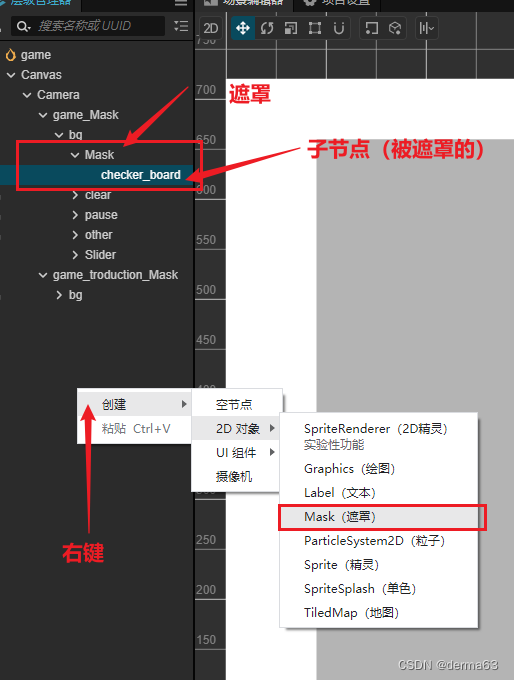
操作(切换场景):
        //切换场景
        this.otherButton.node.on(Node.EventType.TOUCH_START,()=>{
            if(!this.is_pause)return
            //director.loadScene('game_introduct');
            this.game_Mask.getComponent(UITransform).setContentSize(0,0)
            this.game_troduct_Mask.getComponent(UITransform).setContentSize(1280,720)
        })
27、坐标相关的问题
1、世界坐标(绝对坐标)与 本地坐标(相对坐标,相对于它的父节点)
        console.log(this.node.getWorldPosition());//绝对坐标
        console.log(event.getLocation());//鼠标的绝对坐标(返回的不是v3,没有z)

        console.log(this.node.getPosition());//相对坐标,相对于它的父节点
2、向量v3的相关操作:
取反:
求两个v3的和、差距离:
        let point_location = v3(x,y,0).subtract(this.node.getPosition());		//差
        let point_location = v3(x,y,0).add(this.node.getPosition());			//和
        v3_1.multiplyScalar(-1)													//取反
        v3_1.multiplyScalar(0.5)												//取1/2
28、cocos中的函数 传参
1、不同普通变量是复制:
如:number、boolean、
2、大些的是传的引用:
一个地方改其他地方都会改
如:数组、对象


 1456
1456


 被折叠的 条评论
为什么被折叠?
被折叠的 条评论
为什么被折叠?
 到【灌水乐园】发言


