


- int cvFindContours( CvArr* image, CvMemStorage* storage, CvSeq** first_contour,int header_size=sizeof(CvContour),int mode=CV_RETR_LIST,int method=CV_CHAIN_APPROX_SIMPLE, CvPoint offset=cvPoint(0,0) );
int cvFindContours( CvArr* image, CvMemStorage* storage, CvSeq** first_contour,int header_size=sizeof(CvContour),int mode=CV_RETR_LIST,int method=CV_CHAIN_APPROX_SIMPLE, CvPoint offset=cvPoint(0,0) );
这个函数用起来很方便,但是随着你使用的深入,你会发现有一些迷惑在这里。比如当你提取轮廓时只需要最外围的一个轮廓,但是你会发现当轮廓画出来时是好几个;当你需要找一个最大轮廓时却发现找出来的却根本就不是你想要的那个。带着这样问题我们再来仔细看看
cvFindContours这个函数。
下边的是一位仁兄写的测试程序和测试图片,说明提取轮廓的两种方法及绘制轮廓中最大等级分析
的问题,非常感谢他的分享,原文戳
这里:
- /************************************************************************/
- /* 提取轮廓两种方法对比及绘制轮廓'最大等级'分析 */
- /************************************************************************/
- #include "stdafx.h"
- #include "cv.h"
- #include "highgui.h"
- int main()
- {
- IplImage* img = cvLoadImage("lena.jpg", CV_LOAD_IMAGE_GRAYSCALE);
- IplImage* img_temp = cvCreateImage(cvGetSize(img), 8, 1);
- cvThreshold(img, img, 128, 255, CV_THRESH_BINARY);
- CvMemStorage* mem_storage = cvCreateMemStorage(0);
- CvSeq *first_contour = NULL, *c = NULL;
- //
- // 1、
- cvNamedWindow("contour1");
- cvCopyImage(img, img_temp);
- double t = (double)cvGetTickCount();
- cvFindContours(img_temp, mem_storage, &first_contour);
- cvZero(img_temp);
- cvDrawContours(
- img_temp,
- first_contour,
- cvScalar(100),
- cvScalar(100),
- 1
- );
- t = (double)cvGetTickCount() - t;
- cvShowImage("contour1", img_temp);
- printf("run1 = %gms\n", t/(cvGetTickFrequency()*1000.));
- cvClearMemStorage(mem_storage);
- //
- // 2、
- cvNamedWindow("contour2");
- cvCopyImage(img, img_temp);
- t = (double)cvGetTickCount();
- CvContourScanner scanner = cvStartFindContours(img_temp, mem_storage);
- while (cvFindNextContour(scanner));
- first_contour = cvEndFindContours(&scanner);
- cvZero(img_temp);
- cvDrawContours(
- img_temp,
- first_contour,
- cvScalar(100),
- cvScalar(100),
- 1
- );
- t = (double)cvGetTickCount() - t;
- cvShowImage("contour2", img_temp);
- printf("run2 = %gms\n", t/(cvGetTickFrequency()*1000.));
- cvClearMemStorage(mem_storage);
- cvReleaseImage(&img);
- cvReleaseImage(&img_temp);
- cvWaitKey();
- /************************************************************************/
- /* 经测试 run1 = 16.1431ms run2 = 15.8677ms (参考)
- 不过可以肯定这两中算法时间复杂度是相同的 */
- /************************************************************************/
- //
- // 上述两种方法完成了对轮廓的提取,如想绘制轮廓都得配合cvDrawContours来使用
- // 而cvDrawContours 函数第5个参数为 max_level 经查ICVL含义如下:
- //
- // 绘制轮廓的最大等级。如果等级为0,绘制单独的轮廓。如果为1,绘制轮廓及在其后的相同的级别下轮廓。
- // 如果值为2,所有的轮廓。如果等级为2,绘制所有同级轮廓及所有低一级轮廓,诸此种种。如果值为负数,
- // 函数不绘制同级轮廓,但会升序绘制直到级别为abs(max_level)-1的子轮廓。
- //
- // 相信好多读者初次都无法理解等级的含义,而且测试时候输入>=1 的整数效果几乎一样
- // 只有提取轮廓时候的提取模式设为 CV_RETR_CCOMP CV_RETR_TREE 时这个参数才有意义
- //
- // 经查FindContours 函数里面这样介绍提取模式(mode)的这两个参数:
- // CV_RETR_CCOMP - 提取所有轮廓,并且将其组织为两层的 hierarchy: 顶层为连通域的外围边界,次层为洞的内层边界。
- // CV_RETR_TREE - 提取所有轮廓,并且重构嵌套轮廓的全部 hierarchy
- //
- // 下面用第一种方法进行测试
- cvNamedWindow("contour_test");
- cvNamedWindow("contour_raw");
- img = cvLoadImage("contour.jpg", CV_LOAD_IMAGE_GRAYSCALE);
- cvShowImage("contour_raw", img);
- cvThreshold(img, img, 128, 255, CV_THRESH_BINARY);
- img_temp = cvCloneImage(img);
- cvFindContours(
- img_temp,
- mem_storage,
- &first_contour,
- sizeof(CvContour),
- CV_RETR_CCOMP //#1 需更改区域
- );
- cvZero(img_temp);
- cvDrawContours(
- img_temp,
- first_contour,
- cvScalar(100),
- cvScalar(100),
- 1 //#2 需更改区域
- );
- cvShowImage("contour_test", img_temp);
- /************************************************************************/
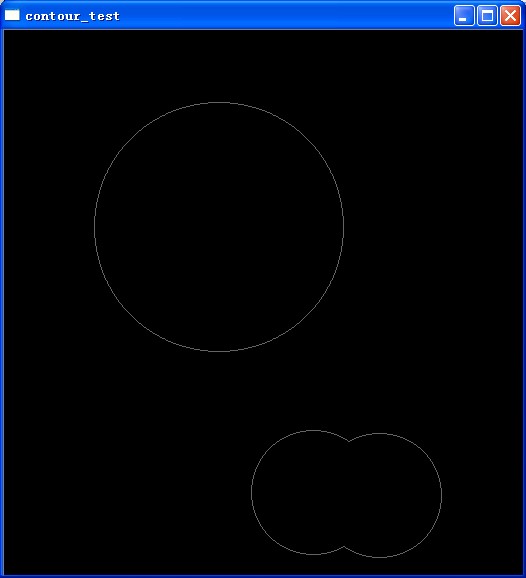
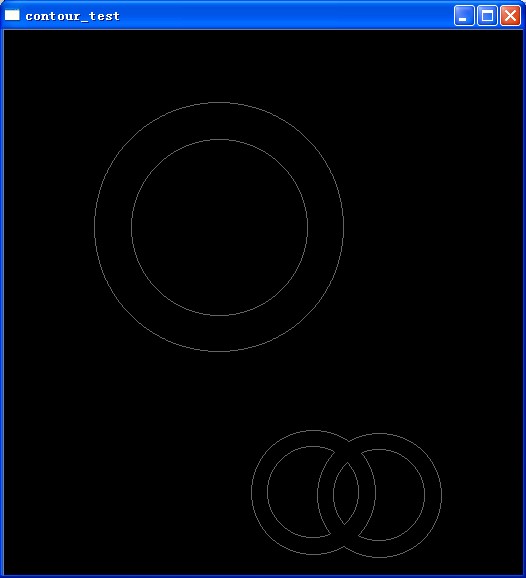
- /* (1, 2) = (CV_RETR_CCOMP, 1) 如图1
- (1, 2) = (CV_RETR_CCOMP, 2) 如图2
- (1, 2) = (CV_RETR_TREE, 1) 如图3
- (1, 2) = (CV_RETR_TREE, 2) 如图4
- (1, 2) = (CV_RETR_TREE, 6) 如图5
- 经分析CV_RETR_CCOMP 只把图像分为两个层次,顶层和次层,一等级轮廓只匹配与其最接近
- 的内侧轮廓即2等级
- CV_RETR_TREE 则从轮廓外到内按等级1 - n 全部分配
- CV_RETR_LIST 全部轮廓均为1级 */
- /************************************************************************/
- cvWaitKey();
- cvReleaseImage(&img);
- cvReleaseImage(&img_temp);
- cvReleaseMemStorage(&mem_storage);
- cvDestroyAllWindows();
- return 0;
- }
/************************************************************************/
/* 提取轮廓两种方法对比及绘制轮廓'最大等级'分析                         */
/************************************************************************/
#include "stdafx.h"
#include "cv.h"
#include "highgui.h"

int main()
{
    IplImage* img = cvLoadImage("lena.jpg", CV_LOAD_IMAGE_GRAYSCALE);
    IplImage* img_temp = cvCreateImage(cvGetSize(img), 8, 1);

    cvThreshold(img, img, 128, 255, CV_THRESH_BINARY);

    CvMemStorage* mem_storage = cvCreateMemStorage(0);
    CvSeq *first_contour = NULL, *c = NULL;

    //
    // 1、
    cvNamedWindow("contour1");
    cvCopyImage(img, img_temp);
    double t = (double)cvGetTickCount();
    cvFindContours(img_temp, mem_storage, &first_contour);
    cvZero(img_temp);
    cvDrawContours(
        img_temp,
        first_contour,
        cvScalar(100),
        cvScalar(100),
        1
        );
    t = (double)cvGetTickCount() - t;
    cvShowImage("contour1", img_temp);

    printf("run1 = %gms\n", t/(cvGetTickFrequency()*1000.));

    cvClearMemStorage(mem_storage);

    //
    // 2、
    cvNamedWindow("contour2");
    cvCopyImage(img, img_temp);
    t = (double)cvGetTickCount();
    CvContourScanner scanner = cvStartFindContours(img_temp, mem_storage);
    while (cvFindNextContour(scanner));
    first_contour = cvEndFindContours(&scanner);

    cvZero(img_temp);
    cvDrawContours(
        img_temp,
        first_contour,
        cvScalar(100),
        cvScalar(100),
        1
        );
    t = (double)cvGetTickCount() - t;
    cvShowImage("contour2", img_temp);

    printf("run2 = %gms\n", t/(cvGetTickFrequency()*1000.));

    cvClearMemStorage(mem_storage);
    cvReleaseImage(&img);
    cvReleaseImage(&img_temp);

    cvWaitKey();

    /************************************************************************/
    /* 经测试 run1 = 16.1431ms run2 = 15.8677ms (参考)
       不过可以肯定这两中算法时间复杂度是相同的                                     */
    /************************************************************************/

    //
    // 上述两种方法完成了对轮廓的提取,如想绘制轮廓都得配合cvDrawContours来使用
    // 而cvDrawContours 函数第5个参数为 max_level 经查ICVL含义如下:
    //
    // 绘制轮廓的最大等级。如果等级为0,绘制单独的轮廓。如果为1,绘制轮廓及在其后的相同的级别下轮廓。
    // 如果值为2,所有的轮廓。如果等级为2,绘制所有同级轮廓及所有低一级轮廓,诸此种种。如果值为负数,
    // 函数不绘制同级轮廓,但会升序绘制直到级别为abs(max_level)-1的子轮廓。
    //
    // 相信好多读者初次都无法理解等级的含义,而且测试时候输入>=1 的整数效果几乎一样
    // 只有提取轮廓时候的提取模式设为 CV_RETR_CCOMP CV_RETR_TREE 时这个参数才有意义
    //
    // 经查FindContours 函数里面这样介绍提取模式(mode)的这两个参数:
    // CV_RETR_CCOMP - 提取所有轮廓,并且将其组织为两层的 hierarchy: 顶层为连通域的外围边界,次层为洞的内层边界。
    // CV_RETR_TREE - 提取所有轮廓,并且重构嵌套轮廓的全部 hierarchy
    //
    // 下面用第一种方法进行测试

    cvNamedWindow("contour_test");
    cvNamedWindow("contour_raw");
    img = cvLoadImage("contour.jpg", CV_LOAD_IMAGE_GRAYSCALE);
    cvShowImage("contour_raw", img);
    cvThreshold(img, img, 128, 255, CV_THRESH_BINARY);
    img_temp = cvCloneImage(img);
    cvFindContours(
        img_temp,
        mem_storage,
        &first_contour,
        sizeof(CvContour),
        CV_RETR_CCOMP           //#1 需更改区域
        );

    cvZero(img_temp);
    cvDrawContours(
        img_temp,
        first_contour,
        cvScalar(100),
        cvScalar(100),
        1                       //#2 需更改区域
        );
    cvShowImage("contour_test", img_temp);
    /************************************************************************/
    /* (1, 2) = (CV_RETR_CCOMP, 1)  如图1
       (1, 2) = (CV_RETR_CCOMP, 2)  如图2
       (1, 2) = (CV_RETR_TREE, 1)   如图3
       (1, 2) = (CV_RETR_TREE, 2)   如图4
       (1, 2) = (CV_RETR_TREE, 6)   如图5
       经分析CV_RETR_CCOMP 只把图像分为两个层次,顶层和次层,一等级轮廓只匹配与其最接近
       的内侧轮廓即2等级
       CV_RETR_TREE 则从轮廓外到内按等级1 - n 全部分配
       CV_RETR_LIST 全部轮廓均为1级                        */
    /************************************************************************/

    cvWaitKey();
    cvReleaseImage(&img);
    cvReleaseImage(&img_temp);
    cvReleaseMemStorage(&mem_storage);
    cvDestroyAllWindows();
    return 0;
} 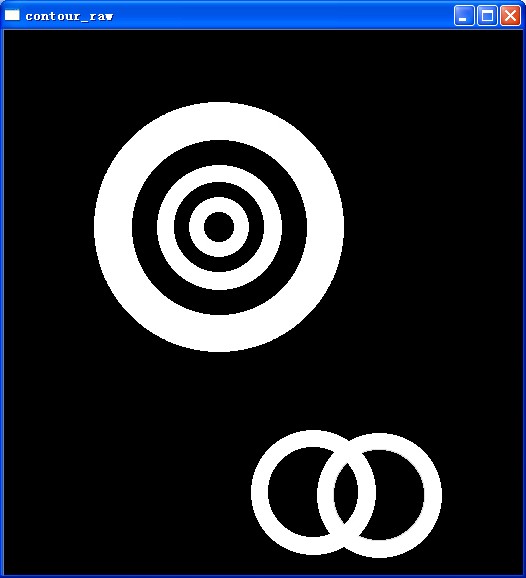
原图

图一

图二
图三
图四
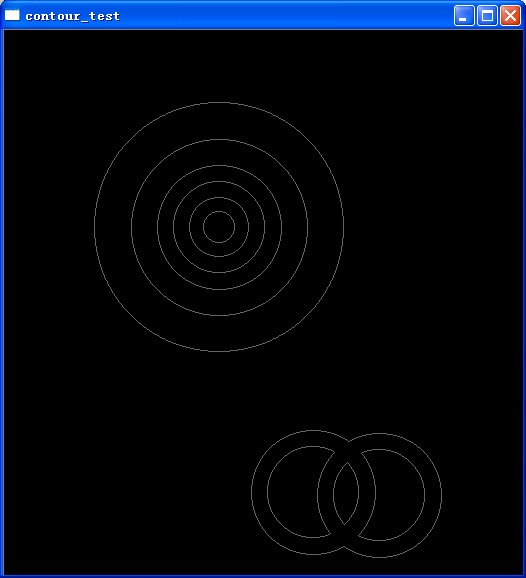
图五
这是OpenCV的经典一个例子:
- #include "cv.h"
- #include "cxcore.h"
- #include "highgui.h"
- #include <math.h>
- #endif
- #pragma comment(lib,"cv.lib")
- #pragma comment(lib,"highgui.lib")
- #pragma comment(lib,"cxcore.lib")
- #define w 500
- int levels = 3;
- CvSeq* contours = 0;
- void on_trackbar(int pos)
- {
- IplImage* cnt_img = cvCreateImage( cvSize(w,w), 8, 3 );
- CvSeq* _contours = contours;
- int _levels = levels - 3;
- if( _levels <= 0 ) // get to the nearest face to make it look more funny
- _contours = _contours->h_next->h_next->h_next->h_next->h_next->h_next->h_next->v_next->h_next->h_next;
- //_contours = _contours->v_next;
- cvZero( cnt_img );
- cvDrawContours( cnt_img, _contours, CV_RGB(255,0,0), CV_RGB(0,255,0), _levels);//, 3, CV_AA, cvPoint(0,0) );
- /*_levels:
- 3,所有外轮廓及包含的内轮廓及里面的内轮廓
- 2:所有外轮廓及包含的内轮廓
- 1:所有外轮廓
- 0,第一个外轮廓
- -1:第一个外轮廓及包含的内轮廓
- -2:第一个外轮廓及包含的内轮廓及里面的内轮廓
- _contours->h_next:同级的下一个轮廓
- _contours->v_next父级下的下层区域;
- */
- cvShowImage( "contours", cnt_img );
- cvReleaseImage( &cnt_img );
- }
- int main( int argc, char** argv )
- {
- int i, j;
- CvMemStorage* storage = cvCreateMemStorage(0);
- IplImage* img = cvCreateImage( cvSize(w,w), 8, 1 );
- cvZero( img );
- for( i=0; i < 6; i++ )
- {
- int dx = (i%2)*250 - 30;//0%2=0;
- int dy = (i/2)*150;
- CvScalar white = cvRealScalar(255);
- CvScalar black = cvRealScalar(0);
- if( i == 0 )
- {
- for( j = 0; j <= 10; j++ )
- {
- double angle = (j+5)*CV_PI/21;
- cvLine(img, cvPoint(cvRound(dx+100+j*10-80*cos(angle)),
- cvRound(dy+100-90*sin(angle))),
- cvPoint(cvRound(dx+100+j*10-30*cos(angle)),
- cvRound(dy+100-30*sin(angle))), white, 1, 8, 0);
- }
- }
- cvEllipse( img, cvPoint(dx+150, dy+100), cvSize(100,70), 0, 0, 360, white, -1, 8, 0 );
- cvEllipse( img, cvPoint(dx+115, dy+70), cvSize(30,20), 0, 0, 360, black, -1, 8, 0 );
- cvEllipse( img, cvPoint(dx+185, dy+70), cvSize(30,20), 0, 0, 360, black, -1, 8, 0 );
- cvEllipse( img, cvPoint(dx+115, dy+70), cvSize(15,15), 0, 0, 360, white, -1, 8, 0 );
- cvEllipse( img, cvPoint(dx+185, dy+70), cvSize(15,15), 0, 0, 360, white, -1, 8, 0 );
- cvEllipse( img, cvPoint(dx+115, dy+70), cvSize(5,5), 0, 0, 360, black, -1, 8, 0 );
- cvEllipse( img, cvPoint(dx+185, dy+70), cvSize(5,5), 0, 0, 360, black, -1, 8, 0 );
- cvEllipse( img, cvPoint(dx+150, dy+100), cvSize(10,5), 0, 0, 360, black, -1, 8, 0 );
- cvEllipse( img, cvPoint(dx+150, dy+150), cvSize(40,10), 0, 0, 360, black, -1, 8, 0 );
- cvEllipse( img, cvPoint(dx+27, dy+100), cvSize(20,35), 0, 0, 360, white, -1, 8, 0 );
- cvEllipse( img, cvPoint(dx+273, dy+100), cvSize(20,35), 0, 0, 360, white, -1, 8, 0 );
- }
- cvNamedWindow( "image", 1 );
- cvShowImage( "image", img );
- cvFindContours( img, storage, &contours, sizeof(CvContour),
- 2, CV_CHAIN_APPROX_SIMPLE, cvPoint(0,0) );
- // comment this out if you do not want approximation
- contours = cvApproxPoly( contours, sizeof(CvContour), storage, CV_POLY_APPROX_DP, 3, 1 );
- //cvApproxPoly: 逼近方法 精度 逼近曲线是否封闭
- cvNamedWindow( "contours", 1 );
- cvCreateTrackbar( "levels+3", "contours", &levels, 7, on_trackbar );
- on_trackbar(0);
- cvWaitKey(0);
- cvReleaseMemStorage( &storage );
- cvReleaseImage( &img );
- return 0;
- }
#include "cv.h"
#include "cxcore.h"
#include "highgui.h"
#include <math.h>
#endif

#pragma   comment(lib,"cv.lib")
#pragma   comment(lib,"highgui.lib")
#pragma   comment(lib,"cxcore.lib")

#define w 500
int levels = 3;
CvSeq* contours = 0;

void on_trackbar(int pos)
{
    IplImage* cnt_img = cvCreateImage( cvSize(w,w), 8, 3 );
    CvSeq* _contours = contours;
    int _levels = levels - 3;
    if( _levels <= 0 ) // get to the nearest face to make it look more funny
        _contours = _contours->h_next->h_next->h_next->h_next->h_next->h_next->h_next->v_next->h_next->h_next;
//_contours = _contours->v_next;
    cvZero( cnt_img );
    cvDrawContours( cnt_img, _contours, CV_RGB(255,0,0), CV_RGB(0,255,0), _levels);//, 3, CV_AA, cvPoint(0,0) );
    /*_levels:
3,所有外轮廓及包含的内轮廓及里面的内轮廓
2:所有外轮廓及包含的内轮廓
1:所有外轮廓
0,第一个外轮廓
-1:第一个外轮廓及包含的内轮廓
-2:第一个外轮廓及包含的内轮廓及里面的内轮廓


   _contours->h_next:同级的下一个轮廓
_contours->v_next父级下的下层区域;
*/
cvShowImage( "contours", cnt_img );
    cvReleaseImage( &cnt_img );
}

int main( int argc, char** argv )
{
    int i, j;
    CvMemStorage* storage = cvCreateMemStorage(0);
    IplImage* img = cvCreateImage( cvSize(w,w), 8, 1 );

    cvZero( img );

    for( i=0; i < 6; i++ )
    {
        int dx = (i%2)*250 - 30;//0%2=0;
        int dy = (i/2)*150;
        CvScalar white = cvRealScalar(255);
        CvScalar black = cvRealScalar(0);

        if( i == 0 )
        {
            for( j = 0; j <= 10; j++ )
            {
                double angle = (j+5)*CV_PI/21;
                cvLine(img, cvPoint(cvRound(dx+100+j*10-80*cos(angle)),
                    cvRound(dy+100-90*sin(angle))),
                    cvPoint(cvRound(dx+100+j*10-30*cos(angle)),
                    cvRound(dy+100-30*sin(angle))), white, 1, 8, 0);
            }
        }

        cvEllipse( img, cvPoint(dx+150, dy+100), cvSize(100,70), 0, 0, 360, white, -1, 8, 0 );
        cvEllipse( img, cvPoint(dx+115, dy+70), cvSize(30,20), 0, 0, 360, black, -1, 8, 0 );
        cvEllipse( img, cvPoint(dx+185, dy+70), cvSize(30,20), 0, 0, 360, black, -1, 8, 0 );
        cvEllipse( img, cvPoint(dx+115, dy+70), cvSize(15,15), 0, 0, 360, white, -1, 8, 0 );
        cvEllipse( img, cvPoint(dx+185, dy+70), cvSize(15,15), 0, 0, 360, white, -1, 8, 0 );
        cvEllipse( img, cvPoint(dx+115, dy+70), cvSize(5,5), 0, 0, 360, black, -1, 8, 0 );
        cvEllipse( img, cvPoint(dx+185, dy+70), cvSize(5,5), 0, 0, 360, black, -1, 8, 0 );
        cvEllipse( img, cvPoint(dx+150, dy+100), cvSize(10,5), 0, 0, 360, black, -1, 8, 0 );
        cvEllipse( img, cvPoint(dx+150, dy+150), cvSize(40,10), 0, 0, 360, black, -1, 8, 0 );
        cvEllipse( img, cvPoint(dx+27, dy+100), cvSize(20,35), 0, 0, 360, white, -1, 8, 0 );
        cvEllipse( img, cvPoint(dx+273, dy+100), cvSize(20,35), 0, 0, 360, white, -1, 8, 0 );
    }

    cvNamedWindow( "image", 1 );
    cvShowImage( "image", img );

    cvFindContours( img, storage, &contours, sizeof(CvContour),
                    2, CV_CHAIN_APPROX_SIMPLE, cvPoint(0,0) );

    // comment this out if you do not want approximation
    contours = cvApproxPoly( contours, sizeof(CvContour), storage, CV_POLY_APPROX_DP, 3, 1 );
 //cvApproxPoly:                                                 逼近方法     精度 逼近曲线是否封闭


    cvNamedWindow( "contours", 1 );
    cvCreateTrackbar( "levels+3", "contours", &levels, 7, on_trackbar );

    on_trackbar(0);
    cvWaitKey(0);
    cvReleaseMemStorage( &storage );
    cvReleaseImage( &img );

    return 0;
}主要还是理解下int mode=CV_RETR_LIST,int method=CV_CHAIN_APPROX_SIMPLE,CvPoint offset=cvPoint(0,0));
当mode 为CV_RETR_CCOMP 只把图像分为两个层次,顶层和次层,一等级轮廓只匹配与其最接近 ;
cvDrawContours 函数第5个参数为 max_level=0时,笑脸图像会显示第一个找到的轮廓,左边的白色耳朵一只;
max_level=1时,所有白色区域的轮廓都会被显示出来,因为他们都属于等级1;
max_level=2时;每个白色区域里面的黑色区域会被显示出来,可能一个白色区域下面有多个黑色区域,但他们都是同级的;
这里你要注意的的是每个白色区域下的黑色区域,如脸下面有4个黑色区域,白色眼珠下有一个黑色区域,这个黑色区域与脸下的那三个区域时同级的,也就是说他不属于脸的内区域,他是白色眼珠的内区域;
当mode为 CV_RETR_LIST 全部轮廓均为1级


 3570
3570


 被折叠的 条评论
为什么被折叠?
被折叠的 条评论
为什么被折叠?
 到【灌水乐园】发言


