


交叉验证网格搜索
介绍及步骤
交叉验证网格搜索(cross-validation grid search)是一种机器学习模型超参数优化的方法。它结合了网格搜索和交叉验证两种技术,以寻找最佳的模型超参数组合。下面是这种方法的基本步骤:
定义超参数空间:首先,需要确定模型的超参数范围。这些超参数是模型的内部参数,不是通过训练数据直接学习得到的,而是通过调整来优化模型性能的参数。
创建网格:基于这些超参数的范围,创建一个超参数的网格。每个网格点代表一个可能的超参数组合。
交叉验证:对于网格中的每一个超参数组合,使用交叉验证来评估模型的性能。交叉验证是将数据集分成多个子集,然后对每个子集作为测试集,其余作为训练集,重复这个过程多次并计算模型的平均性能。
性能评估:在每次交叉验证后,记录下模型的性能指标,如准确率、F1分数等。
选择最佳组合:在所有交叉验证完成后,选择平均性能最好的超参数组合。
最终模型训练:使用选定的最佳超参数组合在整个训练集上训练最终的模型。
代码实现
import numpy as np
from sklearn import datasets
from sklearn.model_selection import train_test_split, GridSearchCV
from sklearn.preprocessing import StandardScaler
from sklearn.neighbors import KNeighborsClassifier
from sklearn.metrics import classification_report, confusion_matrix
# 加载iris数据集
iris = datasets.load_iris()
X = iris.data
y = iris.target
# 划分数据集为训练集和测试集
X_train, X_test, y_train, y_test = train_test_split(X, y, test_size=0.3, random_state=22)
# 数据标准化
scaler = StandardScaler()
X_train = scaler.fit_transform(X_train)
X_test = scaler.transform(X_test)
# 定义KNN模型
knn = KNeighborsClassifier()
# 定义要搜索的参数网格
param_grid = {
'n_neighbors': range(1, 11),
'weights': ['uniform', 'distance'],
'p': [1, 2]
}
# 创建GridSearchCV对象
grid_search = GridSearchCV(knn, param_grid, cv=5, scoring='accuracy')
# 拟合GridSearchCV对象
grid_search.fit(X_train, y_train)
# 打印最佳参数
print("Best parameters found: ", grid_search.best_params_)
# 使用最佳参数的模型进行预测
best_knn = grid_search.best_estimator_
y_pred = best_knn.predict(X_test)
# 打印分类报告和混淆矩阵
print("Classification report for best model:\n", classification_report(y_test, y_pred))
print("Confusion matrix for best model:\n", confusion_matrix(y_test, y_pred))
C:\ProgramData\anaconda3\python.exe C:\Users\LENOVO\PycharmProjects\pythonProject\5.py
Best parameters found: {'n_neighbors': 6, 'p': 2, 'weights': 'uniform'}
Classification report for best model:
precision recall f1-score support
0 1.00 1.00 1.00 13
1 0.89 1.00 0.94 16
2 1.00 0.88 0.93 16
accuracy 0.96 45
macro avg 0.96 0.96 0.96 45
weighted avg 0.96 0.96 0.96 45
Confusion matrix for best model:
[[13 0 0]
[ 0 16 0]
[ 0 2 14]]
进程已结束,退出代码为 0


import matplotlib.pyplot as plt
from sklearn import datasets
from sklearn.model_selection import train_test_split
from sklearn.preprocessing import StandardScaler
from sklearn.neighbors import KNeighborsClassifier
from sklearn.metrics import classification_report, confusion_matrix
# 加载MNIST数据集
digits = datasets.load_digits()
# 显示一些样本图像
for index, (image, label) in enumerate(zip(digits.images[:4], digits.target[:4])):
plt.subplot(2, 2, index + 1)
plt.axis('off')
plt.imshow(image, cmap=plt.cm.gray_r, interpolation='nearest')
plt.title(f'Label: {label}')
plt.show()
# 划分数据集为训练集和测试集
X_train, X_test, y_train, y_test = train_test_split(digits.data, digits.target, test_size=0.2, random_state=42)
# 数据预处理:标准化特征
scaler = StandardScaler()
X_train = scaler.fit_transform(X_train)
X_test = scaler.transform(X_test)
# 选择K值并创建KNN分类器
k = 3 # 你可以尝试不同的k值来找到最佳性能
knn = KNeighborsClassifier(n_neighbors=k)
# 训练KNN模型
knn.fit(X_train, y_train)
# 在测试集上进行预测
y_pred = knn.predict(X_test)
# 评估模型性能
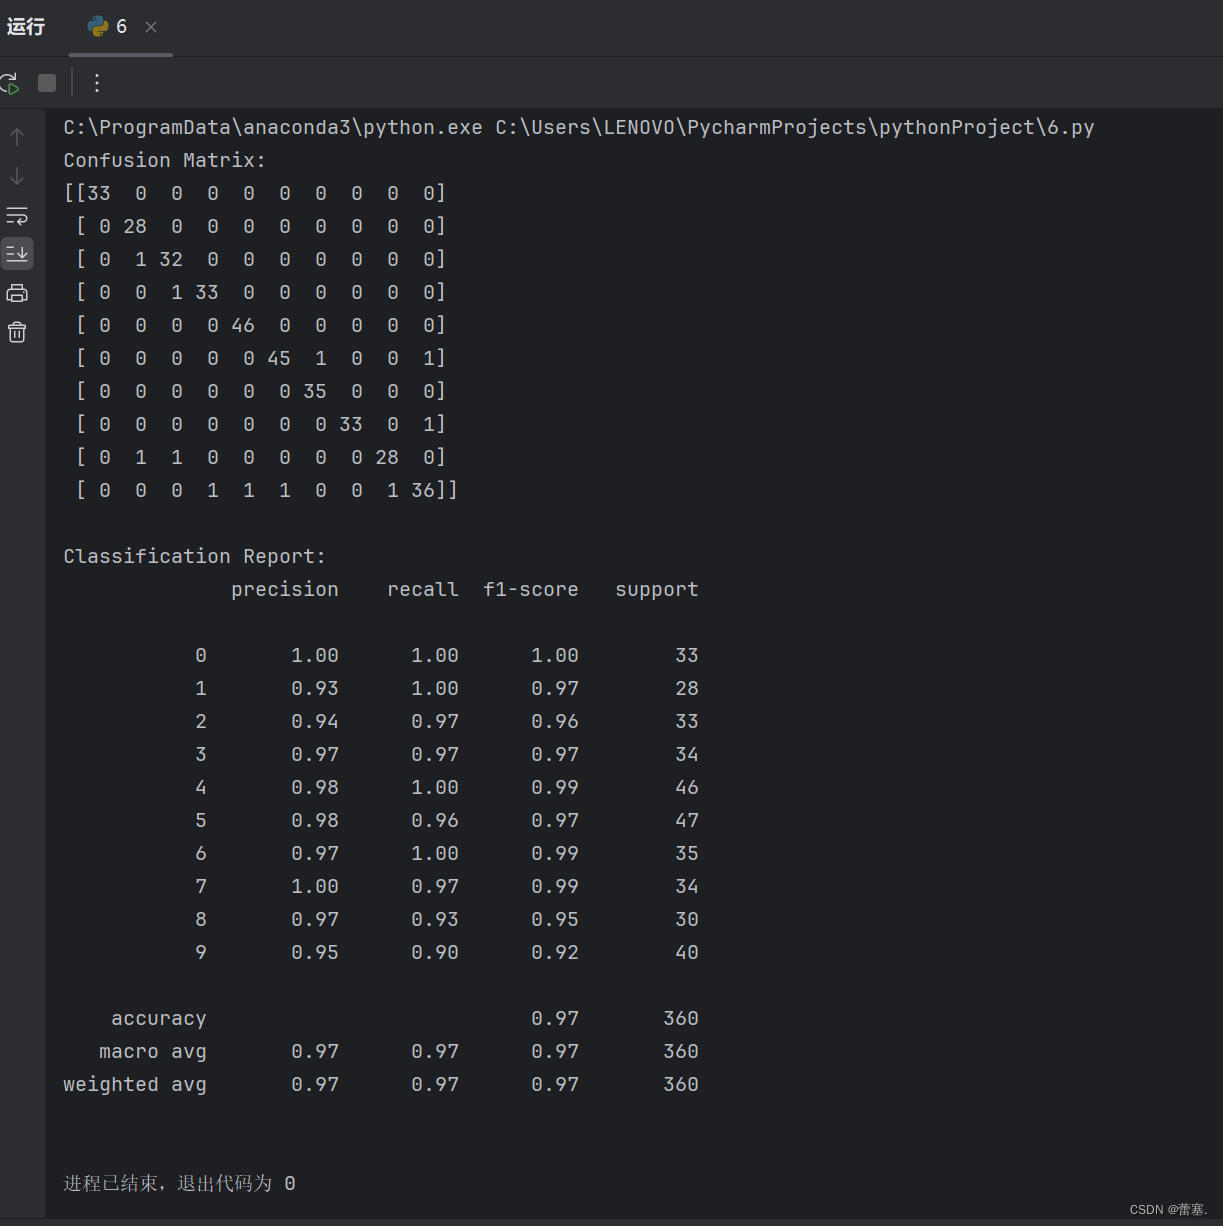
print("Confusion Matrix:")
print(confusion_matrix(y_test, y_pred))
print("\nClassification Report:")
print(classification_report(y_test, y_pred))
# 显示一些预测结果
for index, (image, prediction) in enumerate(zip(digits.images[-4:], y_pred[-4:])):
plt.subplot(2, 2, index + 1)
plt.axis('off')
plt.imshow(image, cmap=plt.cm.gray_r, interpolation='nearest')
plt.title(f'Prediction: {prediction}')
plt.show()
使用KNN算法实现手写体数字识别


 2975
2975

 被折叠的 条评论
为什么被折叠?
被折叠的 条评论
为什么被折叠?
 到【灌水乐园】发言


