


文章目录
引言
在移动互联网时代,Android 设备凭借其广泛的用户群体和强大的功能成为了众多应用的首选平台。其中,GPS 功能在导航、位置追踪、社交互动等各类应用中发挥着不可或缺的作用。Android中定位的方式有许多种,比如GPS定位、Wi-Fi定位、蜂窝网络定位、蓝牙定位、传感器定位、IP地址定位等。深入探究 Android GPS 应用开发,对于提升应用的用户体验、拓展功能边界以及挖掘潜在商业价值具有深远意义。无论是引领出行方向的导航利器,还是激发社交互动活力的位置共享平台,亦或是助力健康管理的运动追踪助手,GPS 技术均发挥着中流砥柱的关键效能。
一、Android GPS 核心 API
1.LocationManager:定位服务的中枢掌控者
LocationManager 作为 Android 定位架构的核心枢纽,担当着统筹定位服务资源的重任。在 Android 应用开发框架中,通过 getSystemService(Context.LOCATION_SERVICE) 这一关键指令,开发者能够在 Activity 或 Service 内顺利建立与系统定位服务的紧密连接,实例化 LocationManager,开启定位服务调用之旅:
LocationManager locationManager = (LocationManager) getSystemService(Context.LOCATION_SERVICE);
此实例化对象仿若一把功能齐备的智能钥匙,解锁一系列定位控制功能。诸如注册与注销 GPS 状态监听器、精准添加与移除临近警告、全面获取定位提供者详情、依条件筛选最优定位源、实时监测定位提供者可用性等功能,均依托此对象高效实现,为构建精准、稳定的定位服务筑基。
2.LocationProvider:定位数据源的精准筛选器
LocationProvider 作为定位技术的关键抽象表征,精准封装定位数据源特质与能力。可借助 LocationManager 丰富方法集,深度探测其属性信息。例如,在开发融合多种定位策略的应用时,可依靠 getAccuracy() 精准判别定位精度,借 getPowerRequirement() 评估功耗特性,凭借 requiresNetwork() 确定网络依赖需求,综合权衡筛选适配场景的理想定位源。在城市导航应用中,当用户穿梭于高楼林立的市区,网络定位(如 network 提供者)可借基站与 Wi-Fi 信号快速定位;一旦进入开阔郊外,GPS 定位(gps 提供者)则凭借其高精度优势精准领航,确保全程精准定位导航服务无缝切换、稳定流畅。
3.Criteria:定位策略的智慧定制框架
Criteria 类恰似一座灵活定制的定位策略配置工厂,依应用场景多元需求,精准雕琢定位参数模型。于追求极致精准的测绘应用而言,可构建如下 Criteria 实例:
Criteria criteria = new Criteria();
criteria.setAccuracy(Criteria.ACCURACY_FINE); // 高精度定位需求
criteria.setPowerRequirement(Criteria.POWER_HIGH); // 允许高功耗以保障精度
criteria.setAltitudeRequired(true); // 必须提供海拔高度信息
criteria.setBearingRequired(true); // 需支持方向信息
criteria.setSpeedRequired(true); // 要求具备速度信息获取能力
随后,将此定制 Criteria 传入 LocationManager 的 getBestProvider() 方法,系统即智能筛选契合度最佳的定位提供者,为高精度定位任务精准匹配 GPS 定位源;反之,在电量敏感的位置追踪应用中,调低精度与功耗要求,可使网络定位提供者脱颖而出,在保障基础定位功能的同时,有效延长设备续航时长,达成性能与功耗的精妙平衡。
4.GPS 开启与权限适配:合规高效定位的基石保障
在 Android 权限管理体系中,精准定位权限是激活 GPS 功能的核心通行证。自 Android 6.0 引入动态权限机制起,应用获取定位权限流程更趋严谨规范。以地图导航应用为例,启动导航瞬间,需精准探测权限授予状态:
if (ContextCompat.checkSelfPermission(this, Manifest.permission.ACCESS_FINE_LOCATION)!= PackageManager.PERMISSION_GRANTED) {
    ActivityCompat.requestPermissions(this, new String[]{Manifest.permission.ACCESS_FINE_LOCATION}, REQUEST_LOCATION_PERMISSION);
} else {
    // 权限已赋予,激活 GPS 定位逻辑,开启位置更新监听
    locationManager.requestLocationUpdates(LocationManager.GPS_PROVIDER, 5000, 10, locationListener);
}
若权限缺失,应及时发起权限申请,引导用户授权;同时妥善处理权限拒绝情形,借友好提示与清晰指引协助用户至系统设置手动授权,确保应用于合规框架内稳健实现 GPS 功能价值最大化,稳固用户信任基石。
二、获取LocationProvider的示例
实现效果图:
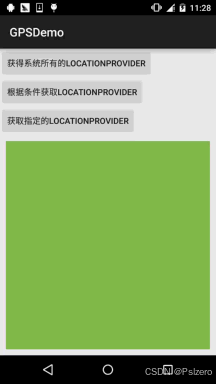
由图可见,当前可用的LocationProvider三个分别是:
passive:被动提供(由其他程序提供)、gps:通过GPS获取定位信息、network:通过网络获取定位信息
实现代码:
布局文件:activity_main.xml:
<LinearLayout xmlns:android="http://schemas.android.com/apk/res/android"
    android:layout_width="match_parent"
    android:layout_height="match_parent"
    android:orientation="vertical">
    <Button
        android:id="@+id/btn_one"
        android:layout_width="wrap_content"
        android:layout_height="wrap_content"
        android:text="获得系统所有的LocationProvider" />
    <Button
        android:id="@+id/btn_two"
        android:layout_width="wrap_content"
        android:layout_height="wrap_content"
        android:text="根据条件获取LocationProvider" />
    <Button
        android:id="@+id/btn_three"
        android:layout_width="wrap_content"
        android:layout_height="wrap_content"
        android:text="获取指定的LocationProvider" />
    <TextView
        android:id="@+id/tv_result"
        android:layout_width="match_parent"
        android:layout_height="match_parent"
        android:layout_margin="10dp"
        android:background="#81BB4D"
        android:padding="5dp"
        android:textColor="#FFFFFF"
        android:textSize="20sp"
        android:textStyle="bold" />
</LinearLayout>
MainActivity.java:
public class MainActivity extends AppCompatActivity implements View.OnClickListener {
    private Button btn_one;
    private Button btn_two;
    private Button btn_three;
    private TextView tv_result;
    private LocationManager lm;
    private List<String> pNames = new ArrayList<String>(); // 存放LocationProvider名称的集合
    @Override
    protected void onCreate(Bundle savedInstanceState) {
        super.onCreate(savedInstanceState);
        setContentView(R.layout.activity_main);
        lm = (LocationManager) getSystemService(Context.LOCATION_SERVICE);
        bindViews();
    }
    private void bindViews() {
        btn_one = (Button) findViewById(R.id.btn_one);
        btn_two = (Button) findViewById(R.id.btn_two);
        btn_three = (Button) findViewById(R.id.btn_three);
        tv_result = (TextView) findViewById(R.id.tv_result);
        btn_one.setOnClickListener(this);
        btn_two.setOnClickListener(this);
        btn_three.setOnClickListener(this);
    }
    @Override
    public void onClick(View v) {
        switch (v.getId()) {
            case R.id.btn_one:
                pNames.clear();
                pNames = lm.getAllProviders();
                tv_result.setText(getProvider());
                break;
            case R.id.btn_two:
                pNames.clear();
                Criteria criteria = new Criteria();
                criteria.setCostAllowed(false);   //免费
                criteria.setAltitudeRequired(true);  //能够提供高度信息
                criteria.setBearingRequired(true);   //能够提供方向信息
                pNames = lm.getProviders(criteria, true);
                tv_result.setText(getProvider());
                break;
            case R.id.btn_three:
                pNames.clear();
                pNames.add(lm.getProvider(LocationManager.GPS_PROVIDER).getName()); //指定名称
                tv_result.setText(getProvider());
                break;
        }
    }
    //遍历数组返回字符串的方法
    private String getProvider(){
        StringBuilder sb = new StringBuilder();
        for (String s : pNames) {
            sb.append(s + "\n");
        }
        return sb.toString();
    }
}
三、判断GPS是否打开以及打开GPS的方式和动态获取位置信息的示例代码
布局 XML 文件(activity_gps.xml)
<?xml version="1.0" encoding="utf-8"?>
<LinearLayout xmlns:android="http://schemas.android.com/apk/res/android"
    android:layout_width="match_parent"
    android:layout_height="match_parent"
    android:orientation="vertical">

    <Button
        android:id="@+id/btn_check_gps_status"
        android:layout_width="wrap_content"
        android:layout_height="wrap_content"
        android:text="检查 GPS 状态" />

    <Button
        android:id="@+id/btn_open_gps_settings"
        android:layout_width="wrap_content"
        android:layout_height="wrap_content"
        android:text="打开 GPS 设置" />

    <Button
        android:id="@+id/btn_open_gps_force"
        android:layout_width="wrap_content"
        android:layout_height="wrap_content"
        android:text="强制打开 GPS(部分系统有效)" />

    <Button
        android:id="@+id/btn_get_location"
        android:layout_width="wrap_content"
        android:layout_height="wrap_content"
        android:text="获取位置信息" />

    <TextView
        android:id="@+id/tv_gps_status_result"
        android:layout_width="match_parent"
        android:layout_height="wrap_content"
        android:text="GPS 状态:未检测"
        android:textSize="16sp" />

    <TextView
        android:id="@+id/tv_location_info"
        android:layout_width="match_parent"
        android:layout_height="wrap_content"
        android:text="位置信息:未获取"
        android:textSize="16sp" />
</LinearLayout>
GPSActivity.java
import androidx.appcompat.app.AppCompatActivity;
import androidx.core.app.ActivityCompat;
import androidx.core.content.ContextCompat;

import android.Manifest;
import android.content.Context;
import android.content.Intent;
import android.location.Criteria;
import android.location.Location;
import android.location.LocationListener;
import android.location.LocationManager;
import android.net.Uri;
import android.os.Bundle;
import android.provider.Settings;
import android.view.View;
import android.widget.Button;
import android.widget.TextView;

import java.util.List;

public class GPSActivity extends AppCompatActivity implements View.OnClickListener, LocationListener {

    private Button btnCheckGpsStatus;
    private Button btnOpenGpsSettings;
    private Button btnOpenGpsForce;
    private Button btnGetLocation;
    private TextView tvGpsStatusResult;
    private TextView tvLocationInfo;
    private LocationManager locationManager;
    private static final int REQUEST_LOCATION_PERMISSION = 1;

    @Override
    protected void onCreate(Bundle savedInstanceState) {
        super.onCreate(savedInstanceState);
        setContentView(R.layout.activity_gps);

        // 初始化视图
        btnCheckGpsStatus = findViewById(R.id.btn_check_gps_status);
        btnOpenGpsSettings = findViewById(R.id.btn_open_gps_settings);
        btnOpenGpsForce = findViewById(R.id.btn_open_gps_force);
        btnGetLocation = findViewById(R.id.btn_get_location);
        tvGpsStatusResult = findViewById(R.id.tv_gps_status_result);
        tvLocationInfo = findViewById(R.id.tv_location_info);

        // 设置点击事件监听器
        btnCheckGpsStatus.setOnClickListener(this);
        btnOpenGpsSettings.setOnClickListener(this);
        btnOpenGpsForce.setOnClickListener(this);
        btnGetLocation.setOnClickListener(this);

        // 获取 LocationManager 实例
        locationManager = (LocationManager) getSystemService(Context.LOCATION_SERVICE);

        // 检查并请求定位权限
        if (ContextCompat.checkSelfPermission(this, Manifest.permission.ACCESS_FINE_LOCATION)!= PackageManager.PERMISSION_GRANTED) {
            ActivityCompat.requestPermissions(this, new String[]{Manifest.permission.ACCESS_FINE_LOCATION}, REQUEST_LOCATION_PERMISSION);
        }
    }

    @Override
    public void onClick(View v) {
        switch (v.getId()) {
            case R.id.btn_check_gps_status:
                checkGpsStatus();
                break;
            case R.id.btn_open_gps_settings:
                openGpsSettings();
                break;
            case R.id.btn_open_gps_force:
                openGpsForce();
                break;
            case R.id.btn_get_location:
                getLocationInfo();
                break;
        }
    }

    // 检查 GPS 是否打开
    private void checkGpsStatus() {
        boolean isGpsEnabled = locationManager.isProviderEnabled(LocationManager.GPS_PROVIDER);
        if (isGpsEnabled) {
            tvGpsStatusResult.setText("GPS 状态:已打开");
        } else {
            tvGpsStatusResult.setText("GPS 状态:未打开");
        }
    }

    // 打开 GPS 设置页面
    private void openGpsSettings() {
        Intent intent = new Intent(Settings.ACTION_LOCATION_SOURCE_SETTINGS);
        startActivity(intent);
    }

    // 强制打开 GPS(部分系统有效)
    private void openGpsForce() {
        try {
            Intent gpsIntent = new Intent();
            gpsIntent.setClassName("com.android.settings", "com.android.settings.widget.SettingsAppWidgetProvider");
            gpsIntent.addCategory("android.intent.category.ALTERNATIVE");
            gpsIntent.setData(Uri.parse("custom:3"));
            PendingIntent.getBroadcast(this, 0, gpsIntent, 0).send();
        } catch (Exception e) {
            e.printStackTrace();
        }
    }

    // 动态获取位置信息
    private void getLocationInfo() {
        if (ContextCompat.checkSelfPermission(this, Manifest.permission.ACCESS_FINE_LOCATION) == PackageManager.PERMISSION_GRANTED) {
            Criteria criteria = new Criteria();
            criteria.setAccuracy(Criteria.ACCURACY_FINE);
            String bestProvider = locationManager.getBestProvider(criteria, true);
            if (bestProvider!= null) {
                locationManager.requestLocationUpdates(bestProvider, 5000, 10, this);
            } else {
                tvLocationInfo.setText("无法获取位置信息:无可用定位提供者");
            }
        } else {
            ActivityCompat.requestPermissions(this, new String[]{Manifest.permission.ACCESS_FINE_LOCATION}, REQUEST_LOCATION_PERMISSION);
        }
    }

    @Override
    public void onLocationChanged(Location location) {
        double latitude = location.getLatitude();
        double longitude = location.getLongitude();
        tvLocationInfo.setText("位置信息:纬度 " + latitude + ",经度 " + longitude);
    }

    @Override
    public void onStatusChanged(String provider, int status, Bundle extras) {
    }

    @Override
    public void onProviderEnabled(String provider) {
    }

    @Override
    public void onProviderDisabled(String provider) {
    }
}
四、临近警告:智能交互触发的核心机制与实践应用
1.ProximityAlert 原理解构
ProximityAlert 功能恰似一位智能位置感知精灵,依托设备实时位置与预设兴趣点(POI)间的动态距离监测,当用户趋近或背离特定 POI 时,迅速触发广播 Intent,为个性化位置感知交互应用(如旅游景区智能导览、商圈精准营销推送)筑牢技术根基。其核心原理在于依据设定的 POI 坐标与触发半径构建虚拟地理围栏,设备位置一旦跨越围栏边界,系统即刻响应,激活预定义广播接收器,驱动个性化提醒功能高效执行。
2示例代码
ProximityActivity.java:
public class ProximityActivity extends AppCompatActivity {
    private LocationManager lm;
    @Override
    public void onCreate(Bundle savedInstanceState) {
        super.onCreate(savedInstanceState);
        setContentView(R.layout.activity_proximity);
        lm = (LocationManager) getSystemService(Context.LOCATION_SERVICE);
        //定义固定点的经纬度
        double longitude = 113.56843;
        double latitude = 22.374937;
        float radius = 10;     //定义半径,米
        Intent intent = new Intent(this, ProximityReceiver.class);
        PendingIntent pi = PendingIntent.getBroadcast(this, -1, intent, 0);
        lm.addProximityAlert(latitude, longitude, radius, -1, pi);
    }
}
ProximityReceiver.java
public class ProximityReceiver extends BroadcastReceiver{
    @Override
    public void onReceive(Context context, Intent intent) {
        boolean isEnter = intent.getBooleanExtra( LocationManager.KEY_PROXIMITY_ENTERING, false);
        if(isEnter) Toast.makeText(context, "你已到健身房附近", Toast.LENGTH_LONG).show();
        else Toast.makeText(context, "你已离开健身房附近", Toast.LENGTH_LONG).show();
    }
}
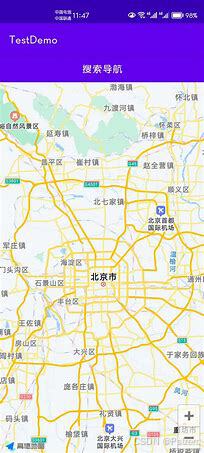
五、Android GPS 拓展疆域:地图定位与导航的创新融合
1.地图 SDK 选型智慧抉择
在 Android 地图开发领域,Google Maps SDK 与高德地图 SDK 凭借卓越性能与丰富功能,成为开发者青睐的双雄。Google Maps 以其全球地理数据深度覆盖、领先街景服务体验与强大国际市场适配性独树一帜;高德地图则深耕本土市场,凭借对国内地理信息细节雕琢、实时路况精准洞察与海量 POI 深度挖掘能力,铸就精准导航优势。开发者应紧扣应用市场定位、功能侧重与用户群体特质,精准抉择适配 SDK。如国际旅行导航应用,倚重 Google Maps 全球资源无缝对接;本地生活服务平台,则凭借高德地图本土洞察能力,为用户呈上精准、贴心的位置服务体验,深度触达用户需求核心,激发应用价值潜能。
安卓中应用GPS地图定位与导航的示例图:
.
2.高德地图 SDK 集成实例精解
2.1 环境搭建与配置
于项目 Gradle 配置文件精准植入高德地图 SDK 依赖:
implementation 'com.amap.api:map3d:最新版本号'
并在 AndroidManifest.xml 核心配置文件妥善配置 API 密钥:
<meta-data android:name="com.amap.api.v2.apikey" android:value="申请密钥"/>
2.2地图视图嵌入与生命周期管理
在布局 XML 文件嵌入地图视图:
<com.amap.api.maps.MapView
    android:id="@+id/mapView"
    android:layout_width="match_parent"
    android:layout_height="match_parent"/>
在承载地图的 Activity 类中,精心管理地图视图生命周期。在 onCreate() 方法内初始化地图视图:
public class MapActivity extends AppCompatActivity {
    private MapView mapView;
    private AMap aMap;

    @Override
    protected void onCreate(Bundle savedInstanceState) {
        super.onCreate(savedInstanceState);
        setContentView(R.layout.activity_map);
        mapView = findViewById(R.id.mapView);
        mapView.onCreate(savedInstanceState);
        if (aMap == null) {
            aMap = mapView.getMap();
            // 初始化地图缩放级别、中心坐标等关键属性
            aMap.moveCamera(CameraUpdateFactory.zoomTo(15));
            aMap.moveCamera(CameraUpdateFactory.changeLatLng(new LatLng(默认纬度, 默认经度)));
        }
    }
并在 onResume()、onPause()、onDestroy() 等方法中精准调用对应生命周期方法,确保地图在应用运行全程稳定、流畅渲染与交互:
    @Override
    protected void onResume() {
        super.onResume();
        mapView.onResume();
    }

    @Override
    protected void onPause() {
        super.onPause();
        mapView.onPause();
    }

    @Override
    protected void onDestroy() {
        super.onDestroy();
        mapView.onDestroy();
    }
}
3.导航与路径规划基本框架示例
借高德地图 SDK 强大导航 API 套件,开发者可轻松构建智能导航路径规划引擎。以下述驾车导航场景为例:
RouteSearch routeSearch = new RouteSearch(this);
RouteSearch.DrivingRouteQuery query = new RouteSearch.DrivingRouteQuery(from, to, null, null, "");
routeSearch.calculateDrivingRoute(query, new RouteSearch.OnRouteSearchListener() {
    @Override
    public void onBusRouteSearched(BusRouteResult busRouteResult, int i) {
    }

    @Override
    public void onDriveRouteSearched(DrivingRouteResult drivingRouteResult, int i) {
        if (i == 1000) {
            if (drivingRouteResult!= null && drivingRouteResult.getPaths()!= null && drivingRouteResult.getPaths().size() > 0) {
                DrivingRoutePath path = drivingRouteResult.getPaths().get(0);
                // 深度剖析路径详情,精准绘制导航路线、生成转向指引、精准预估行程时间
                List<DrivingStep> steps = path.getSteps();
                for (DrivingStep step : steps) {
                    // 精细化处理各导航节点,绘制转向箭头、语音播报指令
                    String instruction = step.getInstruction();
                    LatLng nextStepLatLng = step.getPolyline().get(0);
                    // 于地图精准绘制导航路径与转向标识,构建沉浸式导航交互体验
                    drawRouteAndArrowOnMap(path.getPolyline(), nextStepLatLng, instruction);
                }
            }
        }
    }

    @Override
    public void onWalkRouteSearched(WalkRouteResult walkRouteResult, int i) {
    }
});
此示例代码构建驾车导航查询任务,无缝接收路径规划结果并深度解构路径信息,于地图精准渲染导航路线、实时更新转向提示、精确计算预计到达时间,为交通出行、物流配送、户外探险等多元领域定制流畅、智能导航体验,提升运输效率、优化行程规划。
六、总结与未来展望
本文深入探讨了Android设备中GPS定位的多种方式及其应用开发的核心API。通过详细介绍LocationManager、LocationProvider、Criteria等关键组件,我们展示了如何实现精确、稳定的定位服务。同时,文章还涵盖了权限适配、动态权限请求、获取位置信息、临近警告机制以及地图定位与导航的创新融合等多个方面,为开发者提供了一套全面的GPS应用开发指南。
安卓GPS 应用开发领域持续拓展,从核心 API 深度运用到拓展功能创新突破,机遇与挑战并存。开发者当以创新为楫、以用户体验为帆,深耕技术优化与功能拓展。展望未来,伴随 5G、物联网、人工智能等前沿技术深度融合,Android GPS 技术将深度赋能智能交通(车联网自动驾驶协同定位决策)、智慧物流(全链路货物精准追踪调度优化)、增强现实(AR 实景导航交互与虚拟地理信息融合)等多元领域,解锁无尽潜能,重塑智能互联时代位置服务新生态,引领移动应用体验跃向新高度。
作者:彭淞林
原文链接:https://blog.csdn.net/weixin_74812486/article/details/144571322?spm=1001.2014.3001.5501


 2158
2158

 被折叠的 条评论
为什么被折叠?
被折叠的 条评论
为什么被折叠?
 到【灌水乐园】发言


