


参照《21个项目玩转深度学习》第4章实现的,Deep Dream是google公司在2015年公布的一项有趣技术,通过读取训练模型中某一层的结果值,添加噪声而得到一张结果图,deep Dream可以很好的帮助我们理解卷积层输出的结果。
1.生成原始的Deep Dream图像
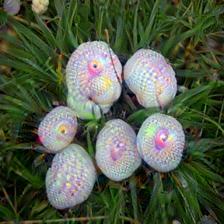
读取inception模型中名字为“mixed4d_3x3_bottleneck_pre_relu”卷积层的第139通道的结果。
import scipy
import tensorflow as tf
import numpy as np

graph = tf.Graph()
sess = tf.InteractiveSession(graph=graph)

model_fn = 'tensorflow_inception_graph.pb'
with tf.gfile.FastGFile(model_fn,'rb') as f:
    graph_def = tf.GraphDef()
    graph_def.ParseFromString(f.read())

t_input = tf.placeholder(tf.float32,name='input')
imagenet_mean = 117.0

t_preprocessed = tf.expand_dims(t_input-imagenet_mean,0)
tf.import_graph_def(graph_def,{'input':t_preprocessed})

layers = [op.name for op in graph.get_operations() if op.type == 'Conv2D' and 'import/' in op.name]
print('Number of layers', len(layers))

def savearray(img_array,img_name):
    scipy.misc.toimage(img_array).save(img_name)
    print('img saved: %s' %img_name )

#渲染函数
def render_naive(t_obj,img0,iter_n=20,step=1.0):
    t_score = tf.reduce_mean(t_obj)
    #计算t_score 对t_input的梯度
    t_grad = tf.gradients(t_score,t_input)[0]

    #创建新图
    img = img0.copy()
    for i in range(iter_n):
        #在sess中计算梯度,以及当前的score
        g,score = sess.run([t_grad,t_score],{t_input:img})
        #对img应用梯度,step可以看做“学习率”
        g /= g.std() + 1e-8
        img += g*step
        print('score(mean)=%f' % (score))
    #保存图片
    savearray(img,'naive.jpg')

if __name__ == '__main__':
    #定义卷积层、通道数,并取出对应的Tensor
    name = 'mixed4d_3x3_bottleneck_pre_relu'
    channel = 139
    layer_output = graph.get_tensor_by_name('import/%s:0' % name)

    #定义原始的图像噪声
    img_noise = np.random.uniform(size=(224,224,3)) + 100.0
    #调用render_naive 函数渲染
    render_naive(layer_output[:,:,:,channel],img_noise,iter_n=20)
结果:

2.生成更大尺寸的Deep Dream图像
import tensorflow as tf
import numpy as np
import scipy

#生成更大尺寸的Deep Dream图像
graph = tf.Graph()
sess = tf.InteractiveSession(graph=graph)


model_fn = 'tensorflow_inception_graph.pb'
with tf.gfile.FastGFile(model_fn,'rb') as f:
    graph_def = tf.GraphDef()
    graph_def.ParseFromString(f.read())

t_input = tf.placeholder(tf.float32,name='input')
imagenet_mean = 117.0
t_preprocessed = tf.expand_dims(t_input-imagenet_mean,0)
tf.import_graph_def(graph_def,{'input':t_preprocessed})

def savearray(img_array,img_name):
    scipy.misc.toimage(img_array).save(img_name)
    print('img saved: %s' % img_name)

def calc_grad_tiled(img,t_grad,tile_size=512):
    #每次只对tile_sizextile_size大小的图像计算梯度,避免内存问题
    sz = tile_size
    h,w = img.shape[:2]
    #img_shift:先在行上做整数移动,再在列上做整数移动
    #防止在tile的边缘产生边缘效应
    sx,sy = np.random.randint(sz,size=2)
    img_shift = np.roll(np.roll(img,sx,1),sy,0)
    grad = np.zeros_like(img)
    #y,x 是开始位置的像素
    for y in range(0,max(h-sz//2,sz),sz):
        for x in range(0,max(w-sz//2,sz),sz):
            #每次对sub计算梯度,sub的大小是tile_sizextile_size
            sub = img_shift[y:y+sz,x:x+sz]
            g = sess.run(t_grad,{t_input:sub})
            grad[y:y+sz,x:x+sz] = g
    #使用np.roll移动回去
    return np.roll(np.roll(grad,-sx,1),sy,0)

def resize_ratio(img,ratio):
    min = img.min()
    max = img.max()
    img = (img-min)/(max-min) * 255
    img = np.float32(scipy.misc.imresize(img,ratio))
    img = img/255*(max-min) + min
    return img

def render_multiscale(t_obj,img0,iter_n=10,step=1.0,octave_n=3,octave_scale=1.4):
    #定义目标和梯度
    t_score = tf.reduce_mean(t_obj)
    t_grad = tf.gradients(t_score,t_input)[0]

    img = img0.copy()
    for octave in range(octave_n):
        if octave>0:
            #每次将图片放大octave_scale倍
            #共放大octave_n-1次
            img = resize_ratio(img,octave_scale)
        for i in range(iter_n):
            #调用calc_grad_tiled计算任意大小图像的梯度
            g = calc_grad_tiled(img,t_grad)
            g /= g.std() + 1e-8
            img += g*step
            print(".",end='')
    savearray(img,'multiscale.jpg')

if __name__ == '__main__':
    name = 'mixed4d_3x3_bottleneck_pre_relu'
    channel = 139
    img_noise = np.random.uniform(size=(224,224,3))+100.0
    layer_output = graph.get_tensor_by_name("import/%s:0" % name)
    render_multiscale(layer_output[:,:,:,channel],img_noise,iter_n=20)
结果:

3.多尺度拉普拉斯变换生成高质量的Deep Dream图像
融合多尺度信息得到高质量的结果图
import tensorflow as tf
import numpy as np
import scipy
from  functools import partial


k = np.float32([1,4,6,4,1])
k = np.outer(k, k)
k5x5 = k[:,:,None,None]/k.sum()*np.eye(3, dtype=np.float32)

graph = tf.Graph()
sess = tf.InteractiveSession(graph=graph)

#tensorflow_inception_graph.pb 文件中,即存储了inception的网络结构,也存储了对应的数据
#使用小面的语句将之导入
model_fn = 'tensorflow_inception_graph.pb'
with tf.gfile.FastGFile(model_fn,'rb') as f:
    graph_def = tf.GraphDef()
    graph_def.ParseFromString(f.read())
#定义t_input为输入图片
t_input = tf.placeholder(np.float32,name='input')
imagenet_mean = 117.0
#输入图像需要经过处理才能送入网络中
#expand_dims是加一维,从[height,width,channel] 变成[1,height,width,channel]
#t_input-imagenet_mean 是减去一个均值
t_preprocessed = tf.expand_dims(t_input-imagenet_mean,0)
tf.import_graph_def(graph_def,{'input':t_preprocessed})

layers = [op.name for op in graph.get_operations() if op.type == 'Conv2D' and 'import/' in op.name]
feature_nums = [int(graph.get_tensor_by_name(name + ':0').get_shape()[-1]) for name in layers]

print('Number of layers', len(layers))
print('Total number of feature channels:', sum(feature_nums))


#这个函数将图像分为低频和高频成分
def lap_split(img):
    with tf.name_scope('split'):
        #做过一次卷积相当于一次“平滑”,因此lo为低频成分
        lo = tf.nn.conv2d(img, k5x5, [1,2,2,1], 'SAME')
        #低频成分缩放到原始图像一样大小得到lo2,再用原始图像img减去lo2,就得到高频成分hi
        lo2 = tf.nn.conv2d_transpose(lo, k5x5 * 4, tf.shape(img), [1, 2, 2, 1])
        hi = img - lo2
    return lo, hi

#这个函数将图像img分成n层拉普拉斯金字塔
def lap_split_n(img,n):
    levels = []
    for i in range(n):
        #调用lap_split将图像分为低频和高频部分
        #高频部分保存到levels中
        #低频部分再继续分解
        img,hi = lap_split(img)
        levels.append(hi)
    levels.append(img)
    return  levels[::-1]

#将拉普拉斯金字塔还原到原始图像
def lap_merge(levels):
    img = levels[0]
    for hi in levels[1:]:
        with tf.name_scope('merge'):
            img = tf.nn.conv2d_transpose(img, k5x5 * 4, tf.shape(hi), [1, 2, 2, 1]) + hi
    return img

#对img做标准化
def normalize_std(img,eps=1e-10):
    with tf.name_scope('normalize'):
        std = tf.sqrt(tf.reduce_mean(tf.square(img)))
        return img / tf.maximum(std,eps)

#拉普拉斯金字塔标准化
def lap_normalize(img,scale_n=4):
    img = tf.expand_dims(img,0)
    tlevels = lap_split_n(img,scale_n)
    #每一层都做一次normalize_std
    tlevels = list(map(normalize_std,tlevels))
    out = lap_merge(tlevels)
    return out[0,:,:,:]

def tffunc(*argtypes):
    placeholders = list(map(tf.placeholder,argtypes))
    def wrap(f):
        out = f(*placeholders)
        def wrapper(*args,**kw):
            return out.eval(dict(zip(placeholders,args)),session=kw.get('session'))
        return wrapper
    return wrap

def resize_ratio(img,ratio):
    min = img.min()
    max = img.max()
    img = (img-min)/(max-min)*255
    img = np.float32(scipy.misc.imresize(img,ratio))
    img = img/255*(max-min) + min
    return img

def cal_grad_tiled(img,t_grad,tile_size=512):
    #每次只对tile_size*tile_size大小的图像计算梯度,避免内存问题
    sz = tile_size
    h,w = img.shape[:2]
    #img_shift:先在行上做整体移动,再在列上做整体移动
    #防止在tile的边缘产生边缘效应
    sx,sy = np.random.randint(sz,size=2)
    img_shift = np.roll(np.roll(img,sx,1),sy,0)
    grad = np.zeros_like(img)
    #y,x是开始位置的像素
    for y in range(0,max(h-sz//2, sz),sz):
        for x in range(0,max(w-sz//2,sz),sz):
            #每次对sub计算梯度,sub的大小是title_size*title_size
            sub = img_shift[y:y+sz,x:x+sz]
            g = sess.run(t_grad,{t_input:sub})
            grad[y:y+sz,x:x+sz] = g
    #使用np.roll移动回去
    return np.roll(np.roll(grad,-sx,1),-sy,0)

def savearray(img_array,img_name):
    scipy.misc.toimage(img_array).save(img_name)
    print('img saved: %s' % img_name)

def render_lapnorm(t_obj,img0,iter_n=10,step=1.0,octave_n=3,octave_scale=1.4,lap_n=4):
    #同样定义目标和梯度
    t_score = tf.reduce_mean(t_obj)
    t_grad = tf.gradients(t_score,t_input)[0]
    #将lap_normalize转换为正常函数
    lap_norm_func = tffunc(np.float32)(partial(lap_normalize,scale_n=lap_n))
    img = img0.copy()
    for octave in range(octave_n):
        if octave>0:
            img = resize_ratio(img,octave_scale)
        for i in range(iter_n):
            g = cal_grad_tiled(img,t_grad)
            #唯一的区别在于使用lap_norm_func将g标准化
            g = lap_norm_func(g)
            img += g*step
            print(".",end='')
    savearray(img,'lapnorm.jpg')


if __name__ == '__main__':
    name = 'mixed4d_3x3_bottleneck_pre_relu'
    channel = 139
    img_noise = np.random.uniform(size=(224,224,3))+100.0
    layer_output = graph.get_tensor_by_name("import/%s:0" % name)
    render_lapnorm(layer_output[:,:,:,channel],img_noise,iter_n=20)
结果图:

4.最终的Deep Dream图像
融合自己的图片做背景。
from  __future__ import print_function
import numpy as np
import tensorflow as tf
import scipy
import PIL

#创建图和会话
graph = tf.Graph()
sess = tf.InteractiveSession(graph=graph)

#tensorflow_inception_graph.pb文件中,既存储了inception的网络结构,也存储了对应的数据
#使用下面的语句将其导入
model_fn = 'tensorflow_inception_graph.pb'
with tf.gfile.FastGFile(model_fn,'rb') as f:
    graph_def = tf.GraphDef()
    graph_def.ParseFromString(f.read())
#定义t_input为输入的图像
t_input = tf.placeholder(np.float32,name='input')
imagenet_mean = 117.0
#expand_dims是加1维,从[height,width,channel]变成[1,height,width,channel]
#t_input-imagenet_mean 是减去一个均值
t_preprocessed = tf.expand_dims(t_input-imagenet_mean,0)
tf.import_graph_def(graph_def,{'input':t_preprocessed})

#找到所有卷积层
layers = [op.name for op in graph.get_operations() if op.type == 'Conv2D' and 'import/' in op.name]

#输出卷积层层数
print('Number of layers', len(layers))

def savearray(img_array,img_name):
    scipy.misc.toimage(img_array).save(img_name)
    print('img saved: %s' % img_name)

def render_naive(t_obj,img0,iter_n=20,step=1.0):
    #t_score是优化目标,它是t_obj的平均值
    #结合调用处看,实际上就是layer_output[:,:,:,channel]的平均值
    t_sore = tf.reduce_mean(t_obj)
    #计算t_score对t_input的梯度
    t_grad = tf.gradients(t_sore,t_input)[0]

    #创建新图
    img = img0.copy()
    for i in range(iter_n):
        #在sess中计算梯度,以及当前的scor
        g,score = sess.run([t_grad,t_sore],{t_input:img})
        #对img应用梯度,step可以看作学习率
        g /= g.std() + 1e-8
        img += g*step
        print('score(mean)=%f' % (score))
    #保存图片
    savearray(img,'naive.jpg')

def cal_grad_tiled(img,t_grad,tile_size=512):
    #每次只对tile_size*tile_size大小的图像计算梯度,避免内存问题
    sz = tile_size
    h,w = img.shape[:2]
    #img_shift:先在行上做整体移动,再在列上做整体移动
    #防止在tile的边缘产生边缘效应
    sx,sy = np.random.randint(sz,size=2)
    img_shift = np.roll(np.roll(img,sx,1),sy,0)
    grad = np.zeros_like(img)
    #y,x是开始位置的像素
    for y in range(0,max(h-sz//2, sz),sz):
        for x in range(0,max(w-sz//2,sz),sz):
            #每次对sub计算梯度,sub的大小是title_size*title_size
            sub = img_shift[y:y+sz,x:x+sz]
            g = sess.run(t_grad,{t_input:sub})
            grad[y:y+sz,x:x+sz] = g
    #使用np.roll移动回去
    return np.roll(np.roll(grad,-sx,1),-sy,0)

def resize_ratio(img,ratio):
    min = img.min()
    max = img.max()
    img = (img-min)/(max-min)*255
    img = np.float32(scipy.misc.imresize(img,ratio))
    img = img/255*(max-min) + min
    return img

def render_multiscale(t_obj,img0,iter_n=10,step=1.0,octave_n=3,octave_scale=1.4):
    #同样定义目标和梯度
    t_score = tf.reduce_mean(t_obj)
    t_grad = tf.gradients(t_score,t_input)[0]

    img = img0.copy()
    for octave in range(octave_n):
        if octave>0:
            #每次将图片放大octave_scale倍
            #共放大octave_n-1 次
            img = resize_ratio(img,octave_scale)
        for i in range(iter_n):
            #调用calc_grad_titled计算任意大小图像的梯度
            g = cal_grad_tiled(img,t_grad)
            g /= g.std() + 1e-8
            img += g*step
            print('.',end='')
    savearray(img,'multiscale.jpg')

def resize(img,hw):
    min = img.min()
    max = img.max()
    img = (img-min) / (max-min) *255
    img = np.float32(scipy.misc.imresize(img,hw))
    img = img / 255 * (max-min) + min
    return  img

def render_deepdream(t_obj,img0,iter_n=10,step=1.5,octave_n=4,octave_scale=1.4):
    t_score = tf.reduce_mean(t_obj)
    t_grad = tf.gradients(t_score,t_input)[0]

    img = img0
    #将图像进行金字塔分解
    #此时提取高频、低频的方法比较简单,直接缩放就可以
    octaves = []
    for i in range(octave_n-1):
        hw = img.shape[:2]
        lo = resize(img,np.int32(np.float32(hw)/octave_scale))
        hi = img - resize(lo,hw)
        img =lo
        octaves.append(hi)

    #先生成低频的图像,再依次放大并加上高频
    for octave in range(octave_n):
        if octave>0:
            hi = octaves[-octave]
            img = resize(img,hi.shape[:2])+hi
        for i in range(iter_n):
            g = cal_grad_tiled(img,t_grad)
            img += g*(step / (np.abs(g).mean() + 1e-7))
            print('.',end='')
    img = img.clip(0,255)
    savearray(img,'deepdream.jpg')

if __name__ == '__main__':
    #特别地,输出mixed4d_3*3_bottleneck_pre_relu的形状
    img0 = PIL.Image.open('test.jpg')
    img0 = img0.resize((224, 224), PIL.Image.ANTIALIAS)
    img0 = np.float32(img0)

    # name = 'mixed4d_3x3_bottleneck_pre_relu'
    # print('shape of %s:%s' % (name,str(graph.get_tensor_by_name('import/' + name + ':0').get_shape())))
    #
    # channel = 139
    # layer_output = graph.get_tensor_by_name("import/%s:0" % name)
    # #img0 = np.random.uniform(size=(224,224,3))+100.0
    # render_deepdream(layer_output[:,:,:,channel], img0, iter_n=150)

    name = 'mixed4c'
    layer_output = graph.get_tensor_by_name("import/%s:0" % name)
    render_deepdream(tf.square(layer_output),img0)
原图:

结果图:


 1859
1859


 被折叠的 条评论
为什么被折叠?
被折叠的 条评论
为什么被折叠?
 到【灌水乐园】发言


