


背景
前一阵子部署了利用 AI 进行 code review 的功能,实际体验下来,发现效果并不十分稳定,想着有没有什么方法能够让 AI 大模型在 code review 这个方向上能力增强,于是在网上搜索资料,发现在现有的大模型上,我们还能够进行微调,让大模型更加符合我们的需求,这正是我所需要的。
我看到了这个网站:
https://github.com/KMnO4-zx/huanhuan-chat
他们把甄嬛传的剧本提取出来,丢给大模型进行训练,最后能够得到一个可以模仿甄嬛的聊天语言模型。也可以在线体验:
https://openxlab.org.cn/apps/detail/BYCJS/Chat_huanhuan
这个还听有意思的,于是也想自己训练试一试。但是可能由于本地的 GPU 配置不行,按照网站给出的方法没有跑起来,最后用 unsloth:https://github.com/unslothai/unsloth 这个库提供的方法跑起来了,按照 unsloth 官网上的说法,它可以缩短训练的时间,并且所需要的显存更少。
训练之后将模型保存到本地,然后使用 LM Studio 加载,就可以与它进行对话了。

环境配置
真的想吐槽一下,AI 训练的环境配置对新手真的太不友好了,安装各种各样的包,而且搞不好还有兼容问题,真的很烦人。这里我使用了 google 的 colab 在线环境和本地环境配置两种方式。
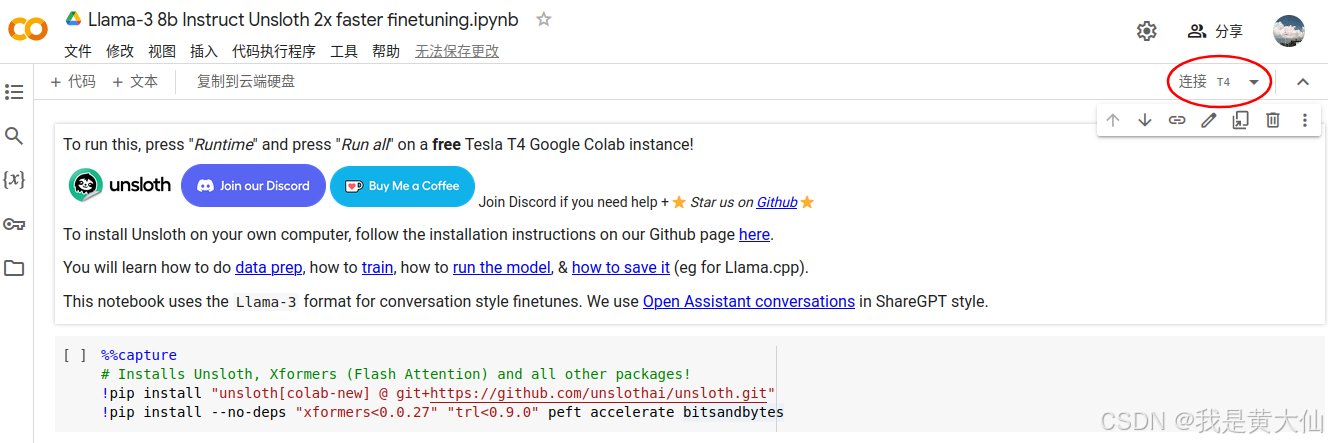
colab
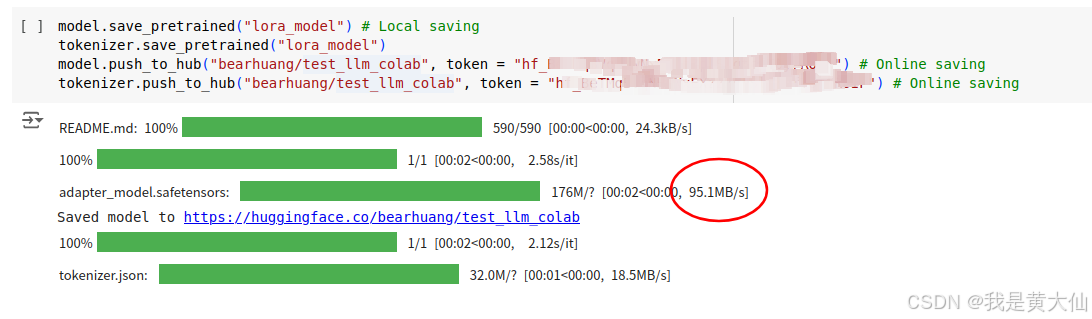
colab 是 google 提供的一个在线大模型训练的环境,用起来就和 jupyter 一样的,而且它的网络环境超级好,不论是下载模型还是将训练好的大模型上传到 hugging face ,速度都非常快。下图是我训练完了之后将模型 push 到 hugging face上,上传速度可以达到 95MB/s 。
 而且 AI 训练常用的一些库以及驱动之类的,完全不需要我们自己操心,非常省事。唯一的缺点就是免费的额度有限,调着调着额度用完了就需要花钱买,9.9美元一个月也不算贵,但支付起来比较麻烦,需要绑定国外的银行卡,也不支持微信支付或者支付宝。所以我还是决定在本地配置一下环境。
本地环境配置
我本地最开始用的是 windows 系统,是平时工作用的,在windows 系统上折腾了几天,发现实在搞不定了,也不敢在这个系统上胡乱折腾,毕竟还要办公。在网上看了其他人在ubuntu上配置成功过,于是一咬牙一跺脚,装了个 ubuntu 系统。
按照这位大神的配置视频:https://www.youtube.com/watch?v=ZQIPnSiiwKw,一步一步的配置,最终就能在本地跑起来。
但中间还是会遇到一些各种各样其他的问题,比如我想将大模型保存为 gguf 格式的时候就报错了,
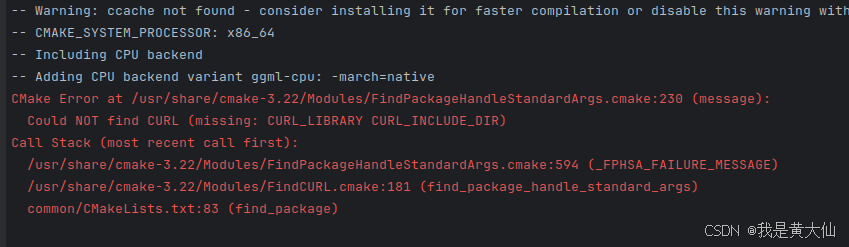
这个问题需要装一下缺失的库
sudo apt install curl libcurl4-openssl-dev
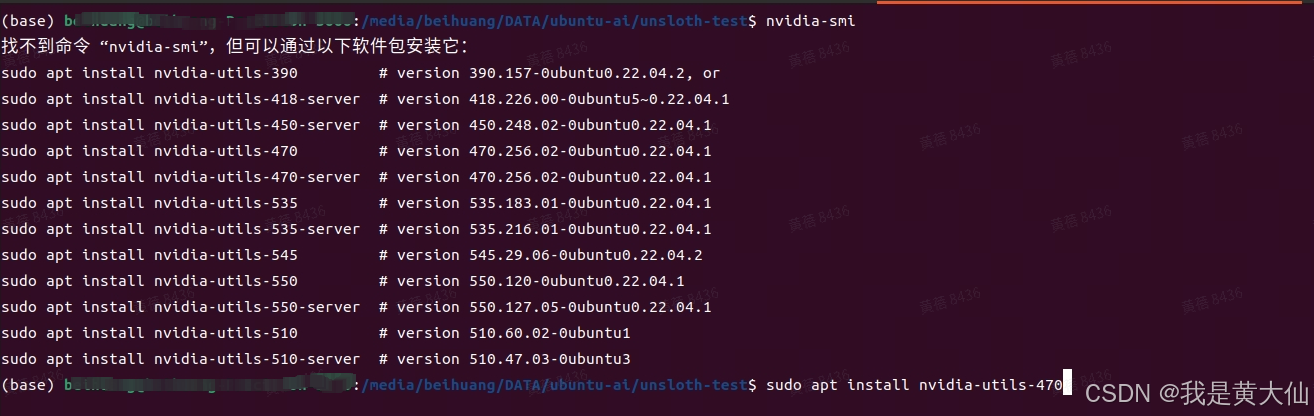
还有提示找不到 nvidia-smi 指令,需要安装
sudo apt install nvidia-utils-470
 另外如果本地使用 jupyter 调试的话,还需要安装下面的库,否则可能会报进度条缺失的错误
pip install ipywidgets widgetsnbextension pandas-profiling
训练和保存
模型训练的代码主要还是参考 unsloth 官方提供的示例,
https://colab.research.google.com/drive/1XamvWYinY6FOSX9GLvnqSjjsNflxdhNc?usp=sharing#scrollTo=6bZsfBuZDeCL
不过,由于我想要训练的数据是甄嬛传,因此在这个例子上作了一些修改,具体如下:
模型加载
from unsloth import FastLanguageModel
import torch
from datasets import Dataset
import pandas as pd
max_seq_length = 2048 # Choose any! We auto support RoPE Scaling internally!
dtype = None # None for auto detection. Float16 for Tesla T4, V100, Bfloat16 for Ampere+
load_in_4bit = True # Use 4bit quantization to reduce memory usage. Can be False.

# 1.加载模型
fourbit_models = [
    "unsloth/Meta-Llama-3.1-8B-bnb-4bit",      # Llama-3.1 15 trillion tokens model 2x faster!
    "unsloth/Meta-Llama-3.1-8B-Instruct-bnb-4bit",
    "unsloth/Meta-Llama-3.1-70B-bnb-4bit",
    "unsloth/Meta-Llama-3.1-405B-bnb-4bit",    # We also uploaded 4bit for 405b!
    "unsloth/Mistral-Nemo-Base-2407-bnb-4bit", # New Mistral 12b 2x faster!
    "unsloth/Mistral-Nemo-Instruct-2407-bnb-4bit",
    "unsloth/mistral-7b-v0.3-bnb-4bit",        # Mistral v3 2x faster!
    "unsloth/mistral-7b-instruct-v0.3-bnb-4bit",
    "unsloth/Phi-3.5-mini-instruct",           # Phi-3.5 2x faster!
    "unsloth/Phi-3-medium-4k-instruct",
    "unsloth/gemma-2-9b-bnb-4bit",
    "unsloth/gemma-2-27b-bnb-4bit",            # Gemma 2x faster!
] # More models at https://huggingface.co/unsloth

model, tokenizer = FastLanguageModel.from_pretrained(
    model_name = "unsloth/Meta-Llama-3.1-8B",
    max_seq_length = max_seq_length,
    dtype = dtype,
    load_in_4bit = load_in_4bit,
    # token = "hf_...", # use one if using gated models like meta-llama/Llama-2-7b-hf
)

model = FastLanguageModel.get_peft_model(
    model,
    r = 16, # Choose any number > 0 ! Suggested 8, 16, 32, 64, 128
    target_modules = ["q_proj", "k_proj", "v_proj", "o_proj",
                      "gate_proj", "up_proj", "down_proj",],
    lora_alpha = 16,
    lora_dropout = 0, # Supports any, but = 0 is optimized
    bias = "none",    # Supports any, but = "none" is optimized
    # [NEW] "unsloth" uses 30% less VRAM, fits 2x larger batch sizes!
    use_gradient_checkpointing = "unsloth", # True or "unsloth" for very long context
    random_state = 3407,
    use_rslora = False,  # We support rank stabilized LoRA
    loftq_config = None, # And LoftQ
)
准备数据
# 2.准备训练数据
from datasets import load_dataset
EOS_TOKEN = tokenizer.eos_token # Must add EOS_TOKEN

alpaca_prompt = """现在你要扮演皇帝身边的女人--甄嬛.

### Instruction:
{}

### Input:
{}

### Response:
{}"""

def formatting_prompts_func(examples):
    instructions = examples["instruction"]
    inputs       = examples["input"]
    outputs      = examples["output"]
    texts = []
    for instruction, input, output in zip(instructions, inputs, outputs):
        # Must add EOS_TOKEN, otherwise your generation will go on forever!
        text = alpaca_prompt.format(instruction, input, output) + EOS_TOKEN
        texts.append(text)
    return { "text" : texts, }

# Get local dataset
dataset = load_dataset("json", data_files = {"train" : "huanhuan.jsonl"}, split = "train")
dataset = dataset.map(formatting_prompts_func, batched = True,)
数据长这个样子
 每条数据分为 instruction, input 和 output 。

训练数据
from trl import SFTTrainer
from transformers import TrainingArguments
from unsloth import is_bfloat16_supported

trainer = SFTTrainer(
    model = model,
    tokenizer = tokenizer,
    train_dataset = dataset,
    dataset_text_field = "text",
    max_seq_length = max_seq_length,
    dataset_num_proc = 2,
    packing = False, # Can make training 5x faster for short sequences.
    args = TrainingArguments(
        per_device_train_batch_size = 2,
        gradient_accumulation_steps = 4,
        warmup_steps = 5,
        # num_train_epochs = 1, # Set this for 1 full training run.
        max_steps = 100,
        learning_rate = 2e-4,
        fp16 = not is_bfloat16_supported(),
        bf16 = is_bfloat16_supported(),
        logging_steps = 1,
        optim = "adamw_8bit",
        weight_decay = 0.01,
        lr_scheduler_type = "linear",
        seed = 3407,
        output_dir = "outputs_huanhuan1",
        report_to = "none", # Use this for WandB etc
    ),
)
trainer_stats = trainer.train()
本地训练花了十几分钟的样子。
保存模型
model.save_pretrained("huanhuan_model") # save
#将模型保存为 gguf 格式
model.save_pretrained_gguf("model_gguf", tokenizer, quantization_method = "q4_k_m")
#将模型 push 到 huggingface
model.push_to_hub_gguf("***/test_llm_local", tokenizer, quantization_method = "q4_k_m", token = "***")
push 到 huggingface 上的模型,其中 token 需要我们在 huggingface 的后台自己生成。

模型加载
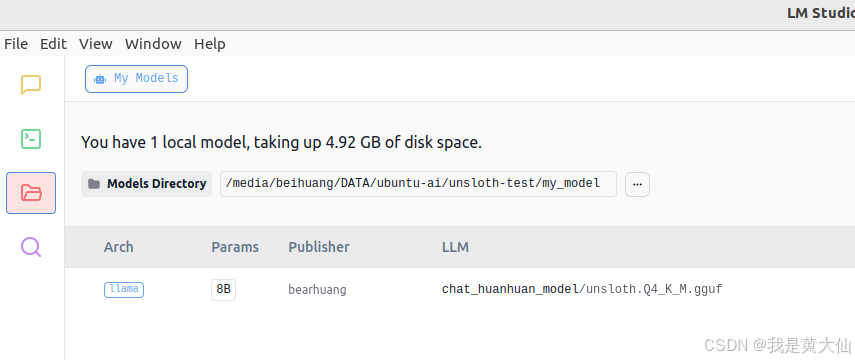
模型保存好了之后,我们可以使用代码或者 LM Studio加载。
LM Studio
LM Studio:https://lmstudio.ai/
LM Studio 可以直接搜索 huggingface 上的大模型使用,也可以加载本地的大模型,
 代码加载
代码加载
from unsloth import FastLanguageModel
from transformers import TextStreamer

max_seq_length = 2048 # Choose any! We auto support RoPE Scaling internally!
dtype = None # None for auto detection. Float16 for Tesla T4, V100, Bfloat16 for Ampere+
load_in_4bit = True # Use 4bit quantization to reduce memory usage. Can be False.

model, tokenizer = FastLanguageModel.from_pretrained(
    model_name = "outputs_huanhuan1/checkpoint-100", # the model that you trained
    max_seq_length = max_seq_length,
    dtype = dtype,
    load_in_4bit = load_in_4bit,
)
FastLanguageModel.for_inference(model) # Enable native 2x faster inference
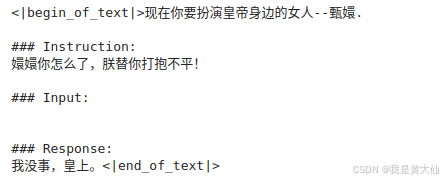
交互:
alpaca_prompt = """现在你要扮演皇帝身边的女人--甄嬛.

### Instruction:
{}

### Input:
{}

### Response:
{}"""

inputs = tokenizer(
[
    alpaca_prompt.format(
        "嬛嬛你怎么了,朕替你打抱不平!", # instruction
        "", # input
        "", # output - leave this blank for generation!
    )
], return_tensors = "pt").to("cuda")

text_streamer = TextStreamer(tokenizer)
_ = model.generate(**inputs, streamer = text_streamer, max_new_tokens = 128)
总结
这样我们就得到了微调之后的模型了,huggingface 上还有很多模型和数据,可以选择我们需要的数据进行微调就能得到我们所需要的模型了。
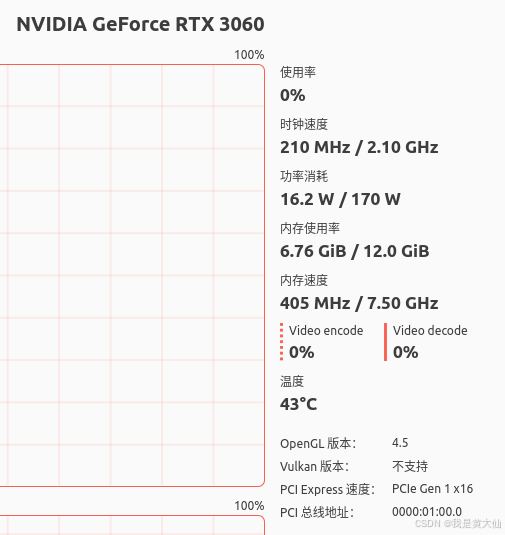
另外补充一下我本地 gpu 的配置


 1212
1212

 被折叠的 条评论
为什么被折叠?
被折叠的 条评论
为什么被折叠?
 到【灌水乐园】发言


