


Llama3微调过程
准备工作
Google Colaboratory
Google Colaboratory,也称为 Colab,是一个基于云的平台,允许用户编写和执行 Python 代码。 它为机器学习和数据分析任务提供了便利的环境,并内置了对 TensorFlow 等流行库的支持。
在Google 创建Colab笔记副本
- 新建->更多->关联更多应用

- 搜索Google Colaboratory

- 安装 Colaboratory

- 再次新建 Google Colaboratory 文件

- 进入Colab笔记副本
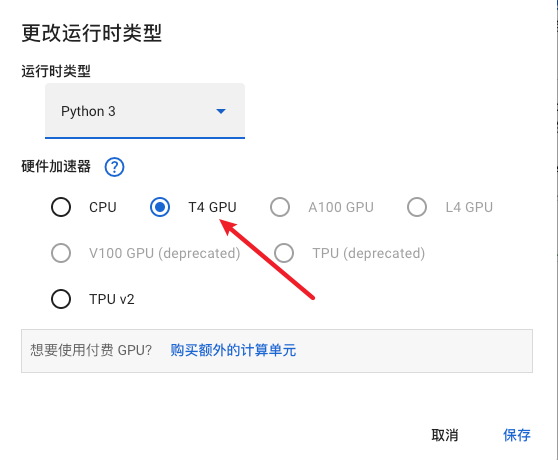
连接到T4 GPU
- 更改运行时类型
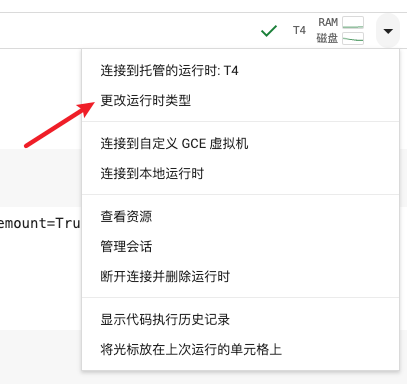
- 选择T4
连接到谷歌云盘
from google.colab import drive
drive.mount('/content/drive')
运行之后要弹出一个页面进行授权
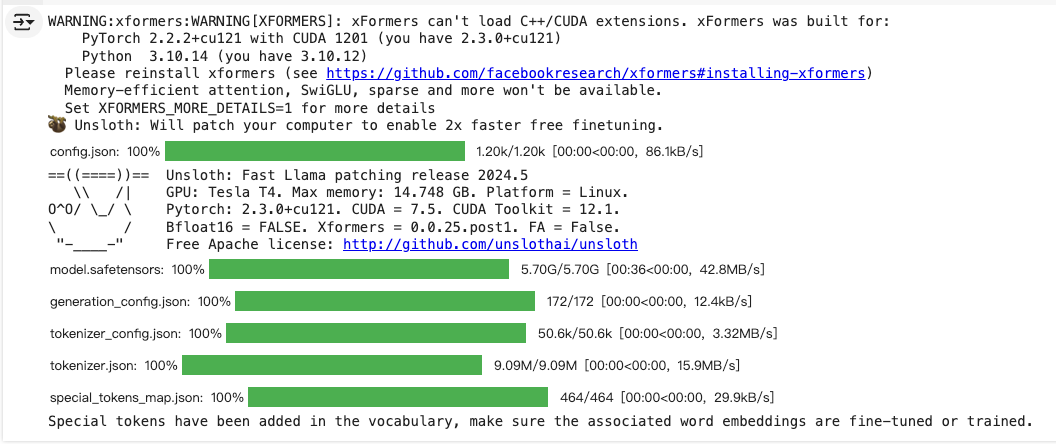
下载Unsloth
unsloth是一个开源的大模型训练加速项目, 用它来微调 Llama 3、Mistral、Phi-3 和 Gemma 速度提高 2-5 倍,内存减少 80%
目前开源版本的 Unsloth,仅支持单机单卡训练,且仅支持 Llama2、Llama3、Mistral、Gemma、Zephyr、TinyLlama、Phi-3 等模型
%%capture
# Installs Unsloth, Xformers (Flash Attention) and all other packages!
!pip install "unsloth[colab-new] @ git+https://github.com/unslothai/unsloth.git"
!pip install --no-deps xformers trl peft accelerate bitsandbytes
下载预训练模型
from unsloth import FastLanguageModel
import torch
max_seq_length = 2048
dtype = None
load_in_4bit = True

# 支持的预4位量化模型,可实现4倍更快的下载速度和无OOM。
fourbit_models = [
    "unsloth/mistral-7b-bnb-4bit",
    "unsloth/mistral-7b-instruct-v0.2-bnb-4bit",
    "unsloth/llama-2-7b-bnb-4bit",
    "unsloth/gemma-7b-bnb-4bit",
    "unsloth/gemma-7b-it-bnb-4bit",
    "unsloth/gemma-2b-bnb-4bit",
    "unsloth/gemma-2b-it-bnb-4bit",
    "unsloth/llama-3-8b-bnb-4bit",
]

model, tokenizer = FastLanguageModel.from_pretrained(
    model_name = "unsloth/llama-3-8b-bnb-4bit",
    max_seq_length = max_seq_length,
    dtype = dtype,
    load_in_4bit = load_in_4bit,
    # token = "hf_...", # 如果使用像meta-llama/Llama-2-7b-hf这样的门控模型,请使用其中一个
)
注意 : 这里运行之前要连接到T4 GPU, 否则会报cuda缺失错误
运行之后:
设置LoRA训练参数
model = FastLanguageModel.get_peft_model(
    model,
    r = 16, # 选择任何大于0的数字!建议使用8、16、32、64、128
    target_modules = ["q_proj", "k_proj", "v_proj", "o_proj",
                      "gate_proj", "up_proj", "down_proj",],
    lora_alpha = 16,
    lora_dropout = 0, # 支持任何值,但等于0时经过优化
    bias = "none",    # 支持任何值,但等于"none"时经过优化
    # [NEW] "unsloth" 使用的VRAM减少30%,适用于2倍更大的批处理大小!
    use_gradient_checkpointing = "unsloth", # True或"unsloth"适用于非常长的上下文
    random_state = 3407,
    use_rslora = False,  # 我们支持排名稳定的LoRA
    loftq_config = None, # 以及LoftQ
)
什么是 LoRA?
LoRA 的核心思想是通过引入低秩矩阵的变化来代替对原始大矩阵的更新,从而减少训练过程中需要更新的参数数量。具体来说,在模型的某些权重矩阵中引入一个低秩分解(两个小矩阵的乘积),并只训练这些小矩阵,而不是原始的大矩阵。
数据准备
这里采用的是来自yahma的Alpaca数据集,这是原始Alpaca数据集的经过筛选的版本,包含了来自原始数据集中的52000条数据。可以用自己的数据准备替换此代码部分
alpaca_prompt = """Below is an instruction that describes a task, paired with an input that provides further context. Write a response that appropriately completes the request.
### Instruction:
{}
### Input:
{}
### Response:
{}"""
EOS_TOKEN = tokenizer.eos_token # 必须添加EOS_TOKEN
def formatting_prompts_func(examples):
instructions = examples["instruction"]
inputs = examples["input"]
outputs = examples["output"]
texts = []
for instruction, input, output in zip(instructions, inputs, outputs):
# 必须添加EOS_TOKEN,否则生成将无法停止!
text = alpaca_prompt.format(instruction, input, output) + EOS_TOKEN
texts.append(text)
return { "text" : texts, }
pass
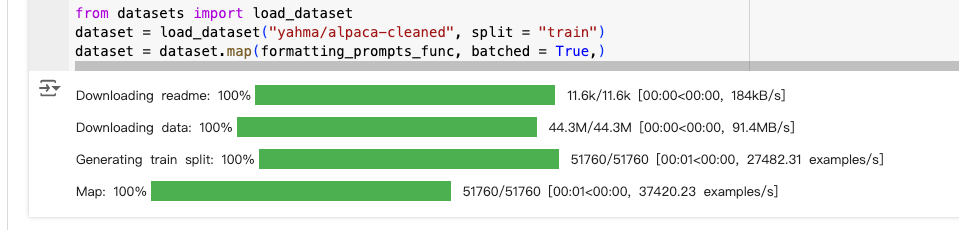
from datasets import load_dataset
dataset = load_dataset("yahma/alpaca-cleaned", split = "train")
dataset = dataset.map(formatting_prompts_func, batched = True,)
运行之后:
训练模型
参数设置
from trl import SFTTrainer  # SFTTrainer:来自 trl(用于大语言模型的低秩适应性训练的库),是一个用于训练模型的类。
from transformers import TrainingArguments # 来自 transformers 库,是一个包含训练参数的类。

trainer = SFTTrainer(
    model = model,  # model:预训练的语言模型。
    tokenizer = tokenizer, # tokenizer:对应的分词器
    train_dataset = dataset, # train_dataset:用于训练的文本数据集。
    dataset_text_field = "text", # dataset_text_field:数据集中包含文本的字段名称。
    max_seq_length = max_seq_length, # max_seq_length:每个输入序列的最大长度。
    dataset_num_proc = 2, # 数据处理时使用的进程数量,设置为 2 表示使用两个进程。
    packing = False, # 是否启用序列打包。打包可以提高短序列训练的效率,这里设置为 False。
    args = TrainingArguments(
        per_device_train_batch_size = 2, # 每个设备(如 GPU)上的训练批量大小,设置为 2
        gradient_accumulation_steps = 4,# 梯度累积步骤数,设置为 4。即每累计 4 个批次的梯度后才进行一次权重更新。
        warmup_steps = 5, # 学习率预热步骤数,设置为 5
        max_steps = 60, # 训练的最大步骤数,设置为 60
        learning_rate = 2e-4, # 初始学习率,设置为 2e-4
        fp16 = not torch.cuda.is_bf16_supported(), # 是否使用 16 位浮点数进行训练
        bf16 = torch.cuda.is_bf16_supported(), # 如果 GPU 支持 bf16,则使用 bf16
        logging_steps = 1, # 日志记录的步数间隔,设置为 1,即每步都记录日志
        optim = "adamw_8bit", # 优化器,设置为 adamw_8bit,表示使用 8 位精度的 AdamW 优化器,可以减少显存占用
        weight_decay = 0.01, # 权重衰减系数,设置为 0.01,用于防止过拟合
        lr_scheduler_type = "linear", # 学习率调度器类型,设置为 linear,表示线性调度
        seed = 3407, # 随机种子,设置为 3407,用于确保结果的可重复性。
        output_dir = "outputs", # 输出目录,训练生成的模型和日志会保存在这个目录下
    ),
)
显示当前内存状态
gpu_stats = torch.cuda.get_device_properties(0)
start_gpu_memory = round(torch.cuda.max_memory_reserved() / 1024 / 1024 / 1024, 3)
max_memory = round(gpu_stats.total_memory / 1024 / 1024 / 1024, 3)
print(f"GPU = {gpu_stats.name}. 最大内存 = {max_memory} GB.")
print(f"{start_gpu_memory} GB of 内存剩余。")
- 输出

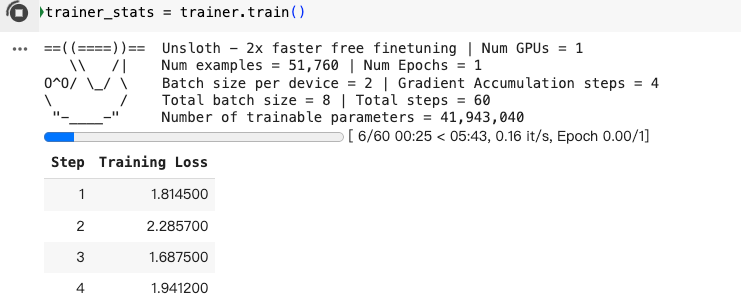
开始训练
trainer_stats = trainer.train()
运行之后:
运行模型
# alpaca_prompt = Copied from above
FastLanguageModel.for_inference(model) # Enable native 2x faster inference
inputs = tokenizer(
[
    alpaca_prompt.format(
        "Continue the fibonnaci sequence.", # instruction
        "1, 1, 2, 3, 5, 8", # input
        "", # output - leave this blank for generation!
    )
], return_tensors = "pt").to("cuda")

outputs = model.generate(**inputs, max_new_tokens = 64, use_cache = True)
tokenizer.batch_decode(outputs)
连接对话
# alpaca_prompt = Copied from above
FastLanguageModel.for_inference(model) # Enable native 2x faster inference
inputs = tokenizer(
[
    alpaca_prompt.format(
        "Continue the fibonnaci sequence.", # instruction
        "1, 1, 2, 3, 5, 8", # input
        "", # output - leave this blank for generation!
    )
], return_tensors = "pt").to("cuda")

from transformers import TextStreamer
text_streamer = TextStreamer(tokenizer)
_ = model.generate(**inputs, streamer = text_streamer, max_new_tokens = 128)
保存模型
- 获取当前的保存的地址
import os
current_path = os.getcwd()
model.save_pretrained("lora_model") # 本地保存
print(f"保存地址 {current_path}/lora_model")
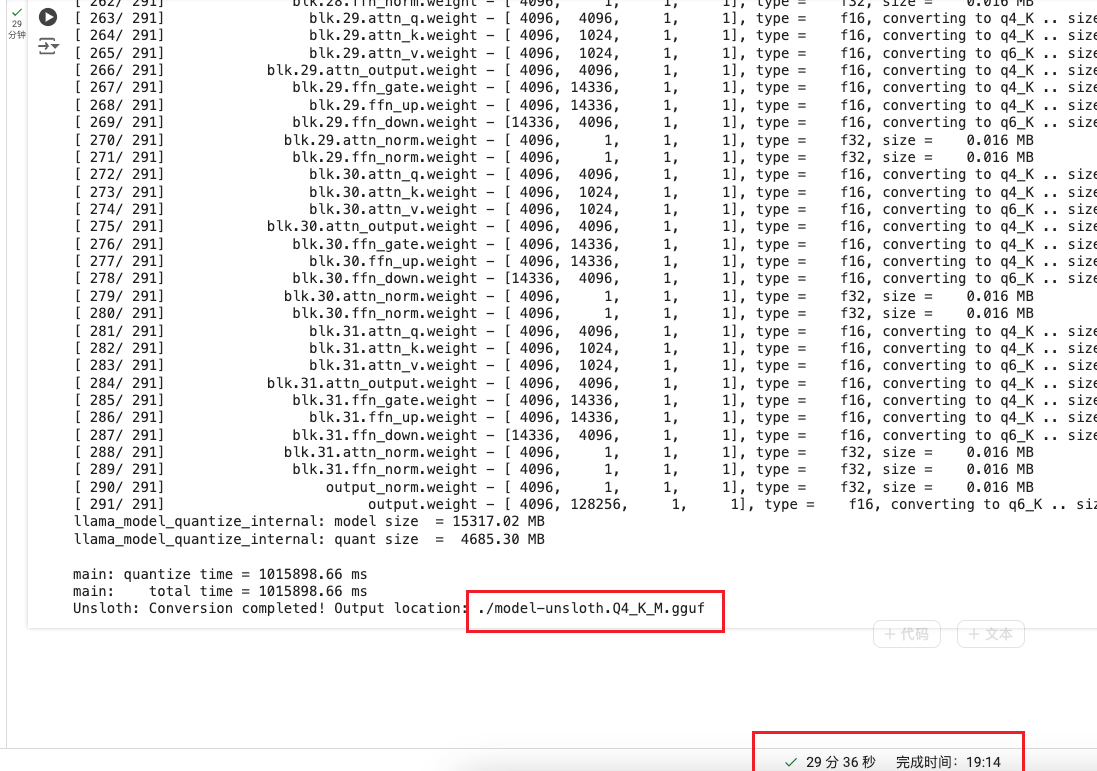
- 将模型保存为预训练的GGUF格式
if True: model.save_pretrained_gguf("model", tokenizer, quantization_method = "q4_k_m")
运行后:
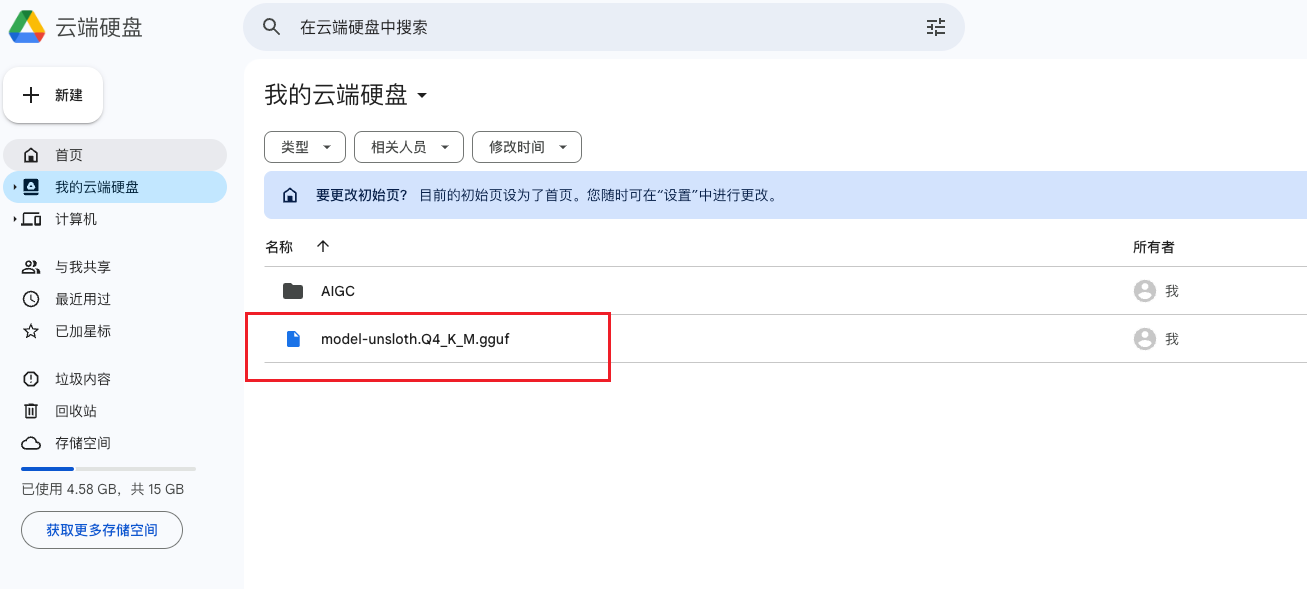
生成的模型移动到谷歌云
import shutil

source_path = '/content/model-unsloth.Q4_K_M.gguf'
destination_path = '/content/drive/MyDrive/'

# 移动文件,内容有点大需要点时间
shutil.move(source_path, destination_path)
print("请使用谷歌云MyDrive中下载该内容")
运行后:

查看模型
LM Studio
导入微调后的模型
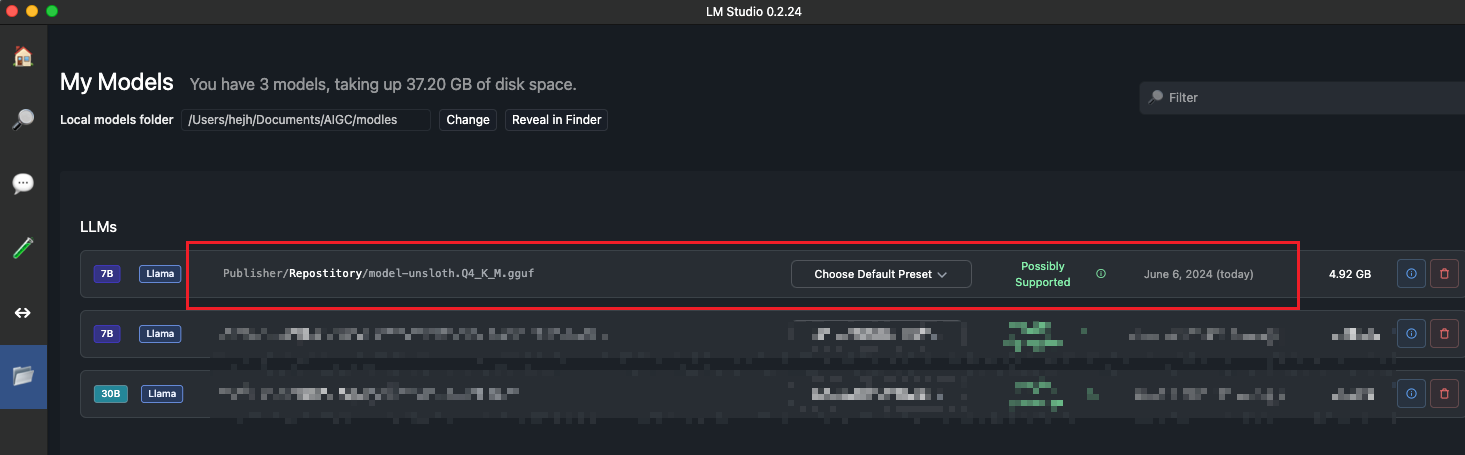
使用微调后的模型

问题记录
- GPU 计算能力不够
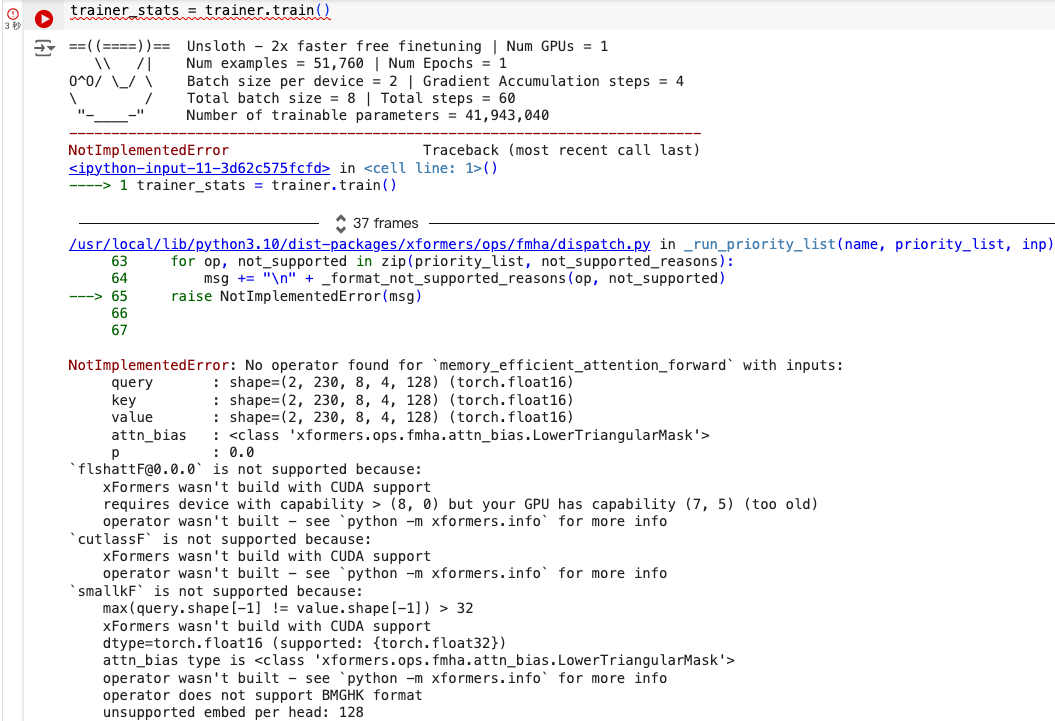
原因 :
之前安装的 PyTorch 版本与 xFormers 编译时使用的 PyTorch 版本不匹配
解决办法:
- 重新安装xformers
pip uninstall xformers -y
!pip install --no-deps xformers trl peft accelerate bitsandbytes


 433
433

 被折叠的 条评论
为什么被折叠?
被折叠的 条评论
为什么被折叠?
 到【灌水乐园】发言


