


目录
实现垂直百叶窗效果。
原理:将图像分成若干个区域,各个区月以一种渐进的方式逐渐显示,效果就像百叶窗翻动一样。主要用到了Bitmap类的GetRixel和SetPixel方法,获取和设置图像中指定像素的颜色,然后使用Refresh方法重新刷新窗体背景。

private void button1_Click(object sender, EventArgs e)
{
openFileDialog1.Filter = "*.jpg,*.jpeg,*.bmp|*.jpg;*.jpeg;*.bmp"; //设置文件的类型
openFileDialog1.ShowDialog(); //打开文件对话框
myImage = System.Drawing.Image.FromFile(openFileDialog1.FileName); //根据文件的路径实例化Image类
this.BackgroundImage = myImage; //显示打开的图片
}
private void button2_Click(object sender, EventArgs e)
{
try
{
Bitmap myBitmap = (Bitmap)this.BackgroundImage.Clone(); //用窗体背景的复本实例化Bitmap类
int intWidth = myBitmap.Width; //记录图片的宽度
int intHeight = myBitmap.Height / 20; //记录图片的指定高度
Graphics myGraphics = this.CreateGraphics(); //创建窗体的Graphics类
myGraphics.Clear(Color.WhiteSmoke); //用指定的颜色清除窗体背景
Point[] myPoint = new Point[30]; //定义数组
for (int i = 0; i < 30; i++) //记录百叶窗各节点的位置
{
myPoint[i].X = 0;
myPoint[i].Y = i * intHeight;
}
Bitmap bitmap = new Bitmap(myBitmap.Width, myBitmap.Height);//实例化Bitmap类
//通过调用Bitmap对象的SetPixel方法重新设置图像的像素点颜色,从而实现百叶窗效果
for (int m = 0; m < intHeight; m++)
{
for (int n = 0; n < 20; n++)
{
for (int j = 0; j < intWidth; j++)
{
bitmap.SetPixel(myPoint[n].X + j, myPoint[n].Y + m, myBitmap.GetPixel(myPoint[n].X + j,myPoint[n].Y + m));//获取当前象素颜色值
}
}
this.Refresh(); //绘制无效
this.BackgroundImage = bitmap; //显示百叶窗体的效果
System.Threading.Thread.Sleep(100); //线程挂起
}
}
catch { }
}
水平交错显示图像
实现原理:将一幅图像分成左右两部分,然后使他们分别从左右两个方向向窗体中间移动,最终形成一幅图画。主要用到了Bitmap的GetPixel方法和SetPixel方法。

private void button1_Click(object sender, EventArgs e)
{
openFileDialog1.Filter = "*.jpg,*.jpeg,*.bmp|*.jpg;*.jpeg;*.bmp"; //设置文件的类型
openFileDialog1.ShowDialog();//打开文件对话框
Image myImage = System.Drawing.Image.FromFile(openFileDialog1.FileName); //根据文件的路径实例化Image类
myBitmap = new Bitmap(myImage); //实例化Bitmap类
this.BackgroundImage = myBitmap; //显示打开的图片
}
private void button2_Click(object sender, EventArgs e)
{
try
{
int intWidth = this.BackgroundImage.Width; //获取背景图片的宽度
int intHeight = this.BackgroundImage.Height; //获取背景图片的高度
Graphics myGraphics = this.CreateGraphics();//创建窗体的Graphics类
myGraphics.Clear(Color.WhiteSmoke); //以指定的颜色清除
Bitmap bitmap = new Bitmap(intWidth, intHeight); //实例化Bitmap类
int i = 0;
//通过调用Bitmap对象的SetPixel方法实现水平交错效果显示图像
while (i <= intWidth / 2)
{
for (int m = 0; m <= intHeight - 1; m++)
{
bitmap.SetPixel(i, m, myBitmap.GetPixel(i, m)); //设置当前象素的颜色值
}
for (int n = 0; n <= intHeight - 1; n++)
{
bitmap.SetPixel(intWidth - i - 1, n, myBitmap.GetPixel(intWidth - i - 1, n));//设置当前象素的颜色值
}
i++;
this.Refresh(); //工作区无效
this.BackgroundImage = bitmap; //显示水平交错的图片
System.Threading.Thread.Sleep(10); //线程挂起
}
}
catch { }
}
纹理效果展示
实现的原理:使用Bitmap对象的LockBits方法将图像锁定到内存中,然后通过BitmapData对象的Scan0属性获得图像中第一个像素数据的地址,最后通过使用System.Runtime.InteropServices.Marshal类的Copy方法为指定图像的像素点找死,并用变换后的图像作为窗体的新背景。

代码:
private void button1_Click(object sender, EventArgs e)
{
openFileDialog1.Filter = "*.jpg,*.jpeg,*.bmp|*.jpg;*.jpeg;*.bmp";//设置文件的类型
openFileDialog1.ShowDialog(); //打开文件对话框
Image myImage = System.Drawing.Image.FromFile(openFileDialog1.FileName);//根据文件的路径实例化Image类
myBitmap = new Bitmap(myImage); //实例化Bitmap类
this.BackgroundImage = myBitmap;//显示打开的图片
}
private void button2_Click(object sender, EventArgs e)
{
try
{
Image myImage = System.Drawing.Image.FromFile(openFileDialog1.FileName);//实例化Image类
myBitmap = new Bitmap(myImage); //实例化Bitmap类
Rectangle rect = new Rectangle(0, 0, myBitmap.Width, myBitmap.Height); //实例化Rectangle类
System.Drawing.Imaging.BitmapData bmpData = myBitmap.LockBits(rect,
System.Drawing.Imaging.ImageLockMode.ReadWrite, myBitmap.PixelFormat); //将指定图像锁定到内存中
IntPtr ptr = bmpData.Scan0; //获得图像中第一个像素数据的地址
int bytes = myBitmap.Width * myBitmap.Height * 3;//设置大小
byte[] rgbValues = new byte[bytes];//实例化byte数组
System.Runtime.InteropServices.Marshal.Copy(ptr, rgbValues, 0, bytes); //使用RGB值为声明的rgbValues数组赋值
for (int counter = 0; counter < rgbValues.Length; counter += 3) //初始化大小
rgbValues[counter] = 255;
System.Runtime.InteropServices.Marshal.Copy(rgbValues, 0, ptr, bytes); //使用RGB值为图像的像素点着色
myBitmap.UnlockBits(bmpData); //从内存中解锁图像
this.BackgroundImage = myBitmap;//显示设置后的图片
}
catch { }
}
实现浮雕效果
实现原理:通过Bitmap对象的GetPixel方法获取各像素点的颜色,然后分别使用Color对象的RGB属性获得各像素点的RGB元素值,并使用这些值减去相邻像素值再加上128,最后使用Bitmap对象的SetPixel方法重新位图像的像素点着色。

代码:
public partial class Frm_Main : Form
{
Bitmap myBitmap;
Image myImage;
public Frm_Main()
{
InitializeComponent();
}
private void button1_Click(object sender, EventArgs e)
{
openFileDialog1.Filter = "*.jpg,*.jpeg,*.bmp|*.jpg;*.jpeg;*.bmp"; //设置文件的类型
openFileDialog1.ShowDialog(); //打开文件对话框
myImage = System.Drawing.Image.FromFile(openFileDialog1.FileName); //根据文件的路径实例化Image类
myBitmap = new Bitmap(myImage); //实例化Bitmap类
this.BackgroundImage = myBitmap; //显示打开的图片
}
private void button2_Click(object sender, EventArgs e)
{
try
{
myBitmap = new Bitmap(myImage); //实例化Bitmap类
//遍历图片中的所有象素
for (int i = 0; i < myBitmap.Width - 1; i++)
{
for (int j = 0; j < myBitmap.Height - 1; j++)
{
Color Color1 = myBitmap.GetPixel(i, j);//获取当前象素的颜色值
Color Color2 = myBitmap.GetPixel(i + 1, j + 1); //获取斜点下象素的颜色值
int red = Math.Abs(Color1.R - Color2.R + 128); //设置R色值
int green = Math.Abs(Color1.G - Color2.G + 128); //设置G色值
int blue = Math.Abs(Color1.B - Color2.B + 128); //设置B色值
//颜色处理
if (red > 255) red = 255; //如果R色值大于255,将R色值设为255
if (red < 0) red = 0; //如果R色值小于0,将R色值设为0
if (green > 255) green = 255; //如果G色值大于255,将R色值设为255
if (green < 0) green = 0; //如果G色值小于0,将R色值设为0
if (blue > 255) blue = 255; //如果B色值大于255,将R色值设为255
if (blue < 0) blue = 0; //如果B色值小于0,将R色值设为0
//通过调用Bitmap对象的SetPixel方法为图像的像素点重新着色
myBitmap.SetPixel(i, j, Color.FromArgb(red, green, blue));
}
}
this.BackgroundImage = myBitmap; //显示处理后的图片
}
catch { }
}
}
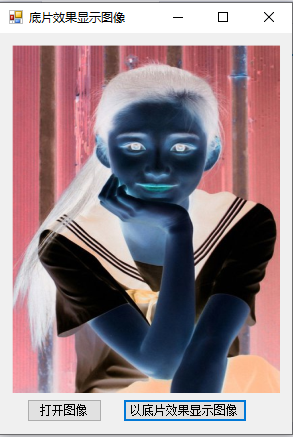
实现胶片效果
实现原理:对现有的图像取反色。
代码:
private void button1_Click(object sender, EventArgs e)
{
try
{
int Height = this.pictureBox1.Image.Height;//获取图片高度
int Width = this.pictureBox1.Image.Width;//获取图片宽度
Bitmap newbitmap = new Bitmap(Width, Height);//实例化位图对象
Bitmap oldbitmap = (Bitmap)this.pictureBox1.Image;//获取原图
Color pixel;//定义一个Color结构
//遍历图片的每个位置
for (int x = 1; x < Width; x++)
{
for (int y = 1; y < Height; y++)
{
int r, g, b;//定义3个变量,用来记录指定点的R\G\B值
pixel = oldbitmap.GetPixel(x, y);//获取指定点的像素值
r = 255 - pixel.R;//记录R值
g = 255 - pixel.G;//记录G值
b = 255 - pixel.B;//记录B值
newbitmap.SetPixel(x, y, Color.FromArgb(r, g, b));//为指定点重新着色
}
}
this.pictureBox1.Image = newbitmap;//显示底片效果的图像
}
catch (Exception ex)
{
MessageBox.Show(ex.Message, "信息提示", MessageBoxButtons.OK, MessageBoxIcon.Information);
}
}
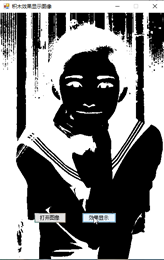
实现积木效果
实现原理:对图像中的各个像素点着重着色,取单个像素点的RGB值,取平均值,平均值大于128的设置为255,否则的设置为0。
代码:
private void button1_Click(object sender, EventArgs e)
{
openFileDialog1.Filter = "*.jpg,*.jpeg,*.bmp|*.jpg;*.jpeg;*.bmp";
openFileDialog1.ShowDialog();
Image myImage = System.Drawing.Image.FromFile(openFileDialog1.FileName);
this.BackgroundImage = myImage;
}
private void button2_Click(object sender, EventArgs e)
{
Graphics myGraphics = this.CreateGraphics(); //创建窗体的Graphics类
Bitmap myBitmap = new Bitmap(openFileDialog1.FileName); //实例化Bitmap类
int myWidth, myHeight, i, j, iAvg, iPixel; //定义变量
Color myColor, myNewColor; //定义颜色变量
RectangleF myRect;
myWidth = myBitmap.Width; //获取背景图片的宽度
myHeight = myBitmap.Height; //获取背景图片的高度
myRect = new RectangleF(0, 0, myWidth, myHeight); //获取图片的区域
Bitmap bitmap = myBitmap.Clone(myRect, System.Drawing.Imaging.PixelFormat.DontCare); //实例化Bitmap类
i = 0;
//遍历图片的所有象素
while (i < myWidth - 1)
{
j = 0;
while (j < myHeight - 1)
{
myColor = bitmap.GetPixel(i, j); //获取当前象素的颜色值
iAvg = (myColor.R + myColor.G + myColor.B) / 3; //平均法
iPixel = 0;
if (iAvg >= 128) //如果颜色值大于等于128
iPixel = 0; //设置为255
else
iPixel = 255;
//通过调用Color对象的FromArgb方法获得图像各像素点的颜色
myNewColor = Color.FromArgb(255, iPixel, iPixel, iPixel);
bitmap.SetPixel(i, j, myNewColor); //设置颜色值
j = j + 1;
}
i = i + 1;
}
myGraphics.Clear(Color.WhiteSmoke);
bitmap.Save("D:11.bmp");//以指定的颜色清除
myGraphics.DrawImage(bitmap, new Rectangle(0, 0, myWidth, myHeight)); //绘制处理后的图片
}
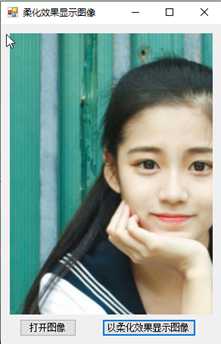
柔化效果显示图片
实现原理:将当前像素和周围的像素点的颜色进行比较,如果颜色差距较大,则去平均值,否则取原来的值,重新给你图像着色。
代码:
private void button2_Click(object sender, EventArgs e)
{
//打图像文件
OpenFileDialog openFileDialog = new OpenFileDialog();
openFileDialog.Filter = "图像文件(JPeg, Gif, Bmp, etc.)|*.jpg;*.jpeg;*.gif;*.bmp;*.tif; *.tiff; *.png| JPeg 图像文件(*.jpg;*.jpeg)|*.jpg;*.jpeg |GIF 图像文件(*.gif)|*.gif |BMP图像文件(*.bmp)|*.bmp|Tiff图像文件(*.tif;*.tiff)|*.tif;*.tiff|Png图像文件(*.png)| *.png |所有文件(*.*)|*.*";
if (openFileDialog.ShowDialog() == DialogResult.OK)
{
Bitmap MyBitmap = new Bitmap(openFileDialog.FileName);
this.pictureBox1.Image = MyBitmap;
}
}
private void button1_Click(object sender, EventArgs e)
{
try
{
int Height = this.pictureBox1.Image.Height;//获取图像高度
int Width = this.pictureBox1.Image.Width;//获取图像宽度
Bitmap bitmap = new Bitmap(Width, Height);//实例化新的位图对象
Bitmap MyBitmap = (Bitmap)this.pictureBox1.Image;//记录原图
Color pixel;//定义一个Color结构
int[] Gauss ={ 1, 2, 1, 2, 4, 2, 1, 2, 1 };//定义高斯模板值
//遍历原图的每个位置
for (int x = 1; x < Width - 1; x++)
for (int y = 1; y < Height - 1; y++)
{
int r = 0, g = 0, b = 0;//声明3个变量,用来记录R/G/B值
int Index = 0;//声明一个变量,用来记录位置
for (int col = -1; col <= 1; col++)
for (int row = -1; row <= 1; row++)
{
pixel = MyBitmap.GetPixel(x + row, y + col);//获取指定点的像素
r += pixel.R * Gauss[Index];//记录R值
g += pixel.G * Gauss[Index];//记录G值
b += pixel.B * Gauss[Index];//记录B值
Index++;
}
r /= 16;//为R重新赋值
g /= 16;//为G重新赋值
b /= 16;//为B重新赋值
//处理颜色值溢出
r = r > 255 ? 255 : r;
r = r < 0 ? 0 : r;
g = g > 255 ? 255 : g;
g = g < 0 ? 0 : g;
b = b > 255 ? 255 : b;
b = b < 0 ? 0 : b;
bitmap.SetPixel(x - 1, y - 1, Color.FromArgb(r, g, b));//重新为指定点赋颜色值
}
this.pictureBox1.Image = bitmap;//显示柔化效果的图像
}
catch (Exception ex)
{
MessageBox.Show(ex.Message, "信息提示");
}
}


 6736
6736


 被折叠的 条评论
为什么被折叠?
被折叠的 条评论
为什么被折叠?
 到【灌水乐园】发言


