


最近在研究material design时了解到了一些android 5.x的新内容,其中就有elevation+translationZ,tinting还有clipping,合理的组合利用他们可以实现更多的UI效果,达到更好的用户体验,在这里只是简单分享一下他们的概念和基本用法。
1. 首先是elevation+translationZ,这个单词本身就是海拔高度的意思,所以从字面意思上很容易理解,以往的android View通常具有两个属性,X和Y,而在android 5.X之后,google 为其新增了一个Z属性(高度),即垂直于屏幕的属性。在真正代码实践之前我本以为它可以通过改变与屏幕的距离从而达到改变view大小的效果,但是并非如此,它主要的目的是实现view的阴影效果。
Z=elevation+translationZ,其中elevation是静态成员,在XML布局中使用,translationZ在代码中使用可以实现动画效果,下面是代码实践:
XML布局:
<?xml version="1.0" encoding="utf-8"?>
<AbsoluteLayout xmlns:android="http://schemas.android.com/apk/res/android"
    xmlns:tools="http://schemas.android.com/tools"
    android:layout_width="match_parent"
    android:layout_height="match_parent"
    android:orientation="vertical"
    tools:context="com.example.syd.elevation.MainActivity">
    <TextView
        android:layout_width="100dp"
        android:layout_height="100dp"
        android:text="Hello World!"
        android:layout_x="100dp"
        android:layout_y="200dp"
        android:layout_marginBottom="50dp"
        android:background="#00bfff"/>
    <TextView
        android:layout_width="100dp"
        android:layout_height="100dp"
        android:text="Hello World 1!"
        android:layout_x="180dp"
        android:layout_y="200dp"
        android:background="#3fa5e4"
        android:id="@+id/transatinz"

        android:layout_marginBottom="50dp"

        android:elevation="-5dp"/>
    <TextView
        android:layout_width="100dp"
        android:layout_height="100dp"
        android:background="#00bfff"
        android:elevation="50dp"
        android:layout_marginBottom="50dp"

        android:text="Hello World 2!" />
</AbsoluteLayout>
代码改变translationZ:
package com.example.syd.elevation;

import android.annotation.TargetApi;
import android.os.Build;
import android.support.v7.app.AppCompatActivity;
import android.os.Bundle;
import android.util.Log;
import android.widget.TextView;

import java.util.Timer;
import java.util.TimerTask;

import static com.example.syd.elevation.R.id.transatinz;

public class MainActivity extends AppCompatActivity {

    @TargetApi(Build.VERSION_CODES.LOLLIPOP)
    @Override
    protected void onCreate(Bundle savedInstanceState) {
        super.onCreate(savedInstanceState);
        setContentView(R.layout.activity_main);
        final TextView textView= (TextView) findViewById(transatinz);
        new Timer().schedule(new TimerTask() {
            int i=0;
            @Override
            public void run() {
                ++i;
                textView.animate().translationZ(5000);
                Log.i("bac",i+"");
                if (i>1){
                textView.animate().translationZ(0);
                    i=0;
                }
            }
        },0,1000);
    }
}
- tinting 和clipping,tinting是着色而clipping是裁剪,通过代码实践看看效果:(主意不同android:tintMode的效果)
<?xml version="1.0" encoding="utf-8"?>
<LinearLayout xmlns:android="http://schemas.android.com/apk/res/android"
    xmlns:tools="http://schemas.android.com/tools"
    android:layout_width="match_parent"
    android:layout_height="match_parent"
    android:orientation="horizontal"
    tools:context="com.example.syd.tinting_and_clipping.MainActivity">

   <LinearLayout
       android:layout_width="wrap_content"
       android:orientation="vertical"
       android:layout_height="match_parent">
       <ImageView
           android:layout_width="100dp"
           android:layout_height="100dp"
           android:src="@mipmap/ic_launcher"/>
       <ImageView
           android:layout_width="100dp"
           android:layout_height="100dp"
           android:tint="@android:color/holo_blue_bright"
           android:src="@mipmap/ic_launcher"/>
       <ImageView
           android:layout_width="100dp"
           android:layout_height="100dp"
           android:tint="@android:color/holo_blue_bright"
           ***android:tintMode="add"***
           android:src="@mipmap/ic_launcher"/>
       <ImageView
           android:layout_width="100dp"
           android:layout_height="100dp"
           android:tint="@android:color/holo_blue_bright"
           **android:tintMode="multiply"**
           android:src="@mipmap/ic_launcher"/>

   </LinearLayout>
    <LinearLayout
        android:layout_width="wrap_content"
        android:orientation="vertical"
        android:layout_marginLeft="20dp"
        android:layout_height="match_parent">
        <!--clipping需要跟elevation结合使用-->
        <TextView
            android:layout_width="100dp"
            android:layout_height="100dp"
            android:id="@+id/tv1"
            android:text="hello1"
            android:elevation="5dp"
            android:gravity="center"
            />
        <TextView
            android:id="@+id/tv2"
            android:text="hello2"
            android:gravity="center"
            android:elevation="5dp"

            android:layout_width="100dp"
            android:layout_height="100dp"
            />
    </LinearLayout>

</LinearLayout>
代码实现clipping:
package com.example.syd.tinting_and_clipping;

import android.annotation.TargetApi;
import android.graphics.Outline;
import android.os.Build;
import android.support.v7.app.AppCompatActivity;
import android.os.Bundle;
import android.view.View;
import android.view.ViewOutlineProvider;

public class MainActivity extends AppCompatActivity {

    @TargetApi(Build.VERSION_CODES.LOLLIPOP)
    @Override
    protected void onCreate(Bundle savedInstanceState) {
        super.onCreate(savedInstanceState);
        setContentView(R.layout.activity_main);
        View v1=findViewById(R.id.tv1);
        View v2=findViewById(R.id.tv2);
        //获取outline
        ViewOutlineProvider viewOutlineProvider1=new ViewOutlineProvider() {
            @Override
            public void getOutline(View view, Outline outline) {
                //修改outline为特定特定形状setRoundRect为圆角矩形
                outline.setRoundRect(0,0,view.getWidth(),view.getHeight(),30);
            }
        };
        //获取outline
        ViewOutlineProvider viewOutlineProvider2=new ViewOutlineProvider() {
            @Override
            public void getOutline(View view, Outline outline) {
                //修改outline为特定特定形状
                outline.setOval(0, 0, view.getWidth(), view.getHeight());
            }
        };
        v1.setOutlineProvider(viewOutlineProvider1);
        v2.setOutlineProvider(viewOutlineProvider1);
    }

}
效果图:
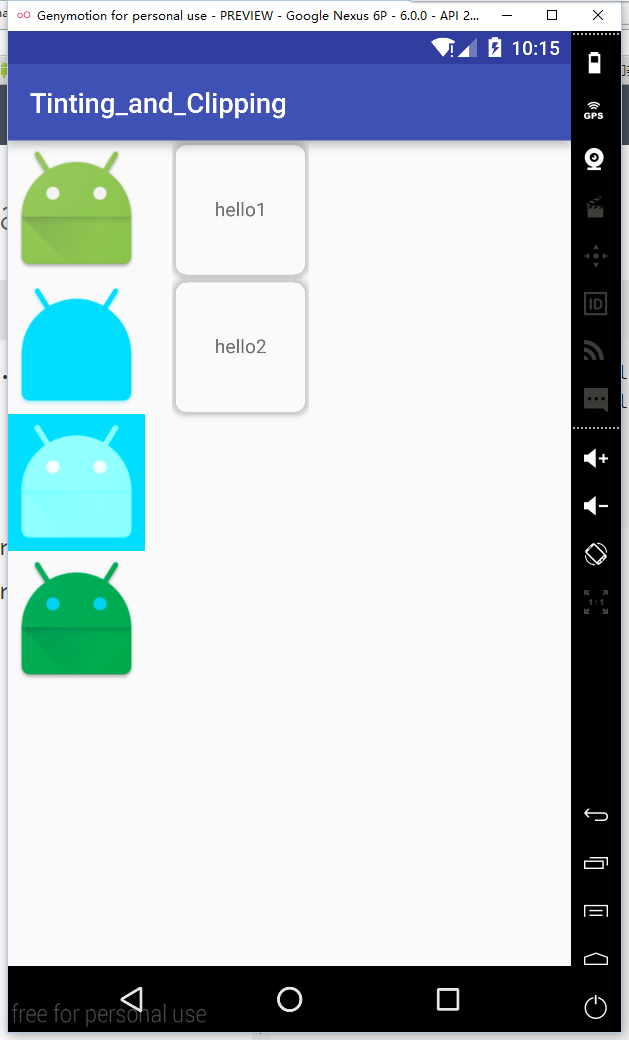
接触到clipping才发现它可以实现view的边框效果哦!之前一直没有找到比较好的边框实现方法,不知道有没有更好的实现边框的方法,欢迎分享!


 678
678

 被折叠的 条评论
为什么被折叠?
被折叠的 条评论
为什么被折叠?
 到【灌水乐园】发言


