


###########nginx############
1.源码包安装
tar zxf nginx-1.12.0.tar.gzcd nginx-1.12.0/src/core
vim nginx.h
#define NGINX_VERSION "0.7.67"
#define NGINX_VER "nginx" ##修改此行,去掉后面的“NGINX_VERSION”,这样编译修改显示名称使其不显示版本号

vim gcc
# debug
#CFLAGS=”$CFLAGS -g” ##注释掉这行,去掉debug模式编译,编译以后程序只有几百k

useradd -M -d /usr/local/lnmp/nginx -s /sbin/nologin -u 800 nginx ##创建用户
##根据需求选择安装项目
./configure --prefix=/usr/local/lnmp/nginx --user=nginx --group=nginx --with-threads --with-file-aio --with-http_ssl_module --with-http_stub_status_module
yum install pcre-devel -y
yum install openssl-devel -y ##安装依赖性
rpm -qc gcc ##检测是否安装gcc,否则必须安装
yum install gcc -y
make && make install ##编译成功后安装
make clean ##若出现问题,需要重新编译,就要清除编译后生成的文件
cd /usr/local/lnmp/nginx/sbin
./nginx ##启动程序
ln -s /usr/local/lnmp/nginx/sbin/nginx /sbin/ ##创建软连接,在任意位置可以打开软件
which nginx
/sbin/nginx
测试结果:
curl localhost -I
HTTP/1.1 200 OK
Server: nginx
Date: Wed, 19 Jul 2017 05:11:39 GMT
Content-Type: text/html
Content-Length: 612
Last-Modified: Wed, 19 Jul 2017 05:10:24 GMT
Connection: keep-alive
ETag: "596ee9c0-264"
Accept-Ranges: bytes
2.cpu绑定
cd /usr/local/lnmp/nginx/confvim nginx.conf
worker_processes 2; ##开启进程数
worker_cpu_affinity 01 10; ##绑定cpu
events {
worker_connections 65535; ##更改允许连接数
}
[root@server1 ~]# sysctl -a|grep file ##查看系统最大文件数必须大于更改的文件
fs.file-nr = 416 0 188444
fs.file-max = 188444
[root@server1 ~]# usermod -s /bin/bash nginx
[root@server1 ~]# vim /etc/security/limits.conf ##更改系统文件限制
nginx - nofile 65535
测试:
[root@server1 ~]# su - nginx-bash-4.1$ ulimit -a
core file size (blocks, -c) 0
data seg size (kbytes, -d) unlimited
scheduling priority (-e) 0
file size (blocks, -f) unlimited
pending signals (-i) 14867
max locked memory (kbytes, -l) 64
max memory size (kbytes, -m) unlimited
open files (-n) 65535 ##改后生效的结果
pipe size (512 bytes, -p) 8
POSIX message queues (bytes, -q) 819200
real-time priority (-r) 0
stack size (kbytes, -s) 10240
cpu time (seconds, -t) unlimited
max user processes (-u) 1024
virtual memory (kbytes, -v) unlimited
file locks (-x) unlimited
-bash-4.1$ logout
3.虚拟主机
[root@server1 ~]# cd /usr/local/lnmp/nginx/conf/[root@server1 conf]# vim nginx.conf
server {
listen 80;
server_name www.westos.org;
location / {
root /web1;
index index.html;
}
}
nginx -t ##检测是否有语法错误
[root@server1 conf]# nginx -s reload ##重新加载配置文件
测试:
网页输入:www.westos.org
4.创建密钥认证https
[root@server1 ~]# cd /usr/local/lnmp/nginx/conf/[root@server1 conf]# vim nginx.conf ##编辑主配置文件
server {
listen 443 ssl; ##开启443端口
server_name localhost; ##主机名
ssl_certificate cert.pem; ##证书名(相对路径)
ssl_certificate_key cert.pem; ##密钥
ssl_session_cache shared:SSL:1m;
ssl_session_timeout 5m;
ssl_ciphers HIGH:!aNULL:!MD5;
ssl_prefer_server_ciphers on;
location / {
root html;
index index.html index.htm;
}
}
[root@server1 conf]# cd /etc/pki/tls/certs/
[root@server1 certs]# make cert.pem ##创建生成密钥
umask 77 ; \
PEM1=`/bin/mktemp /tmp/openssl.XXXXXX` ; \
PEM2=`/bin/mktemp /tmp/openssl.XXXXXX` ; \
/usr/bin/openssl req -utf8 -newkey rsa:2048 -keyout $PEM1 -nodes -x509 -days 365 -out $PEM2 -set_serial 0 ; \
cat $PEM1 > cert.pem ; \
echo "" >> cert.pem ; \
cat $PEM2 >> cert.pem ; \
rm -f $PEM1 $PEM2
Generating a 2048 bit RSA private key
..............................................................+++
..............+++
writing new private key to '/tmp/openssl.3TIgtU'
-----
You are about to be asked to enter information that will be incorporated
into your certificate request.
What you are about to enter is what is called a Distinguished Name or a DN.
There are quite a few fields but you can leave some blank
For some fields there will be a default value,
If you enter '.', the field will be left blank.
-----
Country Name (2 letter code) [XX]:cn
State or Province Name (full name) []:shaanxi
Locality Name (eg, city) [Default City]:xi'an
Organization Name (eg, company) [Default Company Ltd]:westos
Organizational Unit Name (eg, section) []:linux
Common Name (eg, your name or your server's hostname) []:server1
Email Address []:15202913064@163.com
[root@server1 certs]# mv cert.pem /usr/local/lnmp/nginx/conf/ ##移动到文件位置
[root@server1 certs]# nginx -t ##检测是否存在语法错误
nginx: the configuration file /usr/local/lnmp/nginx/conf/nginx.conf syntax is ok
nginx: configuration file /usr/local/lnmp/nginx/conf/nginx.conf test is successful
[root@server1 certs]# nginx -s reload ##重新加载配置文件
[root@server1 certs]#
测试:
网页输入:https://172.25.33.1/
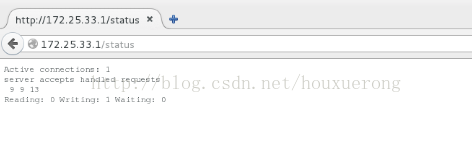
5.访问控制
[root@server1 ~]# cd /usr/local/lnmp/nginx/conf/[root@server1 conf]# vim nginx.conf ##编辑主配置文件
56 location /status {
57 stub_status on;
58 access_log off;
59 allow 127.0.0.1;
60 # deny all;
61 }
测试结果:
6.网页重定向
[root@server1 ~]# cd /usr/local/lnmp/nginx/conf/[root@server1 conf]# vim nginx.conf ##编辑主配置文件
126 location / {
127 root /web1;
128 index index.html index.htm;
129 }
130 }
131 server {
132 listen 80;
133 server_name www.westos.org;
134 rewrite ^(.*)$ https://www.westos.org$1 redirect;
135 }
测试结果:
[root@foundation33 Desktop]# curl www.westos.org -I
HTTP/1.1 302 Moved Temporarily
Server: nginx
Date: Wed, 19 Jul 2017 08:59:58 GMT
Content-Type: text/html
Content-Length: 154
Connection: keep-alive
Location: https://www.westos.org/ ##网页重新定向到该地址
7.反向代理,负载均衡
[root@server1 ~]# cd /usr/local/lnmp/nginx/conf/[root@server1 conf]# vim nginx.conf ##编辑主配置文件
20 upstream westos {
#ip_hash; ##同一ip进行同一访问的算法
21 server 172.25.33.2:80 weight=3; ##轮叫的次数
22 server 172.25.33.3:8080;
23 server 127.0.0.1:8000 backup;
24 }
126 location / {
127 root /web1;
128 index index.html index.htm;
129 }
130 }
131 server {
132 listen 80;
133 server_name www.westos.org;
134 #rewrite ^(.*)$ https://www.westos.org$1 redirect;
135 location / {
136 proxy_pass http://westos;
137 }
138
139 }
更改http 服务的端口
[root@server1 conf]# vim /etc/httpd/conf/httpd.conf
[root@server1 conf]# /etc/init.d/httpd start
Starting httpd: httpd: Could not reliably determine the server's fully qualified domain name, using 172.25.33.1 for ServerName
[ OK ]
测试:
网页输入:www.westos.org


 2万+
2万+


 被折叠的 条评论
为什么被折叠?
被折叠的 条评论
为什么被折叠?
 到【灌水乐园】发言


