


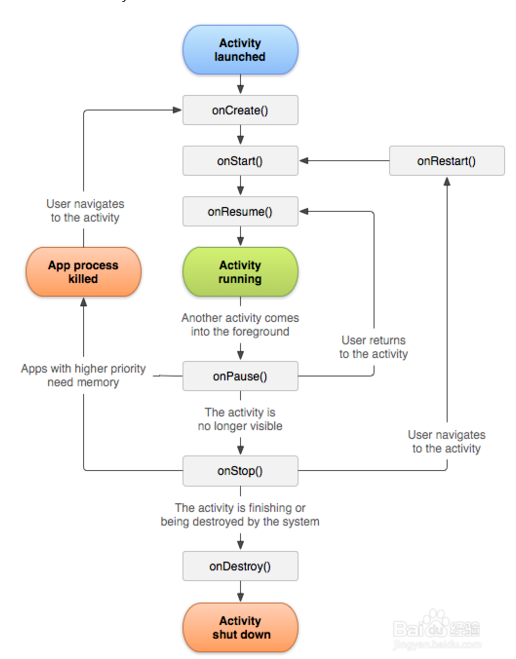
Activity的生命周期
Android是使用Task来管理活动的,一个任务就是一组存放在栈里的活动的集合,这个栈也被称作返回栈。栈是一种先进后出的数据结构,在默认的情况下,每当我们启动了一个新的活动,它会在返回栈中入栈,并处于栈顶的位置。而每当我们按下back键或调用finish()方法去销毁一个活动室,处于栈顶的活动就会出栈,这是前一个入栈的活动就会重新处于栈顶的位置。系统总是会显示处于栈顶的活动给用户。
每个活动在其生命周期中最多可能会有四种状态
- 运行状态 :当一个活动位于返回栈的栈顶时,这时活动就处于运行状态。
- 暂停状态 :当一个活动不再处于栈顶位置,但仍然可见时,这是活动就进入了暂停状态。
- 停止状态 :当一个活动不再处于站定位置,并且完全不可见的时候,就进入了停止状态。
- 销毁状态 :当一个活动从返回栈中移除之后就变成了销毁状态。
Activity类中定义了七个回调方法,覆盖了活动生命周期中的每一个环节。
- onCreate() 在这个方法中完成活动的初始化操作。
- onStart() 这个方法在活动由不可见变为可见的时候调用
- onResume() 这个方法在活动准备好和用户进行交互的时候调用。
- onPause()这个方法在系统准备去启动或者回复另一个活动的时候调用。
- onStop() 这个方法在活动完全 不可见的时候调用
- onDestory() 这个方法在活动被销毁之前调用
- onRestart()这个方法在活动由停止状态变为运行状态之前调用
完整生存期:活动在onCreate()和onStop()方法之间所经历的。
可见生存期:活动在onStart()和onStop()方法之间所经历的。
前台生存期:活动在onResume()和onPause()方法之间所经历的。
在这里编写了简单的代码实现两个界面(编写简单的布局,在Activity中使其可见,在AndroidManifest中注册),然后使用log进行检测Activity的声明活动周期。
1. 如果第二个界面为弹窗,使得第一个界面可见但不可操作的时候运行结果为:
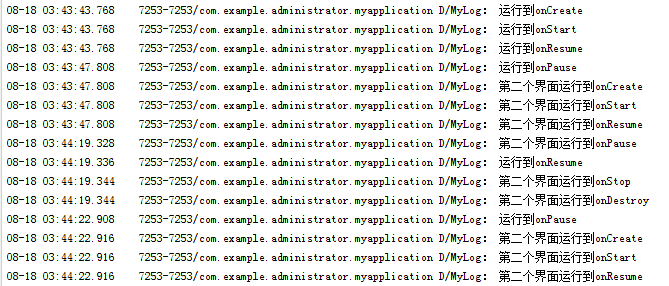
2. 如果第二个界面为全覆盖,第一个界面不可见也不可操作时候的运行结果为: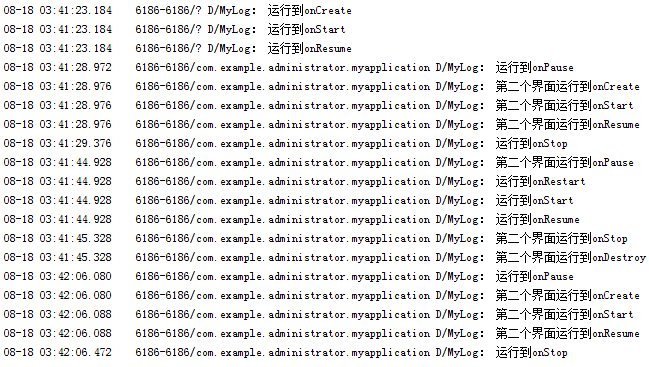
由运行结果可以看出,如果第二界面为全覆盖时,启动第二个界面时候第一个界面会运行到onStop()方法,如果为弹窗时候则不会运行到这个方法。
两种基本布局
LinerLayout(线性布局)
这个布局会将它所包含的控件在线性方向上依次排列。
android:orientation属性制定了排列方向是vertical还是horizontal,即垂直反向和水平方向。
android:layout_width=”match_parent”
android:layout_height=”match_parent”
定义控件的宽和高,match_parent表示适应父类的大小wrap_content表示自适应。
android:weightSum=”4”表示将该部分划分为4等分。
android:layout_weight=”1”表示该部分占据父布局的1等分。
<?xml version="1.0" encoding="utf-8"?>
<LinearLayout xmlns:android="http://schemas.android.com/apk/res/android"
    android:orientation="horizontal"
    android:layout_width="match_parent"
    android:layout_height="match_parent"
    android:weightSum="4">

    <Button
        android:layout_width="0dp"
        android:layout_height="match_parent"
        android:layout_weight="1"/>
    <Button
        android:layout_width="0dp"
        android:layout_height="match_parent"
        android:layout_weight="1"/>
    <Button
        android:layout_width="0dp"
        android:layout_height="match_parent"
        android:layout_weight="1"/>
    <Button
        android:layout_width="0dp"
        android:layout_height="match_parent"
        android:layout_weight="1"/>
</LinearLayout>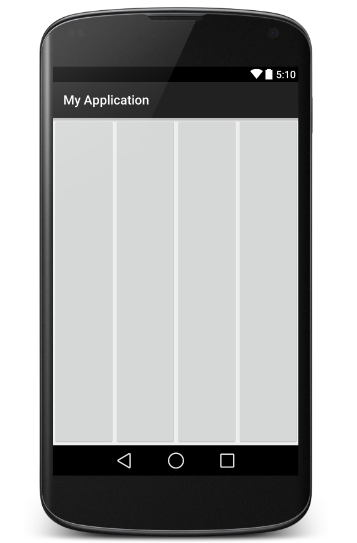
<?xml version="1.0" encoding="utf-8"?>
<LinearLayout xmlns:android="http://schemas.android.com/apk/res/android"
    android:orientation="vertical"
    android:layout_width="match_parent"
    android:layout_height="match_parent"
    android:weightSum="5">
    <Button
        android:layout_width="match_parent"
        android:layout_height="0dp"
        android:layout_weight="1"/>
    <Button
        android:layout_width="match_parent"
        android:layout_height="0dp"
        android:layout_weight="1"/>
    <Button
        android:layout_width="match_parent"
        android:layout_height="0dp"
        android:layout_weight="1"/>
    <Button
        android:layout_width="match_parent"
        android:layout_height="0dp"
        android:layout_weight="1"/>
    <Button
        android:layout_width="match_parent"
        android:layout_height="0dp"
        android:layout_weight="1"/>
</LinearLayout>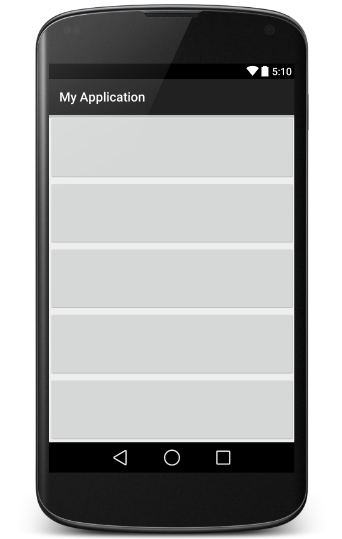
<?xml version="1.0" encoding="utf-8"?>
<LinearLayout xmlns:android="http://schemas.android.com/apk/res/android"
    android:orientation="vertical"
    android:layout_width="match_parent"
    android:layout_height="match_parent"
    android:weightSum="3">
    <Button
        android:layout_width="match_parent"
        android:layout_height="0dp"
        android:layout_weight="1"/>
    <LinearLayout
        android:orientation="horizontal"
        android:layout_width="match_parent"
        android:layout_height="0dp"
        android:layout_weight="2"
        android:weightSum="3">
        <LinearLayout
            android:orientation="vertical"
            android:layout_width="0dp"
            android:layout_height="match_parent"
            android:layout_weight="2"
            android:weightSum="3">
            <Button
                android:layout_width="match_parent"
                android:layout_height="0dp"
                android:layout_weight="1"/>
            <Button
                android:layout_width="match_parent"
                android:layout_height="0dp"
                android:layout_weight="2"/>

        </LinearLayout>
        <Button
            android:layout_width="0dp"
            android:layout_height="match_parent"
            android:layout_weight="1"></Button>
    </LinearLayout>

</LinearLayout>
<?xml version="1.0" encoding="utf-8"?>
<LinearLayout xmlns:android="http://schemas.android.com/apk/res/android"
    android:orientation="vertical"
    android:layout_width="match_parent"
    android:layout_height="match_parent"
    android:weightSum="3">
    <LinearLayout
        android:layout_width="match_parent"
        android:layout_height="0dp"
        android:layout_weight="1"
        android:weightSum="3" >
        <Button

            android:layout_width="0dp"
            android:layout_height="match_parent"
            android:layout_weight="1">

        </Button>
        <LinearLayout
            android:orientation="vertical"
            android:layout_width="0dp"
            android:layout_height="match_parent"
            android:layout_weight="2"
            android:weightSum="2">
            <Button
                android:layout_width="match_parent"
                android:layout_height="0dp"
                android:layout_weight="1"
                android:orientation="vertical"
               ></Button>
            <Button
                android:layout_width="match_parent"
                android:layout_height="0dp"
                android:layout_weight="1"></Button>

        </LinearLayout>

    </LinearLayout>

   <Button
       android:layout_width="match_parent"
       android:layout_height="0dp"
       android:layout_weight="1">
   </Button>

    <LinearLayout
        android:orientation="horizontal"
        android:layout_width="match_parent"
        android:layout_height="0dp"
        android:layout_weight="1"
        android:weightSum="3">
        <LinearLayout
            android:orientation="vertical"
            android:layout_width="0dp"
            android:layout_height="match_parent"
            android:layout_weight="1"
            android:weightSum="3">
            <Button
                android:layout_width="match_parent"
                android:layout_height="0dp"
                android:layout_weight="1"/>
            <Button
                android:layout_width="match_parent"
                android:layout_height="0dp"
                android:layout_weight="1"/>
            <Button
                android:layout_width="match_parent"
                android:layout_height="0dp"
                android:layout_weight="1"/>
        </LinearLayout>
        <Button
            android:layout_width="0dp"
            android:layout_height="match_parent"
            android:layout_weight="2"/>
    </LinearLayout>

</LinearLayout>
布局可以使用嵌套的方式,来满足不同的布局需求。通过以上四个例子对LineatLayout的布局方式做了充分的解释。
RelativeLayout(相对布局)
和LinearLayout的排列规则不同,RelativeLayout显得更加随意一些,他可以通过相对定位的方式让控件出现在布局的任何位置。
android:layout_centerVertical=”true”
android:layout_centerInParent=”true”
android:layout_centerHorizontal=”true”
分别表示位于整个屏幕的中间靠左,正中间,上边中间位置。
android:layout_alignParentBottom=”true”
android:layout_alignParentLeft=”true”
android:layout_alignParentRight=”true”
android:layout_alignParentTop=”true”
表示位于整个屏幕的上下左右,不过上和左是在同一个位置上,下和左是在同一个位置上。
android:layout_toLeftOf=”@+id/button_1”
android:layout_toRightOf=”@+id/button_1”
表示在button1的左边和右边。
android:layout_above=”@+id/button_1”
android:layout_below=”@+id/button_1”
表示在button1的上边和下边,以上这四个都是在参考按钮的外边,控件的上下左右对齐。
android:layout_alignLeft=”@+id/button_1”
android:layout_alignBottom=”@+id/button_1”
android:layout_alignRight=”@+id/button_1”
android:layout_alignTop=”@+id/button_1”
表示在button1的边线附近的上下左右,基准线对齐。
<?xml version="1.0" encoding="utf-8"?>
<RelativeLayout xmlns:android="http://schemas.android.com/apk/res/android"
    android:orientation="vertical"
    android:layout_width="match_parent"
    android:layout_height="match_parent">
    <Button
        android:id="@+id/button_1"
        android:layout_width="150dp"
        android:layout_height="150dp"
        android:layout_centerInParent="true"
        android:text="参考按钮"
        />
    <Button
        android:layout_width="wrap_content"
        android:layout_height="wrap_content"
        android:layout_alignLeft="@+id/button_1"
        android:layout_alignBottom="@+id/button_1"
        android:text="button1"/>
    <Button
        android:layout_width="wrap_content"
        android:layout_height="wrap_content"
        android:layout_alignRight="@+id/button_1"
        android:text="button2"/>
    <Button
        android:layout_width="wrap_content"
        android:layout_height="wrap_content"
        android:layout_toLeftOf="@+id/button_1"
        android:text="button3"/>
    <Button
        android:layout_width="wrap_content"
        android:layout_height="wrap_content"
        android:layout_alignParentBottom="true"
        android:text="button4"/>
    <Button
        android:layout_width="wrap_content"
        android:layout_height="wrap_content"
        android:layout_centerVertical="true"
        android:text="button5"/>
    <Button
        android:layout_width="wrap_content"
        android:layout_height="wrap_content"
        android:layout_above="@+id/button_1"
        android:text="button6"/>
</RelativeLayout>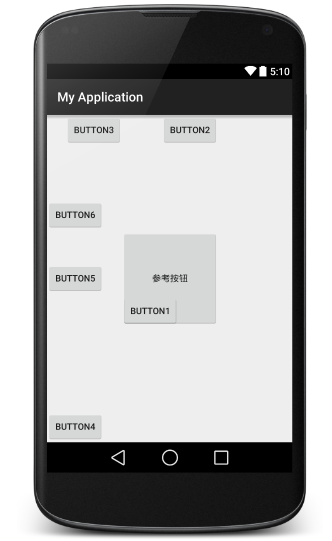


 240
240

 被折叠的 条评论
为什么被折叠?
被折叠的 条评论
为什么被折叠?
 到【灌水乐园】发言


