


在Spring Security 5.7.0-M2,我们弃用了 WebSecurityConfigurerAdapter ,因为我们鼓励用户转向使用基于组件的安全配置。
为了帮助大家熟悉这种新的配置风格,我们编制了一份常见用例表和推荐的新写法。
配置HttpSecurity
@Configuration
public class SecurityConfiguration extends WebSecurityConfigurerAdapter {

    @Override
    protected void configure(HttpSecurity http) throws Exception {
        http
            .authorizeHttpRequests((authz) -> authz
                .anyRequest().authenticated()
            )
            .httpBasic(withDefaults());
    }
}
往后,我们建议注册一个SecurityFilterChain bean来做这件事:
@Configuration
public class SecurityConfiguration {

    @Bean
    public SecurityFilterChain filterChain(HttpSecurity http) throws Exception {
        http
            .authorizeHttpRequests((authz) -> authz
                .anyRequest().authenticated()
            )
            .httpBasic(withDefaults());
        return http.build();
    }
}
配置WebSecurity
在Spring Security 5.4中,我们还引入了WebSecurityCustomizer。
WebSecurityCustomizer是一个回调接口,可以用来定制WebSecurity。
下面是一个使用WebSecurityConfigurerAdapter忽略匹配/ignore1或/ignore2的请求的示例配置:
@Configuration
public class SecurityConfiguration extends WebSecurityConfigurerAdapter {
    @Override
    public void configure(WebSecurity web) {
        web.ignoring().antMatchers("/ignore1", "/ignore2");
    }
}
往后,我们建议注册一个WebSecurityCustomizer bean来做这件事:
@Configuration
public class SecurityConfiguration {
    @Bean
    public WebSecurityCustomizer webSecurityCustomizer() {
        return (web) -> web.ignoring().antMatchers("/ignore1", "/ignore2");
    }
}
警告:如果你正在配置WebSecurity来忽略请求,建议你改为在HttpSecurity#authorizeHttpRequests内使用permitAll。想了解更多请参考configure Javadoc)。
01 认证原理与实战
自定义登录页面注意的细节
form表单提交和成功页面跳转必须是post请求
自定义的login.html中,form表单的method必须是post
<form action="/login" method="post">
    用户名:<input type="text" name="username"/></br>
    密码:<input type="password" name="password"/>
    <input type="submit" value="登录"/>
</form>
关闭csrf
http.csrf().disable();
快速开始
使用Springboot工程搭建Spring Security项目。
1.引入依赖
在pom中新增了Spring Security的依赖
        <dependency>
            <groupId>org.springframework.boot</groupId>
            <artifactId>spring-boot-starter-security</artifactId>
        </dependency>
2.创建测试访问接口
用于访问接口时触发Spring Security登陆页面
package com.qf.my.ss.demo.controller;

import org.springframework.web.bind.annotation.RequestMapping;
import org.springframework.web.bind.annotation.RestController;

/**
 * web controller
 * @author Thor
 * @公众号 Java架构栈
 */
@RestController
public class SecurityController {

    @RequestMapping("/hello")
    public String hello(){
        return "hello security";
    }
}
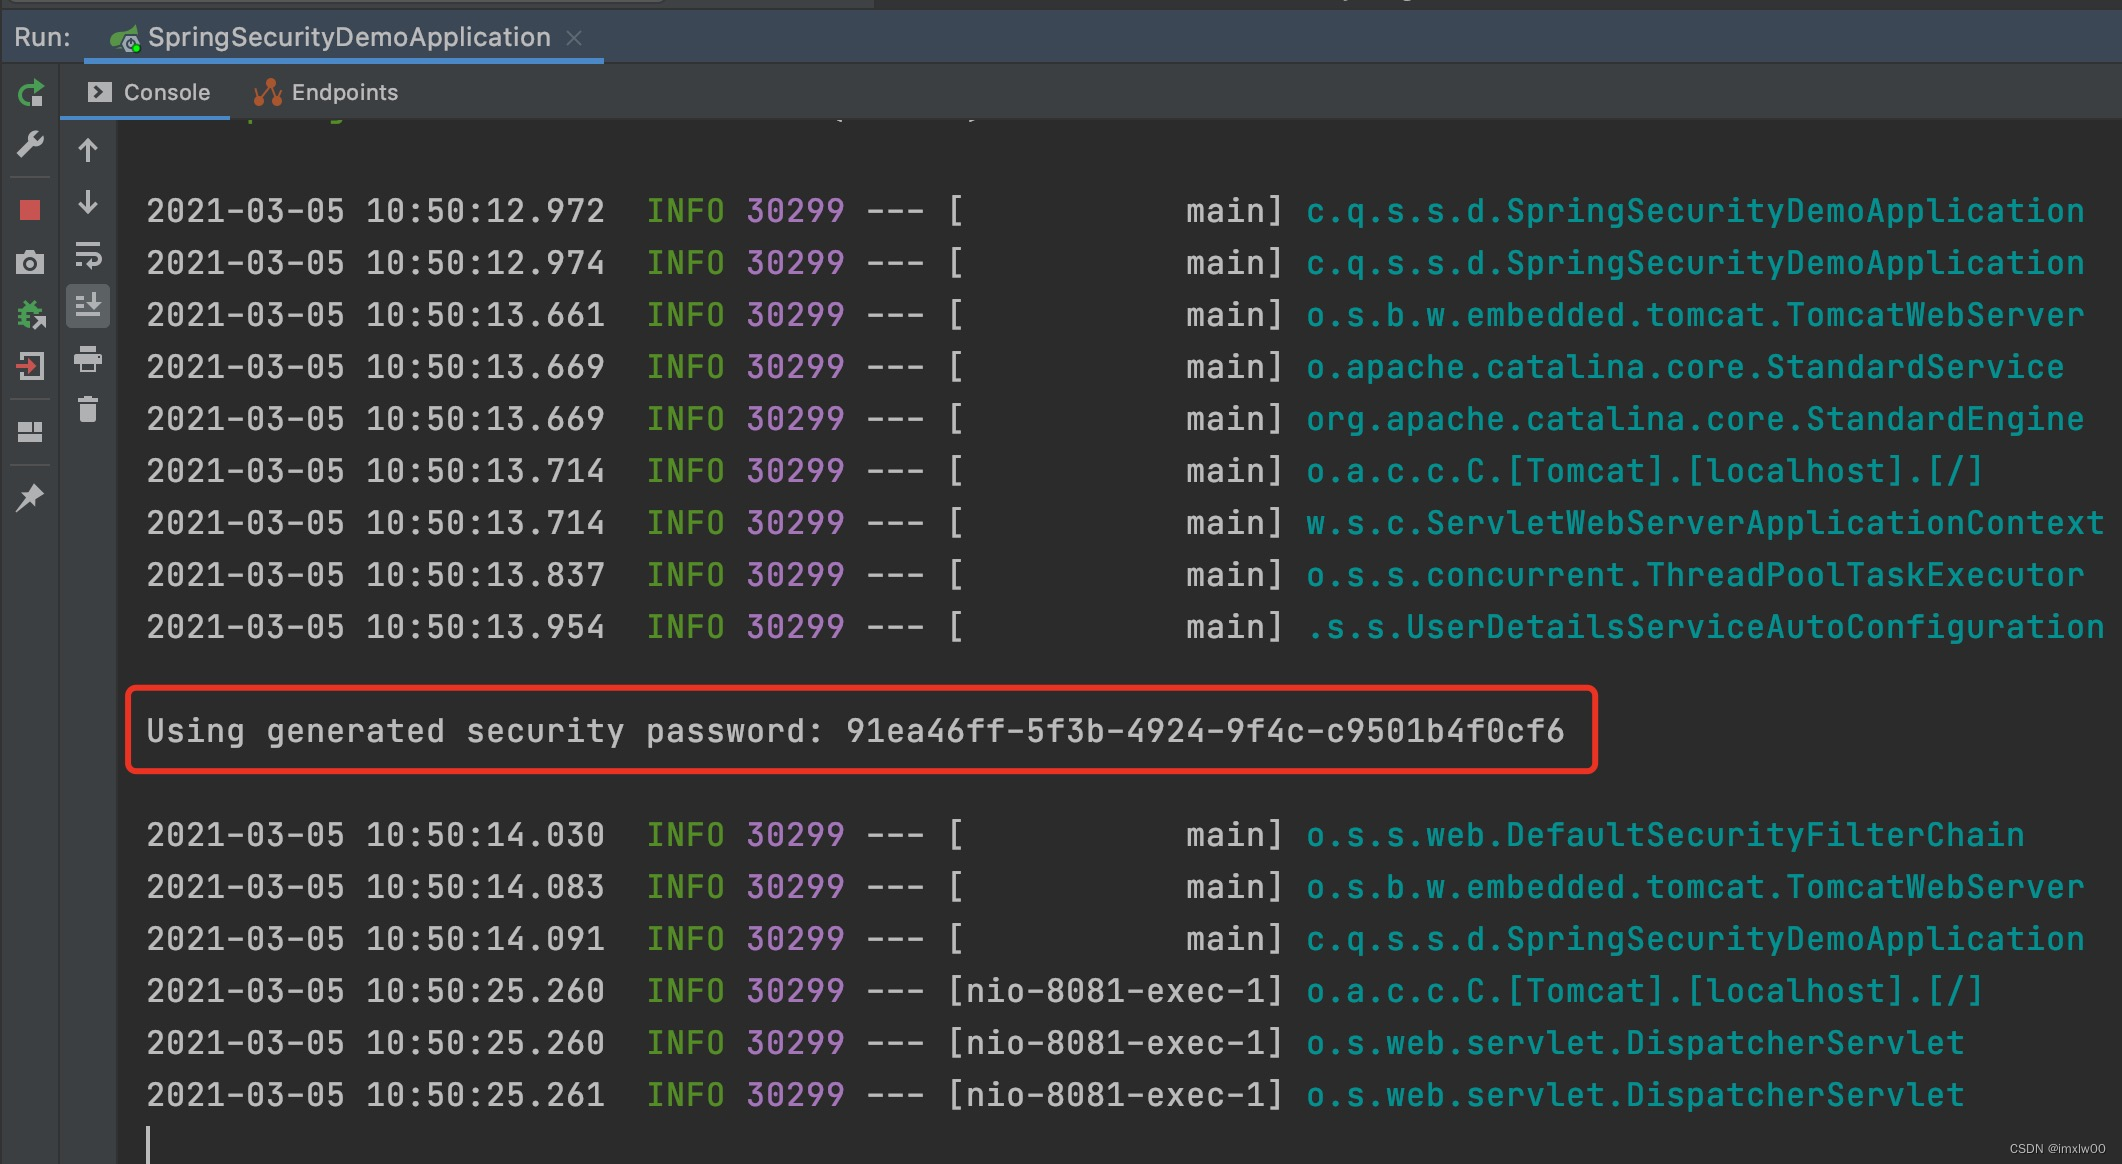
3.访问接口,自动跳转至Security登陆页面
访问add接口,讲自动跳转至Security的登陆页面

默认账号是: user
默认密码是:启动项目的控制台中输出的密码
自定义认证页面
自定义登陆页面
<!DOCTYPE html>
<html lang="zh-CN">
<head>
  <meta charset="utf-8">
  <meta name="viewport" content="width=device-width, initial-scale=1">
  <!-- Bootstrap 的 CSS 文件 -->
  <link rel="stylesheet" href="css/bootstrap/css/bootstrap.min.css">
  <title>登录</title>

</head>
<body class="bg-dark bg-opacity-75">
<div class="container vh-100">
  <div class="row vh-100">
    <div class="col-4 m-auto p-5 justify-content-center bg-white rounded">
      <form class="" role="form" action="/login"  method="post">
        <div class="mb-3">
          <label class="form-label mb-1 text-black-50">用户名:</label>
          <input type="text" class="form-control" name="username" value="user" >
        </div>
        <div class="mb-4">
          <label class="form-label mb-1 text-black-50">密码:</label>
          <input type="password" class="form-control" name="password">
        </div>
        <div class="mb-1">
          <button type="submit" class="form-control btn btn-primary">登录</button>
        </div>
      </form>
    </div>
  </div>
</div>
</body>
</html>
自定义错误页面
<!DOCTYPE html>
<html lang="en">
<head>
    <meta charset="UTF-8">
    <title>Title</title>
</head>
<body>
登录失败
</body>
</html>
自定义配置项
@Configuration
public class SecurityConfig {

    @Bean
    public WebSecurityCustomizer webSecurityCustomizer() {
        return (web) -> web.ignoring().antMatchers("/css/**");
    }


    @Bean
    public SecurityFilterChain filterChain(HttpSecurity http) throws Exception {
        http.formLogin() // 开启认证
                .loginPage("/login.html")//登录页面设置
                .defaultSuccessUrl("/index.html").permitAll()//登陆成功之后,跳转路径
                .loginProcessingUrl("/login")// 登录处理Url,只需要前后台内容一致内部逻辑不需要完成。写什么都可以
                .usernameParameter("username").passwordParameter("password") //修改自定义表单name值.
                //登陆失败,用户名或密码错误
                .failureUrl("/error.html").permitAll()
                .and().authorizeRequests().anyRequest().authenticated();//所有请求都需要认证之后访问*/
        http.csrf().disable();
        return http.build();
    }
}
配置登录用户
基于内存方式 配置文件
在 application.properties
spring.security.user.name=test
spring.security.user.password=test
基于内存方式 配置类
@Configuration
public class SecurityConfig {
    @Bean
    public InMemoryUserDetailsManager inMemoryUserDetailsManager(){
        UserDetails userDetails1 = User.withUsername("memory1").password("{noop}memory1").roles("memory1").build();
        UserDetails userDetails2 = User.withUsername("memory2").password("{noop}memory2").roles("memory2").build();
        return new InMemoryUserDetailsManager(userDetails1,userDetails2);
    }

}
基于JDBC 方式
引入依赖
<dependency>
    <groupId>org.springframework.boot</groupId>
    <artifactId>spring-boot-starter-jdbc</artifactId>
</dependency>
<dependency>
<groupId>com.mysql</groupId>
    <artifactId>mysql-connector-j</artifactId>
    <scope>runtime</scope>
</dependency>
设置配置文件
spring.datasource.driverClassName=com.mysql.cj.jdbc.Driver
spring.datasource.username=root
spring.datasource.password=root
spring.datasource.url = jdbc:mysql://localhost:3306/spring-auth-db?useUnicode=true&characterEncoding=utf-8&useSSL=false
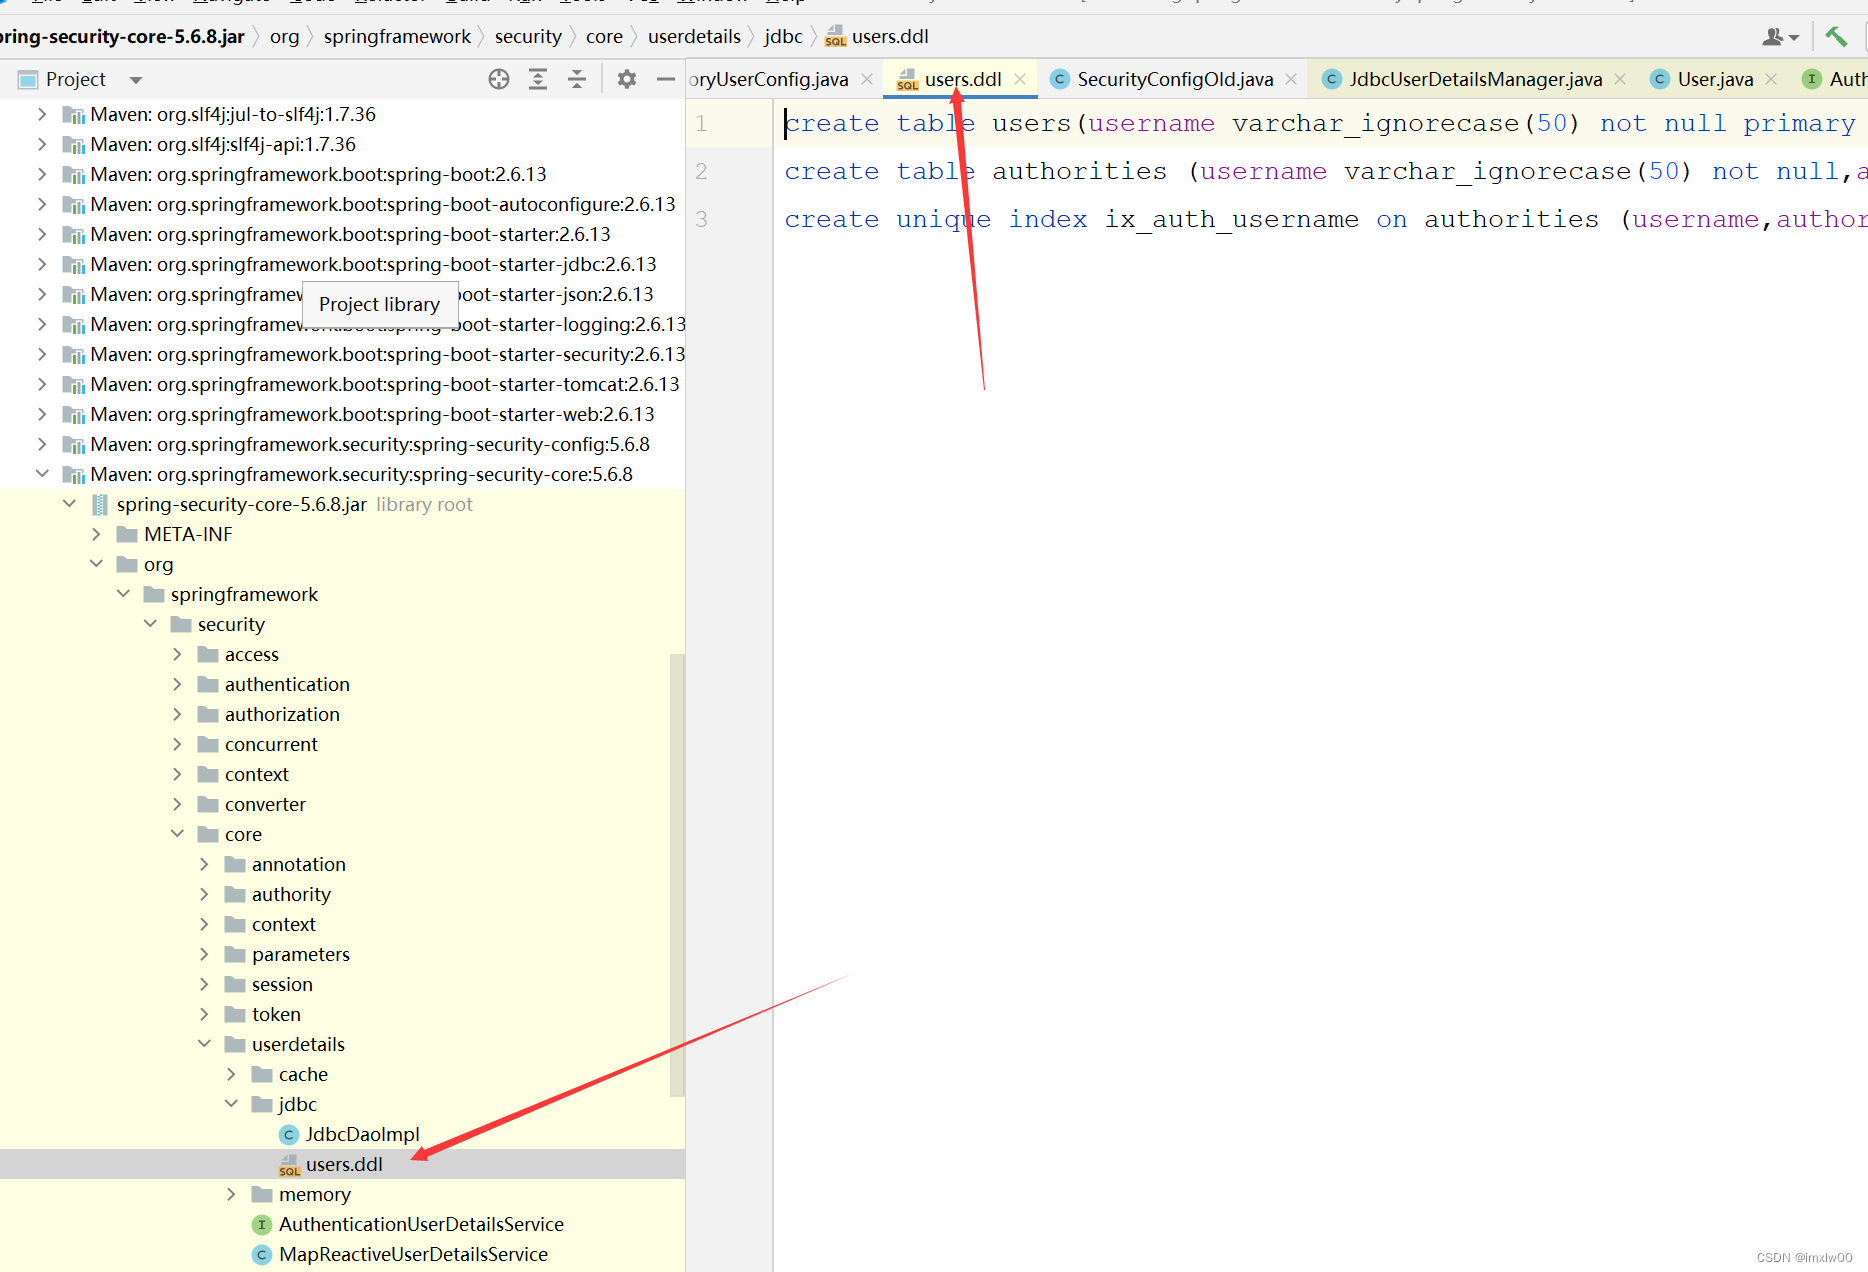
获取数据库执行脚本
在这个路径下:org/springframework/security/core/userdetails/jdbc/users.ddl 得到脚本后,将_ignorecase 去掉
配置JDBC Manager
@Autowired
    private DataSource dataSource;
    @Bean
    public JdbcUserDetailsManager jdbcUserDetailsManager(){
        JdbcUserDetailsManager jdbcUserDetailsManager = new JdbcUserDetailsManager(dataSource);
        if(!jdbcUserDetailsManager.userExists("lglbc-jdbc")){
            jdbcUserDetailsManager.createUser(User.withUsername("lglbc-jdbc").username("lglbc-jdbc").password("{noop}lglbc-jdbc").roles("admin").build());
        }
        if(!jdbcUserDetailsManager.userExists("lglbc-jdbc2")){
            jdbcUserDetailsManager.createUser(User.withUsername("lglbc-jdbc2").username("lglbc-jdbc2").password("{noop}lglbc-jdbc2").roles("admin").build());
        }
        return jdbcUserDetailsManager;
    }
基于自定义数据库
类似于JDBC
创建需要的表
![[外链图片转存失败,源站可能有防盗链机制,建议将图片保存下来直接上传(img-Kln5XlYj-1685353708659)(pringSecurityNew.assets/image-20230526170421830.png)]](https://i-blog.csdnimg.cn/blog_migrate/26cd1a696f06f9b46d06641b67fe6116.png)
定义UserDetails
public class LoginUser  implements UserDetails {
    private  User user;
    public  LoginUser(User user)
    {
        this.user=user;
    }

    @Override
    public Collection<? extends GrantedAuthority> getAuthorities() {
        List<SimpleGrantedAuthority> authorities = new ArrayList<>();
        for (Role role : user.getRoles()) {
            authorities.add(new SimpleGrantedAuthority(role.getName()));
        }
        return authorities;
    }

    @Override
    public String getPassword() {
        return user.getPassword();
    }

    @Override
    public String getUsername() {
        return user.getUsername();
    }

    @Override
    public boolean isAccountNonExpired() {
        return true;
    }

    @Override
    public boolean isAccountNonLocked() {
        return true;
    }

    @Override
    public boolean isCredentialsNonExpired() {
        return true;
    }

    @Override
    public boolean isEnabled() {
        return true;
    }
}
定义 UserDetailService
@Service
public class MyUserDetailService implements UserDetailsService {
    @Autowired
    JdbcTemplate jdbcTemplate;

    @Override
    public UserDetails loadUserByUsername(String username) throws UsernameNotFoundException {

        String ssql = "SELECT * FROM SECURITY_USERS WHERE USERNAME='" + username + "'";
        User user = jdbcTemplate.queryForObject(ssql, new BeanPropertyRowMapper<>(User.class));
        if (user.getUser_id() > 0) {
            String ssql2 = "SELECT A.*,B.NAME ROLENAME FROM SECURITY_AUTH A LEFT JOIN SECURITY_ROLES B ON A.ROLE_ID=B.ROLE_ID WHERE USER_ID='" + user.getUser_id() + "'";
            List<AuthSite> list = jdbcTemplate.query(ssql2, new BeanPropertyRowMapper<>(AuthSite.class));
            for (AuthSite auth : list) {
                user.getRoles().add(new Role(auth.getRole_id(),auth.getRoleName()));
            }
        }
        LoginUser loginUser=new LoginUser(user);
        return loginUser;
    }
}
设置配置文件
    @Autowired
    MyUserDetailService userServiceImpl;

	@Bean
    public AuthenticationManager authenticationManager(HttpSecurity httpSecurity) throws Exception {
        AuthenticationManager authenticationManager = httpSecurity.getSharedObject(AuthenticationManagerBuilder.class)
                .userDetailsService(userServiceImpl)
//                .passwordEncoder(passwordEncoder())
                .and()
                .build();
        return authenticationManager;
    }
自定义认证
实现 AuthenticationProvider
@Service
public class MyAuthenticationProvider implements AuthenticationProvider {
    @Autowired
    MyUserDetailService userService;
    @Override
    public Authentication authenticate(Authentication authentication) throws AuthenticationException {

        String username=authentication.getName();
        String password=authentication.getCredentials().toString();
        UserDetails user=userService.loadUserByUsername(username);


//        PasswordEncoder passwordEncoder=new BCryptPasswordEncoder();
//        if (passwordEncoder.matches(password,user.getPassword()))
//        {
//        {noop}123
        if (password.equals(user.getPassword().substring(6)))
        {
            return new  UsernamePasswordAuthenticationToken(username,password,user.getAuthorities());
        }
        else
            throw  new BadCredentialsException("用户名和密码错误");
    }

    @Override
    public boolean supports(Class<?> authentication) {
        return authentication.equals(UsernamePasswordAuthenticationToken.class);
    }
}
配置文件
 @Autowired
    MyAuthenticationProvider myAuthenticationProvider;

@Bean
    public AuthenticationManager authenticationManager(HttpSecurity httpSecurity) throws Exception {
        AuthenticationManager authenticationManager = httpSecurity.getSharedObject(AuthenticationManagerBuilder.class)
                .authenticationProvider(myAuthenticationProvider)
                .build();
        return authenticationManager;
    }
异常
自定义 AuthenticationEntryPoint
public class UnAuthEntryPoint implements AuthenticationEntryPoint {
    @Override
    public void commence(HttpServletRequest request, HttpServletResponse response, AuthenticationException authException) throws IOException, ServletException {
        //ResultModel:状态码,信息,数据
        ResponseUtil.out(response, LResult.Error("没有权限"));
       // response.sendRedirect("/unauth.html");
    }
}
配置文件
http.exceptionHandling().authenticationEntryPoint(new UnAuthEntryPoint());
自定义登录成功和失败处理
成功 实现AuthenticationSuccessHandler
失败 实现AuthenticationFailureHandler
public class MyAuthenticationSuccessHandler implements AuthenticationSuccessHandler {
//    private RedirectStrategy redirectStrategy = new
//            DefaultRedirectStrategy();

    private String url;

    public MyAuthenticationSuccessHandler() {

    }
    @Override
    public void onAuthenticationSuccess(HttpServletRequest request, HttpServletResponse response, FilterChain chain, Authentication authentication) throws IOException, ServletException {
    }

    @Override
    public void onAuthenticationSuccess(HttpServletRequest request, HttpServletResponse response, Authentication authentication) throws IOException, ServletException {
        System.out.println("登录成功后续处理....");
        //重定向到index页
        // response.sendRedirect("/index.html");
        //redirectStrategy.sendRedirect(request, response, "/index2.html");
         //ajax 请求
        ResponseUtil.out(response, LResult.Success("","登录成功!!!"));
    }
}
public class MyAuthenticationFailureHandler  implements AuthenticationFailureHandler {
    private String url;

    public MyAuthenticationFailureHandler( ) {

    }
    @Override
    public void onAuthenticationFailure(HttpServletRequest request, HttpServletResponse response, AuthenticationException exception) throws IOException, ServletException {
        //ajax 请求
        ResponseUtil.out(response, LResult.Error("密码或用户错误"));
		//response.sendRedirect("/error.html");
        System.out.println("oooo");
    }


}
配置文件
//   .defaultSuccessUrl("/index.html").permitAll()//登陆成功之后,跳转路径
// .failureUrl("/error.html")//登陆失败,
.successHandler(new MyAuthenticationSuccessHandler())
.failureHandler(new MyAuthenticationFailureHandler())


.and().authorizeRequests()
.antMatchers("/error.html").permitAll()
.antMatchers("/unauth.html").permitAll()
自动登录
简单的Token生成方法
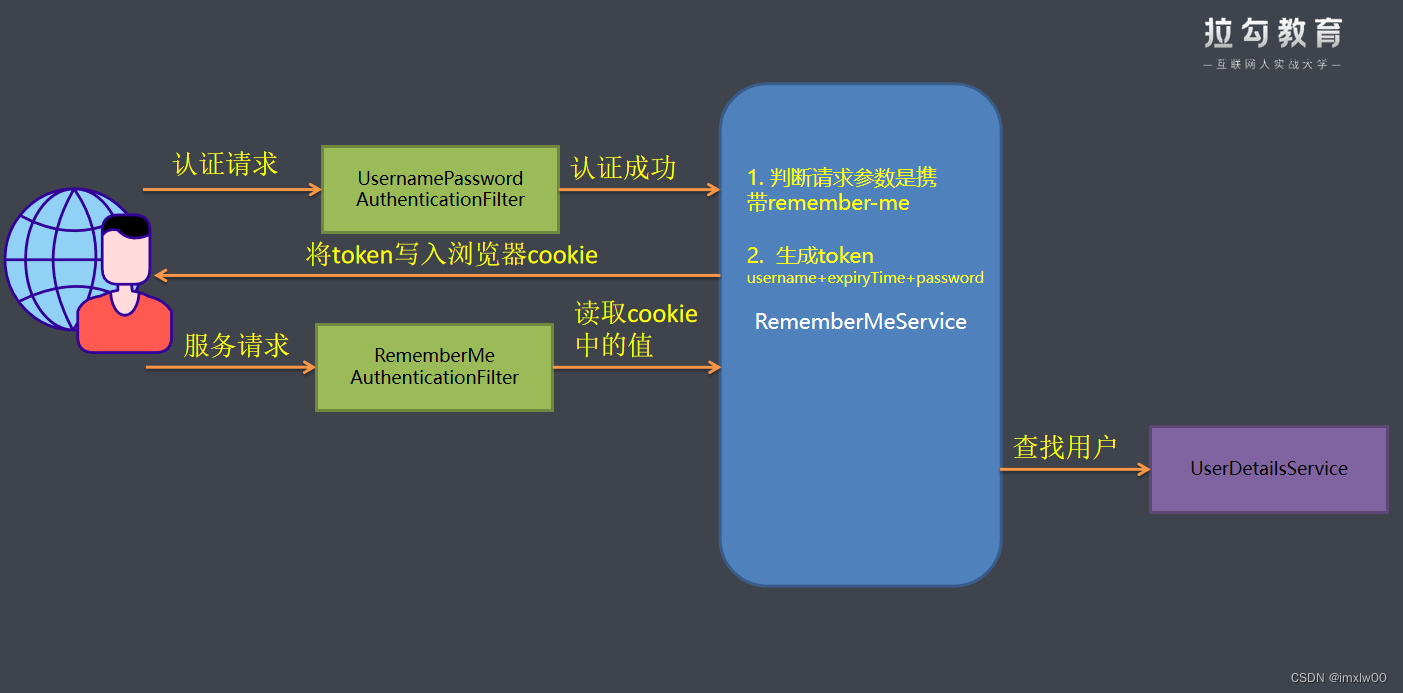
Token=MD5(username+分隔符+expiryTime+分隔符+password)
注意 这种方式不推荐使用 , **有严重的安全问题 ** 。就是密码信息在前端浏览器 cookie中存放如果cookie被盗取很容易破解
- 前端页面需要增加remember-me的复选框
<!--记住我 name为remember-me value值可选true yes 1 on 都行-->

<input type="checkbox" name="remember-me" value="true"/>记住我

</div>

</div>
- 后台代码开启remember-me功能
.and().rememberMe()//开启记住我功能

.tokenValiditySeconds(1209600)// token失效时间默认2周

.rememberMeParameter("remember-me")// 自定义表单name值
- 登录成功后前台cookie
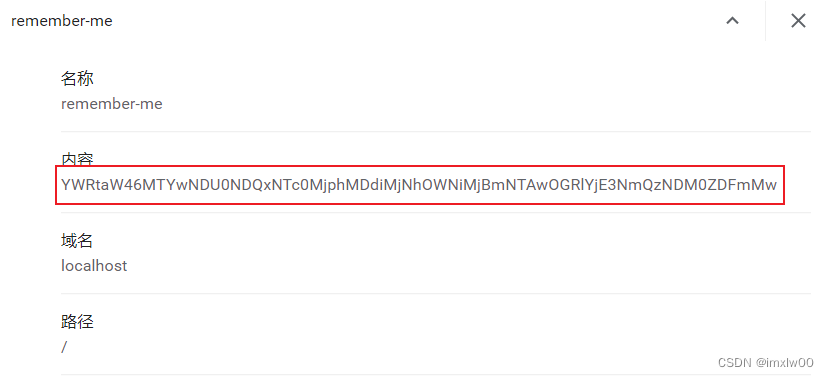
持久化的Token生成方法
存入数据库Token包含
token: 随机生成策略,每次访问都会重新生成
series: 登录序列号,随机生成策略。用户输入用户名和密码登录时,该值重新生成。使用
remember-me功能,该值保持不变
expiryTime: token过期时间。
CookieValue=encode(series+token)
创建表
CREATE TABLE `persistent_logins` (
 `username` varchar(64) NOT NULL,
 `series` varchar(64) NOT NULL,
 `token` varchar(64) NOT NULL,
 `last_used` timestamp NOT NULL DEFAULT CURRENT_TIMESTAMP ON UPDATE
CURRENT_TIMESTAMP,
 PRIMARY KEY (`series`)
)
编写配置类
@Autowired
private DataSource dataSource;
@Bean
public PersistentTokenRepository persistentTokenRepository(){
JdbcTokenRepositoryImpl jdbcTokenRepository = new
JdbcTokenRepositoryImpl();
// 赋值数据源
jdbcTokenRepository.setDataSource(dataSource);
// 自动创建表,第一次执行会创建,以后要执行就要删除掉!
// jdbcTokenRepository.setCreateTableOnStartup(true);
return jdbcTokenRepository;
}
@Autowired
private UsersServiceImpl usersService;
@Autowired
private PersistentTokenRepository tokenRepository;
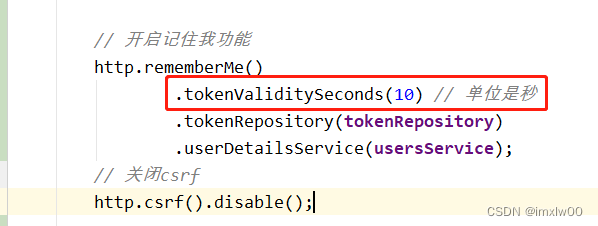
// 开启记住我功能
http.rememberMe()
.tokenRepository(tokenRepository)
.userDetailsService(usersService);
页面添加记住我复选框
记住我:<input type="checkbox"name="remember-me"title="记住密码"/><br/>
设置有效期
退出登录
org.springframework.security.web.authentication.logout.LogoutFilter
匹配URL为/logout的请求,实现用户退出,清除认证信息。
只需要发送请求,请求路径为/logout即可, 当然这个路径也可以自行在配置类中自行指定, 同时退出
操作也有对应的自定义处理LogoutSuccessHandler,退出登录成功后执行,退出的同时如果有
remember-me的数据,同时一并删除
1.前端页面
<a class="button button-little bg-red" href="/logout">

<span class="icon-power-off"></span>退出登录</a></div>
2.LogoutSuccessHandler
public class MyAuthenticationService implements LogoutSuccessHandler {
    @Override
    public void onLogoutSuccess(HttpServletRequest request,HttpServletResponse response, Authentication authentication) throws
    IOException, ServletException {
            System.out.println("退出成功后续处理....");
            redirectStrategy.sendRedirect(request, response, "/toLoginPage");
    }
}
3.配置文件
.and().logout().logoutUrl("/logout")//设置退出url
.logoutSuccessHandler(myAuthenticationService)//自定义退出处理
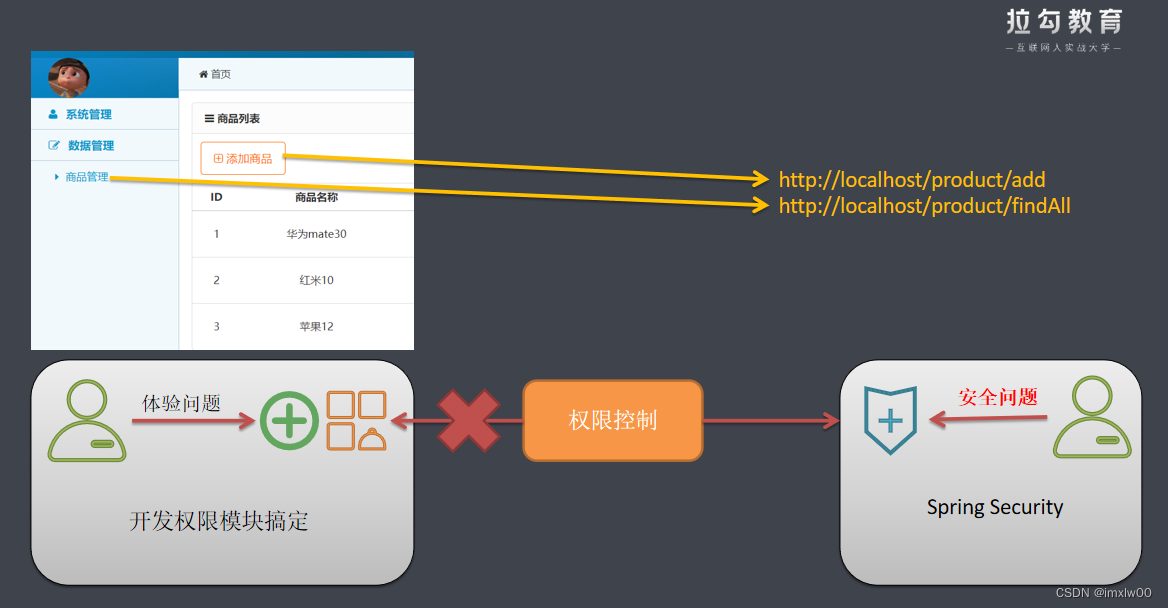
02 授权原理与实战
授权简介
安全权限控制问题其实就是控制能否访问url
Spring Security 授权原理
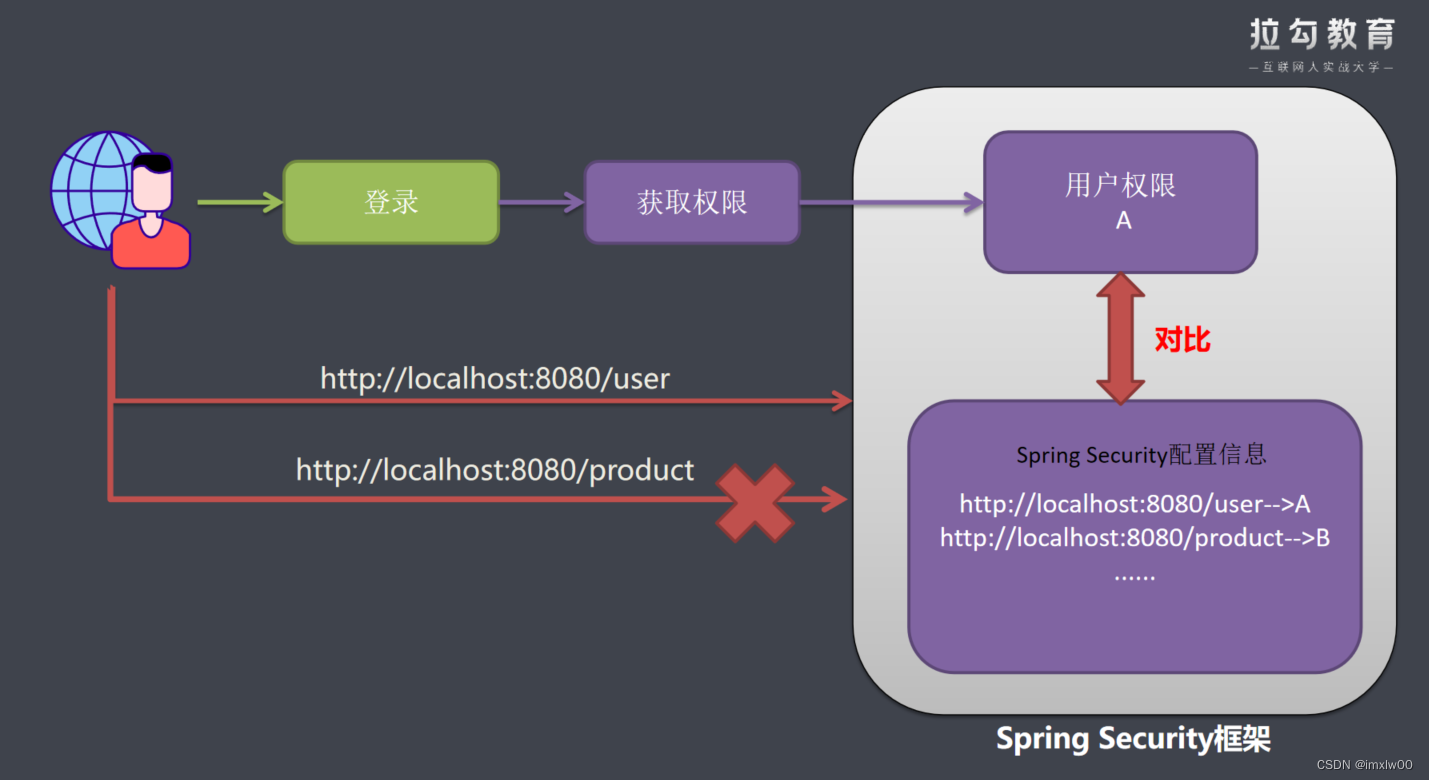
在我们应用系统里面,如果想要控制用户权限,需要有2部分数据。
-
系统配置信息数据:写着系统里面有哪些URL,每一个url拥有哪些权限才允许被访问。
-
另一份数据就是用户权限信息:请求用户拥有权限
系统用户发送一个请求:系统配置信息和用户权限信息作比对,如果比对成功则允许访问。
内置权限表达式
Spring Security 使用Spring EL来支持,主要用于Web访问和方法安全上, 可以通过表达式来判断是否具有访问权限. 下面是Spring Security常用的内置表达式. ExpressionUrlAuthorizationConfifigurer定义了所有的表达式
| 表达式 | 说明 |
|---|---|
| permitAll | 指定任何人都允许访问。 |
| denyAll | 指定任何人都不允许访问 |
| anonymous | 指定匿名用户允许访问。 |
| rememberMe | 指定已记住的用户允许访问。 |
| authenticated | 指定任何经过身份验证的用户都允许访问,不包含 anonymous |
| fullyAuthenticated | 指定由经过身份验证的用户允许访问,不包含anonymous和rememberMe |
| hasRole(role) | 指定需要特定的角色的用户允许访问,会自动在角色前面插入’ROLE_’ |
| hasAnyRole([role1,role2]) | 指定需要任意一个角色的用户允许访问,会自动在角色前面插入’ROLE_’ |
| hasAuthority(authority) | 指定需要特定的权限的用户允许访问 |
| hasAnyAuthority([authority,authority]) | 指定需要任意一个权限的用户允许访问 |
| hasIpAddress(ip) | hasIpAddress(ip) |
url 安全表达式
基于web访问使用表达式保护url请求路径.
-
设置url访问权限
// 设置/user/** 访问需要ADMIN角色 http.authorizeRequests().antMatchers("/user/**").hasRole("ADMIN"); // 设置/user/** 访问需要PRODUCT角色和IP地址为127.0.0.1 .hasAnyRole("PRODUCT,ADMIN") http.authorizeRequests().antMatchers("/product/**") .access("hasAnyRole('ADMIN,PRODUCT') and hasIpAddress('127.0.0.1')"); // 设置自定义权限不足信息. http.exceptionHandling().accessDeniedHandler(accessDeniedHandler); -
MyAccessDeniedHandler自定义权限不足类
/** * 自定义权限不足信息 */ @Component public class MyAccessDeniedHandler implements AccessDeniedHandler { @Override public void handle(HttpServletRequest httpServletRequest, HttpServletResponse resp, AccessDeniedException e) throws IOException, ServletException { resp.setStatus(HttpServletResponse.SC_FORBIDDEN); resp.setContentType("text/html;charset=UTF-8"); resp.getWriter().write("权限不足,请联系管理员!"); } } -
设置用户对应的角色权限

// 先声明一个权限集合, 因为构造方法里面不能传入null
Collection<GrantedAuthority> authorities = new ArrayList<>();
if ("admin".equalsIgnoreCase(user.getUsername())) {
	authorities.add(new SimpleGrantedAuthority("ROLE_ADMIN"));
} else {
	authorities.add(new SimpleGrantedAuthority("ROLE_PRODUCT"));
}
Method安全表达式
针对方法级别的访问控制比较复杂, spring security 提供了4种注解分别是
@PreAuthorize , @PostAuthorize ,@PreFilter , @PostFilter .
- 开启方法级别的注解配置
在security配置类中添加注解
/**
* Security配置类
*/
@Configuration
@EnableGlobalMethodSecurity(prePostEnabled = true)//开启注解支持
public class SecurityConfiguration extends WebSecurityConfigurerAdapter
- 在方法上使用注解
@ProAuthorize : 注解适合进入方法前的权限验证
/**
* 查询所有用户
*
* @return
*/
@RequestMapping("/findAll")
@PreAuthorize("hasRole('ADMIN')")//需要ADMIN权限
public String findAll(Model model) {
    List<User> userList = userService.list();
    model.addAttribute("userList", userList);
    return "user_list";
}
/**
* 用户修改页面跳转
*
* @return
*/
@RequestMapping("/update/{id}")
@PreAuthorize("#id<10")//针对参数权限限定 id<10可以访问
    public String update(@PathVariable Integer id, Model model) {
    User user = userService.getById(id);
    model.addAttribute("user", user);
    return "user_update";
}
@PostAuthorize: @PostAuthorize在方法执行后再进行权限验证,适合验证带有返回值的权限, Spring EL 提供返回对象能够在表达式语言中获取到返回对象的 returnObject
/**
* 根据ID查询用户
*
* @return
*/
@GetMapping("/{id}")
@ResponseBody
@PostAuthorize("returnObject.username==authentication.principal.username")//判断查询用户信息是否是当前登录用户信息.否则没有
权限
public User getById(@PathVariable Integer id) {
    User user = userService.getById(id);
    return user;
}
returnObject : 代表return返回的值
@PreFilter: 可以用来对集合类型的参数进行过滤, 将不符合条件的元素剔除集合
/**
* 商品删除-多选删除
*
* @return
*/
@GetMapping("/delByIds")
@PreFilter(filterTarget = "ids", value = "filterObject%2==0")//剔除参数为
基数的值
public String delByIds(@RequestParam(value = "id") List<Integer> ids) {
    for (Integer id : ids) {
    	System.out.println(id);
    }
    return "redirect:/user/findAll";
}
@PostFilter: 可以用来对集合类型的返回值进行过滤, 将不符合条件的元素剔除集合
/**
* 查询所有用户-返回json数据
*
* @return
*/
@RequestMapping("/findAllTOJson")
@ResponseBody
@PostFilter("filterObject.id%2==0")//剔除返回值ID为偶数的值
public List<User> findAllTOJson() {
    List<User> userList = userService.list();
    return userList;
}
自定义Bean授权
- 定义自定义授权类
/**
* 自定义授权类
*/
@Component
public class MyAuthorizationService {
/**
* 检查用户是否有对应的访问权限
*
* @param authentication 登录用户
* @param request 请求对象
* @return
*/
public boolean check(Authentication authentication, HttpServletRequest
request) {
    User user = (User) authentication.getPrincipal();
    // 获取用户所有权限
    Collection<GrantedAuthority> authorities = user.getAuthorities();
    // 获取用户名
    String username = user.getUsername();
    // 如果用户名为admin,则不需要认证
    if (username.equalsIgnoreCase("admin")) {
    	return true;
    } else {
    // 循环用户的权限, 判断是否有ROLE_ADMIN权限, 有返回true
        for (GrantedAuthority authority : authorities) {
            String role = authority.getAuthority();
            if ("ROLE_ADMIN".equals(role)) {
            	return true;
        	}
    	}
    }
    return false;
}
- 配置类
//使用自定义Bean授权
http.authorizeRequests().antMatchers("/user/**").
access("@myAuthorizationService.check(authentication,request)");
- 携带路径变量
/**
* 检查用户是否有对应的访问权限
*
* @param authentication 登录用户
* @param request 请求对象
* @param id 参数ID
* @return
*/
public boolean check(Authentication authentication, HttpServletRequestrequest, Integer id) {
    if (id > 10) {
    	return false;
    }
    return true;
}
//配置类
//使用自定义Bean授权,并携带路径参数
http.authorizeRequests().antMatchers("/user/delete/{id}").
access("@myAuthorizationService.check(authentication,request,#id)");
基于数据库的RBAC数据模型的权限控制
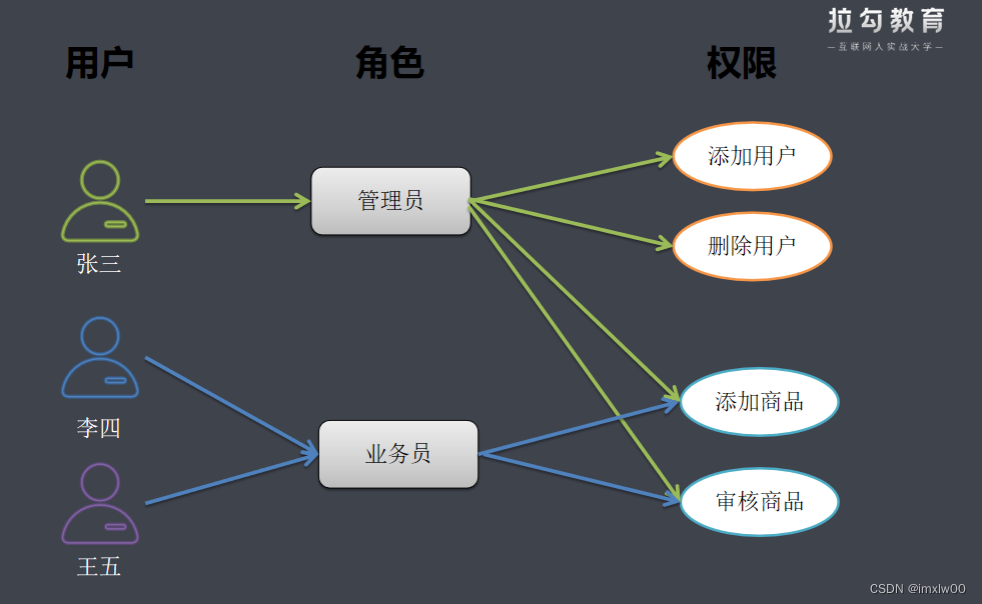
RBAC权限模型简介
RBAC权限模型(Role-Based Access Control)即:基于角色的权限控制。模型中有几个关键的术语:
用户:系统接口及访问的操作者
权限:能够访问某接口或者做某操作的授权资格
角色:具有一类相同操作权限的总称
RBAC权限模型核心授权逻辑如下:
某用户是什么角色?
某角色具有什么权限?
通过角色对应的权限推导出用户的权限
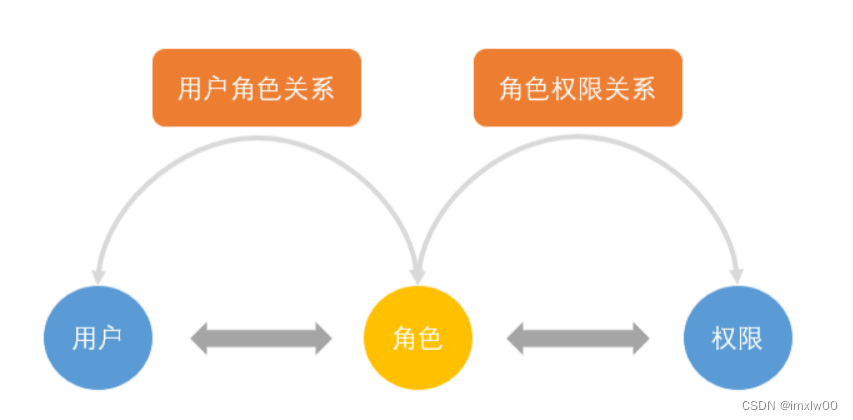
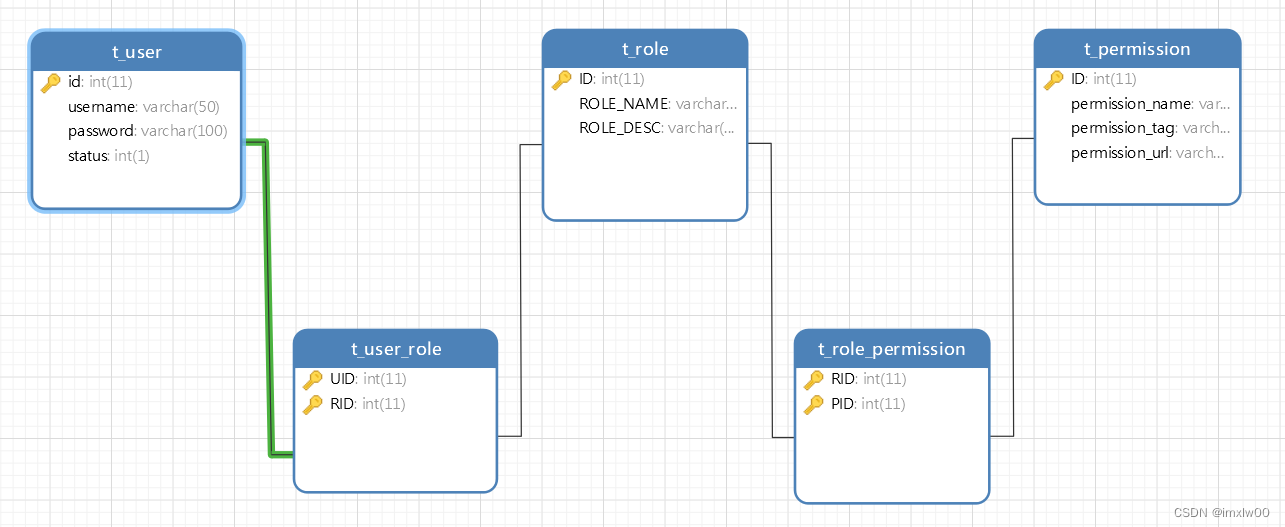
基于RBAC设计权限表结构
一个用户有一个或多个角色
一个角色包含多个用户
一个角色有多种权限
一个权限属于多个角色
实现RBAC权限管理
- 动态查询数据库中用户对应的权限
public interface PermissionMapper extends BaseMapper<Permission> {
/**
* 根据用户ID查询权限
2. 给登录用户授权
3. 设置访问权限
3.4 基于页面端标签的权限控制
在jsp页面或者thymeleaf模板页面中我们可以使用spring security提供的权限标签来进行权限控制.要
想使用thymeleaf为SpringSecurity提供的标签属性,首先需要引入thymeleaf-extras-springsecurity依
赖支持。
1. 在pom 文件中的引入springsecurity的标签依赖thymeleaf-extras-springsecurity5。
2. 在html文件里面申明使用
*
* @param id
* @return
*/
@Select("SELECT p.* FROM t_permission p,t_role_permission rp,t_role r,t_user_role ur,t_user u " +
"WHERE p.id = rp.PID AND rp.RID = r.id AND r.id = ur.RID AND ur.UID = u.id AND u.id =#{id}")
List<Permission> findByUserId(Integer id);
}
- 给登录用户授权
// 先声明一个权限集合, 因为构造方法里面不能传入null
Collection<GrantedAuthority> authorities = new ArrayList<>();
// 查询用户对应所有权限
List<Permission> permissions = permissionService.findByUserId(user.getId());
for (Permission permission : permissions) {
    // 授权
    authorities.add(new SimpleGrantedAuthority(permission.getPermissionTag()));
}
- 设置访问权限
// 查询数据库所有权限列表
List<Permission> permissions = permissionService.list();
for (Permission permission : permissions) {
    //添加请求权限
    http.authorizeRequests().antMatchers(permission.getPermissionUrl()).hasAuthority(permission.getPermissionTag());
}


 1824
1824

 被折叠的 条评论
为什么被折叠?
被折叠的 条评论
为什么被折叠?
 到【灌水乐园】发言


