


This series of articles are the study notes of "An Arduino platform and C Programming", by Prof. Harris, Department of Computer Science, University of California, Irvine. This article is the notes of week 4, lessen 3.
3. Lesson 3
3.1 Lecture3-1: Serial on Arduino
So now we've been talking about serial, specifically UART. Talking about serial protocols and, in general, how they work. So now we're going to talk about how you actually use that on an Arduino, Arduino Serial Communication.
3.1.1 Arduino Serial Communication
(1) UART protocol used over the USB cable
So UART protocol is used over the USB cable. That's not how it used to be, it used to be there was an RS232. That's not what we're using here. We're taking UART and we're transmitting it over the USB cable, which is the Arduino's connection to the host computer.
(2) Initialize by using Serial.begin()
You can use it for interfacing with your machine, actually, with your Arduino one reason
we're using is for debugging. So can we also use for debugging. So basically if you have some debugging statement that you want to print out during the execution of the code, to say something with the status of the code. You can change your code, put in effectively a print statement, which I'll show you in a second. You can put a print statement in there and it'll be printed to the screen of the host using the serial monitor. So what happens is,
you can start the serial monitor on your host, and then when you do one of these print statements, the text will appear in the serial monitor. But you can use serial interface for lots of different things. All kinds of communication from the host to the Arduino at run time.
You can use the serial interface. So you initialize the interface by invoking this command, serial.begin. You invoke that inside your sketch. Typically that's going to be inside the setup part, because you usually want to initialize the serial one time, only right at the beginning when it starts running.
(3) Serial.begin(speed) or Serial.begin(speed, config);
Now, begin can take one argument or two arguments. You can just say Serial.begin with the speed, or it can take the speed and the configuration.
(4) speed is the baud rate
The speed is the baud rate. So you give it a baud rate, 9600 baud is typical. You can give it what you want, just make sure that the baud rate that you use is synchronized at the same as the baud rate used on the receiving end.
So remember there's two things communicating here, there's the Arduino and there's the host. So if, on the Arduino side, you set the baud rate to 9600 baud, then on the host, the host meaning the serial monitor which is the program running on the host, it has to have a baud rate set at the same speed, okay? Now the default is 9600 baud for us so we're just going to stick with 9600 baud, then you don't have to change any settings of the serial monitor. You just start the serial monitor and it is running 9600 baud and it'll work.
(5) config sets the data bits, parity, and stop bits
So the config argument, if you decide to use it, is the configuration of the serial communication. So all the information about or, most of the information about the serial communication has to be known between the transmitter and receiver.
Specifically, it says the number of data bits, typically eight. Eight is the default, if you don't set the configuration. But you can change that, and make it seven or something like that. The parity bits, so are you using a parity bit or not? Yes or no, and you can make it even or odd parity, inverting the parity, but you set if you're going to use the parity bit or not. Also, the number of stop bits. You can use one stop bits, or two stop bits, and you can set that in the configuration as well.
(6) Serial.begin(9600)
So, an example is you can just type Serial.begin(9600), that's typical, it just gives the speed as an argument, and
uses the default configuration, which is
8 data bits,
no parody bits,
one stop bit.
(7) Serial.begin(9600, SERIAL_8N1)
- 8 data bit, no parity, 1 stop bit
Or, you could specify the configuration. So, here we say 9600 bauds of speed but we use Serial_8N1, so that specifies 8, that 8 there is for the number of data bits. The n is for no parity, and the 1 is for the number of stop bid. One stop bid or two.
(8) Usually call inside the setup() function
I usually call serial.begin inside the setup function because you usually only need to do it once.
3.1.2 Sending Text Over Serial
(1) Use Serial.print() or Serial.println() to print text in the serial monitor
Serial.print(“hello”);
So when you're sending data over serial, in order to receive it, you gotta invoke a program on a host to receive it. Now the built in program with the Arduino IDE, is going to be the serial monitor. Now, just as a note, you don't have to technically use a serial monitor. You can use any program that can receive serial data. So there are lots of terminal emulators that you can use that will receive serial data, like putty, or something that I use, but you can use a lot. But we're going to be using the serial monitor. So you invoke the serial monitor from the IDE, and it opens up a window that looks like this.
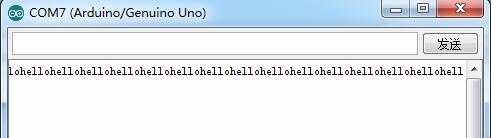
Now, in order to print something, to send data, send some text from the Arduino to the host. To the serial monitor running on the host, you've gotta call a function. Either Serial.print, or Serial.println, and that prints text in the serial monitor on the host. Now Serial.print just sends the text, so you can put in quotes, hello, like I have there. Serial.print("hello"), and it sends the word hello. Or, you could put Serial.println() and that prints the text and it also prints a carriage return. I chose, in this case, Serial.print("hello"), so there's no carriage return. So, if I put that in the loop, my loop is just serial.print("hello"). I upload that to the Arduino and I run it, and as soon as it's uploaded, it starts running. Then I start the serial monitor. When I start the serial monitor, this is what I see in the monitor, the word hello, over and over and over again.
So that's how you send text over serial, with the print function or the println function.
(2) Strings are converted to ASCII and sent using UART
And strings are converted. Strings like hello, are converted to ASCII and sent over to UART. So remember, ASCII is the way we represent characters. So ASCII, the ASCII table is a table that maps every character, visible characters and invisible characters to an eight bit number. We don't see that. When we do a print, we don't see the ASCII, but that's going on behind the scenes.
The data, the word hello is five characters, H-E-L-L-O. So that's converted into eight different bytes, right? One ASCII code byte for each character and those eight bytes are transmitted by serial and then on the receiving end the serial monitor it receives each of these eight, these five bytes and it interprets it as ASCII. So everything it receives, it receives a number. It doesn't print the number that it receives. It says oh, that number must be an ASCII value, it looks in the ASCII table and converts it to the corresponding ASCII code and you see the text.
(3) Serial monitor interprets bytes as ASCII
So it interprets all the bytes it receives as ASCII.
3.1.3 Sending Data Over Serial
(1) Use Serial.write();
- Serial.print(42);
- Serial monitor still interprets data as ASCII
- 42 is the ASCII value for ‘*’
Now let's say you want to send data, you don't want to send a string. You just want to send some raw data, you want to send a number, like the number 42, right? You want to send that number. Instead of using print, Serial.print, you use Serial.write. And then in parenthesis you just pass the number, the value you want to send. And it'll send that number, 42. Now, take a look at the serial monitor there and what you see is that asterisk, right, repeated over and over. The reason for that is because the number 42 is being sent to the serial monitor but the serial monitor interpreting that as an ASCII value. So it's taken the number 42, looking up in its ASCII table what character that is, and it turns out that the number 42 corresponds to an asterisk. So, that's what it prints.
Presumably if you're sending over serial, you might not use a serial monitor. Remember that you can use serial communications with anything, right. Maybe you've got another processor, which also has serial right, has UART. And so you might not want to interpret the data, that 42 might not be meant as a characters, as an asterisk character right. You just want to interpret it as raw data. You could do that, but the serial monitor always interprets everything as an ASCII character and prints it that way.
3.2 Lecture3-2: Reading from Serial
So, so far we've been talking about the serial interface, using it to send data from the Arduino to the host. But it can be used in the opposite direction, so we'll talk about that.
3.2.1 Reading Data Over Serial
(1) Data can be sent to the Arduino via the serial monitor
To be able to take data at the host, and sent it to the Arduino. It's great for user interfaces. If you want to send commands manually, you type in a command and have the Arduino do something in response to your command. You might use a serial interface, want to type something and send it to the Arduino. So the way you do that is, again, you do it through the serial monitor.

The serial monitor, you can see up here is at the top of it, right now I'm just showing the top of that serial monitor window. At the top is a little entry area when you enter text and click on send, so you type some kind of text, some type of characters, you click on send, and that data is sent via serial over to the Arduino. So, you can use a serial monitor to send data as well as receive data.
(2) When data is sent it goes into a buffer in the Arduino until it is read
So, when data is sent, it goes into a buffer in the Arduino until it's red, because maybe when you send data, the Arduino might not immediately receive it. When it receives the data, when it wants to read the data, depends on the code. Maybe the code's busy doing something else when you do the send. But, the data, it's held inside a buffer inside the Arduino until the code is ready to actually read the data out of that buffer.
So there's a buffer in the Arduino, a certain size, where data can sort of be held temporarily.
(3) Serial.available() is used to see how many bytes are waiting in the buffer
Now, there's a function in the serial library called Serial.available that is used to see how many bytes are waiting in the buffer. And you need this because again, this is sort of a synchronization issue between the microcontroller and the human, or, not necessarily human. Because from the point of view of the Arduino, it could be receiving data from a human through the serial monitor, but it might be receiving data from another microcontroller. But when it's receiving data, it can't just read data, if no data is available. So typically before the Arduino tries to read the data, it should check to see if the data is available. So it calls this function called serial data available, which will return how much data is available in the buffer waiting to be read.
int bytenum = Serial.available();
and it just simply returns the number of bytes that are available in the buffer, waiting to be read.
3.2.2 Serial.read()
(1) Serial.read()
Return 1 byte from the serial buffer
int bval = Serial.read();
So, when the Arduino wants to read a byte out of the buffer, from the serial communication interface, it's called Serial.read. So inside your code, you call Serial.read, reads one byte from that buffer, that receiving buffer. So in this case, int bval = Serial.read. And bval will be assigned to whatever that byte is.
Notice that bval is an integer, not a byte. Integer is actually bigger than a byte. The reason why it needs to be bigger than a byte is because it also has to have the option of returning a -1. A byte can't have it be a -1. It has to have the option of returning a -1, if no data is available.
(2) Serial.readBytes() writes several bytes into a buffer
So, in addition to reading one byte, you could read many bytes at a time. So, Serial.read will read one byte, but you might wanna read many bytes. If you read many bytes, you'd
call Serial.readBytes. That reads several bytes out of that buffer, that transmission receiving buffer, but it writes those bites into a new buffer that the programmer specifies.
<div style="text-align: justify;"><span style="font-family: Arial, Helvetica, sans-serif;">char buff[10];</span></div><div style="text-align: justify;"><span style="font-family: Arial, Helvetica, sans-serif;">Serial.readBytes(buff,10);</span></div>
So, in addition to reading one byte, you could read many bytes at a time. So, Serial.read will read one byte, but you might wanna read many bytes. If you read many bytes, you'd call Serial.readBytes. That reads several bytes out of that buffer, that transmission receiving buffer, but it writes those bites into a new buffer that the programmer specifies. I can access that buffer later and do things with the data.


 3638
3638

 被折叠的 条评论
为什么被折叠?
被折叠的 条评论
为什么被折叠?
 到【灌水乐园】发言


