四。基础
lHelloWorld
本文讲述如何使用AE创建Helloworld。相当简单,不需要有什么经验。使用的引擎为:
GLES2
确认android开发环境和AE的代码都准备好了。
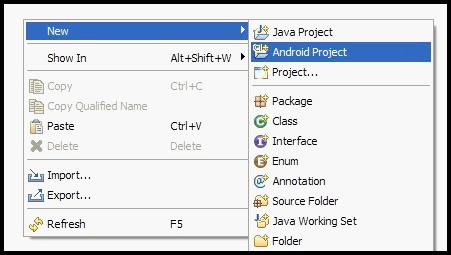
1.在Eclipse中创建一个AndroidProject。
2.将导入的AE工程连接成库
右键点击AndEngine-属性-Android-LibraryField
3.在创建的Helloworld工程中,删除自动生成的Java类.建一个新的类,基类为:SimpleBaseGameActivity
IDE会强制你添加未实现的方法.
packagetest.matim;
importorg.andengine.engine.options.EngineOptions;
importorg.andengine.entity.scene.Scene;
importorg.andengine.ui.activity.SimpleBaseGameActivity;
publicclassTestActivityextendsSimpleBaseGameActivity
{
@Override
publicEngineOptionsonCreateEngineOptions()
{
returnnull;
}
@Override
protectedvoidonCreateResources()
{
}
@Override
protectedSceneonCreateScene()
{
returnnull;
}
}
4.创建新的EngineOptions和Camera.
·声明Camera
·声明两个final变量,作为Camera的宽和高.
privateCameracamera;
privatestaticfinalintCAMERA_WIDTH=800;
privatestaticfinalintCAMERA_HEIGHT=480;
记住,摄相机大小总是由你自己控制.
·在onCreateEngineOptions()中,实例化一个Camera对象.然后生成一个新的EngineOptions
@Override
publicEngineOptionsonCreateEngineOptions()
{
camera=newCamera(0,0,CAMERA_WIDTH,CAMERA_HEIGHT);
EngineOptionsengineOptions=newEngineOptions(true,ScreenOrientation.LANDSCAPE_FIXED,
newFillResolutionPolicy(),camera);
returnengineOptions;
}
EngineOptions第一个参数指是否全屏,第二个是屏幕方法,第三个分辨率大小策略.见CLICKHERE
5.创建新的主场景
·在onCreateScene()中创建新的Scene对象
·场景是个实体(Entity)所以可以增加新的实体,如精灵
·把场景的背景设为蓝色
@Override
protectedSceneonCreateScene()
{
Scenescene=newScene();
scene.setBackground(newBackground(0.09804f,0.6274f,0.8784f));
returnscene;
}
现在这个工程就可以运行了,只有一个蓝色的背景.
l加载游戏资源
这篇会说明如何加载大多数常用的资源:
uGraphics
uFonts
uSounds
1.注意事项
·在GLES2中不再强制要求纹理使用2,4,8,16,32...的大小了.可以自由设置大小.
·强烈不建议使用大于1024X1024像素的纹理,因为在有些低端设备上不支持.
·如果在游戏中需要音乐,考虑.ogg格式.APK会更小.
2.加载资源
要加载资源,所有你要做的是把加载资源的代码放在onCreateResources()中.从易读修改方面考虑,我们可能需要将其分成三个小方法.
@Override
publicvoidonCreateResources(OnCreateResourcesCallbackpOnCreateResourcesCallback)throwsIOException
{
loadGraphics();
loadFonts();
loadSounds();
pOnCreateResourcesCallback.onCreateResourcesFinished();
}
privatevoidloadGraphics()
{
}
privatevoidloadFonts()
{
}
privatevoidloadSounds()
{
}
3.加载图片
这里详细实现loadGraphics
声明一个新的纹理,纹理区域,然后从asset/gfx中加载image.png图片.
privateBitmapTextureAtlasyourTexture;
privateITextureRegionyourTextureRegion;
privatevoidloadGraphics()
{
BitmapTextureAtlasTextureRegionFactory.setAssetBasePath("gfx/");
yourTexture=newBitmapTextureAtlas(getTextureManager(),256,256,TextureOptions.DEFAULT);
yourTextureRegion=BitmapTextureAtlasTextureRegionFactory.createFromAsset(yourTexture,this,"image.png",0,0);
yourTexture.load();
}
纹理大小是256x256,你可以在任何时候加载和缷载图片.
·yourTexture.load();
·yourTexture.unload();
考虑这种情况,有两个场景,每个场景使用自己的图片资源.在场景切换的时候,先缷载一个纹理,加载另一个来达到减少内存的使用.
4.加载字体
加载字体类似,选择合适纹理大小:
privateFontyourFont;
publicvoidloadFonts()
{
FontFactory.setAssetBasePath("font/");
finalITexturefontTexture=newBitmapTextureAtlas(activity.getTextureManager(),256,256,TextureOptions.BILINEAR_PREMULTIPLYALPHA);
yourFont=FontFactory.createFromAsset(getFontManager(),fontTexture,getAssets(),"font.ttf",40,true,Color.BLACK);
yourFont.load();
}
5.加载声音
这里我们从assets/mfx/中加载
privateSoundyourSound;
publicvoidloadSounds()
{
try
{
yourSound=SoundFactory.createSoundFromAsset(getEngine().getSoundManager(),this,"mfx/sound.ogg");
}
catch(IOExceptione)
{
e.printStackTrace();
}
}
l声音和音乐
在AE从加载使用声音很容易,还有一些其他功能如音量控制,也可以加载不同格式的声音文件.
1.加载资源
privateMusicmusic;
try
{
music=MusicFactory.createMusicFromAsset(mEngine.getMusicManager(),this,"mfx/music.ogg");
}
catch(IOExceptione)
{
e.printStackTrace();
}
2.调节音量大小
如此简单:
yourSound.setVolume(0.5f);
3.播放,停止,暂停
yourSound.play();
yourSound.stop();
yourSound.pause();
4.循环播放
比如背景音乐:
yourSound.setLooping(true);
也可以指定循环循环次数:
yourSound.setLoopCount(yourCount);
即音乐停止前会循环yourCount次.
4.如何设计你的游戏----一个有用的模式
本文论述我用AE进行游戏设计的观点,可能对初学者有帮助.在动手前有个计划会让你在开发过程中减少很多痛苦.开发游戏是个耗时的工作,为什么不让它变得容易点呢?
假设有一个游戏,然后呢,在开始编码前思考以下几点:
·思考下整个程序的结构.
·试着画出类图,在以后细节往往更容易.
·看下引擎,确认许多东西已经实现了.
·把你的想法转化为代码!
1.多个活动(Activities)和多场景(Scenes)的比较
显然不需要多少活动,大多数只需要:
·菜单活动(注:指游戏主封面)MenuActivity
·设置活动OptionsActivity
·游戏活动GameActivity
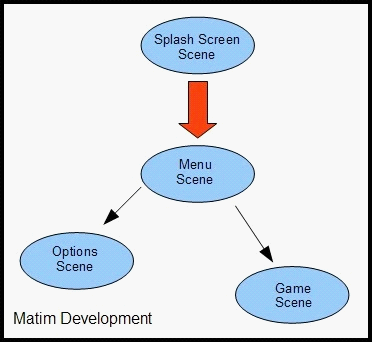
创建很多的活动(每个界面一个活动)是好的吗?我个人认为,不好.首先,会增加加载时间(活动的切换会重新加载资源).而且很麻烦,多活动会让你在访问其他对象时变得麻烦,所以为什么只使用单一活动是个很优雅的方式.
看下面的图:
4个场景一个活动,只需要在SplashScene加载资源后成功后跳到MenuScene:
engine.setScene(yourScene);
l创建加载场景
在上节提到的应当使用多场景代替多活动.本节讲述如何创建一个加载场景.这是thepi分享的代码改版,使用GLES2并额外增加了一些东西.末尾提供了下载.
1.如何工作的?
·加载SplashScene的纹理
·显示SplashScene并加载余下的资源.
·加载资源完成后,显示主场景(menu或者其他)
2.手把手教你
·新建一个活动,继承BaseGameActivity
·在onCreateEngine中创建EngineOptions,Camera
·声明两个场景,splashScene和mainScene
privateBitmapTextureAtlassplashTextureAtlas;
privateITextureRegionsplashTextureRegion;
privateSpritesplash;
在onCreateResources()中加载splash所需的资源,
BitmapTextureAtlasTextureRegionFactory.setAssetBasePath("gfx/");
splashTextureAtlas=newBitmapTextureAtlas(this.getTextureManager(),256,256,TextureOptions.DEFAULT);
splashTextureRegion=BitmapTextureAtlasTextureRegionFactory.createFromAsset(splashTextureAtlas,
this,"splash.png",0,0);
splashTextureAtlas.load();
pOnCreateResourcesCallback.onCreateResourcesFinished();
初始化splashscene:
privatevoidinitSplashScene()
{
splashScene=newScene();
splash=newSprite(0,0,splashTextureRegion,mEngine.getVertexBufferObjectManager())
{
@Override
protectedvoidpreDraw(GLStatepGLState,CamerapCamera)
{
super.preDraw(pGLState,pCamera);
pGLState.enableDither();
}
};
splash.setScale(1.5f);
splash.setPosition((CAMERA_WIDTH-splash.getWidth())*0.5f,(CAMERA_HEIGHT-splash.getHeight())*0.5f);
splashScene.attachChild(splash);
}
·把这些放到onCreateScene()中:
initSplashScene();
pOnCreateSceneCallback.onCreateSceneFinished(this.splashScene);
把以下这些也放到onCreateScene中:
mEngine.registerUpdateHandler(newTimerHandler(3f,newITimerCallback()
{
publicvoidonTimePassed(finalTimerHandlerpTimerHandler)
{
mEngine.unregisterUpdateHandler(pTimerHandler);
loadResources();
loadScenes();
splash.detachSelf();
mEngine.setScene(mainScene);
}
}));
pOnPopulateSceneCallback.onPopulateSceneFinished();
资源加载完成后,跳转到mainScene中
publicvoidloadResources()
{
//Loadyourgameresourceshere!
}
privatevoidloadScenes()
{
//loadyourgamehere,youscenes
mainScene=newScene();
mainScene.setBackground(newBackground(50,50,50));
}
好了!
下面的代码有些更多功能,比如在splash显示期间不能退出.
| splashscreentemplate.rar |
l跟随相机
在许多游戏中,我们很可能需要相机追踪主角,虽然实现简单,但AE也已经内置了这个功能了.
所以你只需要设置要追踪的实体:
camera.setChaseEntity(entity);
l设置相机的边界
这个功能很有用,需要使用BoundCamera类或者其扩展类.使用以下两个方法:
camera.setBounds(0,0,2000,780);
camera.setBoundsEnabled(true);
头两个参数是最小边界,后两个参数是最大边界,也就是说,相机不会超过2000,780
l平滑地移动相机(由A点到B点)
AE没有内置由A到B移动相机的默认方法,但是实现这个有几个比较简单办法
显然你可以设置相机的中心,但是重点是要平滑地移动,而不是简单地跳转.
camera.setCenter(pCenterX,pCenterY);
如果你想看起来专业一点,可以使用个小技巧.声明一个Entity,然后为它注册MoveModifier,然后使用相机跟随:
Entitye=newEntity();
e.setPosition(pX,pY);
camera.setChaseEntity(e);
e.registerEntityModifier(newMoveModifier(duration,e.getX(),pToX,e.getY(),pToY));
Entity(x,y)是起始位置,(pToX,pToY)是终点.到达B点后,应当停止相机跟随,那么应当为MoveModifier增加监听,重写onModifierFinished
Entitye=newEntity();
e.setPosition(pX,pY);
camera.setChaseEntity(e);
finalMoveModifiermodifier=newMoveModifier(duration,e.getX(),pToX,e.getY(),pToY)
{
@Override
protectedvoidonModifierFinished(IEntitypItem)
{
super.onModifierFinished(pItem);
camera.setChaseEntity(null);
}
};
e.registerEntityModifier(modifier);
更简单的方法:
你可以使用SmoothCamera来平滑移动相机,通过调用setCenter(x,y)方法.在创建这类相机时,要在构造函数中增加额外的参数,比如在x,y轴上的速度.如果想直接移动则调用:setCenterDirect(x,y)方法.
lFPS计数
AE中获取FPS使用很简单.
1.FPSLogger
mEngine.registerUpdateHandler(newFPSLogger());
这样就可以在Logcat中看到fps估值了.
2.TextFpsCounter
如果你想把FPS显示在游戏中那就需要声明一个Text对象了
finalFPSCounterfpsCounter=newFPSCounter();
this.mEngine.registerUpdateHandler(fpsCounter);
finalTextfpsText=newText(250,240,this.mFont,"FPS:","FPS:XXXXX".length(),vbo);
scene.attachChild(fpsText);
scene.registerUpdateHandler(newTimerHandler(1/20.0f,true,newITimerCallback()
{
@Override
publicvoidonTimePassed(finalTimerHandlerpTimerHandler)
{
fpsText.setText("FPS:"+fpsCounter.getFPS());
}
}));
使用一个定时器不停地刷新显示FPSCounter中获取的FPS值.简单吧..
l处理onResume,onPauseandonDestroy
如果你对Android生命周期(AndroidLifeCycle)熟悉的话,这些方法就不会陌生.为什么重要呢,请看下文分解:
1.正确地暂停和恢复音乐的播放:
在点击小房子那个按钮后显然我们要暂停音乐的播放,在回到游戏后应该继续音乐的播放.
@Override
protectedvoidonPause()
{
super.onPause();
if(this.isGameLoaded())
music.pause();
}
@Override
protectedsynchronizedvoidonResume()
{
super.onResume();
System.gc();
if(this.isGameLoaded())
music.play();
}
你应当检查isGameLoaded()或者Music对象是否为空,不然会有NullPointerException异常
2.销毁活动.
从游戏中退出,不应简单地finish(),应当在onDestroy中调用System.exit(0);
@Override
protectedvoidonDestroy()
{
super.onDestroy();
if(this.isGameLoaded())
{
System.exit(0);
}
}
检查游戏是否已经加载了很重要.否则在有些机器上,游戏在打开后会马上被关闭.


 本文介绍如何使用AndEngine创建简单的游戏项目,包括设置环境、创建HelloWorld应用、加载资源及控制相机等基本操作。


 1630
1630

 被折叠的 条评论
为什么被折叠?


