


3 FFmpeg在Android端的使用
3.1 编写Java端代码
创建HelloFFmpeg项目,修改MainActivity代码,准备调用C语言函数。使用JNI调用C语言代码有两点需要做的步骤:
1)声明C语言函数对应的Java函数;
2)声明要加载的类库。
需要注意,C语言函数的声明要加上“native”关键字;加载类库的时候需要使用“System.loadLibrary()”方法。
例如MainActivity源代码如下所示:
package com.lzp.helloffmpeg;

import android.app.Activity;
import android.os.Bundle;
import android.text.method.ScrollingMovementMethod;
import android.view.View;
import android.widget.Button;
import android.widget.TextView;

public class MainActivity extends Activity {

    private HelloJNI helloJNI = new HelloJNI();

    @Override
    protected void onCreate(Bundle savedInstanceState) {
        super.onCreate(savedInstanceState);
        setContentView(R.layout.activity_main);

        final TextView libinfoText = findViewById(R.id.text_libinfo);
        libinfoText.setMovementMethod(ScrollingMovementMethod.getInstance());

        libinfoText.setText(helloJNI.configurationinfo());

        Button configurationButton = findViewById(R.id.button_configuration);
        Button urlprotocolButton = findViewById(R.id.button_urlprotocol);
        Button avformatButton = findViewById(R.id.button_avformat);
        Button avcodecButton = findViewById(R.id.button_avcodec);
        Button avfilterButton = findViewById(R.id.button_avfilter);

        urlprotocolButton.setOnClickListener(new View.OnClickListener() {
            public void onClick(View arg0){
                libinfoText.setText(helloJNI.urlprotocolinfo());
            }
        });

        avformatButton.setOnClickListener(new View.OnClickListener() {
            public void onClick(View arg0){
                libinfoText.setText(helloJNI.avformatinfo());
            }
        });

        avcodecButton.setOnClickListener(new View.OnClickListener() {
            public void onClick(View arg0){
                libinfoText.setText(helloJNI.avcodecinfo());
            }
        });

        avfilterButton.setOnClickListener(new View.OnClickListener() {
            public void onClick(View arg0){
                libinfoText.setText(helloJNI.avfilterinfo());
            }
        });

        configurationButton.setOnClickListener(new View.OnClickListener() {
            public void onClick(View arg0){
                libinfoText.setText(helloJNI.configurationinfo());
            }
        });

    }

    static{
        // ffmpeg的.so库
        System.loadLibrary("avutil-54");
        System.loadLibrary("swresample-1");
        System.loadLibrary("avcodec-56");
        System.loadLibrary("avformat-56");
        System.loadLibrary("swscale-3");
        System.loadLibrary("postproc-53");
        System.loadLibrary("avfilter-5");
        System.loadLibrary("avdevice-56");
        // 自己的.so库
        System.loadLibrary("helloffmpeg");
    }

}
JNI所在类HelloJNI代码:
package com.lzp.helloffmpeg;

public class HelloJNI {
    //JNI
    public native String urlprotocolinfo();
    public native String avformatinfo();
    public native String avcodecinfo();
    public native String avfilterinfo();
    public native String configurationinfo();
}
3.2 编写C语言端代码
step 1:获取C语言的接口函数声明
根据Java对于C语言接口的定义,生成相应的接口函数声明。这一步需要用到JDK中的“javah”命令。首先切换到…\HelloFFmpeg\app\src\main\java文件夹下,输入如下命令:
javah com.lzp.helloffmpeg.HelloJNI
就可以在当前目录下生成一个头文件“com_lzp_helloffmpeg_HelloJNI.h”,该头文件内容如下所示:
/* DO NOT EDIT THIS FILE - it is machine generated */
#include <jni.h>
/* Header for class com_lzp_helloffmpeg_HelloJNI */

#ifndef _Included_com_lzp_helloffmpeg_HelloJNI
#define _Included_com_lzp_helloffmpeg_HelloJNI
#ifdef __cplusplus
extern "C" {
#endif
/*
 * Class:     com_lzp_helloffmpeg_HelloJNI
 * Method:    urlprotocolinfo
 * Signature: ()Ljava/lang/String;
 */
JNIEXPORT jstring JNICALL Java_com_lzp_helloffmpeg_HelloJNI_urlprotocolinfo
  (JNIEnv *, jobject);

/*
 * Class:     com_lzp_helloffmpeg_HelloJNI
 * Method:    avformatinfo
 * Signature: ()Ljava/lang/String;
 */
JNIEXPORT jstring JNICALL Java_com_lzp_helloffmpeg_HelloJNI_avformatinfo
  (JNIEnv *, jobject);

/*
 * Class:     com_lzp_helloffmpeg_HelloJNI
 * Method:    avcodecinfo
 * Signature: ()Ljava/lang/String;
 */
JNIEXPORT jstring JNICALL Java_com_lzp_helloffmpeg_HelloJNI_avcodecinfo
  (JNIEnv *, jobject);

/*
 * Class:     com_lzp_helloffmpeg_HelloJNI
 * Method:    avfilterinfo
 * Signature: ()Ljava/lang/String;
 */
JNIEXPORT jstring JNICALL Java_com_lzp_helloffmpeg_HelloJNI_avfilterinfo
  (JNIEnv *, jobject);

/*
 * Class:     com_lzp_helloffmpeg_HelloJNI
 * Method:    configurationinfo
 * Signature: ()Ljava/lang/String;
 */
JNIEXPORT jstring JNICALL Java_com_lzp_helloffmpeg_HelloJNI_configurationinfo
  (JNIEnv *, jobject);

#ifdef __cplusplus
}
#endif
#endif
从源代码可以看出,JNI调用的C语言函数是有固定格式的,即:
Java_{包名}_{类名}(JNIEnv *,jobject,…)
对于HelloJNI类中的configurationinfo方法,其C语言版本的函数声明为:
JNIEXPORT jstring JNICALL Java_com_lzp_helloffmpeg_HelloJNI_configurationinfo
  (JNIEnv *, jobject);
PS:这个头文件只是一个参考,对于JNI来说并不是必须的。也可以根据命名规则直接编写C语言函数。
实现后的com_lzp_helloffmpeg_HelloJNI.c代码如不下:
#include <stdio.h>

#include "libavcodec/avcodec.h"
#include "libavformat/avformat.h"
#include "libavfilter/avfilter.h"

//Log
#ifdef ANDROID
#include <jni.h>
#include <android/log.h>
#define LOGE(format, ...)  __android_log_print(ANDROID_LOG_ERROR, "ffmpeg", format, ##__VA_ARGS__)
#else
#define LOGE(format, ...)  printf("ffmpeg" format "\n", ##__VA_ARGS__)
#endif

//FIX
struct URLProtocol;
/**
 * com.lzp.helloffmpeg.HelloJNI.urlprotocolinfo()
 * Protocol Support Information
 */
JNIEXPORT jstring Java_com_lzp_helloffmpeg_HelloJNI_urlprotocolinfo(JNIEnv *env, jobject obj){

	char info[40000]={0};
	av_register_all();

	struct URLProtocol *pup = NULL;
	//Input
	struct URLProtocol **p_temp = &pup;
	avio_enum_protocols((void **)p_temp, 0);
	while ((*p_temp) != NULL){
		sprintf(info, "%s[In ][%10s]\n", info, avio_enum_protocols((void **)p_temp, 0));
	}
	pup = NULL;
	//Output
	avio_enum_protocols((void **)p_temp, 1);
	while ((*p_temp) != NULL){
		sprintf(info, "%s[Out][%10s]\n", info, avio_enum_protocols((void **)p_temp, 1));
	}

	//LOGE("%s", info);
	return (*env)->NewStringUTF(env, info);
}

/**
 * com.lzp.helloffmpeg.HelloJNI.avformatinfo()
 * AVFormat Support Information
 */
JNIEXPORT jstring Java_com_lzp_helloffmpeg_HelloJNI_avformatinfo(JNIEnv *env, jobject obj){

	char info[40000] = { 0 };

	av_register_all();

	AVInputFormat *if_temp = av_iformat_next(NULL);
	AVOutputFormat *of_temp = av_oformat_next(NULL);
	//Input
	while(if_temp!=NULL){
		sprintf(info, "%s[In ][%10s]\n", info, if_temp->name);
		if_temp=if_temp->next;
	}
	//Output
	while (of_temp != NULL){
		sprintf(info, "%s[Out][%10s]\n", info, of_temp->name);
		of_temp = of_temp->next;
	}
	//LOGE("%s", info);
	return (*env)->NewStringUTF(env, info);
}

/**
 * com.lzp.helloffmpeg.HelloJNI.avcodecinfo()
 * AVCodec Support Information
 */
JNIEXPORT jstring Java_com_lzp_helloffmpeg_HelloJNI_avcodecinfo(JNIEnv *env, jobject obj)
{
	char info[40000] = { 0 };

	av_register_all();

	AVCodec *c_temp = av_codec_next(NULL);

	while(c_temp!=NULL){
		if (c_temp->decode!=NULL){
			sprintf(info, "%s[Dec]", info);
		}
		else{
			sprintf(info, "%s[Enc]", info);
		}
		switch (c_temp->type){
		case AVMEDIA_TYPE_VIDEO:
			sprintf(info, "%s[Video]", info);
			break;
		case AVMEDIA_TYPE_AUDIO:
			sprintf(info, "%s[Audio]", info);
			break;
		default:
			sprintf(info, "%s[Other]", info);
			break;
		}
		sprintf(info, "%s[%10s]\n", info, c_temp->name);


		c_temp=c_temp->next;
	}
	//LOGE("%s", info);

	return (*env)->NewStringUTF(env, info);
}

/**
 * com.lzp.helloffmpeg.HelloJNI.avfilterinfo()
 * AVFilter Support Information
 */
JNIEXPORT jstring Java_com_lzp_helloffmpeg_HelloJNI_avfilterinfo(JNIEnv *env, jobject obj)
{
	char info[40000] = { 0 };
	av_register_all();
	AVFilter *f_temp = (AVFilter *)avfilter_next(NULL);
	while (f_temp != NULL){
		sprintf(info, "%s[%10s]\n", info, f_temp->name);
	}
	//LOGE("%s", info);

	return (*env)->NewStringUTF(env, info);
}

/**
 * com.lzp.helloffmpeg.HelloJNI.urlprotocolinfo()
 * Protocol Support Information
 */
JNIEXPORT jstring Java_com_lzp_helloffmpeg_HelloJNI_configurationinfo(JNIEnv *env, jobject obj)
{
	char info[10000] = { 0 };
	av_register_all();

	sprintf(info, "%s\n", avcodec_configuration());

	//LOGE("%s", info);
	return (*env)->NewStringUTF(env, info);
}
3.3 修改Android.mk、Application.mk、build.gradle、local.properties
a) Android.mk:
LOCAL_PATH := $(call my-dir)

# FFmpeg library
include $(CLEAR_VARS)
LOCAL_MODULE := avcodec
LOCAL_SRC_FILES := libavcodec-56.so
include $(PREBUILT_SHARED_LIBRARY)

include $(CLEAR_VARS)
LOCAL_MODULE := avdevice
LOCAL_SRC_FILES := libavdevice-56.so
include $(PREBUILT_SHARED_LIBRARY)

include $(CLEAR_VARS)
LOCAL_MODULE := avfilter
LOCAL_SRC_FILES := libavfilter-5.so
include $(PREBUILT_SHARED_LIBRARY)

include $(CLEAR_VARS)
LOCAL_MODULE := avformat
LOCAL_SRC_FILES := libavformat-56.so
include $(PREBUILT_SHARED_LIBRARY)

include $(CLEAR_VARS)
LOCAL_MODULE := avutil
LOCAL_SRC_FILES := libavutil-54.so
include $(PREBUILT_SHARED_LIBRARY)

include $(CLEAR_VARS)
LOCAL_MODULE := postproc
LOCAL_SRC_FILES := libpostproc-53.so
include $(PREBUILT_SHARED_LIBRARY)

include $(CLEAR_VARS)
LOCAL_MODULE := swresample
LOCAL_SRC_FILES := libswresample-1.so
include $(PREBUILT_SHARED_LIBRARY)

include $(CLEAR_VARS)
LOCAL_MODULE := swscale
LOCAL_SRC_FILES := libswscale-3.so
include $(PREBUILT_SHARED_LIBRARY)

# Program
include $(CLEAR_VARS)
LOCAL_MODULE := helloffmpeg
LOCAL_SRC_FILES :=com_lzp_helloffmpeg_HelloJNI.c
LOCAL_C_INCLUDES += $(LOCAL_PATH)/include
LOCAL_LDLIBS := -llog -lz
LOCAL_SHARED_LIBRARIES := avcodec avdevice avfilter avformat avutil postproc swresample swscale
include $(BUILD_SHARED_LIBRARY)
LOCAL_MODULE指定的是所生成的库,被引用的名称,并非文件名。指定的LOCAL_MODULE对于编译后的文件名分两种情况:
**1).so生成.so,文件名不变:**如ffmpeg中的libavcodec-56.so指定LOCAL_MODULE为avcodec后生成的文件名依然为libavcodec-56.so;
**2).c生成.so,文件变为lib+LOCAL_MODULE+.so:**如com_lzp_helloffmpeg_HelloJNI.c指定LOCAL_MODULE为helloffmpeg后,生成的文件名为libhelloffmpeg.so。
但是上述两种情况的引用名都是一样的,都为其LOCAL_MODULE名。
b) Application.mk:
Application.mk中的APP_ABI设定了编译后库文件支持的指令集,默认使用“armeabi”。在本例子中,APP_ABI取值为“all”。由于我们编译的FFmpeg并不在像x86这样的平台下运行,所以不需要“all”,把它修改为“armeabi”或者删除就可以了(对于本例子,不做这一步的话会在编译x86平台类库的时候报错,但并不影响后面的测试运行)。
#APP_ABI := all
#APP_ABI := armeabi armeabi-v7a x86

APP_ABI :=armeabi
c) build.gradle:
import org.apache.tools.ant.taskdefs.condition.Os

apply plugin: 'com.android.application'

android {
    compileSdkVersion 26
    buildToolsVersion "26.0.1"
    defaultConfig {
        applicationId "com.lzp.helloffmpeg"
        minSdkVersion 15
        targetSdkVersion 26
        versionCode 1
        versionName "1.0"
        testInstrumentationRunner "android.support.test.runner.AndroidJUnitRunner"
    }
    buildTypes {
        release {
            minifyEnabled false
            proguardFiles getDefaultProguardFile('proguard-android.txt'), 'proguard-rules.pro'
        }
    }

    //指定动态库路径
    sourceSets{
        main{
            jni.srcDirs = []    // disable automatic ndk-build call, which ignore our Android.mk
            jniLibs.srcDir 'src/main/libs'
        }
    }

    // call regular ndk-build(.cmd) script from app directory
    task ndkBuild(type: Exec) {
        workingDir file('src/main')
        commandLine getNdkBuildCmd()
        //commandLine 'D:/ndk/android-ndk-r10e/ndk-build.cmd'   //也可以直接使用绝对路径
    }

    tasks.withType(JavaCompile) {
        compileTask -> compileTask.dependsOn ndkBuild
    }

    task cleanNative(type: Exec) {
        workingDir file('src/main')
        commandLine getNdkBuildCmd(), 'clean'
    }

    clean.dependsOn cleanNative
}

//获取NDK目录路径
def getNdkDir() {
    if (System.env.ANDROID_NDK_ROOT != null)
        return System.env.ANDROID_NDK_ROOT

    Properties properties = new Properties()
    properties.load(project.rootProject.file('local.properties').newDataInputStream())
    def ndkdir = properties.getProperty('ndk.dir', null)
    if (ndkdir == null)
        throw new GradleException("NDK location not found. Define location with ndk.dir in the local.properties file or with an ANDROID_NDK_ROOT environment variable.")

    return ndkdir
}

//根据不同系统获取ndk-build脚本
def getNdkBuildCmd() {
    def ndkbuild = getNdkDir() + "/ndk-build"
    if (Os.isFamily(Os.FAMILY_WINDOWS))
        ndkbuild += ".cmd"

    return ndkbuild
}

dependencies {
    compile fileTree(dir: 'libs', include: ['*.jar'])
    androidTestCompile('com.android.support.test.espresso:espresso-core:2.2.2', {
        exclude group: 'com.android.support', module: 'support-annotations'
    })
    compile 'com.android.support:appcompat-v7:26.+'
    compile 'com.android.support.constraint:constraint-layout:1.0.2'
    testCompile 'junit:junit:4.12'
}
d) local.properties:由于我们用的是ffmpeg2.x,要使用低版本NDK,这里用的是r10e。
#ndk.dir=C\:\\Users\\lizhiping03\\AppData\\Local\\Android\\Sdk\\ndk-bundle
ndk.dir=D\:\\ndk\\android-ndk-r10e
3.4 编译、运行
点击Build->Make Project(Ctrl + F9)后,会在根目录下的“libs/armeabi”目录中生成相关的库文件。本例子中,会生成以下库文件:

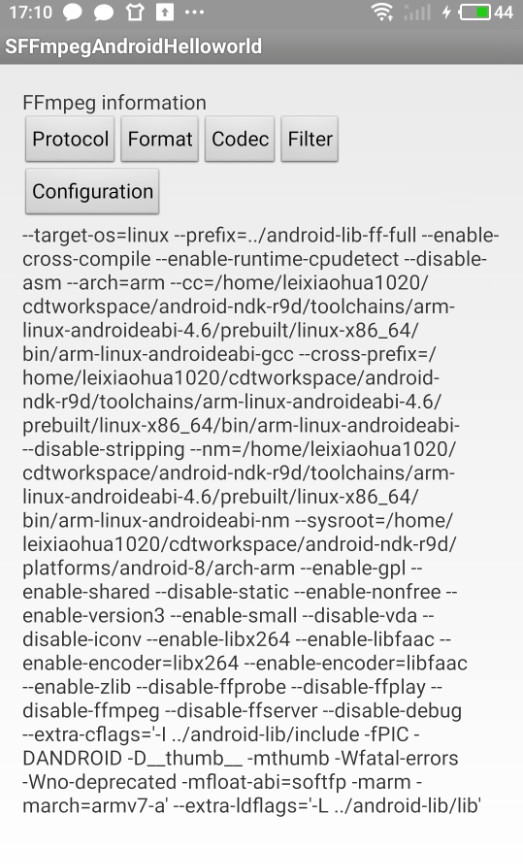
运行后的效果如下:


 7315
7315

 被折叠的 条评论
为什么被折叠?
被折叠的 条评论
为什么被折叠?
 到【灌水乐园】发言


