


重要: 这是一个稳定的版本. 让我们知道你的喜好。 我们将会修改bug和错误,并且定期更新所有章节。
*注意: 我们已经更新到这个章节支持到Laravel 5.2了。
第三章: 搭建一个标签支持系统
在本章中,我们将会搭建一个标签支持系统来学习Laravel的主要属性,比如Eloquent ORM, Eloquent依赖关系,数据迁徙,请求,Laravel集合, 发送电子邮件等等。
然而项目设计很简单,但却是一个学习Laravel的好机会。
开始之前我们需要些什么呢?
假设你已经按照我们在之前章节中的要求来搭建了一个基本的网站。你将会需要一个基本应用来开始搭建标签支持系统。
我们将会搭建什么?
在创建应用之前我们先制定基本的原则,和概括下它是如何工作的。
我们的标签系统很简单:
当用户访问contact页时,他们能够提交标签来联系我们。
一旦他们创建一条标签,系统将会给我们发送邮件提醒我们有了新标签了。
这个标签系统自动生成一个唯一的链接供我们访问这个标签。
我们可以预览所有的标签。
我们能够回复,编辑,更改标签的状态和删除他们。
话不多说,开干!
Laravel数据库配置
我们的应用必须要有数据库才能运行起来。Laravel支持多重数据库平台,包括:
- MySQL
- SQLite
- PostgreSQL
- SQL Server
注意: 数据库是用来收集数据的。我们使用数据来使得保存,管理和更新我们数据更简单。
我们可以选择他们中任何一种来开发我们的应用。在本书中,我们使用MySQL.
你可以使用config文件夹下的database.php文件来配置数据库。
config/database.php
<?php

return [

    /*
    |--------------------------------------------------------------------------
    | PDO Fetch Style
    |--------------------------------------------------------------------------
    |
    | By default, database results will be returned as instances of the PHP
    | stdClass object; however, you may desire to retrieve records in an
    | array format for simplicity. Here you can tweak the fetch style.
    |
    */

    'fetch' => PDO::FETCH_CLASS,

    /*
    |--------------------------------------------------------------------------
    | Default Database Connection Name
    |--------------------------------------------------------------------------
    |
    | Here you may specify which of the database connections below you wish
    | to use as your default connection for all database work. Of course
    | you may use many connections at once using the Database library.
    |
    */

    'default' => env('DB_CONNECTION', 'mysql'),

    /*
    |--------------------------------------------------------------------------
    | Database Connections
    |--------------------------------------------------------------------------
    |
    | Here are each of the database connections setup for your application.
    | Of course, examples of configuring each database platform that is
    | supported by Laravel is shown below to make development simple.
    |
    |
    | All database work in Laravel is done through the PHP PDO facilities
    | so make sure you have the driver for your particular database of
    | choice installed on your machine before you begin development.
    |
    */

    'connections' => [

        'sqlite' => [
            'driver'   => 'sqlite',
            'database' => storage_path('database.sqlite'),
            'prefix'   => '',
        ],

        'mysql' => [
            'driver'    => 'mysql',
            'host'      => env('DB_HOST', 'localhost'),
            'database'  => env('DB_DATABASE', 'forge'),
            'username'  => env('DB_USERNAME', 'forge'),
            'password'  => env('DB_PASSWORD', ''),
            'charset'   => 'utf8',
            'collation' => 'utf8_unicode_ci',
            'prefix'    => '',
            'strict'    => false,
        ],

        'pgsql' => [
            'driver'   => 'pgsql',
            'host'     => env('DB_HOST', 'localhost'),
            'database' => env('DB_DATABASE', 'forge'),
            'username' => env('DB_USERNAME', 'forge'),
            'password' => env('DB_PASSWORD', ''),
            'charset'  => 'utf8',
            'prefix'   => '',
            'schema'   => 'public',
        ],

        'sqlsrv' => [
            'driver'   => 'sqlsrv',
            'host'     => env('DB_HOST', 'localhost'),
            'database' => env('DB_DATABASE', 'forge'),
            'username' => env('DB_USERNAME', 'forge'),
            'password' => env('DB_PASSWORD', ''),
            'prefix'   => '',
        ],

    ],

    /*
    |--------------------------------------------------------------------------
    | Migration Repository Table
    |--------------------------------------------------------------------------
    |
    | This table keeps track of all the migrations that have already run for
    | your application. Using this information, we can determine which of
    | the migrations on disk haven't actually been run in the database.
    |
    */

    'migrations' => 'migrations',

    /*
    |--------------------------------------------------------------------------
    | Redis Databases
    |--------------------------------------------------------------------------
    |
    | Redis is an open source, fast, and advanced key-value store that also
    | provides a richer set of commands than a typical key-value systems
    | such as APC or Memcached. Laravel makes it easy to dig right in.
    |
    */

    'redis' => [

        'cluster' => false,

        'default' => [
            'host'     => '127.0.0.1',
            'port'     => 6379,
            'database' => 0,
        ],

    ],

];
试着查阅下注释来了解如何使用这个文件。其中最重要的两点设置是:
default: 你可以在这里设置你想使用的数据库类型。默认是mysql,如果你想使用其他的数据库,把它设置为:pgsql, sqlite, sqlsrv.
connections: 填写你的数据库认证信息。env()函数是用 来从.env file文件中获取配置变量(DB_HOST, DB_DATABASE, DB_USERNAME, DB_PASSWORD)。如果未能找到任何变量,它将会使用这个函数的第二个参数(localhost, forge).
如果你使用的是Homestead, Laravel早已给你创建好了homestead数据量。如果你没用Homestead, 就需要你手动创建数据库了。
Laravel 使用PHP数据对象(PDO). 当我们执行Laravel SQL查询,数据集将会被格式化成一个StdClass对象之后返回。举个栗子,我们可以通过如下方式访问我们的数据:
$user->name
通过修改如下一行代码,你可以轻松地将查询的结果以数组的格式返回:
'fetch' => PDO::FETCH_CLASS,
更改:
'fetch' => PDO:FETCH_ASSOC,
说实话,我一点也不建议你更改这个选项。
创建一个数据库
注意:开发Laravel应用你必须对SQL有一个基本的认知。至少你得知道如何查看,更新,修改和删除一个数据库和它的表。如果你对数据库一无所知,这是一个学习的好地方:http://www.w3schools.com/sql
要开发多个应用,我们将会需要多个数据库。在本节中,我们将会学习如何创建一个数据库。
数据库默认信息
Laravel已经为我们创建了一个名为homestead的数据库。要连接MySQL或者Postgres数据库,你可以设置如下参数:
host: 127.0.0.1
database: homestead
username: homestead
password: secret
port: 33060 (MySQL) or 54320 (Postgres)
使用CLI创建一个数据库
通过命令行你可以轻松地创建一个新数据库。首先,vagrant ssh 连接上你的Homestead. 使用以下命令连接MySQL:
mysql -uhomestead -p
当程序询问密码时,使用 secret.
要创建一个新的数据库,使用如下命令:
CREATE DATABASE your_database_name;
your_database_name是你数据库的名字,随便你自己起。
要看到所有的数据库,运行如下命令:
show databases
最后,使用如下命令退出MYSQL:
exit
尽管通过CLI我们可以轻松地创建一个新的数据库,我们应该使用图形化用户接口(GUI)来更轻松地管理数据库。
在Mac上创建数据库
在Mac上,最火的数据库客户端是Sequel Pro. 这个软件免费,用起来很简单很快。你可以从这里下载:
然后你就可以通过使用Default database information小节中的数据库凭证连接MYSQL或者Postgres.
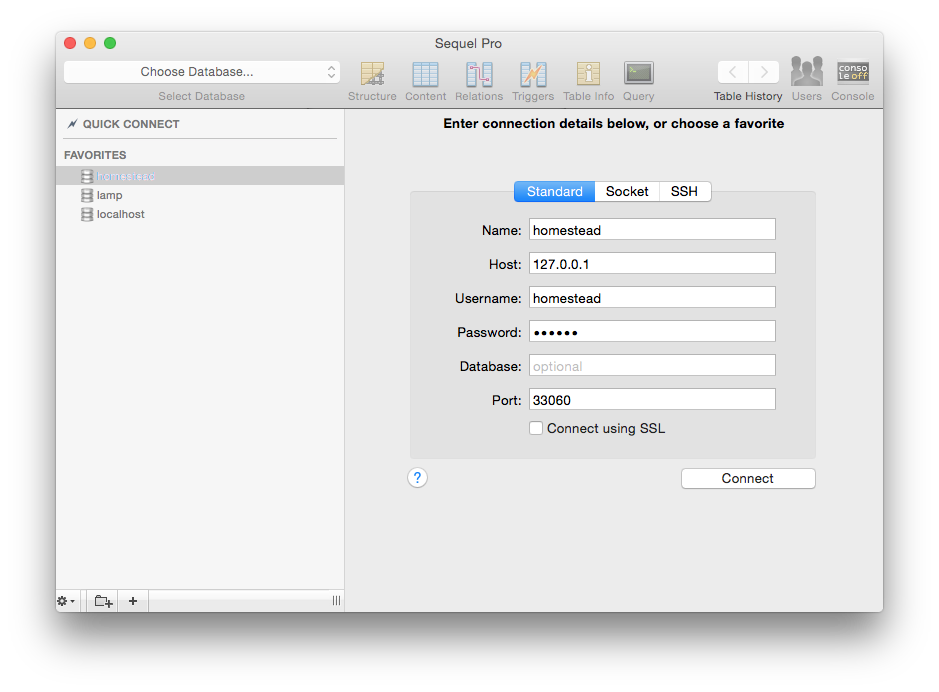
一旦连接成功,你可以通过点击Choose Database和Add Database轻松地创建新数据。
另外,你也可以使用Navicat.
在windows上创建一个数据库
在Windows上,有三个很受欢迎的数据库GUI程序:
SQLYog (免费)
https://www.webyog.com/product/sqlyog
SQLYog有一个免费开源的版本。你可以从这里下载:
https://github.com/webyog/sqlyog-community
点击Download SQLyog Community Version下载。
HeidiSQL (免费)
Navicat
随便选择哪个你喜欢的GUI程序。然后你就可以通过使用Default database information小节中的数据库凭证连接MYSQL或者Postgres。
使用数据库迁徙
Laravel最好的特性之一便是数据库迁徙Migrations.
无论你是和团队一起工作还是单兵作战,都需要跟踪数据库的schema. Laravel数据库迁徙就是为解决这个需求而准备的。
Laravel数据库迁徙来记录我们数据库的更改。好处就是,你可以通过运行一条命令来恢复和使你应用的更改生效。举个栗子,我们可以使用如下命令重置数据库:
php artisan migrate:reset
简单吧?
这个特性很有用哦。你应该经常使用数据库迁徙来搭建应用的数据库schma.
你可以从这里查看数据库迁徙的文档:
http://laravel.com/docs/master/migrations
初窥Laravel Artisan
Artisan是Laravel的CLI (命令行接口). 我们经常使用Artisan 命令来开发我们的Laravel应用。比如,我们使用Artisan命令生成数据库迁徙文件,种植我们的数据库,设置应用的命名空间等等。
之前你已经使用过Artisan命令了!在最近的章节中,我们使用过Artisan命令生成控制器:
php artisan make:controller PagesController
Artisan官方文档:
http://laravel.com/docs/master/artisan
要查看可用的Artisan命令列表,跳转到应用的根目录,运行:
php artisan list
创建一个新数据库迁徙文件
现在,让我们试着生成一个新的数据库迁徙文件吧!
我们将要创建一个tickets table. 跳转到你的应用根目录 (~/Code/Laravel), 运行以下命令:
php artisan make:migration create_tickets_table
你将会看到:
vagrant@homestead:~/Code/Laravel$ php artisan make:migration create_tickets_table
Created Migration: 2015_06_15_150120_create_tickets_table
Laravel将会创建一个新的数据库迁徙模板并将之放在应用的database/migrations目录下。
新数据库迁徙模板名叫: create_tickets_table.当然你可以改成其他名字。检查一下migrations目录,你将会看到一个跟以下文件类似的文件:
2015_06_15_150120_create_tickets_table.php
你应该注意到了Laravel将时间戳作为文件名的前缀,这是用来确认数据库迁徙为顺序的。
打开文件:
<?php

use Illuminate\Database\Schema\Blueprint;
use Illuminate\Database\Migrations\Migration;

class CreateTicketsTable extends Migration
{
    /**
     * Run the migrations.
     *
     * @return void
     */
    public function up()
    {
        //
    }

    /**
     * Reverse the migrations.
     *
     * @return void
     */
    public function down()
    {
        //
    }
}
从根本上来说,数据库迁徙只是一个标准的类。其中有两个很重要的方法:
up 方法:使用这个方法来给数据库添加新表,列。
down 方法:好吧,你应该已经猜到了,这个方法被用来备份你的数据结构。
现在试试通过更改up方法来创建我们的标签表!
我擦,,,,,等等!
我刚刚想起来还有一个更快的方法:使用–create选项。
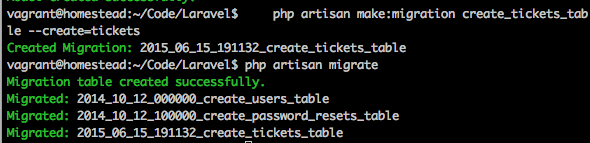
把你刚创建的数据库迁徙文件删了。删了后运行以下命令:
php artisan make:migration create_tickets_table --create=tickets
通过使用–create选项,Laravel将会自动为你生成创建标签表的代码。
public function up()
{
    Schema::create('tickets', function (Blueprint $table) {
        $table->increments('id');
        $table->timestamps();
    });
}
理解Schema来编写数据库迁徙
Schema是一个可以用来定义和操作表的类。我们使用Schema::create方法来创建tickets表:
Schema::create('tickets', function (Blueprint $table) {
Schema::create方法有两个参数。第一个表示表名。
第二参数是一个闭包。闭包也有一个参数: $table. 当然你可以将这个参数命名为其他名字。
我们使用$table参数来创建数据库列, 比如id, name, date等等。
$table->increments('id');
$table->timestamps();
increments(‘id’)命令被用来在tickets表中创建id列并且定义它是一个自增的主键字段。
timestamps 是Laravel中一个特殊的方法。它将会创建updated_at和created_at字段。Laravel通过这几个字段来标记某一行记录是合适创建和修改的。
要查看Schema全部方法和字段类型,请查看官方文档:
http://laravel.com/docs/master/migrations
你不需要全部记住他们。在本书中,通过创建数据库迁徙我们将会学习其中某些。
我们的标签将会有以下字段:
id
title
content
slug: URL化友好的标签标题
status: 标签目前的状态(已回答或者等待)
user_id: 谁创建了标签
以下是我们创建第一个数据库迁徙的步骤:
create_tickets_table.php
<?php

use Illuminate\Database\Schema\Blueprint;
use Illuminate\Database\Migrations\Migration;

class CreateTicketsTable extends Migration
{
    /**
     * Run the migrations.
     *
     * @return void
     */
    public function up()
    {
        Schema::create('tickets', function (Blueprint $table) {
            $table->increments('id');
            $table->string('title', 255);
            $table->text('content');
            $table->string('slug')->nullable();
            $table->tinyInteger('status')->default(1);
            $table->integer('user_id');
            $table->timestamps();
        });
    }

    /**
     * Reverse the migrations.
     *
     * @return void
     */
    public function down()
    {
        Schema::drop('tickets');
    }
}
最后,运行以下命令来创建标签表和它的字段:
php artisan migrate
当你第一次运行这个名时,Laravel将会创建数据库迁徙表来监控你刚创建的数据库迁徙。
实际上,Laravel也会为我们创建create_users_table数据库迁徙和create_password_resets数据库迁徙。这些数据库迁徙将会创建users和password_resets表。如果你想要实现默认的身份验证,那就别动这些文件。否则,你可以把它们删了,或者使用php artisan fresh命令来完全删除默认的验证特性。
好吧,我才你已经搞定了!看起来这些表你都已经创建了。让我们检查一下homestead数据库吧:
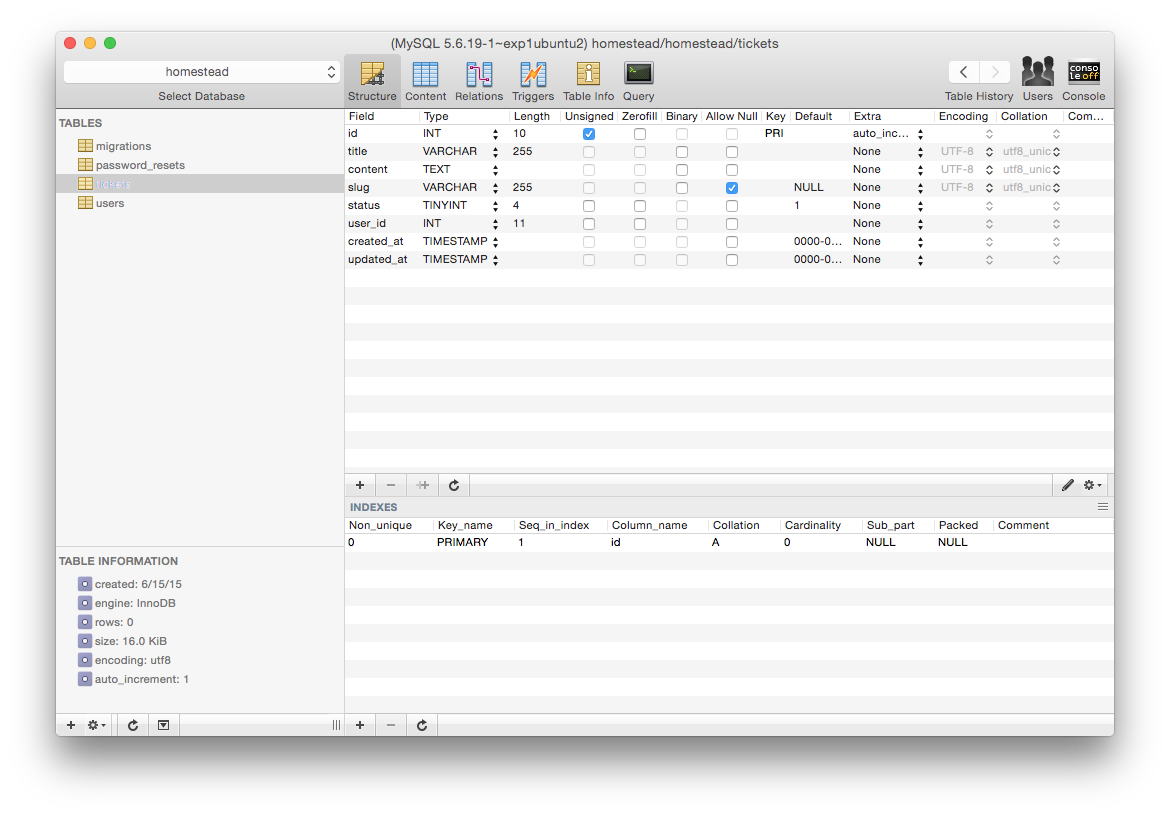
注意: 我使用homestead数据库。如果你想使用其他的,随便你在.env文件中更改。
干得漂亮!你已经成功创建一个标签表来保存我们的数据了。
创建一个新Eloquent模型
Laravel有一个非常赞的特性: Eloquent ORM.
当和数据库一起工作时,Eloquent提供了一个非常简单的方法,使用ActiveRecord自动匹配pattern。通过使用这个技术,我们可以将数据库包装到对象中。
这个意味着什么呢?
在面向对象编程(OOP)思想中,我们经常创建多个对象。对象可以是包含属性和动作方法的任何东西。比如,一个手机可以是一个对象。每个手机的模型都有它自己的设计图。 你可以给它换个壳,或者更换它的主屏。但是不管你再怎么定制它,它仍然是基于制造商制造的设计图的。
我们把设计图原型叫做: 模型。从根本上来说,模型只是一个类。每个类都有它自己的变量(每个手机的特性)和方法(你给你手机自定义的功能)。
Model在MVC系统中被称为M.
现在让我们返回到我们的标签表。如果我们可以把tickets表抽象成一个模型,我们就能轻松地访问和管理它咯。Eloquent可以帮我们向变魔术一样的实现这个功能。
我们可以使用Eloquent ORM来创建,编辑,操作,删除我们的标签而不需要写一行的SQL语句!
作为开始,运行以下Artisan命令来创建我们第一个Ticket模型:
php artisan make:model Ticket
注意: 模型的名称应该为单数形式,表名应该为复数形式。
耶!炒鸡简单吧!你已经成功创建一个模型了!
你可以在app目录中找到Ticket模型(Ticket.php)。
这里有一个小技巧。你可以在后面添加-m选项同时生成标签表的数据库迁徙文件:
php artisan make:model Ticket -m
很酷吧?
好了,让我们打开我们新Ticket模型:
<?php

namespace App;

use Illuminate\Database\Eloquent\Model;

class Ticket extends Model
{
    //
}
正如你所注意到的,Ticket模型只是一个PHP继承了Model的类 。现在我们可以使用这个文件来告诉Laravel关于这张表的关系。 比如,每个标签都是被用户创建的,我们可以说tickets表属于users的 ,通过如下代码在程序中表现出来的:
public function user()
{
    return $this->belongsTo('App\User');
}
当然我们也可以通过这个模型来访问标签的数据,比如:标题,内容等等。
public function getTitle()
{
    return $this->title
}
Eloquent很聪明的。它将会自动找到并且将我们数据库的表和模型连接起来,前提是你的命名是正确的(比如Ticket模型和tickets表,注意单复数形式哦)。
因为某些原因,如果你想使用不同的名字,你通过如下的配置来告诉Eloquent你想使用的表名:
protected $table = 'yourCustomTableName';
点这里,了解更多关于Eloquent:
http://laravel.com/docs/master/eloquent
一旦我们有了Ticket模型,我们可以搭建一个表单供用户创建一个新标签了!
创建一个提交标签的页面
既然我们有了Ticket模型,那就让我们来写创建新标签的代码吧。
要创建一个新标签,我们需要使用控制器 动作 (也可以叫做控制器 方法) 和 视图来 显示新标签表单。
创建一个视图来显示提交标签的表单
前往我们views目录,创建一个名叫tickets的新目录。
因为我们将会有很多标签视图(比如:创建标签视图,编辑标签视图,删除标签上视图等等),我们应该将所有的视图保存到tickets目录下。
接下来,创建一个名为create.blade.php的Blade模板
@extends('master')
@section('title', 'Contact')

@section('content')
    <div class="container col-md-8 col-md-offset-2">
        <div class="well well bs-component">
            <form class="form-horizontal">
                <fieldset>
                    <legend>Submit a new ticket</legend>
                    <div class="form-group">
                        <label for="title" class="col-lg-2 control-label">Title</label>
                        <div class="col-lg-10">
                            <input type="text" class="form-control" id="title" placeholder="Title">
                        </div>
                    </div>
                    <div class="form-group">
                        <label for="content" class="col-lg-2 control-label">Content</label>
                        <div class="col-lg-10">
                            <textarea class="form-control" rows="3" id="content"></textarea>
                            <span class="help-block">Feel free to ask us any question.</span>
                        </div>
                    </div>

                    <div class="form-group">
                        <div class="col-lg-10 col-lg-offset-2">
                            <button class="btn btn-default">Cancel</button>
                            <button type="submit" class="btn btn-primary">Submit</button>
                        </div>
                    </div>
                </fieldset>
            </form>
        </div>
    </div>
@endsection
很不幸的是,我们现在还看不到这个视图,必须使用控制器的action来显示它。打开PagesController.php文件并编辑:
public function contact()
{
    return view('contact');
}
改为:
public function contact()
{
    return view('tickets.create');
}
为了代替显示contact视图,我们重定向用户到tickets.create 视图。
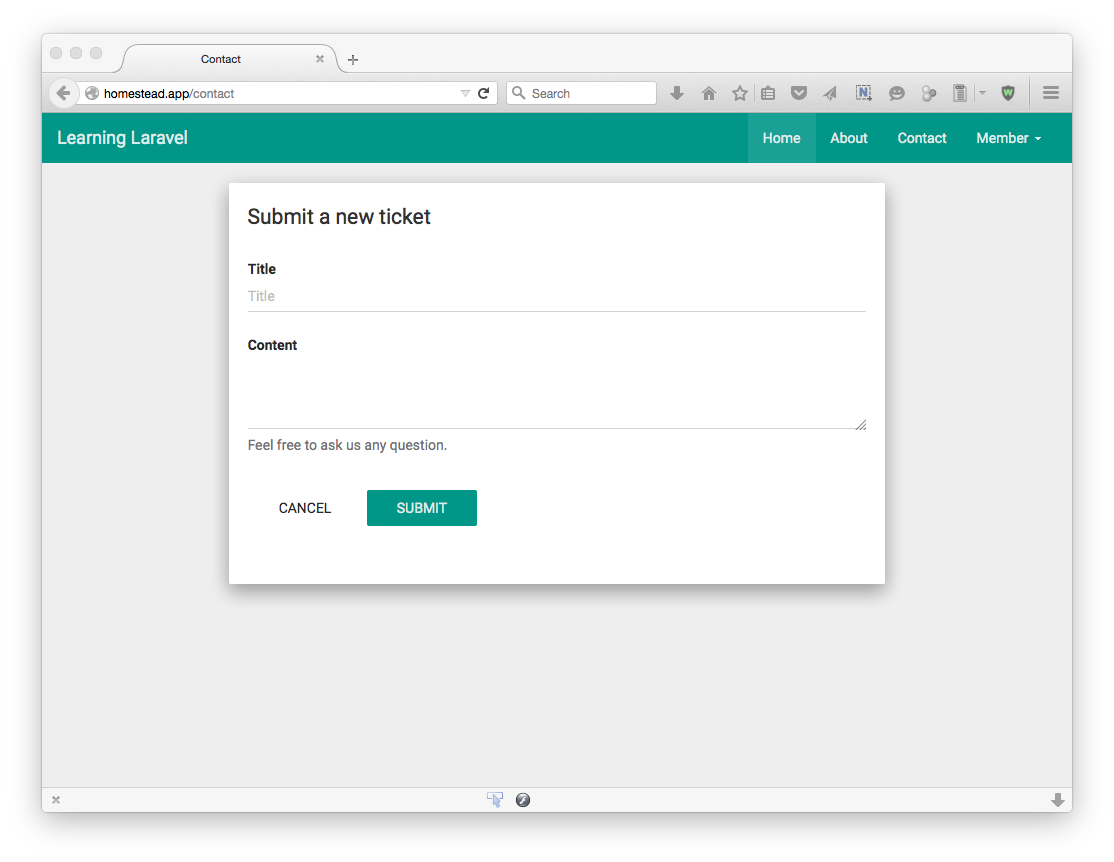
保存这个更改之后,当我们访问contact页面时我们就应该可以看到新的响应结果提交标签表单:
## 为标签创建新的控制器
尽管我们可以使用PagesController来管理所有的页面,我们也应该创建TicketsController来管理我们的标签。
TicketsController将会提供创建,编辑和删除标签的功能。它将会会使组织和维护我们的程序变得更容易。
你已经知道怎么创建一个控制器了,通过运行以下命令来创建TicketsController:
php artisan make:controller TicketsController
实际上,Laravel默认给我们创建RESTful actions (创建,编辑,更新等等). 我们将会使用一些actions, 因此你不需要全部删了它们。
更新create action如下:
public function create()
{
    return view('tickets.create');
}
可不要访问更新routes.php文件哦:
Route::get('/contact', 'TicketsController@create');
太好了!你现在已经有TicketsController了。很简单对吧?
## HTTP Request简介
在Laravel之前的版本中,开发者都是随意放在他们的数据验证的。这可是一个不好的习惯啊。
庆幸的是Laravel 5有一个叫做Requests (又名HTTP Requests或者Form Requests). 当用户发送一个请求(比如提交一个标签),我们可以使用实例化一个Request对象来定义一些规则并验证请求。如果校验器通过了,将会正常执行之后的程序。否则用户将会被自动重定向到他们原位。
正如你所看到的,要验证我们程序的表单将会变得很方便。
我们将会使用Request来校验创建标签的表单。
要创建新的Request,只要运行这个Artisan命令:
php artisan make:request TicketFormRequest
一个新的TicketFormRequest将会被生成!你可以在app/Http/Requests目录下找到它。
打开这个文件,你将会看到这里有两个方法:authorize和rules.
authorize() 方法
public function authorize()
{
    return false;
}
该方法默认返回false,也就意味着没有人能执行这个请求。为了能够提交标签,我们必须让它返回true:
public function authorize()
{
    return true;
}
rules() 方法
public function rules()
{
    return [
        //
    ];
}
我们使用这个方法来定义我们的验证规则。
当前,我们创建标签的表单有两个字段: title和content, 我们设置如下规则:
public function rules()
{
    return [
        'title' => 'required|min:3',
        'content'=> 'required|min:10',
    ];
}
required|min:3 验证规则表示用户必须填写这个字段而且内容长度不能少于3个字符。
这里有很多验证规则,你可以查看一下可以校验规则的列表:
http://laravel.com/docs/master/validation#available-validation-rules
安装Laravel集合包
从Laravel 5开始,很多Laravel组件都从核心框架中移除了。如果你使用的是之前的版本,你也许会爱上这些特性:
HTML: HTML帮助床架通用HTML和表单元素
Annotations: 映射和事件注释
Remote: 一个通过SSH连上远程服务器和运行命令的简单方式
幸运的是,让这些特性回归是很简单的。你只要安装一个Laravel集合包!
不知道如何安装这个包吗?让我来告诉你吧。
使用Composer安装一个包
首先,你需要打开你的composer.json文件,这个文件放置在你应用的根目录下。
{
    "name": "laravel/laravel",
    "description": "The Laravel Framework.",
    "keywords": ["framework", "laravel"],
    "license": "MIT",
    "type": "project",
    "require": {
        "php": ">=5.5.9",
        "laravel/framework": "5.1.*"
    },
    "require-dev": {
        "fzaninotto/faker": "~1.4",
        "mockery/mockery": "0.9.*",
        "phpunit/phpunit": "~4.0",
        "phpspec/phpspec": "~2.1"
    },
    "autoload": {
        "classmap": [
            "database"
        ],
        "psr-4": {
            "App\\": "app/"
        }
    },
    "autoload-dev": {
        "classmap": [
            "tests/TestCase.php"
        ]
    },
    "scripts": {
        "post-install-cmd": [
            "php artisan clear-compiled",
            "php artisan optimize"
        ],
        "post-update-cmd": [
            "php artisan clear-compiled",
            "php artisan optimize"
        ],
        "post-root-package-install": [
            "php -r \"copy('.env.example', '.env');\""
        ],
        "post-create-project-cmd": [
            "php artisan key:generate"
        ]
    },
    "config": {
        "preferred-install": "dist"
    },
    "minimum-stability": "dev",
    "prefer-stable": true
}
这是一个JSON文件。我们使用JSON来存储和交换数据。JSON阅读性很强。如果你之前看过HTML或者XML, 相信JSON对于你来说是没问题的。
如果你看不懂它,点这里学一下吧:
在本节中,我们将会添加HTML包到我们的应用中。包的介绍可以从如下找到:
http://laravelcollective.com/docs/5.1/html
要使用Composer安装一个Laravel包,你只需要添加如下代码:
找到:
"require": {
    "php": ">=5.5.9",
    "laravel/framework": "5.1.*"
},
添加:
"require": {
    "php": ">=5.5.9",
    "laravel/framework": "5.1.*",
    "laravelcollective/html": "5.1.*"
},
注意: 如果你正在使用Laravel 5.2或者更新的版本,这个版本有可能是不一样的。比如,如果你使用的是Laravel 5.2, 这代码应该是
“laravelcollective/html”: “5.2.*”
保存文件并在你应用的根目录下运行如下命令:
composer update
搞定!你已经成功安装LaravelCollective/HTML包了!
创建一个服务提供者和别名
通过Composer安装HTML包之后,你必须完成以下几步来让Laravel知道 去哪里找这些包并使用它。
要使用这个包,你必须添加一个服务提供者到config/app.php文件中的提供者数组中。
找到:
'providers' => [

    /*
     * Laravel Framework Service Providers...
     */
    Illuminate\Foundation\Providers\ArtisanServiceProvider::class,
    Illuminate\Auth\AuthServiceProvider::class,
    Illuminate\Broadcasting\BroadcastServiceProvider::class,
    Illuminate\Bus\BusServiceProvider::class,
    Illuminate\Cache\CacheServiceProvider::class,
    Illuminate\Foundation\Providers\ConsoleSupportServiceProvider::class,
    Illuminate\Routing\ControllerServiceProvider::class,
    Illuminate\Cookie\CookieServiceProvider::class,
    Illuminate\Database\DatabaseServiceProvider::class,
    Illuminate\Encryption\EncryptionServiceProvider::class,
    Illuminate\Filesystem\FilesystemServiceProvider::class,
    Illuminate\Foundation\Providers\FoundationServiceProvider::class,
    Illuminate\Hashing\HashServiceProvider::class,
    Illuminate\Mail\MailServiceProvider::class,
    Illuminate\Pagination\PaginationServiceProvider::class,
    Illuminate\Pipeline\PipelineServiceProvider::class,
    Illuminate\Queue\QueueServiceProvider::class,
    Illuminate\Redis\RedisServiceProvider::class,
    Illuminate\Auth\Passwords\PasswordResetServiceProvider::class,
    Illuminate\Session\SessionServiceProvider::class,
    Illuminate\Translation\TranslationServiceProvider::class,
    Illuminate\Validation\ValidationServiceProvider::class,
    Illuminate\View\ViewServiceProvider::class,

    /*
     * Application Service Providers...
     */
    App\Providers\AppServiceProvider::class,
    App\Providers\EventServiceProvider::class,
    App\Providers\RouteServiceProvider::class,

],
添加如下行到$provider数组中:
Collective\Html\HtmlServiceProvider::class,
如下:
    App\Providers\RouteServiceProvider::class,
    Collective\Html\HtmlServiceProvider::class,
],
找到aliases数组:
'aliases' => [

    'App'       => Illuminate\Support\Facades\App::class,
    'Artisan'   => Illuminate\Support\Facades\Artisan::class,
    'Auth'      => Illuminate\Support\Facades\Auth::class,
    'Blade'     => Illuminate\Support\Facades\Blade::class,
    'Bus'       => Illuminate\Support\Facades\Bus::class,
    'Cache'     => Illuminate\Support\Facades\Cache::class,
    'Config'    => Illuminate\Support\Facades\Config::class,
    'Cookie'    => Illuminate\Support\Facades\Cookie::class,
    'Crypt'     => Illuminate\Support\Facades\Crypt::class,
    'DB'        => Illuminate\Support\Facades\DB::class,
    'Eloquent'  => Illuminate\Database\Eloquent\Model::class,
    'Event'     => Illuminate\Support\Facades\Event::class,
    'File'      => Illuminate\Support\Facades\File::class,
    'Hash'      => Illuminate\Support\Facades\Hash::class,
    'Input'     => Illuminate\Support\Facades\Input::class,
    'Inspiring' => Illuminate\Foundation\Inspiring::class,
    'Lang'      => Illuminate\Support\Facades\Lang::class,
    'Log'       => Illuminate\Support\Facades\Log::class,
    'Mail'      => Illuminate\Support\Facades\Mail::class,
    'Password'  => Illuminate\Support\Facades\Password::class,
    'Queue'     => Illuminate\Support\Facades\Queue::class,
    'Redirect'  => Illuminate\Support\Facades\Redirect::class,
    'Redis'     => Illuminate\Support\Facades\Redis::class,
    'Request'   => Illuminate\Support\Facades\Request::class,
    'Response'  => Illuminate\Support\Facades\Response::class,
    'Route'     => Illuminate\Support\Facades\Route::class,
    'Schema'    => Illuminate\Support\Facades\Schema::class,
    'Session'   => Illuminate\Support\Facades\Session::class,
    'Storage'   => Illuminate\Support\Facades\Storage::class,
    'URL'       => Illuminate\Support\Facades\URL::class,
    'Validator' => Illuminate\Support\Facades\Validator::class,
    'View'      => Illuminate\Support\Facades\View::class,

],
添加两个别名到aliases数组中:
  'Form' => Collective\Html\FormFacade::class,
  'Html' => Collective\Html\HtmlFacade::class,
如下:
    'View'      => Illuminate\Support\Facades\View::class,
    'Form' => Collective\Html\FormFacade::class,
    'Html' => Collective\Html\HtmlFacade::class,
],
现在你就可以使用LaravelCollective/HTML包了!
怎么使用HTML包
HTML包帮助我们更快更简单的搭建表单。举个栗子:
普通HTML代码:
        <form action="contact">
            <label>First name:</label>
            <input type="text" name="firstname" value="Enter your first name">
            <br />
            <label>Last name:</label>
            <input type="text" name="lastname" value="Enter your last name">
            <br />
            <input type="submit" value="Submit">
        </form>
使用HTML包:
        {!! Form::open(array ('url' => 'contact')) !!}
        {!! Form::label('First name') !!}
        {!! Form::text('firstname', 'Enter your first name') !!}
        <br />
        {!! Form::label('Last name') !!}
        {!! Form::text('lastname', 'Enter your last name') !!}
        <br />
        {!! Form::submit() !!}
        {!! Form::close() !!}
正如你看到的,我们使用Form::open()来打开form标签,使用Form::close()来关闭表单。
Text字段和标签都可以分别用Form::text和Form::label方法来直接生成的。
你可以通过Laravel4的官方文档来学习如何使用HTML包:
http://laravel.com/docs/4.2/html
如果你不想使用HTML包创建表单的优点,你可以不用它。我只是想让你明白它的语法因为很多Laravel开发者正在使用它。如果你每个方法都懂了,那便是极好的。
Laravel 5.2的更改笔记
重要: 如果你正在使用Laravel 5.2或者更新版本,请接着往下读。
自Laravel 5.2起, /app/Http/Kernel.php和/app/Http/routes.php都已经更改了。你也行会碰到如下信息:
Undefined variable: errors
解决方案一:使用web中间件组
在Laravel 5.2中,这是一个新的web中间件组。
/*
|--------------------------------------------------------------------------
| Application Routes
|--------------------------------------------------------------------------
|
| This route group applies the "web" middleware group to every route
| it contains. The "web" middleware group is defined in your HTTP
| kernel and includes session state, CSRF protection, and more.
|
*/
Route::group(['middleware' => ['web']], function () {
    //
});
如果你正在使用Session ($errors对象, session(‘status’)等等)或者CSRF保护,确定将所有相关路由放到web中间件组。比如:
如果你看到:
Route::get('/contact', 'TicketsController@create');
Route::post('/contact', 'TicketsController@store');
确定将他们放到web中间件组中:
Route::group(['middleware' => ['web']], function () {
    Route::get('/contact', 'TicketsController@create');
    Route::post('/contact', 'TicketsController@store');
});
解决方案一:修复$errors的错误
因为只有当你将相关的路由放到web中间件组时,$errors对象才能可用:
Undefined variable: errors
要修复它,找到:
@foreach ($errors->all() as $error)
    // content
@endforeach
添加判断$errors对象是否可用:
@if (isset($errors) && $errors->any())
    @foreach ($errors->all() as $error)
        // content
    @endforeach
@endif
最好的解决方案:更新你的Kernel.php文件
如果你不想将你的路由放到web中间件组中,那就按照如下更改你的Kernel.php文件:
找到:
protected $middleware = [
    \Illuminate\Foundation\Http\Middleware\CheckForMaintenanceMode::class,
];
改为:
protected $middleware = [
    \Illuminate\Foundation\Http\Middleware\CheckForMaintenanceMode::class,
    \App\Http\Middleware\EncryptCookies::class,
    \Illuminate\Cookie\Middleware\AddQueuedCookiesToResponse::class,
    \Illuminate\Session\Middleware\StartSession::class,
    \Illuminate\View\Middleware\ShareErrorsFromSession::class,
    \App\Http\Middleware\VerifyCsrfToken::class,
];
现在万事大吉了。
提交表单数据
之前学习了Requests,又用控制器和视图来搭建创建标签的表单,现在该准备处理提交的数据了。
如果你点击提交表单后,并没有任何事情发生。我们需要使用其他的HTTP方法来提交表单。
客户端和服务器通讯的两个常用HTTP方法分别是: GET和POST.
我们已经使用GET方法来显示表单了:
Route::get('/contact', 'TicketsController@create');
但是不会使用GET来提交数据。GET请求应该只用来获取数据的。
我们经常使用POST方法来处理表单的提交终端。当我们使用 POST,请求永远不会被缓存参数也不会被保存到用户浏览器的历史记录中。因此POST比GET更安全。
打开routes.php文件,添加:
Route::post('/contact', 'TicketsController@store');
很好!现在当用户发送POST请求访问contact页面时,这个路由告诉Laravel执行TicketsController的store动作。
这个store动作还是空的。你可以修改它来显示表单数据:
TicketsController.php
public function store(TicketFormRequest $request)
{
    return $request->all();
}
在这里,我们将TicketFormRequest当做store动作的一个参数来告诉Laravel我们想要验证store动作。
Laravel要求我们在控制器的构造函数中获取当前HTTP请求的一个实例。简单地说,我们需要将以下代码添加到TicketsController.php文件顶部:
use App\Http\Requests\TicketFormRequest;
找到:
class TicketsController extends Controller
{
在上面添加
use App\Http\Requests\TicketFormRequest;
class TicketsController extends Controller
{
还有一步,你需要修改标签表单来发送POST请求。打开tickets/create.blade.php.
找到:
<form class="form-horizontal">
更改为:
<form class="form-horizontal" method="post">
你还需要告诉Laravel表单字段的名字:
找到:
<input type="text" class="form-control" id="title" placeholder="Title">
...
<textarea class="form-control" rows="3" id="content"></textarea>
修改为:
<input type="text" class="form-control" id="title" placeholder="Title" name="title">
...
<textarea class="form-control" rows="3" id="content" name="content"></textarea>
现在,试试点击提交按钮呗!
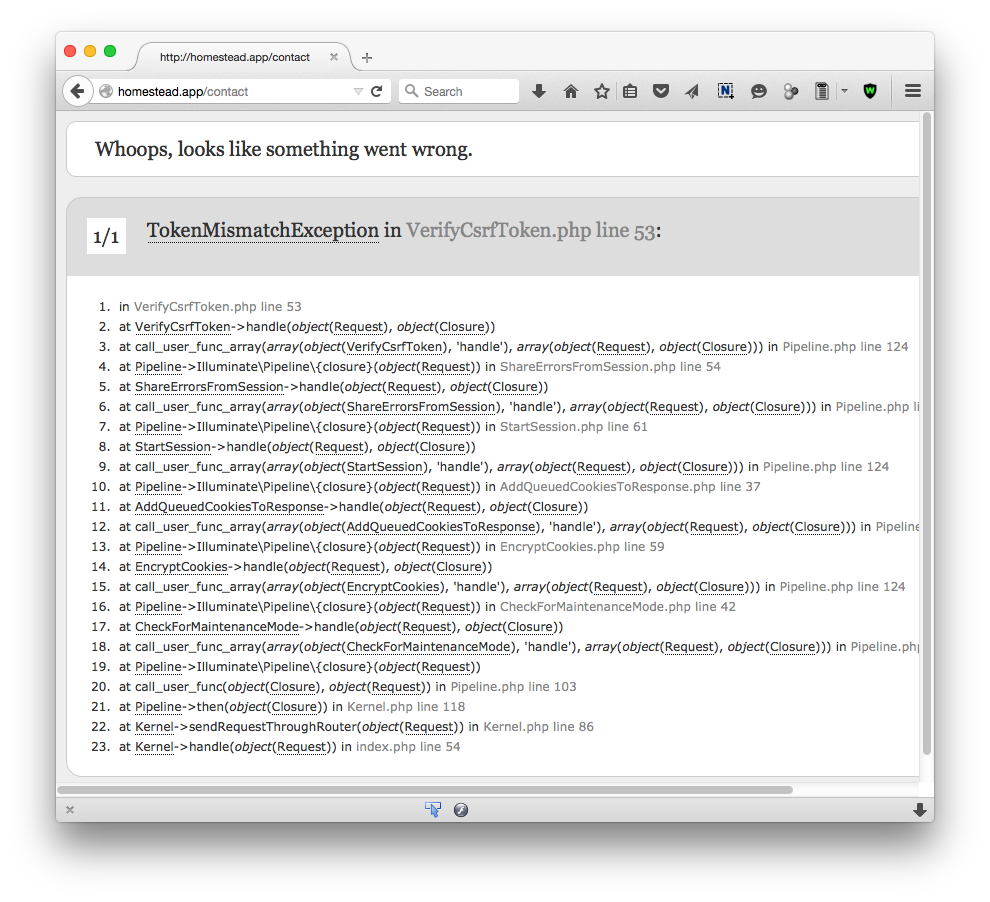
真是哔了狗了!竟然出错了。
TokenMismatchException是什么鬼呀?
出于安全考虑,当使用POST方法时,Laravel现在要求必须要有一个Token(口令).如果你没有发送任何口令,程序就会抛出这样的异常。
要修复这个错误,你需要在你的表单标签中添加隐藏的口令字段:
<form class="form-horizontal" method="post">
    <input type="hidden" name="_token" value="{!! csrf_token() !!}">
很好!刷新你的浏览器,填写表单并再次提交数据,你将会看到:
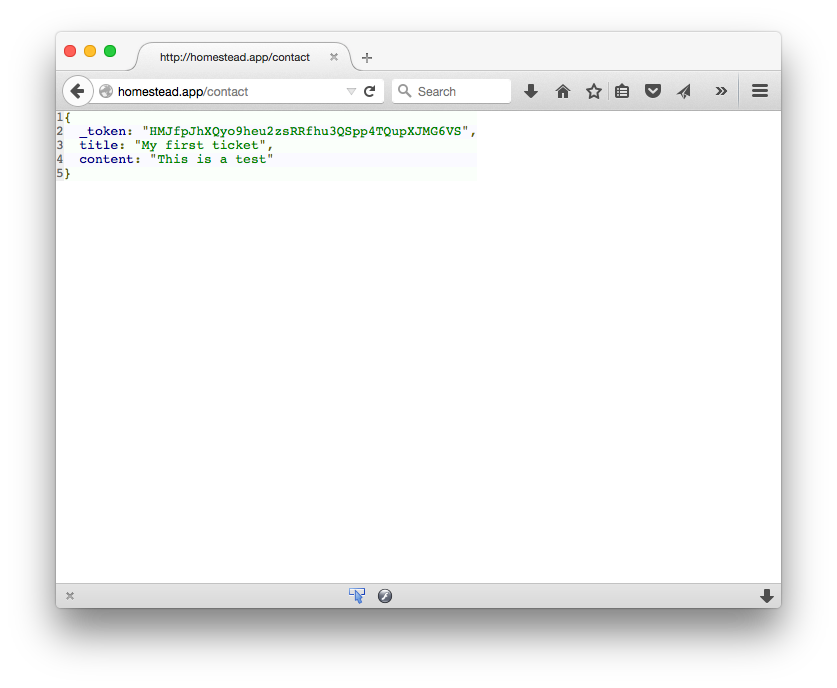
要要要切克闹!我们可以看到标签数据了!干得漂亮!
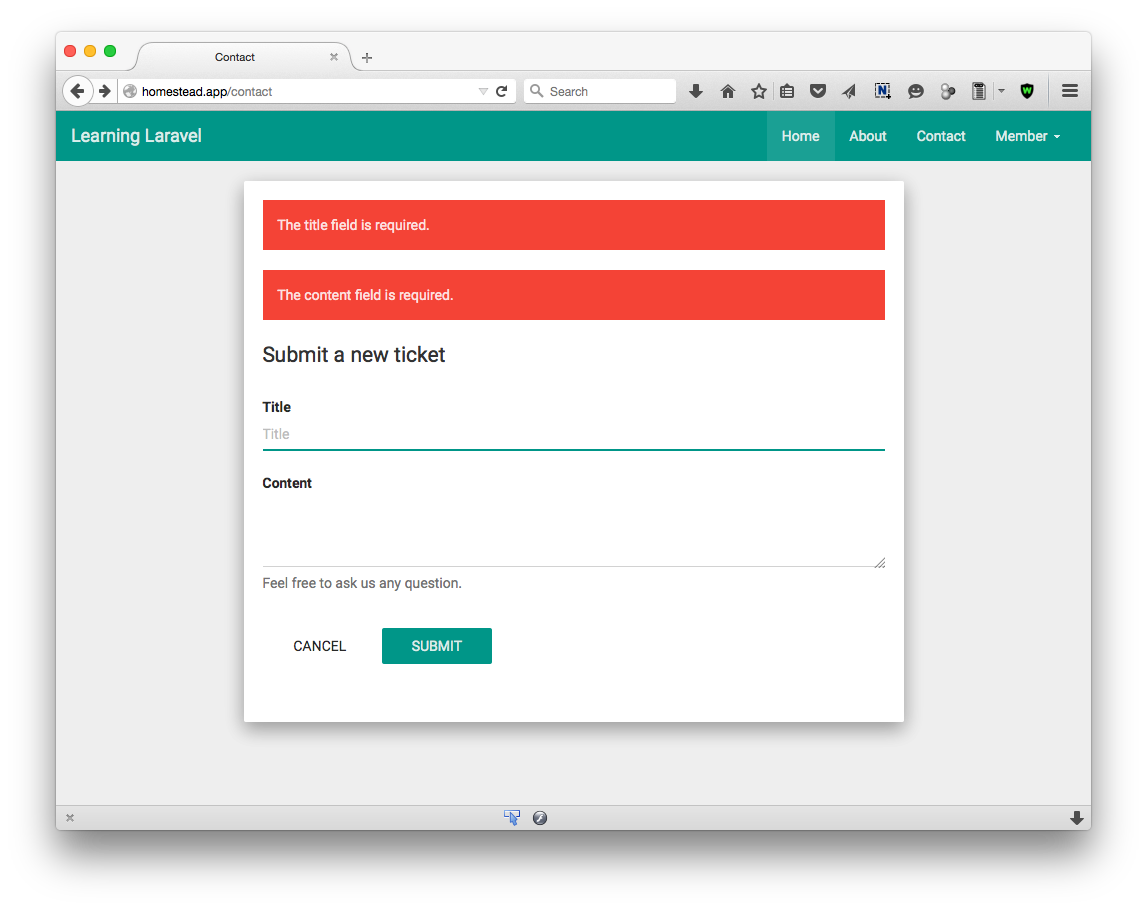
最后一步,当用户没有填写表单或者表单不可用时显示错误信息。
找到:
<form class="form-horizontal" method="post">
在下面添加:
@foreach ($errors->all() as $error)
    <p class="alert alert-danger">{{ $error }}</p>
@endforeach
总的来说,如果校验器失败了,Laravel将会保存错误信息到session中。我们可以通过$error对象轻松的访问errors。
现在,让我们回到表单,不填写表单然后直接点击提交按钮:
这是一个新tickets/create.blade.php文件:
@extends('master')
@section('title', 'Create a new ticket')

@section('content')
    <div class="container col-md-8 col-md-offset-2">
        <div class="well well bs-component">

            <form class="form-horizontal" method="post">

                @foreach ($errors->all() as $error)
                    <p class="alert alert-danger">{{ $error }}</p>
                @endforeach

                <input type="hidden" name="_token" value="{!! csrf_token() !!}">

                <fieldset>
                    <legend>Submit a new ticket</legend>
                    <div class="form-group">
                        <label for="title" class="col-lg-2 control-label">Title</label>
                        <div class="col-lg-10">
                            <input type="title" class="form-control" id="title" placeholder="Title" name="title">
                        </div>
                    </div>
                    <div class="form-group">
                        <label for="content" class="col-lg-2 control-label">Content</label>
                        <div class="col-lg-10">
                            <textarea class="form-control" rows="3" id="content" name="content"></textarea>
                            <span class="help-block">Feel free to ask us any question.</span>
                        </div>
                    </div>

                    <div class="form-group">
                        <div class="col-lg-10 col-lg-offset-2">
                            <button class="btn btn-default">Cancel</button>
                            <button type="submit" class="btn btn-primary">Submit</button>
                        </div>
                    </div>
                </fieldset>
            </form>
        </div>
    </div>
@endsection
使用 .env文件
在接下来的小节中,我们将会学习如何插入数据到我们的数据库中。在使用数据库之前,你得先理解.env文件。
.env文件是什么鬼?
我们的应用经常在不同的环境中运行。比如,我们在本地服务器上开发我们的应用,但是却要去将其部署到生产环境中的服务器上。其中的数据库设置和服务器认证信息有可能不一样。Laravel 5给我们提供了一个通过编辑.env文件来操作不同配置的方法。
.env文件帮我们加载自定义的配置变量而不需要编辑.htaccess文件或者虚拟hosts,这样可以使我们本就敏感的认证信息更安全。
了解更多关于.env文件的信息:
https://github.com/vlucas/phpdotenv
怎么编辑该文件呢?
.env文件配置起来很简单。先打开该文件:
APP_ENV=local
APP_DEBUG=true
APP_KEY=o8UTlUkakeVkSUlFbGjSXaCcmAAkU0xB

DB_HOST=localhost
DB_DATABASE=homestead
DB_USERNAME=homestead
DB_PASSWORD=secret

CACHE_DRIVER=file
SESSION_DRIVER=file
QUEUE_DRIVER=sync

MAIL_DRIVER=smtp
MAIL_HOST=mailtrap.io
MAIL_PORT=2525
MAIL_USERNAME=null
MAIL_PASSWORD=null
MAIL_ENCRYPTION=null
正如你所看到的,这个文件结构很清晰。让我们试着修改一些设置。
目前,你正在使用默认的homestead数据库。如果你创建了一个不同的数据库并且你想使用这个数据库,编辑这一行:
DB_DATABASE=homestead
为
DB_DATABASE=你自定义的数据库名字
如果你如果你不想显示全部错误信息,将APP_DEBUG改为false.
如果你正在使用sendgrid来发送邮件,使用你的sendgrid认证信息来替换以下行:
MAIL_DRIVER=smtp
MAIL_HOST=mailtrap.io
MAIL_PORT=2525
MAIL_USERNAME=null
MAIL_PASSWORD=null
MAIL_ENCRYPTION=null
比如:
MAIL_DRIVER=smtp
MAIL_HOST=smtp.sendgrid.net
MAIL_PORT=587
MAIL_USERNAME=learninglaravel
MAIL_PASSWORD=secret
现在,终于要到了有趣的部分了!
往数据库中插入数据
在之前的小节中你已经学会了如何接收和校验用户的请求。
一旦你提交了表单的数据,将数据插入到数据库中就会很简单。
首先,将以下代码插入到TicketsController文件的头部:
use App\Ticket;
确定是插在类名的上面:
use App\Ticket;
class TicketsController extends Controller
{
这段代码告诉Laravel你想在这个类中使用你的Ticket模型。
现在你可以使用Ticket模型来存储表单数据。修改store动作:
public function store(TicketFormRequest $request)
{
    $slug = uniqid();
    $ticket = new Ticket(array(
        'title' => $request->get('title'),
        'content' => $request->get('content'),
        'slug' => $slug
    ));

    $ticket->save();

    return redirect('/contact')->with('status', 'Your ticket has been created! Its unique id is: '.$slug);

}
让我们一行行的看下来:
$slug = uniqid();
我们使用uniqid()函数来生成一个基于微秒时间的唯一ID。你也可以使用md5()函数来生成slugs或者创建你自己的slugs.
这句是标签的唯一ID.
    $ticket = new Ticket(array(
        'title' => $request->get('title'),
        'content' => $request->get('content'),
        'slug' => $slug
    ));
接下来,我们创建一个新Ticket模型实例,设置模型的属性。
$ticket->save();
然后我们调用save方法来保存数据库到我们的数据库。
return redirect('/contact')->with('status', 'Your ticket has been created! Its unique id is: '.$slug);
一旦标签被保存了,我们便会让用户携带一个消息重定向到contact页。
最后,试着创建一个新标签并提交它。
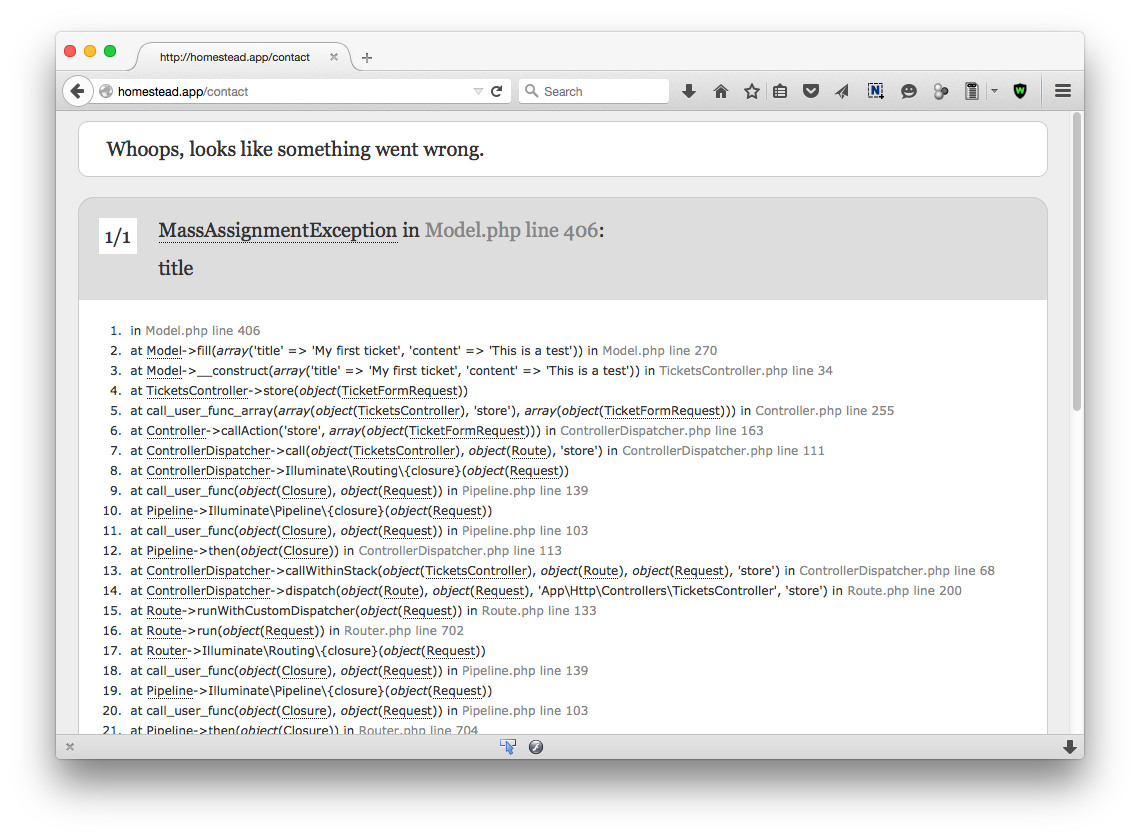
心中十万匹草泥马奔腾而过!
报了个错啊: “MassAssignmentException”
不过不要慌,这是Laravel一个新特性用以防范mass-assignment.
mass-assignment是什么鬼?
根据Laravel官方文档:
“用户通过http请求发送不合法的http参数时会促发mass-assignment 漏洞,这个参数将会篡改数据库中的列。比如,一个恶意用户通过HTTP请求发送一个is_admin参数,这是一个映射到你的模型的创建方法,运行用户将他们自己升级为管理员”
点击查看更多:
http://laravel.com/docs/master/eloquent#mass-assignment
要保存标签,打开Ticket模型. (Ticket.php文件)
然后将以下内容放到Ticket模型中:
class Ticket extends Model
{
    protected $fillable = ['title', 'content', 'slug', 'status', 'user_id'];
}
$fillable属性可以使模型字段集体可赋值。
要不然,你可以使用$guarded属性让所有的属性集体可赋值,除了被你选择了的属性。比如,我使用id字段:
protected $guarded = ['id'];
注意:你必须使用 fillable和 guarded其中之一。
还有一件事需要做,我们需要更新tickets/create.blade.php视图来显示状态信息:
找到:
<form class="form-horizontal" method="post">

    @foreach ($errors->all() as $error)
        <p class="alert alert-danger">{{ $error }}</p>
    @endforeach
在下面添加:
@if (session('status'))
    <div class="alert alert-success">
        {{ session('status') }}
    </div>
@endif
很好!试着再次创建新的标签。
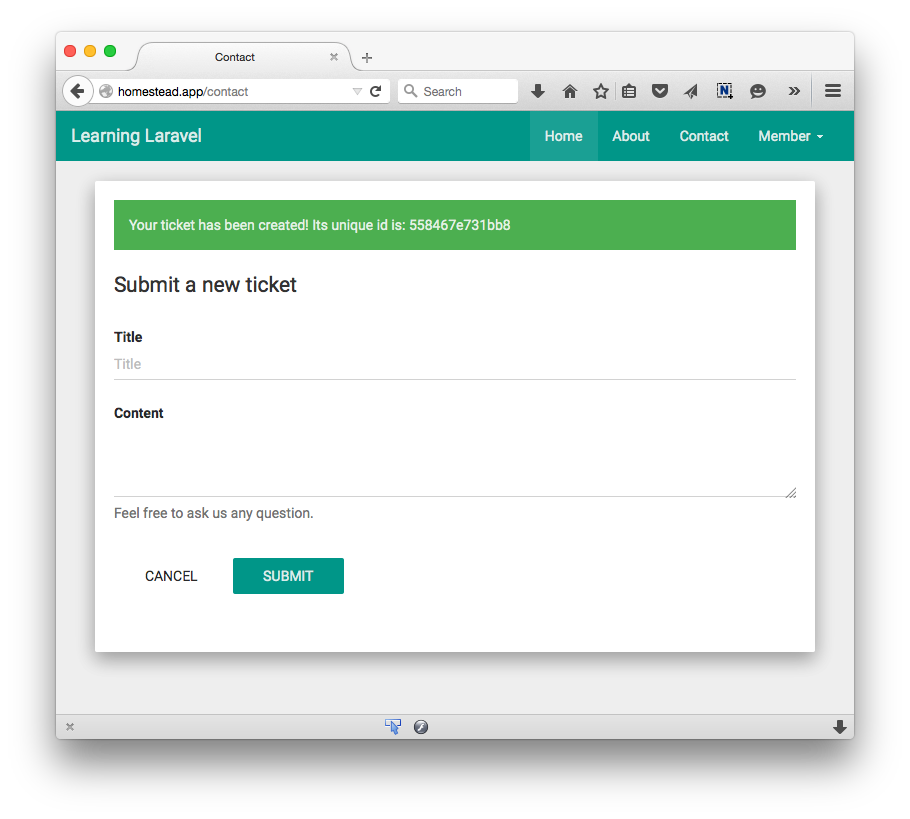
干得漂亮!你已经保存新标签到数据了!
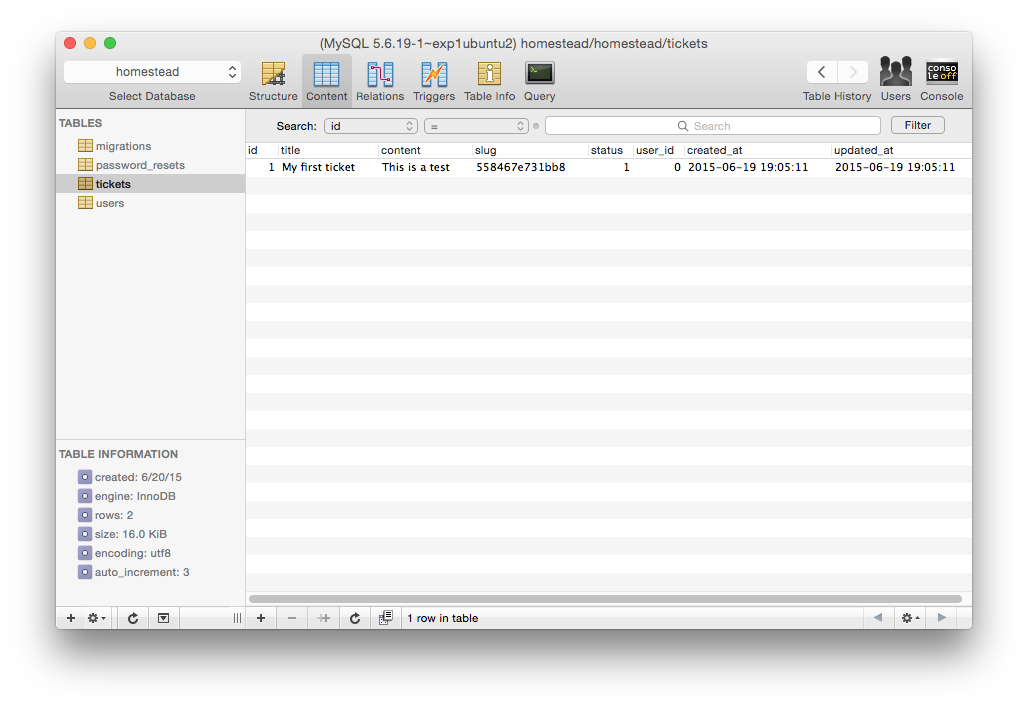
确认检查一下你应用的数据库,你将会在tickets表中看到几条新记录:
预览所有的标签
当你继续开发应用时,你将会发现你需要一个显示所有标签发方法,从而可以轻松地预览,修改或者删除它们。
以下便是列出所有标签的详细步骤:
首先,我们将会修改routes.php文件:
Route::get('/tickets', 'TicketsController@index');
当用户访问homestead.app/tickets,我们使用TicketsController来执行index动作。随便更改链接路径或者动作的名字。
然后打开TicketsController文件,修改index动作:
public function index()
{
    $tickets = Ticket::all();
    return view('tickets.index', compact('tickets'));
}
我们使用Ticket::all()来从你的数据库中获取所有的标签并保存到 $tickets变量中。
在我们返回tickets.index视图之前,我们使用compact()方法 将结果转换成数组并将其传递给视图。
要不然你就会看到:
return view('tickets.index')->with('tickets', $tickets);
或者
return view('tickets.index', ['tickets'=> $tickets]);
其实这三个方法的功能是一样的。
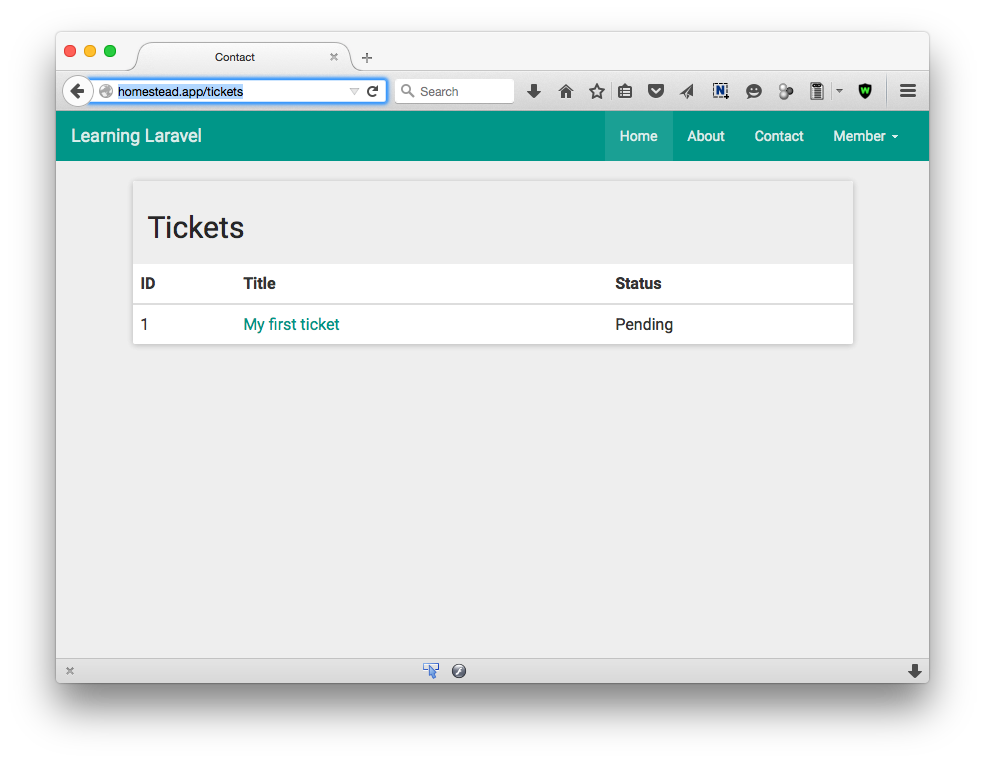
最后,创建一个名为index.blade.php的新视图并把它放置在tickets目录中:
@extends('master')
@section('title', 'View all tickets')
@section('content')

    <div class="container col-md-8 col-md-offset-2">
            <div class="panel panel-default">
                <div class="panel-heading">
                    <h2> Tickets </h2>
                </div>
                @if ($tickets->isEmpty())
                    <p> There is no ticket.</p>
                @else
                    <table class="table">
                        <thead>
                            <tr>
                                <th>ID</th>
                                <th>Title</th>
                                <th>Status</th>
                            </tr>
                        </thead>
                        <tbody>
                            @foreach($tickets as $ticket)
                                <tr>
                                    <td>{!! $ticket->id !!} </td>
                                    <td>{!! $ticket->title !!}</td>
                                    <td>{!! $ticket->status ? 'Pending' : 'Answered' !!}</td>
                                </tr>
                            @endforeach
                        </tbody>
                    </table>
                @endif
            </div>
    </div>

@endsection
我们执行以下步骤来加载标签:
@if ($tickets->isEmpty())
    <p> There is no ticket.</p>
@else
首先,我们判断一下$tickets变量是不是为空。如果为空,我们便会给用户展示一个消息。
@else
    <table class="table">
        <thead>
            <tr>
                <th>ID</th>
                <th>Title</th>
                <th>Status</th>
            </tr>
        </thead>
        <tbody>
                @foreach($tickets as $ticket)
                    <tr>
                        <td>{!! $ticket->id !!} </td>
                        <td>{!! $ticket->title !!}</td>
                        <td>{!! $ticket->status ? 'Pending' : 'Answered' !!}</td>
                    </tr>
                @endforeach
        </tbody>
    </table>
@endif
如果$tickets不为空,我们使用foreach()循环来显示所有的标签。
<td>{{ $ticket->status ? 'Pending' : 'Answered' }}</td>
这里我们使用这种形式简写if else.如果标签的状态为1,我们认为这是等待状态。如果标签的状态是0, 我们认为这是已答状态。
随便更改你喜欢的状态名称。
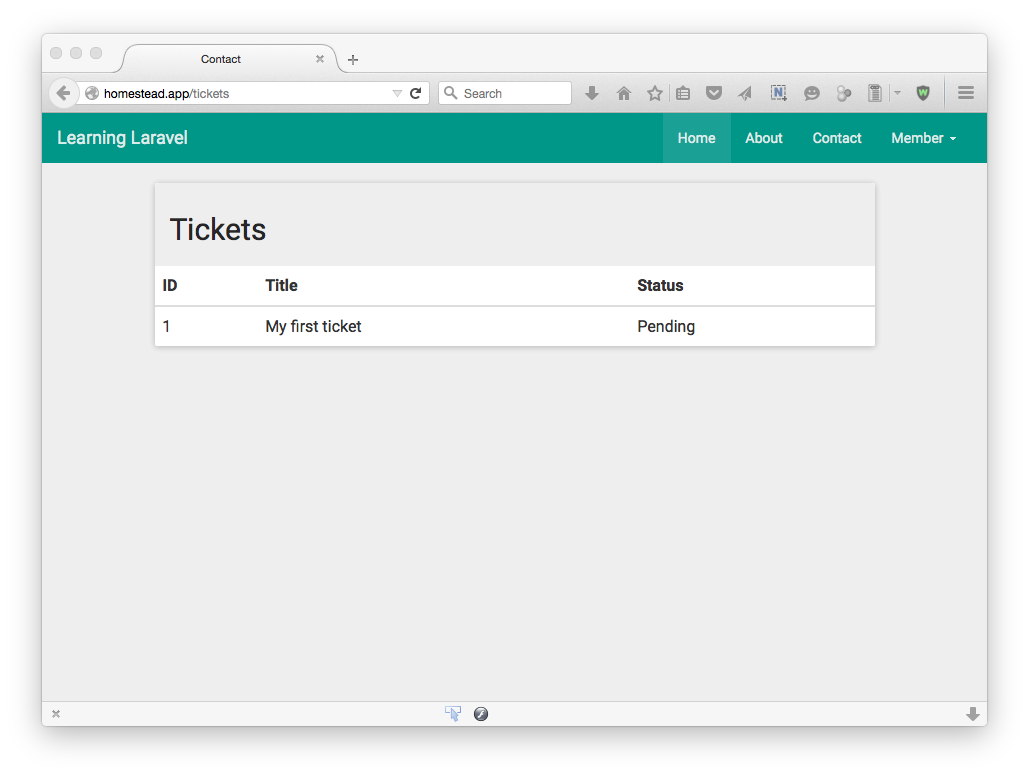
前往homestead.app/tickets, 你将会看到你所创建的所有标签!
查看单个标签
就这一点,查看一个标签更简单。当我们点击一个标签的标题时,我们想显示它的内容和状态。
和往常一样,打开routes.php文件,添加:
Route::get('/ticket/{slug?}', 'TicketsController@show');
你应该意识到了这里我们使用了一个特殊路由(/ticket/{slug?})。 这样做,是要告诉Laravel任何一个名叫slug的路由参数将会被绑定到我们TicketsController的show动作上。简单来说,当我们访问ticket/558467e731bb8,Laravel将会自动发现slug (558467e731bb8)然后将它传递给动作。
注意: 你可以将{slug?}改为{slug}或者任何其他你想改的名字。确认将你自定义的名字放在{ }。
接下来,打开TicketsController, 更改show动作如下:
public function show($slug)
{
    $ticket = Ticket::whereSlug($slug)->firstOrFail();
    return view('tickets.show', compact('ticket'));
}
我们将slug传递给show动作。然后我们可以使用这个slug通过Ticket模型中的firstOrFail方法找到正确的标签。
firstOrFail方法将会取出第一条查询的结果。如果没有结果,将会抛出一个ModelNotFoundException的异常。
如果你不想抛出一个异常,你可以使用first()方法。
$ticket = Ticket::whereSlug($slug)->first();
最后,我们带着标签信息返回tickets.show视图。
我们直接还没有show视图,先创建它吧:
@extends('master')
@section('title', 'View a ticket')
@section('content')

    <div class="container col-md-8 col-md-offset-2">
            <div class="well well bs-component">
                <div class="content">
                    <h2 class="header">{!! $ticket->title !!}</h2>
                    <p> <strong>Status</strong>: {!! $ticket->status ? 'Pending' : 'Answered' !!}</p>
                    <p> {!! $ticket->content !!} </p>
                </div>
                <a href="#" class="btn btn-info">Edit</a>
                <a href="#" class="btn btn-info">Delete</a>
            </div>
    </div>

@endsection
炒鸡简单,对吧?
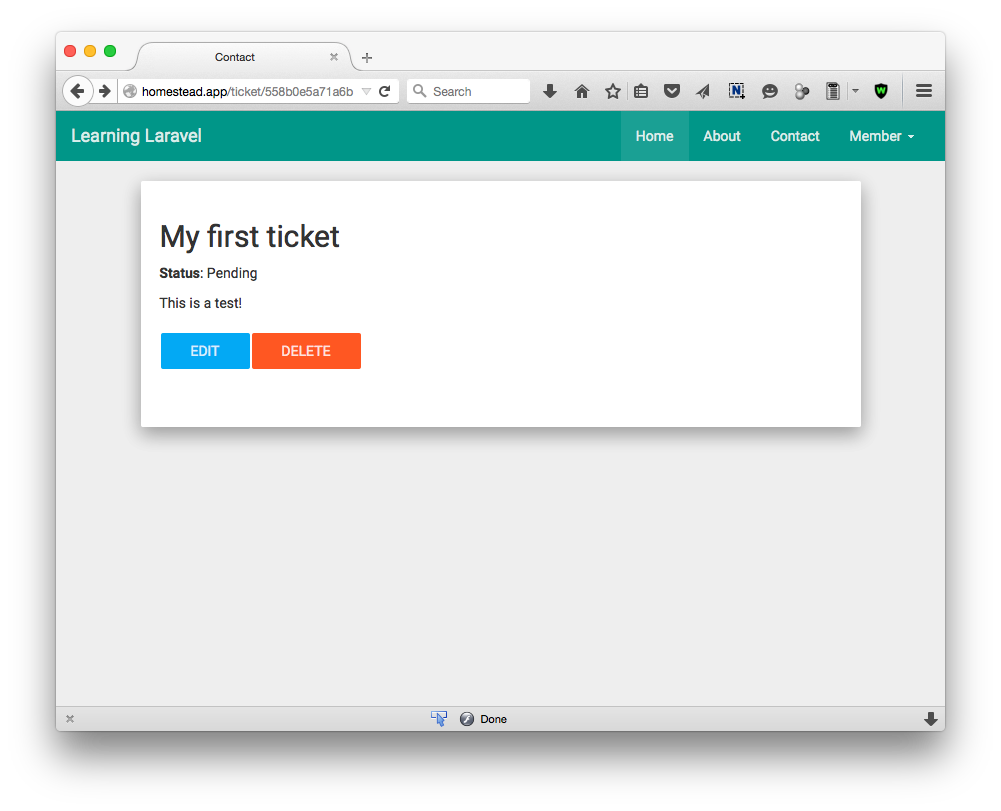
我们实现了显示标签的标题,状态和内容。我们再添加edit和 delete按钮来轻松地编辑和移除标签。
现在如果你访问http://homestead.app/ticket/yourSlug,你将会看到:
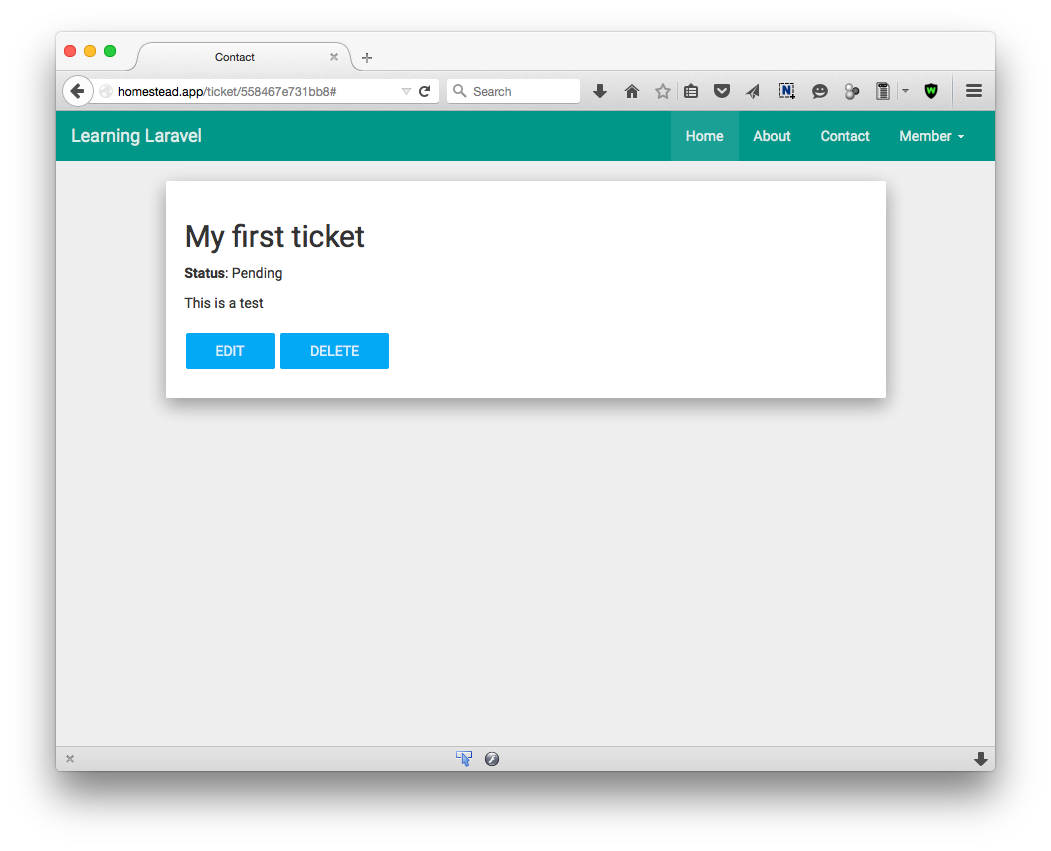
注意: 你的标签的slug和我的也许会不一样。确认下是否用了正确的slug来查看标签。
使用辅助功能
Laravel有很多辅助功能。这些PHP函数非常有用。我们可以使用辅助功能来管理路径,修改字符串,配置我们的应用等等。
你可以在这里找到他们:
http://laravel.com/docs/master/helpers
现在,当我们有了一个查看所有标签的视图以后,让我们思考下如何将标签的标题链接到TicketController的show动作。
打开tickets/index.blade.php.
找到:
   @foreach($tickets as $ticket)
        <tr>
            <td>{!! $ticket->id !!} </td>
            <td>{!! $ticket->title !!}</td>
            <td>{!! $ticket->status ? 'Pending' : 'Answered' !!}</td>
        </tr>
    @endforeach
改为:
@foreach($tickets as $ticket)
    <tr>
        <td>{!! $ticket->id !!}</td>
        <td>
            <a href="{!! action('TicketsController@show', $ticket->slug) !!}">{!! $ticket->title !!} </a>
        </td>
        <td>{!! $ticket->status ? 'Pending' : 'Answered' !!}</td>
    </tr>
@endforeach
这里,我们使用action函数来生成一个链接TicketsController的 show动作的URL:
action('TicketsController@show', $ticket->slug)
第二个参数是一个路由参数。我们使用slug来找到标签,我们将标签的slug放到这里来。
要不然,你可以把代码改成如下:
action('TicketsController@show', ['slug' => $ticket->slug])
现在,当你访问homestead.app/tickets,你将可以通过点击标题来查看标签。
Edit a ticket
It’s time to move on to create our ticket edit form.
Open routes.php, add this route:
Route::get('/ticket/{slug?}/edit','TicketsController@edit');
When users go to /ticket/{slug?}/edit, we redirect them to the TicketsController’s edit action.
Let’s modify the edit action:
public function edit($slug)
{
    $ticket = Ticket::whereSlug($slug)->firstOrFail();
    return view('tickets.edit', compact('ticket'));
}
We find the ticket using its slug, then we use the tickets.edit view to display the edit form.
Let’s create our edit view at resouces/views/tickets/edit.blade.php:
@extends('master')
@section('title', 'Edit a ticket')

@section('content')
    <div class="container col-md-8 col-md-offset-2">
        <div class="well well bs-component">

            <form class="form-horizontal" method="post">

                @foreach ($errors->all() as $error)
                    <p class="alert alert-danger">{{ $error }}</p>
                @endforeach

                @if (session('status'))
                    <div class="alert alert-success">
                        {{ session('status') }}
                    </div>
                @endif

                <input type="hidden" name="_token" value="{!! csrf_token() !!}">

                <fieldset>
                    <legend>Edit ticket</legend>
                    <div class="form-group">
                        <label for="title" class="col-lg-2 control-label">Title</label>
                        <div class="col-lg-10">
                            <input type="text" class="form-control" id="title" name="title" value="{!! $ticket->title !!}">
                        </div>
                    </div>
                    <div class="form-group">
                        <label for="content" class="col-lg-2 control-label">Content</label>
                        <div class="col-lg-10">
                            <textarea class="form-control" rows="3" id="content" name="content">{!! $ticket->content !!}</textarea>
                        </div>
                    </div>

                    <div class="form-group">
                        <label>
                            <input type="checkbox" name="status" {!! $ticket->status?"":"checked"!!} > Close this ticket?
                        </label>
                    </div>

                    <div class="form-group">
                        <div class="col-lg-10 col-lg-offset-2">
                            <button class="btn btn-default">Cancel</button>
                            <button type="submit" class="btn btn-primary">Update</button>
                        </div>
                    </div>
                </fieldset>
            </form>
        </div>
    </div>
@endsection
This view is very similar to the create view, but we add a new checkbox to modify ticket’s status.
<div class="form-group">
    <label>
        <input type="checkbox" name="status" {!! $ticket->status?"":"checked"!!} > Close this ticket?
    </label>
</div>
Try to understand this line:
{!! $ticket->status?"":"checked"!!}
If the status is 1 (pending), we display nothing, the checkbox is not checked. If the status is 0 (answered) , we display a checked attribute, the checkbox is checked.
Good! Now, let’s open the show view, update the edit button as follows:
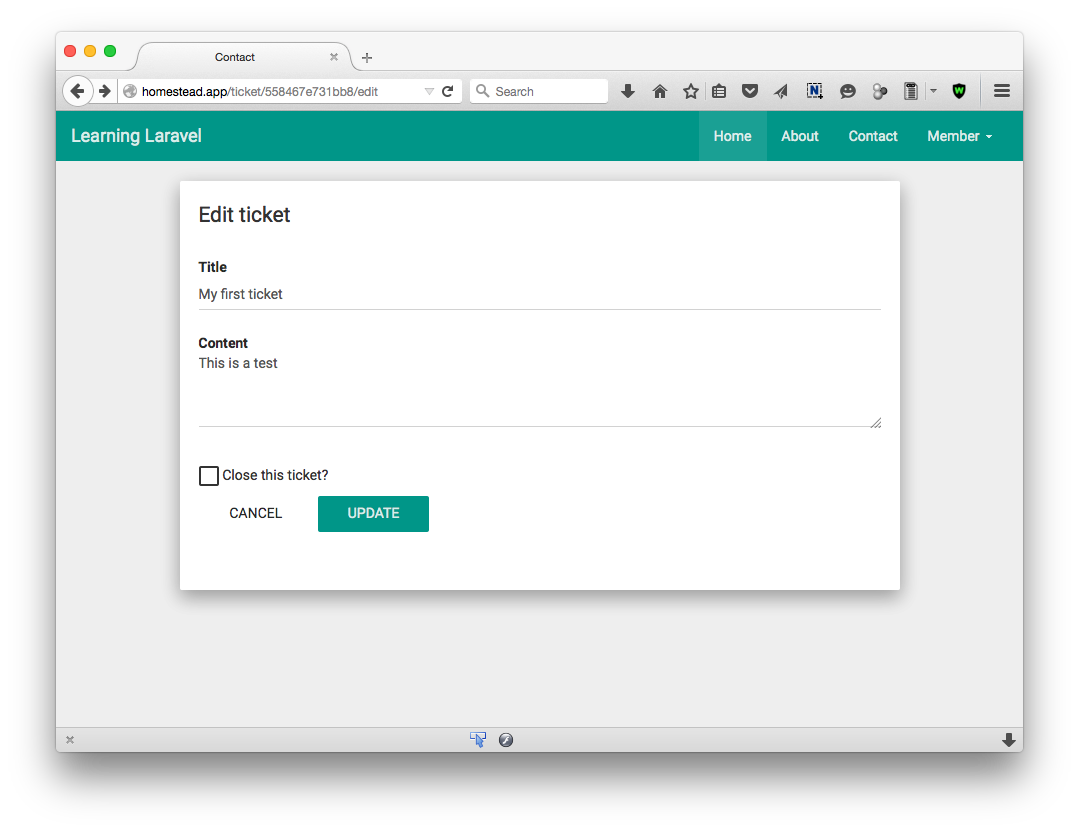
<a href="{!! action('TicketsController@edit', $ticket->slug) !!}" class="btn btn-info">Edit</a>
We use the action helper again! When you click on the edit button, you should be able to access the edit form:
Unfortunately, we can’t update the ticket yet. Remember what you’ve done to create a new ticket?
We need to use POST method to submit the form.
Open routes.php, add:
Route::post('/ticket/{slug?}/edit','TicketsController@update');
Then use update action to handle the submission and store the changes.
public function update($slug, TicketFormRequest $request)
{
    $ticket = Ticket::whereSlug($slug)->firstOrFail();
    $ticket->title = $request->get('title');
    $ticket->content = $request->get('content');
    if($request->get('status') != null) {
        $ticket->status = 0;
    } else {
        $ticket->status = 1;
    }
    $ticket->save();
    return redirect(action('TicketsController@edit', $ticket->slug))->with('status', 'The ticket '.$slug.' has been updated!');

}
As you notice, you can save the ticket by using the following code:
    $ticket = Ticket::whereSlug($slug)->firstOrFail();
    $ticket->title = $request->get('title');
    $ticket->content = $request->get('content');
    if($request->get('status') != null) {
        $ticket->status = 0;
    } else {
        $ticket->status = 1;
    }
    $ticket->save();
This is how we can check if the users select the status checkbox or not:
if($request->get('status') != null) {
    $ticket->status = 0;
} else {
    $ticket->status = 1;
}
Finally, we redirect users to the ticket page with a status message:
return redirect(action('TicketsController@edit', $ticket->slug))->with('status', 'The ticket '.$slug.' has been updated!');
Try to edit the ticket now and hit the update button!
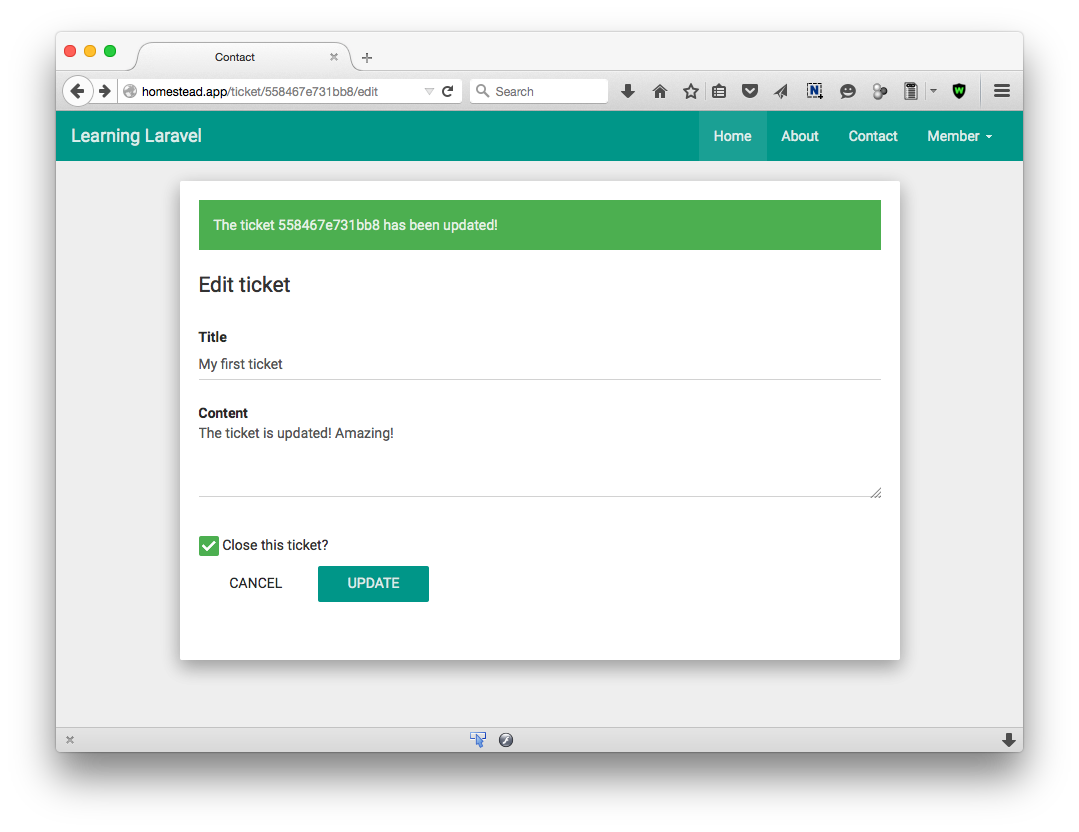
Amazing! The ticket has been updated!
Delete a ticket
You’ve learned how to create, read and update a ticket. Next, you will learn how to delete it. By the end of this section, you’ll have a nice CRUD application!
First step, let’s open the routes.php file:
Route::post('/ticket/{slug?}/delete','TicketsController@destroy');
When we send a POST request to this route, Laravel will take the slug and execute the TicketsController’s destroy action.
Note: You may use the GET method here.
Open TicketsController and update the destroy action:
public function destroy($slug)
{
    $ticket = Ticket::whereSlug($slug)->firstOrFail();
    $ticket->delete();
    return redirect('/tickets')->with('status', 'The ticket '.$slug.' has been deleted!');
}
We find the ticket using the provided slug. After that, we use $ticket->delete() method to delete the ticket.
As always, we then redirect users to the all tickets page. Let’s update the index.blade.php to display the status message:
Find:
<div class="panel-heading">
    <h2> Tickets </h2>
</div>
Add below:
@if (session('status'))
    <div class="alert alert-success">
        {{ session('status') }}
    </div>
@endif
Finally, in order to remove the ticket, all we need to do is create a form to submit a delete request.
Open show.blade.php and find:
<a href="{!! action('TicketsController@edit', $ticket->slug) !!}" class="btn btn-info">Edit</a>
<a href="#" class="btn btn-info">Delete</a>
Update to:
<a href="{!! action('TicketsController@edit', $ticket->slug) !!}" class="btn btn-info pull-left">Edit</a>

<form method="post" action="{!! action('TicketsController@destroy', $ticket->slug) !!}" class="pull-left">
<input type="hidden" name="_token" value="{!! csrf_token() !!}">
        <div class="form-group">
            <div>
                <button type="submit" class="btn btn-warning">Delete</button>
            </div>
        </div>
</form>
<div class="clearfix"></div>
The code above creates a nice delete form for you. When you view a ticket, you should see a different delete button:
Now, click the delete button, you should be able to remove the ticket!
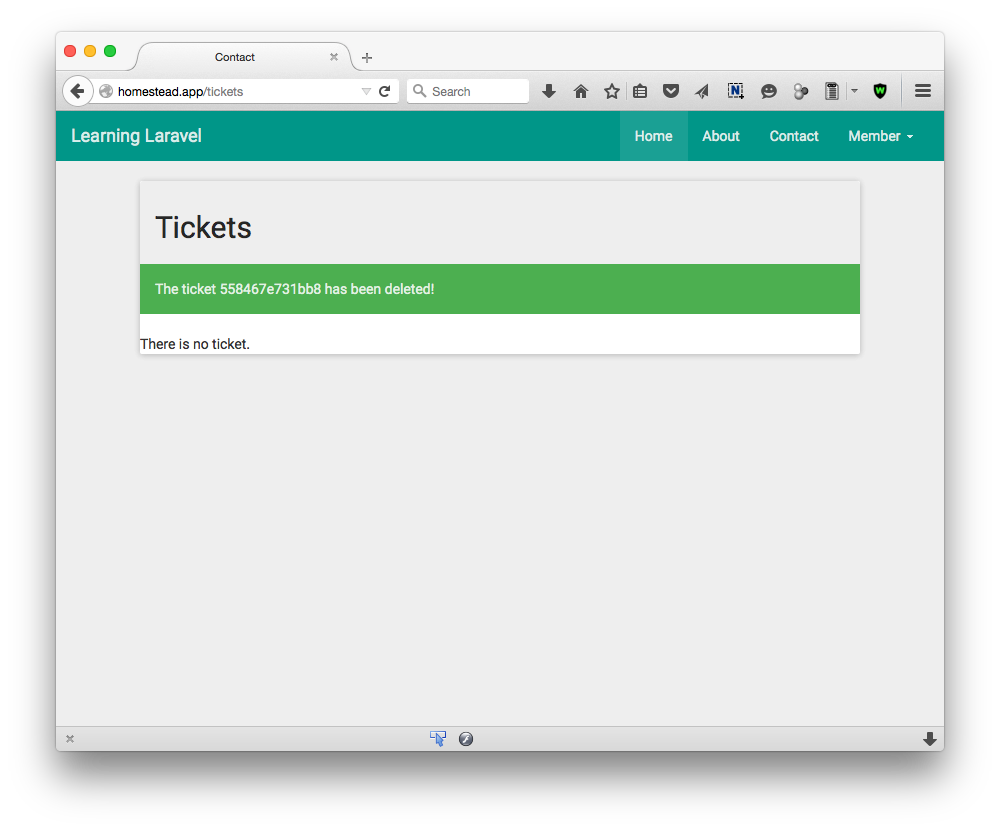
You’ve just deleted a ticket!
Congratulations! You now have a CRUD (Create, Read, Update, Delete) application!
Sending an email
When users submit a ticket, we may want to receive an email to get notified. In this section, you will learn how to send emails using Laravel.
Laravel provides many methods to send emails. You may use a plain PHP method to send emails, or you may use some email service providers such as Mailgun, Sendgrid, Mandrill, Amazon SES, etc.
To send emails on a production server, simply edit the mail.php configuration file, which is placed in the config directory.
Here is the file without comments:
return [

    'driver' => env('MAIL_DRIVER', 'smtp'),

    'host' => env('MAIL_HOST', 'smtp.mailgun.org'),

    'port' => env('MAIL_PORT', 587),

    'from' => ['address' => null, 'name' => null],

    'encryption' => env('MAIL_ENCRYPTION', 'tls'),

    'username' => env('MAIL_USERNAME'),

    'password' => env('MAIL_PASSWORD'),

    'sendmail' => '/usr/sbin/sendmail -bs',

    'pretend' => false,
];
To send emails on a local development server (Homestead), simply edit the .env file.
MAIL_DRIVER=mail
MAIL_HOST=mailtrap.io
MAIL_PORT=2525
MAIL_USERNAME=null
MAIL_PASSWORD=null
MAIL_ENCRYPTION=null
As usual, you may learn how to use Mailgun, Mandrill and SES drivers at the official docs:
http://laravel.com/docs/master/mail
Because we’re working on Homestead, we will learn how to send emails on Homestead using Gmail and Sendgrid for FREE!!!!!
Sending emails using Gmail
If you have a gmail account, it’s very easy to send emails using Laravel 5!
First, go to:
https://myaccount.google.com/security#connectedapps
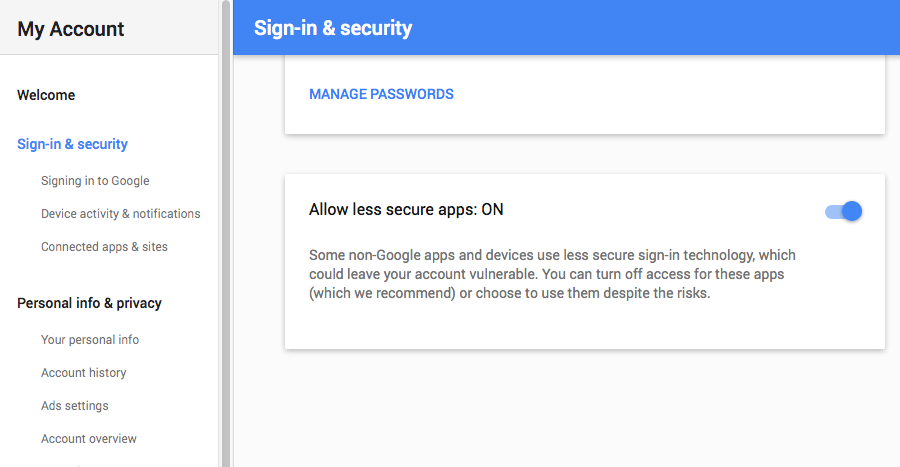
Take a look at the Sign-in & security -> Connected apps & sites -> Allow less secure apps settings.
You must turn the option “Allow less secure apps” ON.
Once complete, edit the .env file:
MAIL_DRIVER=smtp
MAIL_HOST=smtp.gmail.com
MAIL_PORT=587
MAIL_USERNAME=yourEmail
MAIL_PASSWORD=yourPassword
MAIL_ENCRYPTION=tls
Well done! You’re now ready to send emails using Gmail!
If you get this error when sending email: “Failed to authenticate on SMTP server with username “youremail@gmail.com” using 3 possible authenticators”
You may try one of these methods:
Go to https://accounts.google.com/UnlockCaptcha“>https://accounts.google.com/UnlockCaptcha, click continue and unlock your account for access through other media/sites.
Using a double quote password: “your password”
Try to use only your Gmail username: yourGmailUsername
Sending emails using Sendgrid
Go to SendGrid, register a new account:
When your account is activated, edit the .env file:
MAIL_DRIVER=smtp
MAIL_HOST=smtp.sendgrid.net
MAIL_PORT=587
MAIL_USERNAME=yourSendgridUsername
MAIL_PASSWORD=yourPassword
Good job! You’re now ready to send emails using Sendgrid!
Sending a test email
To send a test email, open routes.php file and add this route:
Route::get('sendemail', function () {

    $data = array(
        'name' => "Learning Laravel",
    );

    Mail::send('emails.welcome', $data, function ($message) {

        $message->from('yourEmail@domain.com', 'Learning Laravel');

        $message->to('yourEmail@domain.com')->subject('Learning Laravel test email');

    });

    return "Your email has been sent successfully";

});
As you see, we use the send method on the Mail facade. There are three arguments:
The name of the view that we use to send emails.
An array of data that we want to pass to the email.
A closure that we can use to customize our email subjects, sender, recipients, etc.
When you visit http://homestead.app/sendemail, Laravel will try to send an email. If the email is sent successfully, Laravel will display a message.
Note: Be sure to replace yourEmail@domain.com with your real email address
Finally, we don’t have the welcome.blade.php view yet, let’s create it and put it in the emails directory.
<!DOCTYPE html>
<html lang="en-US">
<head>
    <meta charset="utf-8">
</head>
<body>
<h2>Learning Laravel!</h2>

<div>
    Welcome to {!! $name !!} website!
</div>

</body>
</html>
Because we’ve passed an array containing the $name key in the above route, we could display the name within this welcome view using:
{!! $name !!}
or
<?php echo $name ?>
Done! Now go to http://homestead.app/sendemail, you should see:
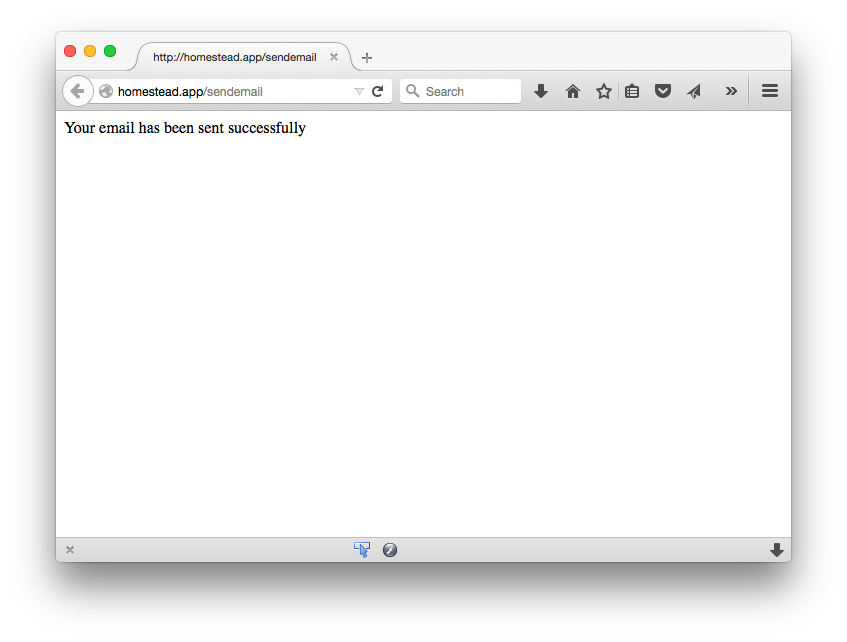
Check your inbox, you should receive a new email!
Feel free to customize your email address, recipients, subjects, etc.
Sending an email when there is a new ticket
Now that we have set up everything, let’s send an email when users create a new ticket!
Open TicketsController.php and update the store action.
Find:
return redirect('/contact')->with('status', 'Your ticket has been created! Its unique id is: '.$slug);
Add above:
    $data = array(
        'ticket' => $slug,
    );

    Mail::send('emails.ticket', $data, function ($message) {
        $message->from('yourEmail@domain.com', 'Learning Laravel');

        $message->to('yourEmail@domain.com')->subject('There is a new ticket!');
    });
And don’t forget to tell Laravel that you want to use the Mail facade here:
Find:
class TicketsController extends Controller
Add above:
use Illuminate\Support\Facades\Mail;
As you may notice, we don’t have the emails/ticket.blade.php view yet. Let’s create it!
<!DOCTYPE html>
<html lang="en-US">
<head>
    <meta charset="utf-8">
</head>
<body>
<h2>Learning Laravel!</h2>

<div>
    You have a new ticket. The ticket id is {!! $ticket !!}!
</div>

</body>
</html>
It’s time to create a new ticket!
If everything works out well, you should see a new email in your inbox! Here is the email’s content:

Reply to a ticket
Welcome to the last section!
In this section, we will learn how to create a form for users to post a reply.
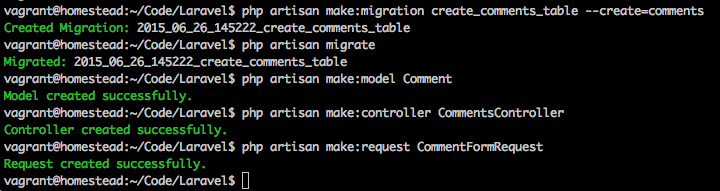
Create a new comments table
First, we need a table to store all the ticket responses. I name this table comments.
Let’s run this migration command:
php artisan make:migration create_comments_table --create=comments
Then, open yourTimestamps_create_comments_table.php, use Schema to create some columns:
<?php

use Illuminate\Database\Schema\Blueprint;
use Illuminate\Database\Migrations\Migration;

class CreateCommentsTable extends Migration
{
    /**
     * Run the migrations.
     *
     * @return void
     */
    public function up()
    {
        Schema::create('comments', function (Blueprint $table) {
            $table->increments('id');
            $table->text('content');
            $table->integer('post_id');
            $table->integer('user_id');
            $table->tinyInteger('status')->default(1);
            $table->timestamps();
        });
    }

    /**
     * Reverse the migrations.
     *
     * @return void
     */
    public function down()
    {
        Schema::drop('comments');
    }
}
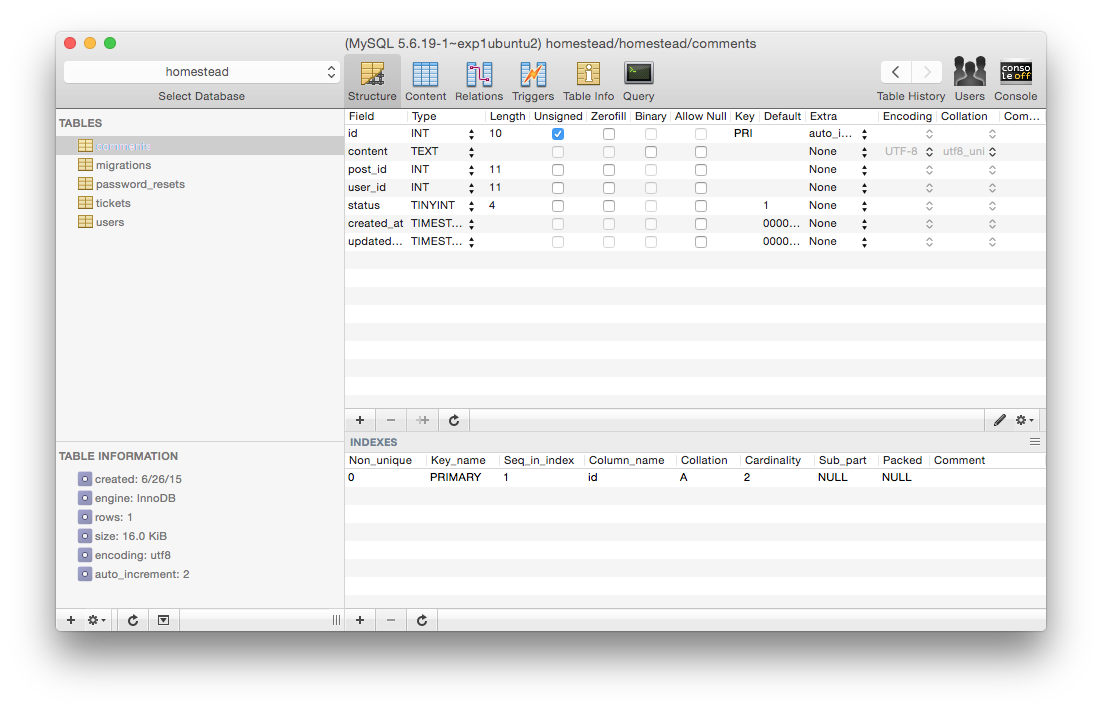
You should know how to read this file by now. Let’s run the migrate command to create the comments table and its columns:
php artisan migrate
Great! Check your database now to make sure that you have created the comments table.
Introducing Eloquent: Relationships
In Laravel, you can maintain a relationship between tables easily using Eloquent. Here are the relationships that Eloquent supports:
One to One
One to Many
Many to Many
Has Many Through
Polymorphic Relations
Many To Many Polymorphic Relations
What is a relationship?
Usually, tables are related to each other. For instance, our tickets may have many comments (ticket responses). That is One to Many relationship.
Once we’ve defined a One to Many relationship between tickets and comments table, we can easily access and list all comments or any related records.
Learn more about Eloquent relationships here:
http://laravel.com/docs/master/eloquent-relationships
Create a new Comment model
As you know, we need a Comment model! Run this command to create it:
php artisan make:model Comment
Once completed, open it and add this relationship:
    public function ticket()
    {
        return $this->belongsTo('App\Ticket');
    }
In addition, we may want to make all columns mass assignable except the id column:
protected $guarded = ['id'];
Instead of using the fillable∗∗property,weusethe∗∗ guarded property here.
You now have:
<?php

namespace App;

use Illuminate\Database\Eloquent\Model;

class Comment extends Model
{
    protected $guarded = ['id'];

    public function ticket()
    {
        return $this->belongsTo('App\Ticket');
    }
}
By doing this, we let Eloquent know that this Comment model belongs to the Ticket model.
Next, open the Ticket model and add:
public function comments()
{
    return $this->hasMany('App\Comment', 'post_id');
}
As you may have guessed, we tell that the Ticket model has many comments and Eloquent can use the post_id (ticket id) to find all related comments.
That’s it! You’ve defined a One to Many relationship between two tables.
Create a new comments controller
With the relation defined, we will create a new CommentsController to handle form submissions and save comments to our database.
Before doing that, let’s modify our routes.php first:
Route::post('/comment', 'CommentsController@newComment');
When we send a POST request to this route, Laravel will execute the CommetsController’s newComment action.
It’s time to run this command to generate our controller:
php artisan make:controller CommentsController
Open the new CommentsController. Remove all default actions and create a new one:
<?php

namespace App\Http\Controllers;

use Illuminate\Http\Request;

use App\Http\Requests;
use App\Http\Controllers\Controller;
use App\Http\Requests\CommentFormRequest;
use App\Comment;

class CommentsController extends Controller
{
    public function newComment(CommentFormRequest $request)
    {
        $comment = new Comment(array(
            'post_id' => $request->get('post_id'),
            'content' => $request->get('content')
        ));

        $comment->save();

        return redirect()->back()->with('status', 'Your comment has been created!');
    }
}
Here is a little tip, you can use redirect()->back() to redirect users back to the previous page!
As you see, we still use Request here for the validation.
创建一个新CommentFormRequest
我们至今还没有CommentFormRequest,因此也创建一个吧:
php artisan make:request CommentFormRequest
现在,定义我们的规则:
<?php

namespace App\Http\Requests;

use App\Http\Requests\Request;

class CommentFormRequest extends Request
{
    /**
     * Determine if the user is authorized to make this request.
     *
     * @return bool
     */
    public function authorize()
    {
        return true;
    }

    /**
     * Get the validation rules that apply to the request.
     *
     * @return array
     */
    public function rules()
    {
        return [
            'content'=> 'required|min:3',
        ];
    }
}
创建新回复表单
很好!现在打开tickets.show视图,添加如下表单:
       <div class="well well bs-component">
            <form class="form-horizontal" method="post" action="/comment">

                @foreach($errors->all() as $error)
                    <p class="alert alert-danger">{{ $error }}</p>
                @endforeach

                @if(session('status'))
                    <div class="alert alert-success">
                        {{ session('status') }}
                    </div>
                @endif

                <input type="hidden" name="_token" value="{!! csrf_token() !!}">
                <input type="hidden" name="post_id" value="{!! $ticket->id !!}">

                <fieldset>
                    <legend>Reply</legend>
                    <div class="form-group">
                        <div class="col-lg-12">
                            <textarea class="form-control" rows="3" id="content" name="content"></textarea>
                        </div>
                    </div>

                    <div class="form-group">
                        <div class="col-lg-10 col-lg-offset-2">
                            <button type="reset" class="btn btn-default">Cancel</button>
                            <button type="submit" class="btn btn-primary">Post</button>
                        </div>
                    </div>
                </fieldset>
            </form>
        </div>
这个表单和创建标签表单很相似,我们也只需要添加一个hidden input来提交ticket id (post_id).
当你有了这个表单,让我们试着回复一个标签呗。
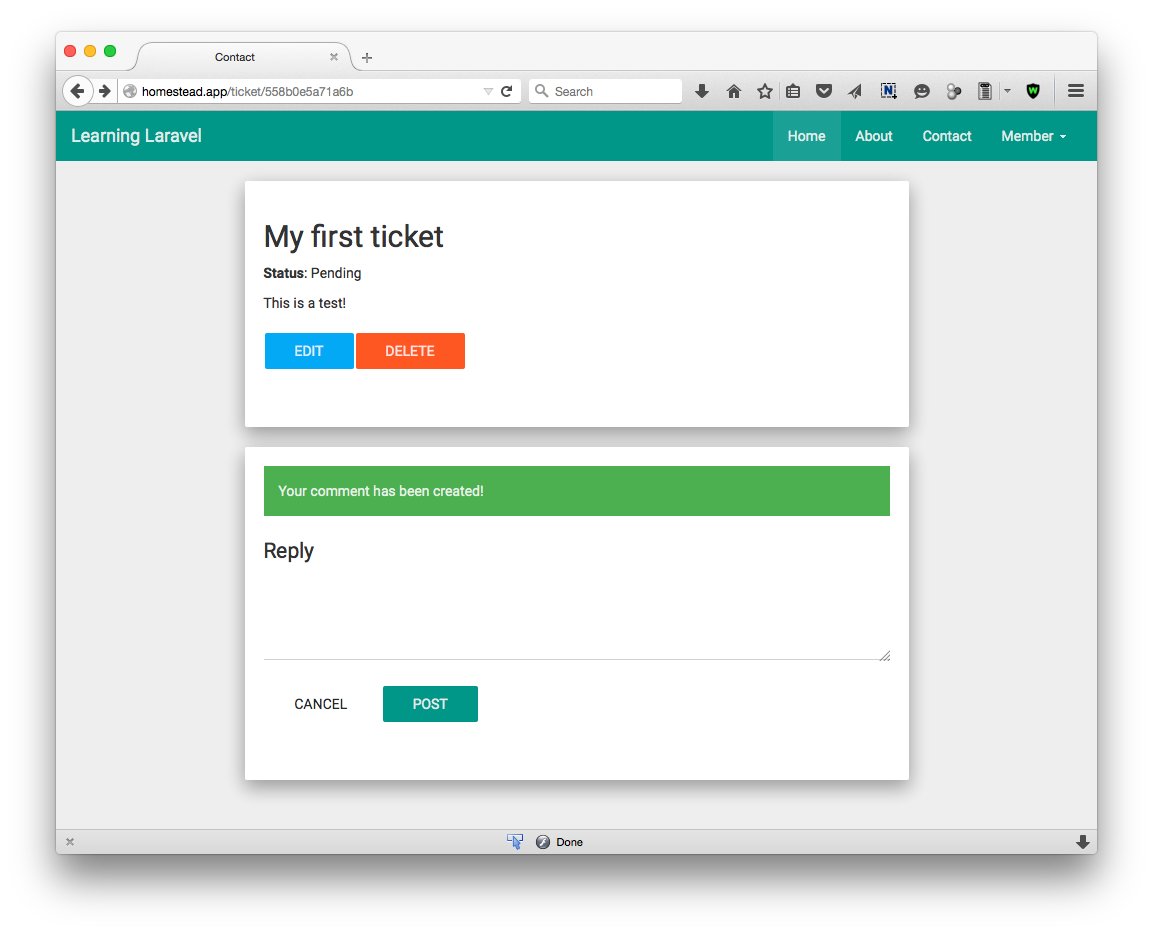
没错!你已经成功创建一个新回复了!
显示评论
最后一步,我们将会修改TicketsController中的show action来列出所有标签的评论并将之传递给视图。
打开TicketsController. 更改show action如下:
public function show($slug)
{
    $ticket = Ticket::whereSlug($slug)->firstOrFail();
    $comments = $ticket->comments()->get();
    return view('tickets.show', compact('ticket', 'comments'));
}
正如你所看到的以上代码,我们只需要使用如下代码列出所有的评论:
$comments = $ticket->comments()->get();
好神奇,是不?一条SQL语句都不需要写呢!
现在,打开show.blade.php视图,在上面的回复表单中添加如下代码:
@foreach(
commentsas
comment)
{!! $comment->content !!}
@endforeach
以下便是新show.blade.php:
@extends('master')
@section('title', 'View a ticket')
@section('content')

    <div class="container col-md-8 col-md-offset-2">
            <div class="well well bs-component">
                <div class="content">
                    <h2 class="header">{!! $ticket->title !!}</h2>
                    <p> <strong>Status</strong>: {!! $ticket->status ? 'Pending' : 'Answered' !!}</p>
                    <p> {!! $ticket->content !!} </p>
                </div>
                <a href="{!! action('TicketsController@edit', $ticket->slug) !!}" class="btn btn-info pull-left">Edit</a>

                <form method="post" action={!! action('TicketsController@destroy', $ticket->slug) !!} class="pull-left">
                <input type="hidden" name="_token" value="{!! csrf_token() !!}">
                        <div class="form-group">
                            <div>
                                <button type="submit" class="btn btn-warning">Delete</button>
                            </div>
                        </div>
                </form>
                <div class="clearfix"></div>
            </div>

            @foreach($comments as $comment)
                <div class="well well bs-component">
                    <div class="content">
                        {!! $comment->content !!}
                    </div>
                </div>
            @endforeach

            <div class="well well bs-component">
                <form class="form-horizontal" method="post" action="/comment">

                    @foreach($errors->all() as $error)
                        <p class="alert alert-danger">{{ $error }}</p>
                    @endforeach

                    @if(session('status'))
                        <div class="alert alert-success">
                            {{ session('status') }}
                        </div>
                    @endif

                    <input type="hidden" name="_token" value="{!! csrf_token() !!}">
                    <input type="hidden" name="post_id" value="{!! $ticket->id !!}">

                    <fieldset>
                        <legend>Reply</legend>
                        <div class="form-group">
                            <div class="col-lg-12">
                                <textarea class="form-control" rows="3" id="content" name="content"></textarea>
                            </div>
                        </div>

                        <div class="form-group">
                            <div class="col-lg-10 col-lg-offset-2">
                                <button type="reset" class="btn btn-default">Cancel</button>
                                <button type="submit" class="btn btn-primary">Post</button>
                            </div>
                        </div>
                    </fieldset>
                </form>
            </div>
    </div>

@endsection
现在刷新你的浏览器!
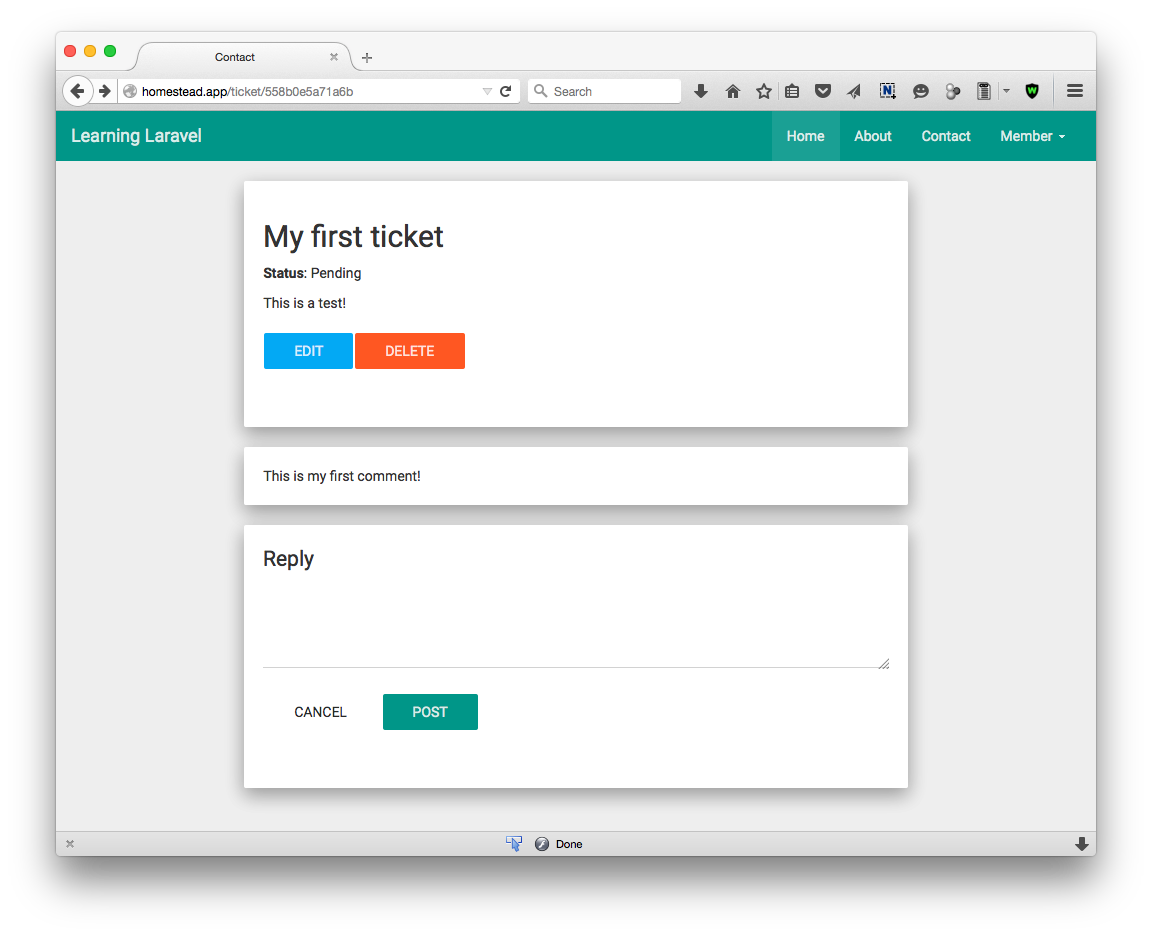
要确认所有的事情没问题,再次回复试试!
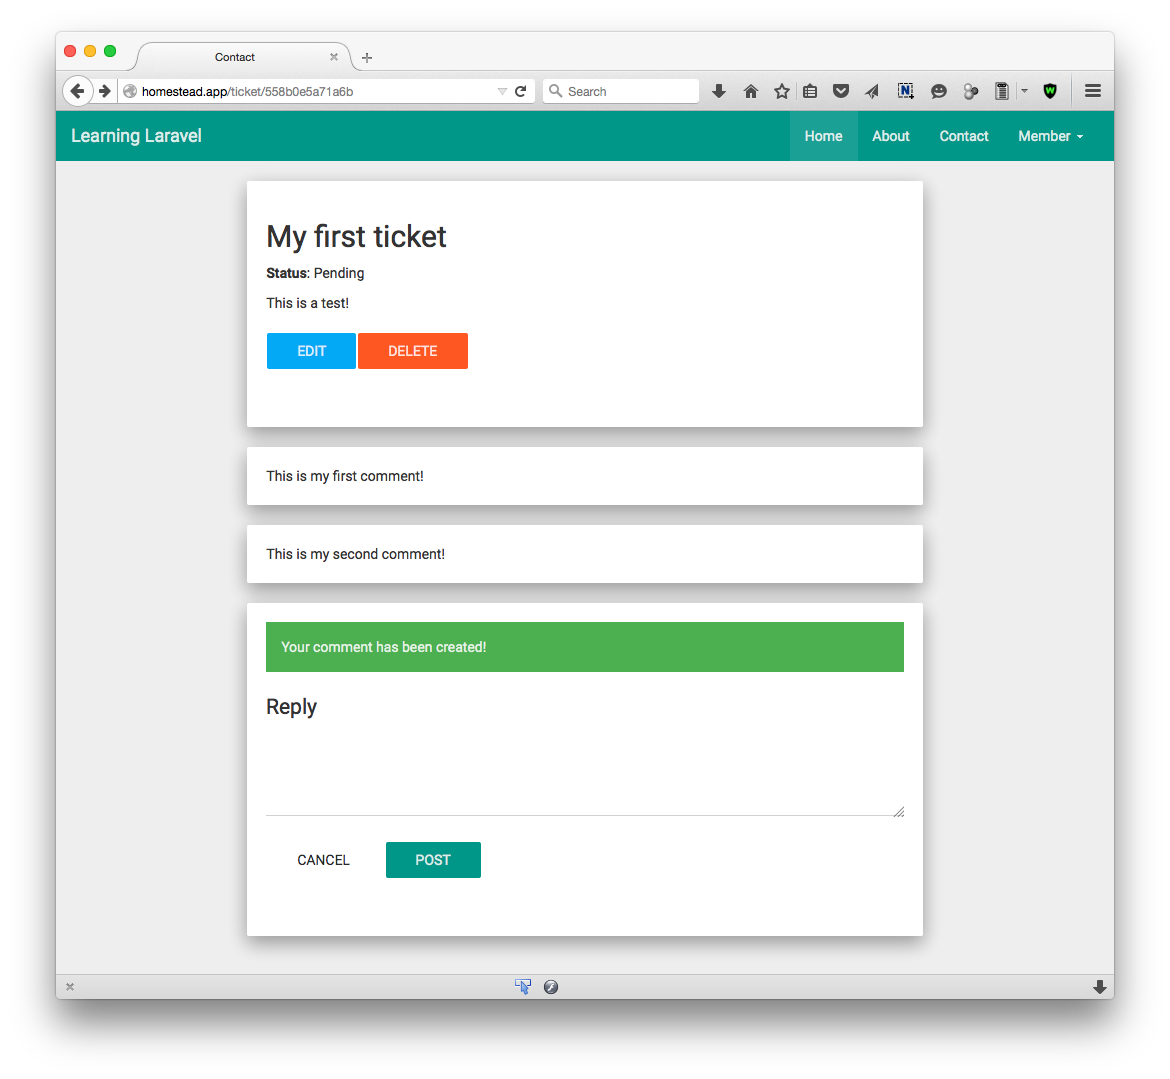
喜大普奔!现在你已经有一个能正常工作的标签支持系统!
第三章总结
在本章,你学会了通过不同的方法来创建一个标签支持系统。尽管这个应用很简单,但是却让我们学到了很多东西:
你已经知道怎么创建数据了。
你已经学会了Laravel最重要的特性之一: migrations. 现在你可以创建任何你想创建的数据库结构了。
你已经明白了怎么使用Request来校验表单。
如果你想使用不同的包,你已经知道怎么安装它们了。
你已经学会了Laravel辅助函数。
使用Gmail和Sendgrid发送邮件很简单对不?
你已经知道怎么定义Eloquent关系并轻松的使用这些关系。
基本上,现在你可以创建一个简单的博客系统了。随便搭建一个不同的应用或者自定义这个应用按照你自己的需求。
下一章又是一个很有趣的项目!你将会学习创建一个拥有控制面板复杂的博客应用。你可以使用这个应用写你的博客文章或者作为其他应用很好的模板。


 6073
6073


 被折叠的 条评论
为什么被折叠?
被折叠的 条评论
为什么被折叠?
 到【灌水乐园】发言


