


一、游戏内容要求:
- 游戏有 n 个 round,每个 round 都包括10 次 trial;
- 每个 trial 的飞碟的色彩、大小、发射位置、速度、角度、同时出现的个数都可能不同。它们由该 round 的 ruler 控制;
- 每个 trial 的飞碟有随机性,总体难度随 round 上升;
- 鼠标点中得分,得分规则按色彩、大小、速度不同计算,规则可自由设定。
二、游戏的要求:
- 使用带缓存的工厂模式管理不同飞碟的生产与回收,该工厂必须是场景单实例的!
- 使用 MVC 结构实现人机交互与游戏模型分离
三、游戏的实现
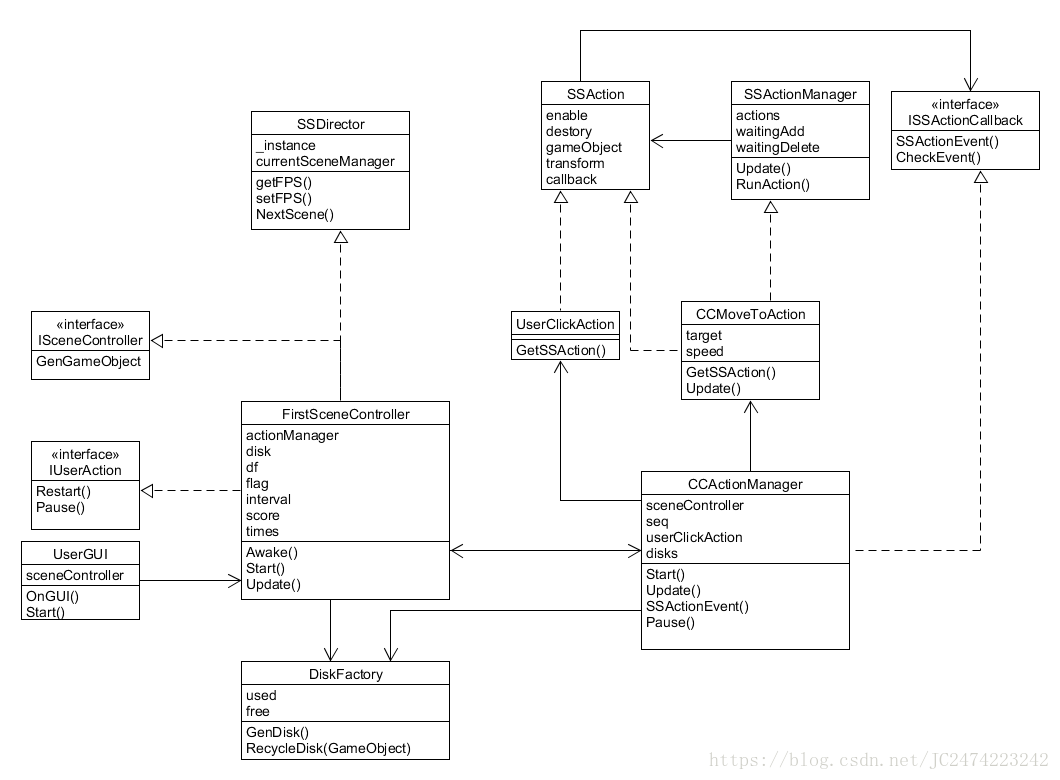
之前的几个博客已经构建好了一个较为完整的MVC框架,这里可以套用之前的框架。看上面的UML图就能了解到
游戏结构和上一个游戏基本没有不同,仅仅添加了一个飞碟工厂!!!
其实不加这个也可以实现这一个游戏,但是为什么要加上这个飞碟工厂呢?
这是因为加上对象的构建和销毁都是很耗资源的,这个工厂能够让我们有效的利用已经构造好的游戏对象来实现资源的重利用,从而减少资源开销
那么,先看看这个工厂是如何实现的:
using System.Collections.Generic;
using UnityEngine;

public class DiskFactory : MonoBehaviour {
    public List<GameObject> used = new List<GameObject>();
    public List<GameObject> free = new List<GameObject>();

    // Use this for initialization
    void Start () { }

    public void GenDisk()
    {
        GameObject disk;
        if(free.Count == 0)
        {
            disk = Instantiate<GameObject>(Resources.Load<GameObject>("Prefabs/Disk"), Vector3.zero, Quaternion.identity);
        }
        else
        {
            disk = free[0];
            free.RemoveAt(0);
        }
        float x = Random.Range(-10.0f, 10.0f);
        disk.transform.position = new Vector3(x, 0, 0);
        disk.transform.Rotate(new Vector3(x < 0? -x*9 : x*9, 0, 0));
        float r = Random.Range(0f, 1f);
        float g = Random.Range(0f, 1f);
        float b = Random.Range(0f, 1f);
        Color color = new Color(r, g, b);
        disk.transform.GetComponent<Renderer>().material.color = color;
        used.Add(disk);
    }
    public void RecycleDisk(GameObject obj)
    {
        obj.transform.position = Vector3.zero;
        free.Add(obj);
    }
}
这里的used和free分别表示已经在使用的和未被利用的飞碟对象,如果free的列表为空,而我们有需要它,这时才创建新的对象,不然,就用之前的。好了,这就是飞碟工厂,然后我们看场景控制器如何利用这个工厂。
using UnityEngine;
using UnityEngine.SceneManagement;

public class FirstSceneController : MonoBehaviour, IUserAction, ISceneController{
    public CCActionManager actionManager;
    public GameObject disk;
    protected DiskFactory df;
    public int flag = 0;
    private float interval = 3;
    public int score = 0;
    public static int times = 0;

    private void Awake()
    {
        SSDirector director = SSDirector.getInstance();
        director.setFPS(60);
        director.currentSceneController = this;
        this.gameObject.AddComponent<DiskFactory>();
        this.gameObject.AddComponent<CCActionManager>();
        this.gameObject.AddComponent<UserGUI>();
        df = Singleton<DiskFactory>.Instance;
        //director.currentSceneController.GenGameObjects();
    }
    private void Start()
    {
    }
    public void GenGameObjects ()
    {
    }
    public void Restart()
    {
        SceneManager.LoadScene("1");
    }
    public void Pause ()
    {
        actionManager.Pause();
    }
    public void Update()
    {
        if (times < 30 && flag == 0)
        {
            if (interval <= 0)
            {
                interval = Random.Range(3, 5);
                times++;
                df.GenDisk();
            }
            interval -= Time.deltaTime;
        }
    }
}
场景控制器是需要重写的一个类,因为它是游戏对象生成的,显然之前的场景控制器在这里完全用不上当然由于之前MVC架构的分离作用,这里也仅需要改Awake,Update,GenGameObject这三个函数和各种变量。
然后动作管理器是需要重写动作的,而动作在这里需要的改动较小,只需要改MoveToAction就行了,不过为了更好的控制飞碟,这里的动作将变成一个列表,这是为了能够同时控制多个飞碟在游戏中飞行。
using System.Collections;
using System.Collections.Generic;
using UnityEngine;

public class CCActionManager : SSActionManager, ISSActionCallback {
    public FirstSceneController sceneController;
    public List<CCMoveToAction> seq = new List<CCMoveToAction>();
    public UserClickAction userClickAction;
    public DiskFactory disks;

    protected new void Start()
    {
        sceneController = (FirstSceneController)SSDirector.getInstance().currentSceneController;
        sceneController.actionManager = this;
        disks = Singleton<DiskFactory>.Instance;
    }
    protected new void Update()
    {
        if(disks.used.Count > 0)
        {
            GameObject disk = disks.used[0];
            float x = Random.Range(-10, 10);
            CCMoveToAction moveToAction = CCMoveToAction.GetSSAction(new Vector3(x, 12, 0), 3 * (Mathf.CeilToInt(FirstSceneController.times / 10) + 1) * Time.deltaTime);
            seq.Add(moveToAction);
            this.RunAction(disk, moveToAction, this);
            disks.used.RemoveAt(0);
        }
        if (Input.GetMouseButtonDown(0) && sceneController.flag == 0)
        {
            Ray ray = Camera.main.ScreenPointToRay(Input.mousePosition);
            RaycastHit hitGameObject;
            if (Physics.Raycast(ray, out hitGameObject))
            {
                GameObject gameObject = hitGameObject.collider.gameObject;
                if (gameObject.tag == "disk")
                {
                    foreach(var k in seq)
                    {
                        if (k.gameObject == gameObject)
                            k.transform.position = k.target;
                    }
                    userClickAction = UserClickAction.GetSSAction();
                    this.RunAction(gameObject, userClickAction, this);
                }
            }
        }
        base.Update();
    }
    public void SSActionEvent(SSAction source, SSActionEventType events = SSActionEventType.Completed, int intParam = 0, string strParam = null, Object objParam = null)
    {
        disks.RecycleDisk(source.gameObject);
        seq.Remove(source as CCMoveToAction);
        source.destory = true;
        if (FirstSceneController.times >= 30)
            sceneController.flag = 1;
    }
    public void CheckEvent(SSAction source, SSActionEventType events = SSActionEventType.Completed, int intParam = 0, string strParam = null, Object objParam = null)
    {
    }
    public void Pause()
    {
        if(sceneController.flag == 0)
        {
            foreach (var k in seq)
            {
                k.enable = false;
            }
            sceneController.flag = 2;
        }
        else if(sceneController.flag == 2)
        {
            foreach (var k in seq)
            {
                k.enable = true;
            }
            sceneController.flag = 0;
        }
    }
}
这里需要改动的也只有那几个函数:Update,SSActionEvent,Pause函数,另外几个类的改动更小,基本就改了一两行代码,在这里就不说了。如果对那些改动感兴趣的话,可以去文章末尾的链接看看。
下面说说用户GUI:
using UnityEngine;
public class UserGUI : MonoBehaviour {
private FirstSceneController action;
private GUIStyle fontstyle1 = new GUIStyle();
// Use this for initialization
void Start () {
action = SSDirector.getInstance().currentSceneController as FirstSceneController;
fontstyle1.fontSize = 50;
}
// Update is called once per frame
private void OnGUI()
{
if (GUI.Button(new Rect(0, 80, 80, 60), "RESTART"))
{
action.Restart();
}
if (GUI.Button(new Rect(0, 160, 80, 60), "Pause"))
{
action.Pause();
}
if (action.flag == 0)
{
fontstyle1.normal.textColor = Color.green;
GUI.Label(new Rect(Screen.width / 2 - 150, 0, 300, 100), "Score: " +
action.score + ", Round: " + (Mathf.CeilToInt(FirstSceneController.times / 10) + 1), fontstyle1);
}
else if (action.flag == 1)
{
fontstyle1.normal.textColor = Color.red;
GUI.Label(new Rect(Screen.width / 2 - 150, 0, 300, 100), "Your score is : " + action.score, fontstyle1);
}
else
{
fontstyle1.normal.textColor = Color.green;
GUI.Label(new Rect(Screen.width / 2 - 150, 0, 300, 100), "Score: " +
action.score + ", Round: " + (Mathf.CeilToInt(FirstSceneController.times / 10) + 1), fontstyle1);
fontstyle1.normal.textColor = Color.red;
GUI.Label(new Rect(Screen.width / 2 - 150, Screen.height/2-50, 300, 100), "Pause!", fontstyle1);
}
}
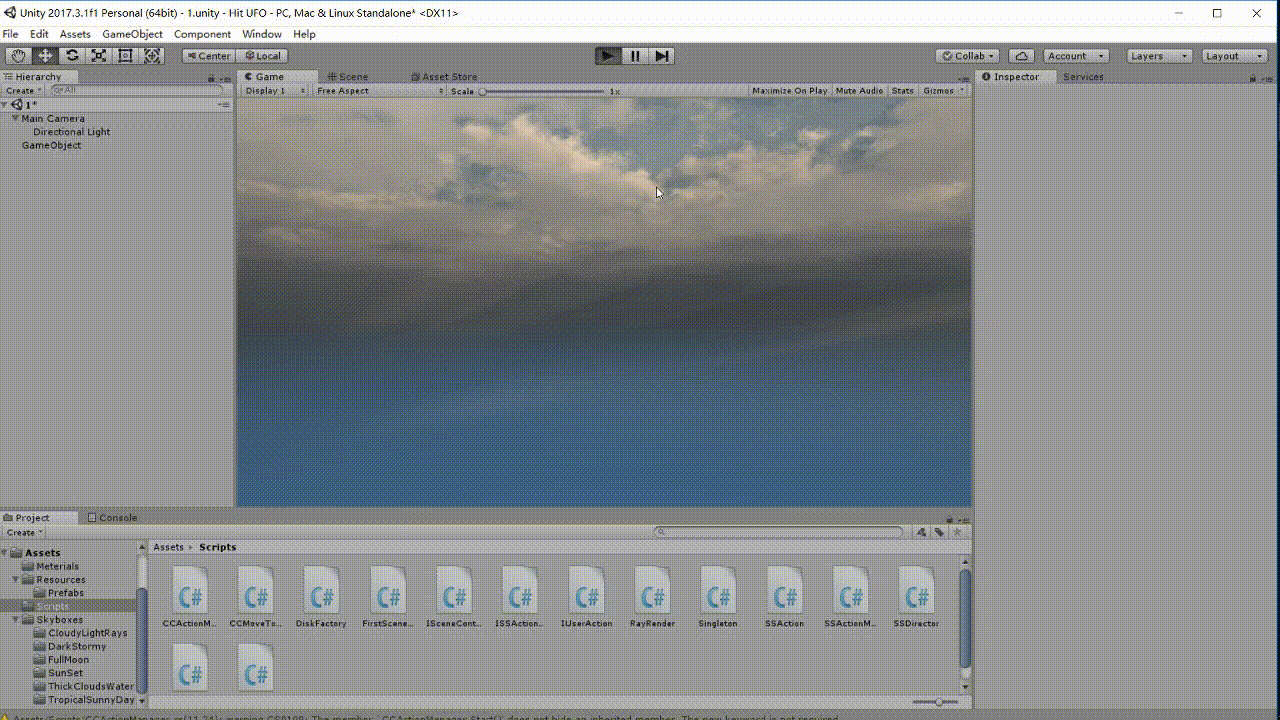
}这本身就是一个很简单的类,应该不难看懂,因此仅贴上代码。游戏效果图如下(没下什么资源,所以界面有点难看)
更多更详细的内容请戳:github


 454
454


 被折叠的 条评论
为什么被折叠?
被折叠的 条评论
为什么被折叠?
 到【灌水乐园】发言


