


文章目录
一、微调(fine tuning)
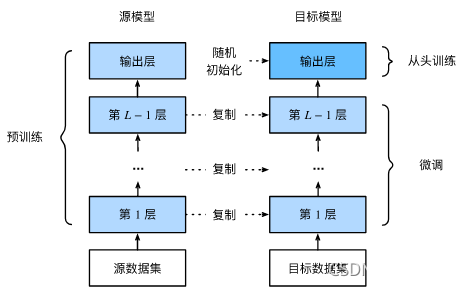
1. 微调的四个步骤:
- 在源数据集(如ImageNet数据集)上预训练一个神经网络模型,即源模型。
- 创建一个新的神经网络模型,即目标模型。它复制了源模型上除了输出层外的所有模型设计及其参数。我们假设这些模型参数包含了源数据集上学习到的知识,且这些知识同样适用于目标数据集。我们还假设源模型的输出层与源数据集的标签紧密相关,因此在目标模型中不予采用。
- 为目标模型添加一个输出大小为目标数据集类别个数的输出层,并随机初始化该层的模型参数。
- 在目标数据集(如椅子数据集)上训练目标模型。我们将从头训练输出层,而其余层的参数都是基于源模型的参数微调得到的。
2. 微调的训练过程
- 是一个目标数据集上的正常训练任务
- 使用了更强的正则化:
- 更小的学习率(大stride在初始模型中已走过了,相当于已经有一个比较好的模型了)
- 更少的迭代次数
3.源数据集远复杂于目标数据,通常得到的微调效果更好
3. 常用的微调技术
- 重用分类器权重(对最后的分类层进行的处理哦!!!)
- 源数据可能也有目标数据中的部分标号
- 可以使用预训练好的模型分类器中对应标号对应的向量作初始化值
- 固定一些层
- 神经网络通常学习有层次的特征表示(底层描述的特征更加通用,而高层的特征和数据集相关性更强)
- 可以固定相对底部的层,不参与参数更新(应用了更强的正则化)
4. 总结
- 微调通过使用在大数据上得到的预训练模型来初始化权重来提高精度
- 预训练模型质量非常重要
- 微调通常速度更快、精度更高
二、动手实现和测试微调
%matplotlib inline
import os
import torch
import torchvision
from torch import nn
from d2l import torch as d2l
1. 数据准备
# 下载热狗数据集
d2l.DATA_HUB['hotdog'] = (d2l.DATA_URL+'hotdog.zip',
                          'fba480ffa8aa7e0febbb511d181409f899b9baa5')
data_dir = d2l.download_extract('hotdog')
# 加载数据
train_imgs = torchvision.datasets.ImageFolder(os.path.join(data_dir, 'train'))
test_imgs = torchvision.datasets.ImageFolder(os.path.join(data_dir, 'test'))
# 查看数据
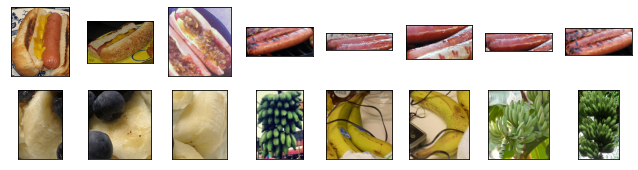
'''展示了8张热狗数据和非热狗的数据,图像的大小和横纵比例都不尽相同'''
hotdogs = [train_imgs[i][0] for i in range(8)] # hotdogs
not_hotdogs = [train_imgs[-i-1][0] for i in range(8)] # not hotdogs
d2l.show_images(hotdogs + not_hotdogs, 2, 8, scale=1.4);
# 数据增广使数据规整变多
'''
在训练期间,我们首先从图像中裁切随机大小和随机长宽比的区域,然后将该区域缩放为 224x224 输入图像。
在测试过程中,我们将图像的高度和宽度都缩放到 256 像素,然后裁剪中央 224 x 224 区域作为输入。
此外,对于三个 RGB(红、绿和蓝)颜色通道,我们标准化每个通道。
具体而言,通道的平均值将从该通道的每个值中减去,然后将结果除以该通道的标准差。
'''
# 在Imagenet上使用的Normalize直接搬过来,参数第一个是mean,第二个是std;image = (image-mean)/std;这里是三通道
normalize = torchvision.transforms.Normalize([0.485, 0.456, 0.406],
                                             [0.229, 0.224, 0.225])
train_augs = torchvision.transforms.Compose([
    torchvision.transforms.RandomResizedCrop(224),
    torchvision.transforms.RandomHorizontalFlip(),
    torchvision.transforms.ToTensor(),
    normalize,
])

test_augs = torchvision.transforms.Compose([
    torchvision.transforms.Resize(256),
    torchvision.transforms.CenterCrop(224),
    torchvision.transforms.ToTensor(), normalize])
2. 模型微调
定义和初始化模型
# 定义和初始化模型
'''
使用ImageNet数据集预训练的ResNet-18作为源模型;
指pretrained =True,以保存模型参数
'''
pretrained_net = torchvision.models.resnet18(pretrained=True)
Check原始模型参数
# 源模型包含多个要素图层和一个输出图层,对除了输出图层之外的层进行微调
'''查看源模型的输出图层参数'''
pretrained_net.fc
Linear(in_features=512, out_features=1000, bias=True)
# 初始化微调图层
finetune_net = torchvision.models.resnet18(pretrained=True)
finetune_net.fc = nn.Linear(finetune_net.fc.in_features, 2)
nn.init.xavier_uniform_(finetune_net.fc.weight);
定义训练函数,便于更多参数的调整
# 如果 `param_group=True`,输出层中的模型参数将使用十倍的学习率
def train_fine_tuning(net, learning_rate, batch_size=128, num_epochs=5,
                      param_group=True):
    train_iter = torch.utils.data.DataLoader(
        torchvision.datasets.ImageFolder(os.path.join(data_dir, 'train'),
                                         transform=train_augs),
        batch_size=batch_size, shuffle=True)
    test_iter = torch.utils.data.DataLoader(
        torchvision.datasets.ImageFolder(os.path.join(data_dir, 'test'),
                                         transform=test_augs),
        batch_size=batch_size)
    devices = d2l.try_all_gpus()
    loss = nn.CrossEntropyLoss(reduction="none")
    if param_group:
        '''将所有层的参数都拿出来进行训练,最后一层的学习率是前面层的10倍'''
        params_1x = [
            param for name, param in net.named_parameters()
            if name not in ["fc.weight", "fc.bias"]]
        trainer = torch.optim.SGD([{
            'params': params_1x}, {
                'params': net.fc.parameters(),
                'lr': learning_rate * 10}], lr=learning_rate,
                                  weight_decay=0.001)
    else:
        '''全部参数一样地训练'''
        trainer = torch.optim.SGD(net.parameters(), lr=learning_rate,
                                  weight_decay=0.001)
    d2l.train_ch13(net, train_iter, test_iter, loss, trainer, num_epochs,
                   devices)
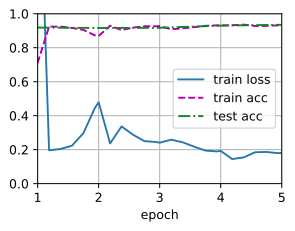
# 使用较小的学习率,通过微调预训练获得的模型参数
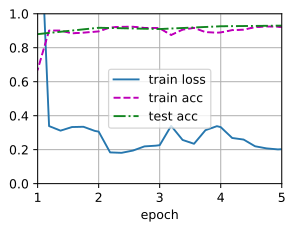
train_fine_tuning(finetune_net, 5e-5)
loss 0.181, train acc 0.932, test acc 0.935
228.9 examples/sec on [device(type='cuda', index=0)]
3. 对比不使用微调和不同的微调参数
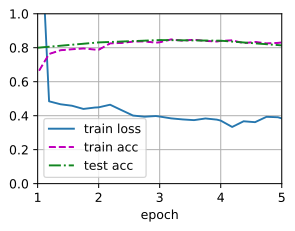
如果不使用微调,直接从零开始训练:不使用微调的结果精度远远低于微调的结果
# 对比不使用微调
scratch_net = torchvision.models.resnet18()
scratch_net.fc = nn.Linear(scratch_net.fc.in_features, 2)
train_fine_tuning(scratch_net, 5e-4, param_group=False)
loss 0.384, train acc 0.831, test acc 0.814
229.5 examples/sec on [device(type='cuda', index=0)]
调整fine turning 的学习率发现:学习率变太高会降低训练的精度
# 调高fine turning 的学习率
finetune_net = torchvision.models.resnet18(pretrained=True)
finetune_net.fc = nn.Linear(finetune_net.fc.in_features, 2)
nn.init.xavier_uniform_(finetune_net.fc.weight);
train_fine_tuning(finetune_net, 4e-5)
loss 0.203, train acc 0.921, test acc 0.930
229.4 examples/sec on [device(type='cuda', index=0)]
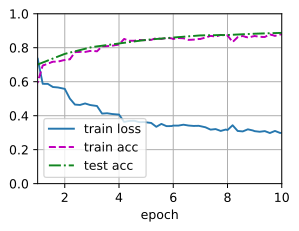
4. 冻结层进行微调
冻结一部分的层进行训练:冻结层训练可以减少训练的时间,但是具体要冻结哪些层需要调整,我这里使用的方法也不确定是否正确,因为使用requires_grad没有使用成功,就找了个笨方法
# 如果不更新输出层之前的层的参数(冻结一些层)
# 我这里没有使用requires_grad = False,没有仔细探究是否真的冻结住了。是否需要将不计算梯度放到train函数之中
def train_fine_tuning_freeze(net, learning_rate, batch_size=128, num_epochs=5):
    train_iter = torch.utils.data.DataLoader(
        torchvision.datasets.ImageFolder(os.path.join(data_dir, 'train'),
                                         transform=train_augs),
        batch_size=batch_size, shuffle=True)
    test_iter = torch.utils.data.DataLoader(
        torchvision.datasets.ImageFolder(os.path.join(data_dir, 'test'),
                                         transform=test_augs),
        batch_size=batch_size)
    devices = d2l.try_all_gpus()
    loss = nn.CrossEntropyLoss(reduction="none")
    '''冻结一些层(只更新最后层的参数)'''
    trainer = torch.optim.SGD(net.fc.parameters(), lr=learning_rate,weight_decay=0.001)
    d2l.train_ch13(net, train_iter, test_iter, loss, trainer, num_epochs,devices)

finetune_net = torchvision.models.resnet18(pretrained=True)
finetune_net.fc = nn.Linear(finetune_net.fc.in_features, 2)
nn.init.xavier_uniform_(finetune_net.fc.weight);
train_fine_tuning_freeze(finetune_net, 5e-5,num_epochs=10)
loss 0.299, train acc 0.878, test acc 0.887
231.1 examples/sec on [device(type='cuda', index=0)]
如果有什么存在疑惑的地方可以在评论区提出,大家一起讨论!


 7万+
7万+

 被折叠的 条评论
为什么被折叠?
被折叠的 条评论
为什么被折叠?
 到【灌水乐园】发言


