


每次打开一个新的应用,都极有可能弹出一个入门教程,例如:

本文就来看看如何制作属于我们自己的App入门教程。
首先当然是准备图片资源了,这里我直接引用了ThatPDF(GitHub上的一个项目)中的png资源。
看看故事板先:
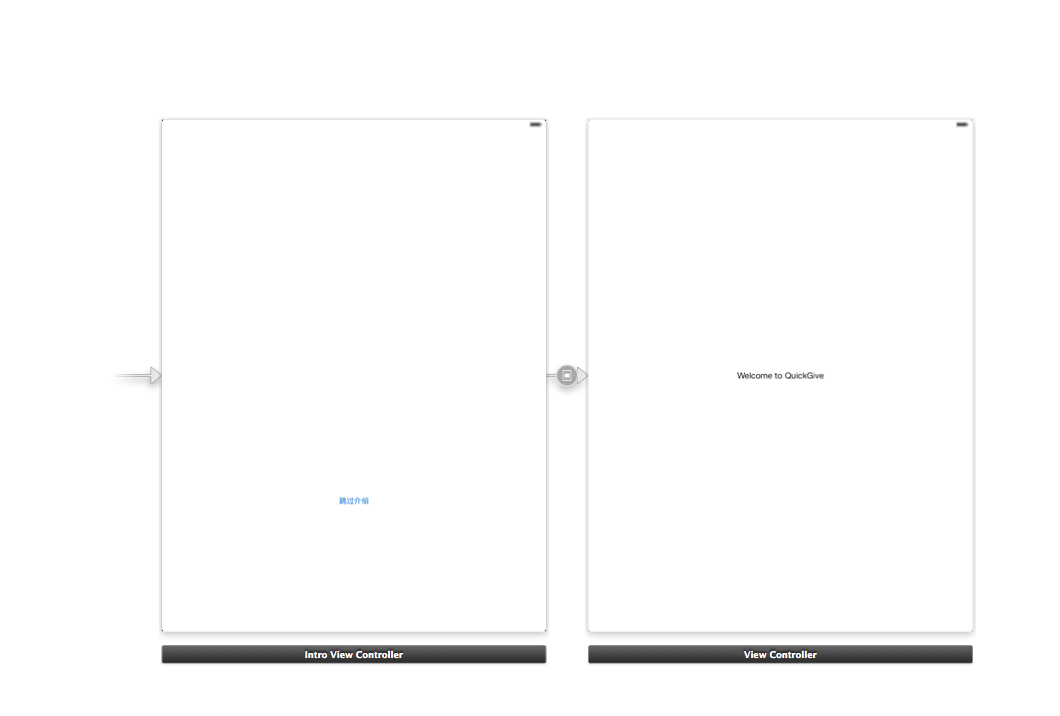
IntroViewController用于展示我们的入门教程,ViewController就是进入程序后的Welcome界面。
上代码:
先是IntroViewController的头文件
#import <UIKit/UIKit.h>

@class ContentView;

@interface IntroViewController : UIViewController

@property IBOutlet ContentView *contentView; // 为了在代码中引用initWithFrame:方法,这里要将weak属性去掉

@end
- (void)viewDidLoad {
    [super viewDidLoad];

    // 1.初始化contentView
    CGRect contentFrame = CGRectMake(24.0, 72.0, 720.0, 568.0);
    self.contentView = [self.contentView initWithFrame:contentFrame];


    // 2.初始化视图数组viewsForContent
    NSMutableArray *viewsForContent = [NSMutableArray arrayWithCapacity:3];
    NSArray *imageNames = @[@"1.png", @"2.png", @"3.png"];
    for (NSString *name in imageNames) {
        UIView *contentBackground = [[UIView alloc] initWithFrame:contentFrame];
        contentBackground.autoresizingMask = UIViewAutoresizingFlexibleLeftMargin |  UIViewAutoresizingFlexibleRightMargin | UIViewAutoresizingFlexibleTopMargin | UIViewAutoresizingFlexibleBottomMargin;

        UIImageView *imageView = [[UIImageView alloc] initWithImage:[UIImage imageNamed:name]];
        imageView.autoresizingMask = UIViewAutoresizingFlexibleLeftMargin | UIViewAutoresizingFlexibleRightMargin; // 控件的宽度和高度随着父视图的宽度按比例改变;
        imageView.frame = CGRectMake(76.0, 0.0, 568.0, 568.0);
        [contentBackground addSubview:imageView];

        [viewsForContent addObject:contentBackground];
    }

    // 3.设置ContentView中的各个内容视图
    [self.contentView setContentViews:viewsForContent];
}

/* 对pagedScrollView的scrollView中的各个子视图的位置进行布局 */
- (void)viewWillLayoutSubviews {
    [self.contentView layoutContentViews];
}
再到ContentView类型的contentView,该子视图在IntroViewController的主视图中,是展示入门教程图片的主要视图。对应的ContentView类代码如下:
头文件:
#import <UIKit/UIKit.h>

@interface ContentView : UIView

@property (strong, nonatomic) UIScrollView *scrollViewForContent;

@property (strong, nonatomic) UIPageControl *pageControl;

@property (assign, nonatomic) CGRect baseFrame;

- (void)setContentViews:(NSArray *)viewsForContent;

- (void)layoutContentViews;

@end
实现部分:
#import "ContentView.h"

#define PAGECONTROL_DOT_WIDTH  20
#define PAGECONTROL_DOT_HEIGHT 20

@interface ContentView () <UIScrollViewDelegate>

@property (assign, nonatomic) BOOL isPageChanged_;

@end

@implementation ContentView

#pragma mark Initialization

/* 设置视图的一些基本属性 */
- (id)initWithFrame:(CGRect)frame {
    self = [super initWithFrame:frame];
    if (self) {
        self.baseFrame = frame;
        self.backgroundColor = [UIColor whiteColor];

        self.scrollViewForContent = [[UIScrollView alloc] initWithFrame:CGRectMake(0.0, 0.0, frame.size.width, frame.size.height)];
        self.scrollViewForContent.backgroundColor = [UIColor whiteColor];
        self.scrollViewForContent.delegate = self;
        self.scrollViewForContent.autoresizesSubviews = YES;
        self.scrollViewForContent.contentOffset = CGPointZero;
        self.scrollViewForContent.directionalLockEnabled = NO;
        self.scrollViewForContent.pagingEnabled = YES;
        self.scrollViewForContent.showsHorizontalScrollIndicator = NO;
        self.scrollViewForContent.showsVerticalScrollIndicator = NO;
        [self addSubview:self.scrollViewForContent];

        self.pageControl = [[UIPageControl alloc] init];
        UIColor *tintColor = [UIColor colorWithRed:203.f/255.f green:86.f/255.f blue:142.f/255.f alpha:1.f];
        self.pageControl.currentPageIndicatorTintColor = tintColor;
        self.pageControl.pageIndicatorTintColor = [UIColor darkGrayColor];
        self.pageControl.hidesForSinglePage = YES;
        [self.pageControl addTarget:self action:@selector(changePage:) forControlEvents:UIControlEventValueChanged];
        [self addSubview:self.pageControl];
    }
    return self;
}

/* 当UIPageControl的值改变时触发的方法 */
- (void)changePage:(UIPageControl *)sender {
    // 设置pageControl翻页后页面的位置
    CGRect frame = self.baseFrame;
    frame.origin.x = frame.size.width * self.pageControl.currentPage; // 设置水平位移
    frame.origin.y = 0.0;
    frame.size = self.baseFrame.size;
    [self.scrollViewForContent scrollRectToVisible:frame animated:YES];
    self.isPageChanged_ = YES; // 翻页成功
}

/* 设置scrollView的内容视图 */
- (void)setContentViews:(NSArray *)viewsForContent {
    // 移除之前在scrollView中的子视图
    for (UIView *subView in [self.scrollViewForContent subviews]) {
        [subView removeFromSuperview];
    }

    if (viewsForContent.count <= 0) {
        self.pageControl.numberOfPages = 0;
        return;
    }


    self.scrollViewForContent.contentSize = CGSizeMake(self.baseFrame.size.width * viewsForContent.count, self.baseFrame.size.height);

    // 设置views中各个元素的frame并将其添加到scrollView中,注意当前的各个子视图尚未进行布局
    [viewsForContent enumerateObjectsUsingBlock:^(UIView *v, NSUInteger i, BOOL *stop) {
        v.frame = CGRectMake(self.frame.size.width * i, v.frame.origin.y, v.frame.size.width, v.frame.size.height);
        [self.scrollViewForContent addSubview:viewsForContent[i]];
    }];


    // 设置pageControl的位置
    self.pageControl.numberOfPages = viewsForContent.count;
    CGFloat width = PAGECONTROL_DOT_WIDTH * self.pageControl.numberOfPages;
    self.pageControl.frame = CGRectMake((self.scrollViewForContent.frame.size.width - width) / 2,
                                        self.scrollViewForContent.frame.size.height - PAGECONTROL_DOT_HEIGHT,
                                        width, PAGECONTROL_DOT_HEIGHT);
}

/* 设置scrollView中各个子视图的位置 */
- (void)layoutContentViews {
    // 设置当前pageControl停在第一页
    self.pageControl.currentPage = 0;
    CGRect currentFrame = CGRectMake(self.baseFrame.size.width * self.pageControl.currentPage,
                                     0.0f,
                                     self.baseFrame.size.width, self.baseFrame.size.height);
    [self.scrollViewForContent scrollRectToVisible:currentFrame animated:YES];


    // 初始化isPageControlling_为YES
    self.isPageChanged_ = YES;


    // 将scrollView的各个子视图分别布局到scrollView中
    [self.scrollViewForContent.subviews enumerateObjectsUsingBlock:^(UIView *v, NSUInteger i, BOOL *stop) {
        v.frame = CGRectMake(self.frame.size.width * i, 0.f, self.frame.size.width, self.frame.size.height);
        [v setNeedsLayout]; // 立即刷新v当前的位置
    }];
}


#pragma mark - UIScrollViewDelegate

/* 用户drag scrollView动作即将发生时 */
- (void)scrollViewWillBeginDragging:(UIScrollView *)scrollView {
    self.isPageChanged_ = NO; // 将isPageChanged重置为NO
}

/* scroll事件尚未停止,即scrollView还没完成减速 */
- (void)scrollViewDidScroll:(UIScrollView *)ascrollView {
    if (self.isPageChanged_) {
        return;
    }
    else { // 如果翻页尚未完成
        // 如果当前scrollView的位移点大于当前页面的一半就跳转到下一个页面
        CGFloat pageWidth = ascrollView.frame.size.width;
        int page = floor((ascrollView.contentOffset.x - pageWidth / 2) / pageWidth) + 1; // 向下取整
        self.pageControl.currentPage = page;
    }
}

/* scrollView完成减速 */
- (void)scrollViewDidEndDecelerating:(UIScrollView *)scrollView {
    self.isPageChanged_ = NO;
}

@end
第一次使用UIPageControl,以后可能还要专门研究下另外写篇博客做下笔记。
Run一下看看吧:
华丽的翻页(这里用了UIPageControl控件来控制UIScrollView的滚动翻页)
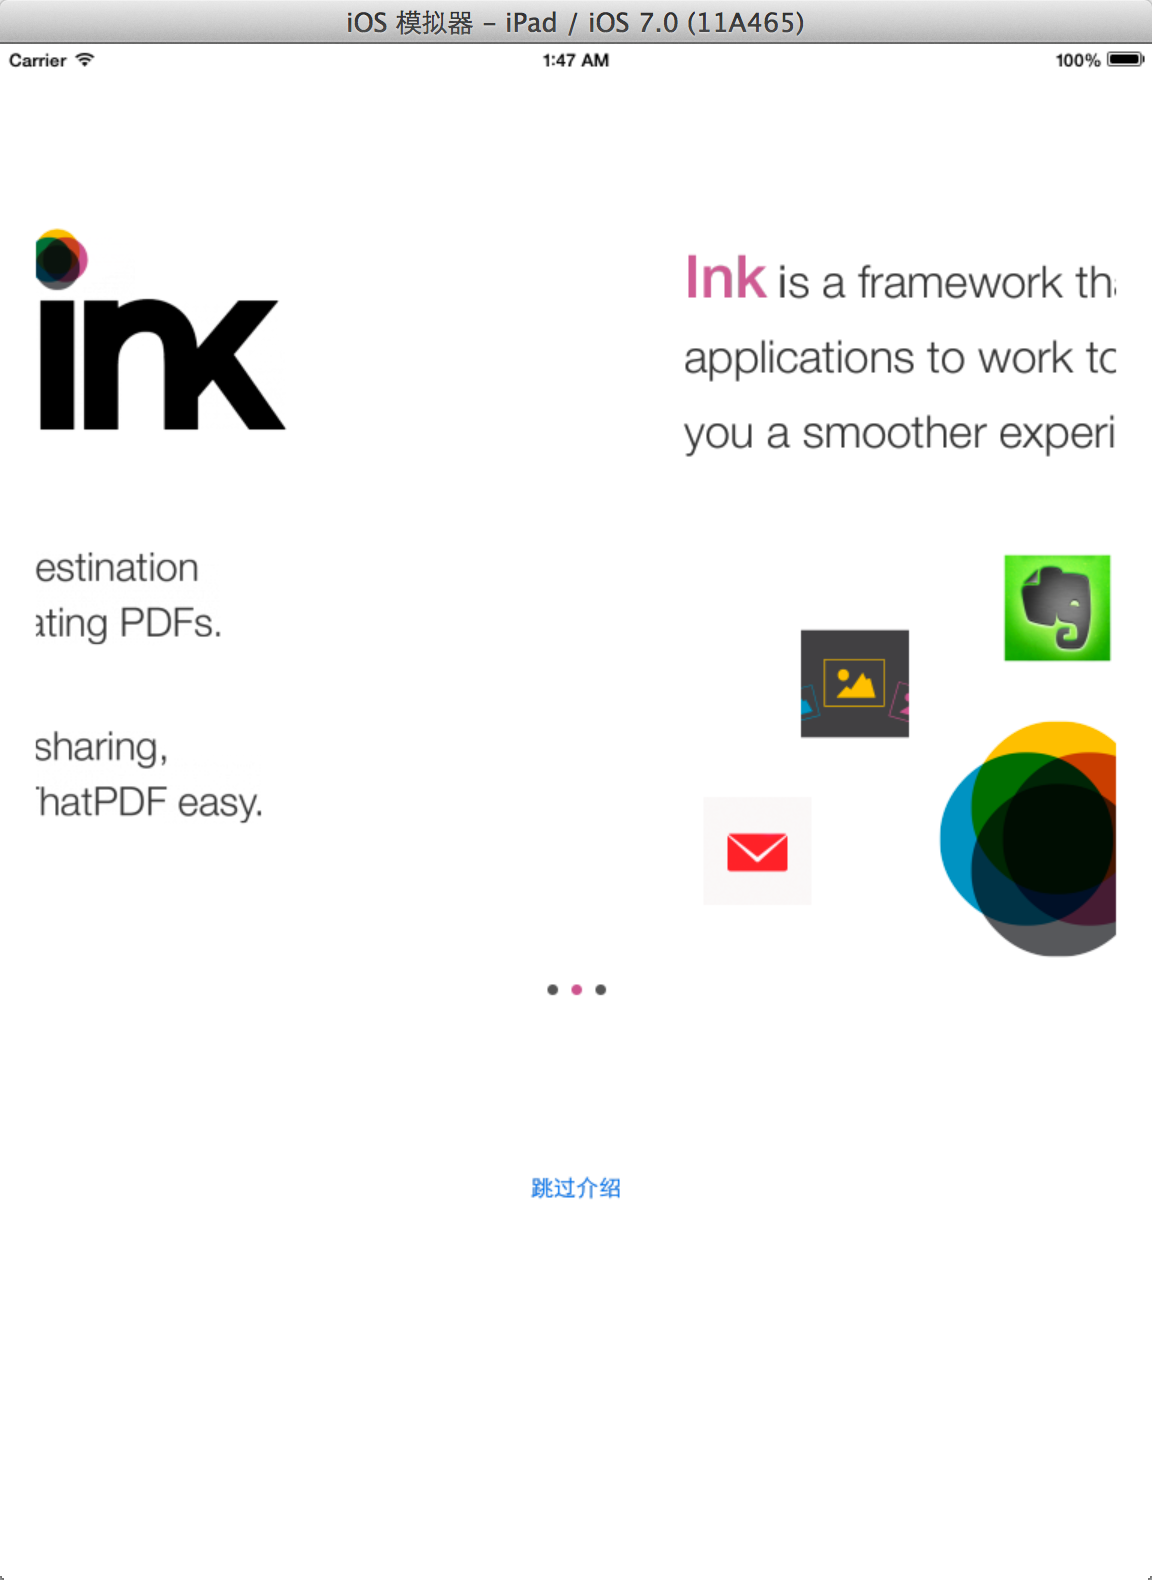
以及点击跳过介绍:
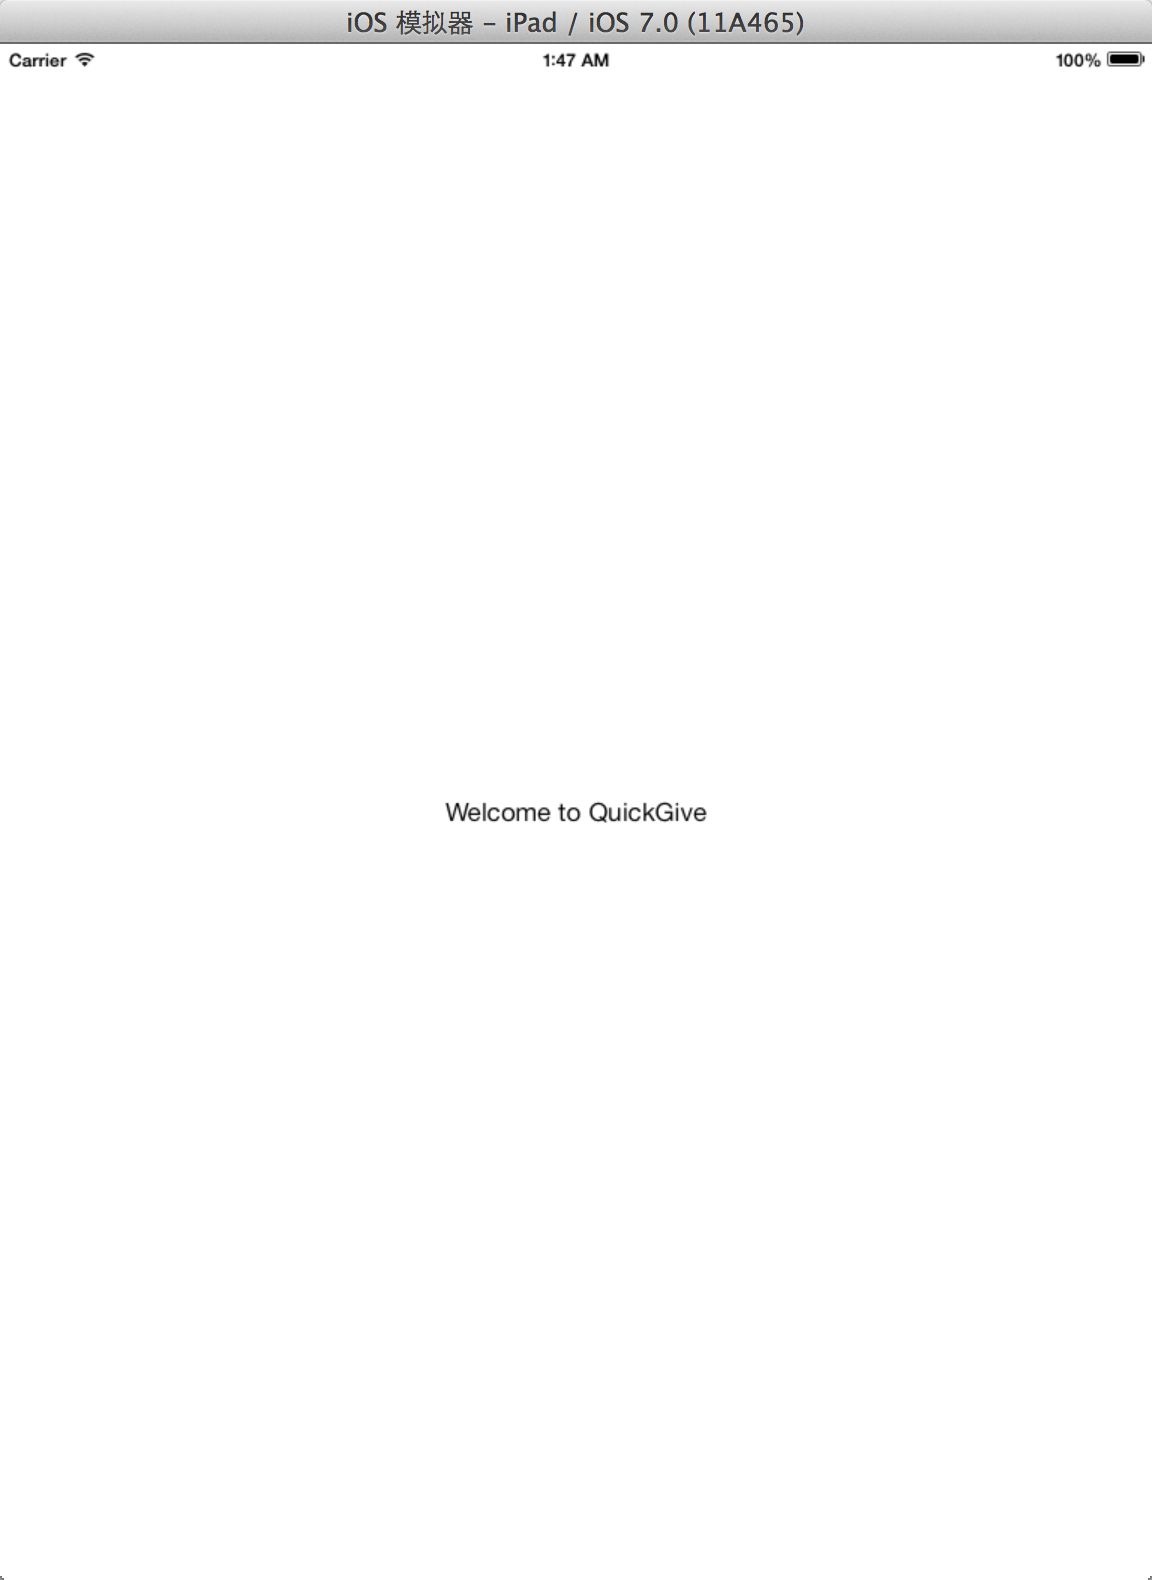
欢迎来到程序的主界面。
有些用户觉得这种入门教程是多余而又无聊的,但是个人认为对于某些应用有这样的指导还是很有意义的,只要用户愿意耐心停下来看看。
昨晚深夜写的,现在做些补充:如果用户点了跳过介绍后,那么以后启动应用将不会展示入门教程(必须有的),直接上代码:
首先是Delegate部分:
- (BOOL)application:(UIApplication *)application didFinishLaunchingWithOptions:(NSDictionary *)launchOptions
{
    NSUserDefaults *userDefaults = [NSUserDefaults standardUserDefaults];
    NSString *shouldShowIntroView = [userDefaults objectForKey:@"shouldShowIntroView"];
    if (shouldShowIntroView && [shouldShowIntroView isEqualToString:@"NO"]) {
        self.welcomeViewController = [[UIStoryboard storyboardWithName:@"Main" bundle:nil] instantiateViewControllerWithIdentifier:@"WelcomeViewController_ID"];
        self.window.rootViewController = self.welcomeViewController;
    }
    else {
        self.introViewController = [[UIStoryboard storyboardWithName:@"Main" bundle:nil] instantiateViewControllerWithIdentifier:@"IntroViewController_ID"];
        self.window.rootViewController = self.introViewController;
    }

    return YES;
}
然后给IntroViewController上的按钮加一个方法:
- (IBAction)gotoMainView:(id)sender {
    NSUserDefaults *userDefaults = [NSUserDefaults standardUserDefaults];
    [userDefaults setObject:@"NO" forKey:@"shouldShowIntroView"];
    [userDefaults synchronize];
}
此时视图跳转依然会执行,因为在故事板中已经指定。
原理也非常非常简单,就是利用NSUserDefaults存储数据,然后在viewDidFinishLauching的时候将对应key的值取出做个判断就可以了。
Demo已上传,有兴趣的可以下载来看看。


 1万+
1万+

 被折叠的 条评论
为什么被折叠?
被折叠的 条评论
为什么被折叠?
 到【灌水乐园】发言


