


本篇继续介绍WaitHandler类及其子类 Mutex,ManualResetEvent,AutoResetEvent的用法。
.NET中线程同步的方式多的让人看了眼花缭乱,究竟该怎么去理解呢?
其实,我们抛开.NET环境看线程同步,无非是执行两种操作:
- 一是互斥/加锁,目的是保证临界区代码操作的“原子性”;
- 另一种是信号灯操作,目的是保证多个线程按照一定顺序执行,如生产者线程要先于消费者线程执行。
.NET中线程同步的类无非是对这两种方式的封装,目的归根结底都可以归结为实现互斥/ 加锁或者是信号灯这两种方式,只是它们的适用场合有所不。
下面我们根据类的层次结构了解WaitHandler及其子类。
1.WaitHandler
WaitHandle是Mutex,Semaphore,EventWaitHandler,AutoResetEvent,ManualResetEvent共同的祖先,它封装Win32同步句柄内核对象,也就是说是这些内核对象的托管版本。
线程可以通过调用WaitHandler实例的方法WaitOne在单个等待句柄上阻止。此外,WaitHandler类重载了静态方法,以等待所有指定的等待句柄都已收集到信号WaitAll,或者等待某一指定的等待句柄收集到信号WaitAny。这些方法都提供了放弃等待的超时间隔、在进入等待之前退出同步上下文的机会,并允许其它线程使用同步上下文。WaitHandler是C#中的抽象类,不能实例化。
2.EventWaitHandler vs. ManualResetEvent vs. AutoResetEvent(同步事件)
我们先看看两个子类ManualResetEvent和AutoResetEvent在.NET Framework中的实现:
//.NET Framework中ManualResetEvent类的实现 [ComVisible(true), HostProtection(SecurityAction.LinkDemand, Synchronization = true, ExternalThreading = true)] public sealed class ManualResetEvent : EventWaitHandle { // Methods public ManualResetEvent(bool initialState) : base(initialState, EventResetMode.ManualReset) { } } //.NET Framework中AutoResetEvent类的实现 [ComVisible(true), HostProtection(SecurityAction.LinkDemand, Synchronization = true, ExternalThreading = true)] public sealed class AutoResetEvent : EventWaitHandle { // Methods public AutoResetEvent(bool initialState) : base(initialState, EventResetMode.AutoReset) { } }
原来ManualResetEvent和AutoResetEvent都继承自EventWaitHandler,它们的唯一区别就在于父类 EventWaitHandler的构造函数参数EventResetMode不同,这样我们只要弄清了参数EventResetMode值不同时,EventWaitHandler类控制线程同步的行为有什么不同,两个子类也就清楚了。为了便于描述,我们不去介绍父类的两种模式,而直接介绍子类。
ManualResetEvent和AutoResetEvent的共同点:
1)Set方法将事件状态设置为终止状态,允许一个或多个等待线程继续;Reset方法将事件状态设置为非终止状态,导致线程阻止;WaitOne阻止当前线程,直到当前线程的WaitHandler收到事件信号。
2)可以通过构造函数的参数值来决定其初始状态,若为true则事件为终止状态从而使线程为非阻塞状态,为false则线程为阻塞状态。
3)如果某个线程调用WaitOne方法,则当事件状态为终止状态时,该线程会得到信号,继续向下执行。
ManualResetEvent和AutoResetEvent的不同点:
1)AutoResetEvent.WaitOne()每次只允许一个线程进入,当某个线程得到信号后,AutoResetEvent会自动又将信号置为不发送状态,则其他调用WaitOne的线程只有继续等待,也就是说AutoResetEvent一次只唤醒一个线程;
2)ManualResetEvent则可以唤醒多个线程,因为当某个线程调用了ManualResetEvent.Set()方法后,其他调用WaitOne的线程获得信号得以继续执行,而ManualResetEvent不会自动将信号置为不发送。
3)也就是说,除非手工调用了ManualResetEvent.Reset()方法,则ManualResetEvent将一直保持有信号状态,ManualResetEvent也就可以同时唤醒多个线程继续执行。
示例场景:张三、李四两个好朋友去餐馆吃饭,两个人点了一份宫爆鸡丁,宫爆鸡丁做好需要一段时间,张三、李四不愿傻等,都专心致志的玩起了手机游戏,心想宫爆鸡丁做好了,服务员肯定会叫我们的。服务员上菜之后,张三李四开始享用美味的饭菜,饭菜吃光了,他们再叫服务员过来买单。我们可以从这个场景中抽象出来三个线程,张三线程、李四线程和服务员线程,他们之间需要同步:服务员上菜—>张三、李四开始享用宫爆鸡丁—>吃好后叫服务员过来买单。这个同步用什么呢? ManualResetEvent还是AutoResetEvent?通过上面的分析不难看出,我们应该用ManualResetEvent进行同步,下面是程序代码:
https://www.cnblogs.com/dotnet261010/p/6055092.html
张三李四吃饭的故事
————————————————
C#发展至今,已经从最初的1.0到了5.0版本,其进化史如下,参考了C# 5.0 IN A NUTSHEL:
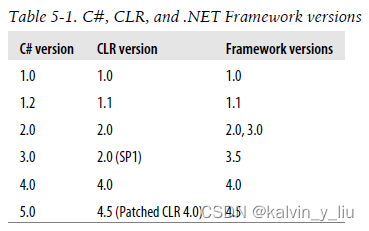
让我们来回顾一下各个版本都带来了什么:
- 1.0版本 - 基本C#语法。
- 2.0版本 - 泛型的支持,CLR进行了升级,从根本上支持了运行时泛型。
- 3.0版本 - LINQ,添加了from / join等类SQL关键字,添加了扩展函数,添加了编译期动态类型var关键字。
- 4.0版本 - dynamic关键字,CLR进行升级,加入DLR,开始对动态进行友好的支持。同时加入动态参数、参数默认值、泛型协变等特性。
- 5.0版本-新的异步模型,新增了async/await等关键字,简化并行计算Parallel。
可以看出作为编程语言的C#已经非常强大,单随着时代的发展,C#依然在不断的前进。每一代的C#都会在语法的调整之,外带来一个新特性。从2.0的泛型、3.0的LINQ、4.0的dynamic到5.0的Async异步,每个版本的C#都有一个主导的思想,而其他细节的改进和调整则是围绕着这个主导思想给予支持。
下面我们来看下C#5.0及之前版本,异步调用方法的各种实现方法。
首先我们来看一个普通的同步方法,如下:
using System;
using System.Net;

namespace NoAsync
{
    class Program
    {
        static void Main(string[] args)
        {
            ShowUriContent("http://www.cnblogs.com/DebugLZQ");
        }

        static void ShowUriContent(string uri)
        {
            using (WebClient client = new WebClient())
            {
                string text = client.DownloadString(uri);
                Display(text);
            }
        }

        static void Display(string text)
        {
            Console.WriteLine(text.Length);
        }
    }
}
同步方法会造成线程的阻塞。
因此我们有了异步的方法,最早期的异步方法时Begin/End模式(其实现方法一共有四种,请参考DebugLZQ前面的博文:.NET异步编程总结----四种实现模式)。
我们用Begin/End推荐模式来封装这个同步方法以实现异步调用,如下:
using System;
using System.Threading;
using System.Net;

namespace AsyBeginEndNoEncapsulation
{
    class Program
    {
        static void Main(string[] args)
        {
            ShowUriContent("http://www.cnblogs.com/DebugLZQ");//原同步方法
            ShowUriContentAsync("http://www.cnblogs.com/DebugLZQ");//封装后的异步方法

            Thread.Sleep(5000);
        }
        //------进行异步封装
        public delegate void ShowUriContentDelegate(string text);
        static void ShowUriContentAsync(string uri)
        {
            ShowUriContentDelegate showUriContentDelegate = ShowUriContent;
            showUriContentDelegate.BeginInvoke(uri, ShowUriContentCompleted, showUriContentDelegate);
        }

        static void ShowUriContentCompleted(IAsyncResult result)
        {
            (result.AsyncState as ShowUriContentDelegate).EndInvoke(result);
        }
        //------原同步方法
        static void ShowUriContent(string uri)
        {
            using (WebClient client = new WebClient())
            {
                string text = client.DownloadString(uri);
                Display(text);
            }
        }

        static void Display(string text)
        {
            Console.WriteLine(text.Length);
        }
    }
}
最原始的封装就是这个样子。
可以利用C#新特性,如Action/Function、匿名方法、Lambda表达式等,简写(合写)如下:
using System;
//using System.Collections.Generic;
//using System.Linq;
//using System.Text;
using System.Threading;
using System.Net;

namespace AsyBeginEndNoEncapsulationSimply
{
    class Program
    {
        static void Main(string[] args)
        {
            ShowUriContent("http://www.cnblogs.com/DebugLZQ");//原同步方法
            ShowUriContentAsync("http://www.cnblogs.com/DebugLZQ");  //进行异步封装
            ShowUriContentAsync1("http://www.cnblogs.com/DebugLZQ");//简化1:Action简化
            ShowUriContentAsync2("http://www.cnblogs.com/DebugLZQ");//简化2:匿名方法简化
            ShowUriContentAsync3("http://www.cnblogs.com/DebugLZQ");//简化3:Lambda简化


            Thread.Sleep(50000);
        }
        //------进行异步封装
        public delegate void ShowUriContentDelegate(string text);
        static void ShowUriContentAsync(string uri)
        {
            ShowUriContentDelegate showUriContentDelegate = ShowUriContent;
            showUriContentDelegate.BeginInvoke(uri, ShowUriContentCompleted, showUriContentDelegate);
        }

        static void ShowUriContentCompleted(IAsyncResult result)
        {
            (result.AsyncState as ShowUriContentDelegate).EndInvoke(result);
        }
        //------进行异步封装--简化1:Action简化
        static void ShowUriContentAsync1(string uri)
        {
            Action<string> showUriContentDelegate = ShowUriContent;
            showUriContentDelegate.BeginInvoke(uri, ShowUriContentCompleted1, showUriContentDelegate);
        }

        static void ShowUriContentCompleted1(IAsyncResult result)
        {
            (result.AsyncState as Action<string>).EndInvoke(result);
        }
        //------简化2:匿名方法简化
        static void ShowUriContentAsync2(string uri)
        {
            Action<string> showUriContentDelegate = delegate(string uri_)
            {
                using (WebClient client = new WebClient())
                {
                    string text = client.DownloadString(uri_);
                    Display(text);
                }
            };
            showUriContentDelegate.BeginInvoke(uri, delegate(IAsyncResult result) { (result.AsyncState as Action<string>).EndInvoke(result); }, showUriContentDelegate);
        }
        //------简化3:Lambda简化
        static void ShowUriContentAsync3(string uri)
        {
            Action<string> showUriContentDelegate = ( uri_)=>
            {
                using (WebClient client = new WebClient())
                {
                    string text = client.DownloadString(uri_);
                    Display(text);
                }
            };
            showUriContentDelegate.BeginInvoke(uri, (result) => { (result.AsyncState as Action<string>).EndInvoke(result); }, showUriContentDelegate);
        }

        //---------------------原同步方法
        static void ShowUriContent(string uri)
        {
            using (WebClient client = new WebClient())
            {
                string text = client.DownloadString(uri);
                Display(text);
            }
        }

        static void Display(string text)
        {
            Console.WriteLine(text.Length);
        }
    }
}
以上是我们最原始的实现方法,及利用新特性的各种变种写法。
但是WebClient作为WebRequest的高层封装,.NET已经帮我们把这个异步模式给封装了(也就是说有些同步方法不需要我们自己进行封装了)。
因此我们也可以如下:
using System;
using System.Threading;
using System.Net;

namespace AsyncBeginEndEncapsulation
{
    class Program
    {
        static void Main(string[] args)
        {
            ShowUriContent("http://www.cnblogs.com/DebugLZQ");
            ShowUriContent2("http://www.cnblogs.com/DebugLZQ");

            Console.WriteLine("Main thread continue...");
            Thread.Sleep(5000);
        }

        static void ShowUriContent(string uri)
        {
            using (WebClient client = new WebClient())
            {
                client.DownloadStringCompleted += new DownloadStringCompletedEventHandler(Display);
                client.DownloadStringAsync(new Uri(uri));
            }
        }

        static void Display(object sender, DownloadStringCompletedEventArgs e)
        {
            Console.WriteLine(e.Result.Length);
        }

        //-------简化的写法
        static void ShowUriContent2(string uri)
        {
            using (WebClient client = new WebClient())
            {
                client.DownloadStringCompleted += (s, e) => { Console.WriteLine(e.Result.Length); };
                client.DownloadStringAsync(new Uri(uri));
            }
        }
    }
}
从上面.NET对Begin/End模式的主动封装可以看出,其目的是为了简化异步方法的调用,最终的目的是让异步方法调用像我们最熟悉的同步方法调用那么简单。
C#5.0引入了两个关键字async、await以提供一种更为简洁的异步方法调用模式。
我们实现如下(控制台入口点Main方法无法标记为async,因此我们用Winform程序演示):
using System;
using System.Windows.Forms;
using System.Net;

namespace AsyncAwaitWinForm
{
    public partial class Form1 : Form
    {
        public Form1()
        {
            InitializeComponent();
        }

        private async void button1_Click(object sender, EventArgs e)
        {
            int length = await ShowUriContentAsyncAwait("http://www.cnblogs.com/DebugLZQ");
            textBox1.Text = length.ToString();
        }

         //
        async Task<int> ShowUriContentAsyncAwait(string uri)
        {
            using (WebClient client = new WebClient())
            {
                string text = client.DownloadString(uri);
                return text.Length;
            }
        }
    }
}
需要说明的是async、await需要:Visual Studio 2010 + SP1+Visual Studio Async CTP,或是Visual Studio 2012.
Update: 关于 Parallel—Task,请参考DebugLZQ后续博文:Task and Parallel
update:关于Async await详细,请参考DebugLZQ后续博文:
async wait
以上所有示例程序均由DebugLZQ动手编写,可以正常运行,其结果显而易见,因此没有附上运行截图。
科技不断向前发展,期待以后版本的C#6,7,8,X…带来的更多精彩~
把自己的理解分享给大家,共同交流进步,认识不断提升~
Update: Read more
Difference between Delegate.BeginInvoke and Thread.Start
Differences in the different ways to make concurrent programs


 283
283


 被折叠的 条评论
为什么被折叠?
被折叠的 条评论
为什么被折叠?
 到【灌水乐园】发言


