


Linux下3G拨号上网
开发板型号 :FL2440
内核版本:linux-3.0
3G上网卡:ZTE MF626
SIM卡:中国移动
1、 usb_modeswitch移植
usb_modeswitch工具用到libusb提供的API,所以在移植usb_modeswitch之前先编译libusb。
1.1、下载源码
[lingyun@localhost keyue]$ mkdir usbmode
[lingyun@localhostkeyue]$ cd usbmode
[lingyun@localhostusbmode]$ wget
http://pkgs.fedoraproject.org/repo/pkgs/libusb1/libusb-1.0.0.tar.bz2
[lingyun@localhostusbmode]$ wget http://pkgs.fedoraproject.org/repo/pkgs/libusb/libusb-compat-0.1.4.tar.bz2/2ca521fffadd0c28fdf174e6ec73865b/libusb-compat-0.1.4.tar.bz2
[lingyun@localhostusbmode]$ wget http://pkgs.fedoraproject.org/repo/pkgs/usb_modeswitch/usb-modeswitch-1.2.4.tar.bz2
[lingyun@localhostusbmode]$ wget http://www.draisberghof.de/usb_modeswitch/usb-modeswitch-data-20130607.tar.bz2
1.2、解压
[lingyun@localhost usbmode]$ tar –xjf libusb-1.0.0.tar.bz2
[lingyun@localhostusbmode]$ tar –xjf libusb-compat-0.1.4.tar.bz2
[lingyun@localhostusbmode]$ tar –xjf usb-modeswitch-1.2.4.tar.bz2
[lingyun@localhostusbmode]$ tar –xjf usb-modeswitch-data-20130607.tar.bz2
1.3、编译libusb
[lingyun@localhost usbmode]$ cd libusb-1.0.0
[lingyun@localhostlibusb-1.0.0]$ mkdir ../install
[lingyun@localhostlibusb-1.0.0]$ ./configure --prefix=/home/lingyun/keyue/usbmode/install/ --build=i686 --host=arm-linux--disable-shared --enable-static
[lingyun@localhostlibusb-1.0.0]$ make
[lingyun@localhostlibusb-1.0.0]$make install
[lingyun@localhostlibusb-1.0.0]$ cd ..
[lingyun@localhostusbmode]$ export PKG_CONFIG_PATH=/home/lingyun/keyue/usbmode/install/lib/pkgconfig:$PKG_CONFIG_PATH
[lingyun@localhostusbmode]$ cd libusb-compat-0.1.4
[lingyun@localhostlibusb-compat-0.1.4]$./configure--prefix=/home/lingyun/keyue/usbmode/install/ --build=i686 --host=arm-linux--disable-shared --enable-static
[lingyun@localhost libusb-compat-0.1.4]$make
[lingyun@localhostlibusb-compat-0.1.4]$ make install
[lingyun@localhostlibusb-compat-0.1.4]$ cd ..
[lingyun@localhostusbmode]$ ls install/
bin include lib
1.4、编译usb-modeswitch
[lingyun@localhost usbmode]$ cd usb-modeswitch-1.2.4
[lingyun@localhost usb-modeswitch-1.2.4]$vim Makefile
修改3、4、6行

[lingyun@localhost usb-modeswitch-1.2.4]$make
[lingyun@localhost usb-modeswitch-1.2.4]$cp usb_modeswitch ../install/bin/
[lingyun@localhost usb-modeswitch-1.2.4]$cp usb_modeswitch /tftp/
1.5、把usb-modeswitch-data-20130607下的usb_modeswitch.d中的所以文件都拷贝到开发板的etc/usb_modeswitch.d/目录:
[lingyun@localhost usbmode]$ cd usb-modeswitch-data-20130607
[lingyun@localhostusb-modeswitch-data-20130607]$ tar -jcf usb_modeswitch.d.tar.bz2 usb_modeswitch.d
[lingyun@localhostusb-modeswitch-data-20130607]$ cp usb_modeswitch.d.tar.bz2 /tftp/
1.6、把usb_modeswitch下载到/usr/sbin目录下,把usb_modeswitch.d下载到/etc/目录下:
~ >: cd usr/sbin/
/usr/sbin >: tftp -gr usb_modeswitch 192.168.1.3
/usr/sbin >: cd
~ >: cd etc/
/etc >: tftp -gr usb_modeswitch.d.tar.bz2 192.168.1.3
/etc >: tar -jxf usb_modeswitch.d.tar.bz2
到这里usb_modeswitch移植完成。
2、ppp移植
2.1、向linux内核添加3G模块的驱动(USB转串口驱动)和PPP协议的支持,然后编译内核并下载到开发板。当然如果之前已经移植好内核,那么只需要增加几个选项就可以,然后在编译内核就可以了,这个文档默认内核已经移植过,所以只讲与USB转串口驱动和PPP协议支持的几个选项。
[lingyun@localhostlinux-3.0]$ vt100
[lingyun@localhostlinux-3.0]$ make menuconfig
DeviceDrivers---→
USBsupport---→
<*>USBSerialConverter support--→
[*]USBGenericSerial Driver
<*>USBdriverfor GSM and CDMA modems
到此3G模块驱动添加完成,下面进行ppp协议支持的添加(下面所示的几个选项必选):
DeviceDrivers--→
Networkdevicesupport---→
<*> PPP (point-to-point protocol) support
[*] PPP multilink support (EXPERIMENTAL)
<*> PPP support for async serial ports
<*> PPP support for sync tty ports
<*> PPP Deflate compression
<*> PPP BSD-Compress compression
完成了这些步骤以后就可以退出make menuconfig进行make编译内核了。然后再把生成的镜像文件下载到板子上重启开发板即可。然后就会发现在/dev/目录下生成ppp设备节点:
~ >: ls -l dev/ppp
crw-rw---- 1 root root 108, 0 Mar 24 05:12 dev/ppp
2.2、交叉编译好工作源代码ppp-2.4.4,得到pppd和chat,解压源代码包,进入目录,进行交叉编译:
[lingyun@localhost keyue]$ mkdir ppp
[lingyun@localhost keyue]$ cd ppp
[lingyun@localhostppp]$ wget ftp://ftp.samba.org/pub/ppp/ppp-2.4.4.tar.gz
[lingyun@localhost ppp]$ tar -zxf ppp-2.4.4.tar.gz
[lingyun@localhost ppp]$ cd ppp-2.4.4
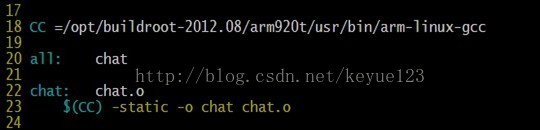
[lingyun@localhostppp-2.4.4]$./configure //生成Makefile
[lingyun@localhost ppp-2.4.4]$cd chat/ //对chat目录下的文件进行修改
[lingyun@localhost chat]$ ls
chat.8 chat.c chat.o Makefile Makefile.linux Makefile.sol2
[lingyun@localhost chat]$ vim chat.c
[lingyun@localhostchat]$ vim Makefile
[lingyun@localhostpppd]$ vim auth.c

[lingyun@localhostpppd]$ vim Makefile

47 #MPPE=y
52 #FILTER=y
69 #PLUGIN=y
[lingyun@localhost pppd]$ cd ..
[lingyun@localhost ppp-2.4.4]$ make
[lingyun@localhost ppp-2.4.4]$cd chat/
[lingyun@localhost chat]$ ls
chat chat.8 chat.c chat.o Makefile Makefile.linux Makefile.sol2
[lingyun@localhost chat]$ mv chat ky-chat
[lingyun@localhost chat]$ ls
chat.8 chat.c chat.o ky-chat Makefile Makefile.linux Makefile.sol2
[lingyun@localhost ppp-2.4.4]$ cd ../pppd
[lingyun@localhost pppd]$ mv pppd ky-pppd
拨号所用到的程序就是ppp-2.4.4/pppd下的ky-pppd和ppp-2.4.4/chat下的ky-chat可执行程序,将交叉编译出来的这两个应用程序拷贝到开发板 /usr/sbin目录下,更改其属性为可执行文件。
[lingyun@localhost pppd]$ cp ky-pppd /tftp/
[lingyun@localhost chat]$ cp ky-chat /tftp/
~ >: cd usr/sbin/
/usr/sbin >: tftp -gr ky-chat 192.168.1.3
/usr/sbin >: tftp -gr ky-pppd 192.168.1.3
/usr/sbin >: chmod a+x ky-chat
/usr/sbin >: chmod a+x ky-pppd
2.3、配置拨号的脚文件
拨号上网需要的配置文件有3个wcdma,wcdma-chat-connect,wcdma-chat-disconnect(存放位置是开发板的/etc/ky-ppp/peers)。
~ >: cd etc/
/etc >: mkdir ky-ppp/
/etc/ky-ppp >: mkdir peers
wcdma配置文件:
/etc/ky-ppp/peers >: vi wcdma
#/etc/ky-ppp/peers/cdma
# Usage: root>pppd call cdma
hide-password
noauth
connect '/usr/sbin/chat -s -v-f/etc/ky-ppp/peers/wcdma-chat-connect'
disconnect '/usr/sbin/chat -s -v-f/etc/ky-ppp/peers/wcdma-chat-disconnect'
debug
/dev/ttyUSB2
115200
defaultroute
noipdefault
novj
novjccomp
noccp
ipcp-accept-local
ipcp-accept-remote
local
lock
dump
nodetach
user "card"
password "card"
crtscts
remotename 3gppp
ipparam 3gppp
usepeerdns
wcdma-chat-connect配置文件:
/etc/ky-ppp/peers >: vi wcdma-chat-connect
ABORT "BUSY"
ABORT "NO CARRIER"
ABORT "NO DIALTONE"
ABORT "ERROR"
ABORT "NO ANSWER"
TIMEOUT 120
"" AT
OK \rATZ
OK\rAT+CGDCONT=1,"IP","cmnet",,0,0
OK ATDT*99#
CONNECT \d\c
wcdma-chat-disconnect配置文件
/etc/ky-ppp/peers >: vi wcdma-chat-disconnect
ABORT "ERROR"
ABORT "NO DIALTONE"
SAY "\NSending break to themodem\n"
""\k"
""+++ATH"
SAY "\nGood bay\n"
域名解析配置文件
/etc/ky-ppp/peers >: cd ../..
/etc >: vi resolv.conf
nameserver 4.2.2.2
nameserver 8.8.8.8
到这里PPP 移植就完成了。
到了这里大部分工作已经完成了,但是我们的开发板依然不能拨号,还需进一步修改和添加配置文件。
当我们的MF626插件中兴WCDMAUSB调制解调器,Linux内核识别作为一个cd – rom。
scsi0 :usb-storage 1-1.4:1.0
scsi 0:0:0:0: CD-ROM ZTE USB SCSI CD-ROM 2.31 PQ: 0 ANSI: 2
现在我们需要使用usb_modeswitch切换3 g USB调制解调器来调制解调器(USB转换为seiral),对于usb_modeswitch使用libusb,libusb依赖于USB文件系统。所以我们在使用usb_modeswitch之前必须挂在usbfs,否则它不能检测USB设备。
添加中兴WCDMA现代usb_modeswitchMF626配置文件:
/etc >: cd
~ >: cd apps/
/apps >: vi zte_mf626.conf
# Configuration for the usb_modeswitchpackage, a mode switching tool for
# USB devices providing multiplestates or modes
#
# Evaluated by the wrapper script/usr/sbin/usb_modeswitch_dispatcher
#
# To enable an option, set it to"1", "yes" or "true" (case doesn't matter)
# Everything else counts as"disable"
# Disable automatic mode switchingglobally (e.g. to access the original
# install storage)
#DisableSwitching=0
# Enable logging (results in aextensive report file in /var/log, named
#"usb_modeswitch_<interface-name>" and probably others
#EnableLogging=0
########################################################
# ZTE MF622 (aka "OndaMDC502HS")
# ZTE MF626
# ZTE MF628+ (tested version fromTelia / Sweden)
# ZTE MF633
# ZTE MF636 (aka "Telstra /BigPond 7.2 Mobile Card")
# ZTE MF637
# and probably others not listed here
#
# Contributor: Joakim Wennergren andothers
DefaultVendor= 0x19d2
DefaultProduct= 0x2000
TargetVendor= 0x19d2
TargetProductList="0001,0002,0015,0016,0017,0031,0037,0052,0055,0063,0064,0066,0091,0108,0117,0128,0157,2002,2003"
MessageContent="5553424312345678000000000000061e000000000000000000000000000000"
MessageContent2="5553424312345679000000000000061b000000020000000000000000000000"
MessageContent3="55534243123456702000000080000c85010101180101010101000000000000"
NeedResponse=1
>: usb_modeswitch -c /apps/zte_mf626.conf
Looking for target devices... No devices in target mode or class found Looking fordefault devices ... No devices in default mode found. Nothing todo. Bye.
这是因为usbfs文件系统没有挂在起来,所以使用usb_modeswitch之前要挂载它:
>: mount -t usbfs usbfs /proc/bus/usb/
>: mount
rootfs on / typerootfs (rw)
ubi0:rootfs on /type ubifs(rw,relatime)
proc on /proc typeproc (rw,relatime)
tmpfs on /tmp typetmpfs (rw,relatime)
tmpfs on /dev typetmpfs (rw,relatime)
sysfs on /sys typesysfs (rw,relatime)
usbfs on/proc/bus/usb type usbfs(rw,relatime)
devpts on /dev/ptstype devpts(rw,relatime,mode=600)
>: ls proc/bus/usb/
001 devices
这样我usbfs就挂载起来了,但是如果重启开发板后,还得重新挂载,为了每次启动系统都能自动挂载,我们进行如下修改:
>: cd etc/
>: vi fstab
# /etc/fstab: static file system information.
# Copyright (C) 2013 keyue <keyue654321@163.com>
#
#<File system> <mountpt> <type> <options> <dump><pass>
#devpts /dev/pts devpts defaults 0 0
#/dev/root /ext2 rw,noauto 0 1
proc /proc proc defaults 0 0
tmpfs /tmp tmpfs defaults 0 0
tmpfs /dev tmpfs defaults 0 0
sysfs /sys sysfs defaults 0 0
usbfs /proc/bus/usb usbfs defaults 0 0
使用usb_modemswitch来切换它到串口设备上来工作
>: usb_modeswitch -c /apps/zte_mf626.conf
Looking for targetdevices ...
No devicesintarget mode or class found
Looking for defaultdevices ...
foundmatching product ID
addingdevice
Found deviceindefault mode, class or configuration (1)
Accessing device 007 onbus 001 ...
Getting the currentdevice configuration ...
OK, gotcurrentdevice configuration (1)
Using interface number 0
Using endpoints 0x01(out) and 0x81 (in)
Inquiring devicedetails; driver will be detached ...
Looking for activedriver ...
OK, driverfound;name unknown, limitation of libusb1
OK,driver"unkown" detached
SCSI inquiry data (foridentification)
-------------------------
VendorString:ZTE
ModelString:USB SCSI CD-ROM
Revision String: 2.31
-------------------------
USB description data(for identification)
usb 1-1.4: usbfs:process 802 (usb_modeswitch) did notclaim interface 0 before use
-------------------------
Manufacturer:ZTE,Incorporated
Product:ZTE CDMA Technologies MSM
SerialNo.:1234567890ABCDEF
-------------------------
Setting up communicationwith interface 0
Using endpoint 0x01 formessage sending ...
Trying to send message 1to endpoint 0x01 ...
OK,messagesuccessfully sent
Reading the response tomessage 1 (CSW) ...
OK,responsesuccessfully read (13 bytes).
Trying to send message 2to endpoint 0x01 ...
OK,messagesuccessfully sent
Reading the response tomessage 2 (CSW) ...
OK,responsesuccessfully read (13 bytes).
Trying to send message 3to endpoint 0x01 ...
OK,messagesuccessfully sent
Reading the response tomessage 3 (CSW) ...
OK,responsesuccessfully read (0 bytes).
Resetting responseendpoint 0x81
Resetting messageendpoint 0x01
Device isgone,skipping any further commands
-> Run lsusb to noteany changes. Bye.
>: usb 1-1.4: USBdisconnect, device number 7
usb 1-1.4: new fullspeed USB device number 8 using s3c2410-ohci
usb 1-1.4: New USBdevice found, idVendor=19d2,idProduct=0031
usb 1-1.4: New USBdevice strings: Mfr=2, Product=1,SerialNumber=3
usb 1-1.4: Product: ZTECDMA Technologies MSM
usb 1-1.4: Manufacturer:ZTE,Incorporated
usb 1-1.4: SerialNumber:1234567890ABCDEF
option 1-1.4:1.0: GSMmodem (1-port) converterdetected
usb 1-1.4: GSM modem(1-port) converter now attachedto ttyUSB0
option 1-1.4:1.1: GSMmodem (1-port) converterdetected
usb 1-1.4: GSM modem(1-port) converter now attachedto ttyUSB1
scsi5 : usb-storage1-1.4:1.2
option 1-1.4:1.3: GSMmodem (1-port) converterdetected
usb 1-1.4: GSM modem(1-port) converter now attachedto ttyUSB2
scsi 5:0:0:0:Direct-Access ZTE MMCStorage 2.31 PQ: 0 ANSI:2
sd 5:0:0:0: Attachedscsi generic sg0 type 0
sd 5:0:0:0: [sda]Attached SCSI removable disk
这时我们就可以看到这个3G上网卡对应的3个USB转串口设备,其中/dev/ttyUSB0对AT命令没 有反应,应该是Debug口;/dev/ttyUSB1对AT命令有反应,但是不能进行拨号,之前调试的时候,用它拨号一直出错。在chat脚本中 ATD$DIALNUM 提示No carrier。 /dev/ttyUSB2对AT命令有反应,也能拨号。所以要想ppp拨号,我们必须使用/dev/ttyUSB2。这与UC864E这个模块不 同,UC864E的/dev/ttyUSB1和/dev/ttyUSB2都能拨号。
下面利用comport来检测
~>: comport -d /dev/ttyUSB2
aatt //AT命令检查模块
OK
aattee00 //关闭AT命令回显
OK
at+cgmm //查GPRS模块名
MF626
OK
at+cgmr //查模块版本信息
BD_TMOP673M3V1.0.1B07
OK
at+cgmi //查模块制造商
ZTE INCORPORATED
OK
at+cgsn //查模块IMEI号
357034030351793
OK
at+csq //查GPRS信号强度
+CSQ: 15,99
OK
at+cpin? //查SIM卡是否在位,用联通的3G卡一直探测不到。只有一次能正常工作,可能与SIM卡有关,以前碰到过类似情况。
+CPIN: READY
OK
at+creg? //查SIM卡是否注册上
+CREG: 0,1
OK
at+cops? //查SIM卡运营商
+COPS: 1,0,"China Mobile Communication Corp.",0
OK
at+cnsmod //不支持UC8643的cnsmod查网络类型
ERROR
at+cpsi //不支持UC8643的cpsi查GPRS location
ERROR
~ >:
当我们看到AT+CREG返回1(本地网络注册)或5(漫游)的时候,就说明我们的SIM卡已经注册上了,这时我们就可以开始PPP拨号了。
~>: ifup-ppp
ifup-ppp Usage: ifup-ppp [-d /dev/ttyUSB0] [-a apn] [-u username] [-p password][-v chap/pap] [-i ipaddr] pppXX
This shell script used to do pppd dial up on GPRS/3G modem, if no optionsgived, it
will use the default configure file "/apps/etc/network/ifcfg-pppXX".If get options
in this command, it will use the option from the command line, and be carefulthe -d
option must be given to specify the modem device.
pppXX: Required, specify the dial up generated PPP device, such as ppp10.
-d: Required, if use command line options, specify the modem TTY device.
-a: Option, APN(Access Point Name) for the SIM card provider.
-u: Option, username for the GPRS login if needed.
-p: Option, password for the GPRS login if needed.
-v: Option, authenticate method, pap or chap.
-i: Option, <local_IP_address>:<remote_IP_address> such as0.0.0.0:0.0.0.0
Example: ifup-ppp -d /dev/ttyUSB0 -a 3gnet -u uid -p pwd ppp1
~>: ifup-ppp -d /dev/ttyUSB2 -a "apn" -u "uid" -p"pwd" -v chap ppp10
+ pppd /dev/ttyUSB2 115200 name uid password pwd unit 10 require-chap idle 86400refuse-mschap refuse-mschap-v2 refuse-eap nodefaultroute updetach debuglcp-echo-failure 3 lcp-echo-interval 5 ipcp-accept-local ipcp-accept-remoteipcp-restart 50 modem crtscts noipdefault noauth novj noccp novjccomp lockconnect /usr/sbin/chat -v -V -s -E -f /etc/ppp/gprs-chat
abort on (BUSY)
abort on (NO ANSWER)
abort on (NO CARRIER)
abort on (NO DIALTONE)
abort on (ERROR)
abort on (\nRING\r\n\r\nRING\r)
timeout set to 20 seconds
send (ATE0^M)
expect (OK)
^M
OKOK
-- got it
send (AT+CGDCONT=1,"IP","apn"^M)
expect (OK)
^M
^M
OKOK
-- got it
send (ATD*99***1#^M)
+ requesting data connection
expect (CONNECT)
^M
^M
CONNECTCONNECT
-- got it
send (^M)
+ connected
Script /usr/sbin/chat -v -V -s -E -f /etc/ppp/gprs-chat finished (pid 920),status = 0x0
Serial connection established.
using channel 2
Using interface ppp10
Connect: ppp10 <--> /dev/ttyUSB2
sent [LCP ConfReq id=0x1 <asyncmap 0x0> <magic 0x13ccd8e><pcomp> <accomp>]
rcvd [LCP ConfReq id=0x0 <asyncmap 0x0> <auth chap MD5> <magic0x317e9ad> <pcomp> <accomp>]
sent [LCP ConfAck id=0x0 <asyncmap 0x0> <auth chap MD5> <magic0x317e9ad> <pcomp> <accomp>]
rcvd [LCP ConfAck id=0x1 <asyncmap 0x0> <magic 0x13ccd8e><pcomp> <accomp>]
sent [LCP EchoReq id=0x0 magic=0x13ccd8e]
rcvd [LCP DiscReq id=0x1 magic=0x317e9ad]
rcvd [CHAP Challenge id=0x1 <407507e94434a3e8aed3bc32885eed0a>, name ="UMTS_CHAP_SRVR"]
sent [CHAP Response id=0x1 <2901a6bd9c799e61aaca38fa541dcc0d>, name ="uid"]
rcvd [LCP EchoRep id=0x0 magic=0x317e9ad 01 3c cd 8e]
rcvd [CHAP Success id=0x1 ""]
CHAP authentication succeeded
CHAP authentication succeeded
sent [IPCP ConfReq id=0x1 <addr 0.0.0.0>]
rcvd [IPCP ConfReq id=0x0]
sent [IPCP ConfNak id=0x0 <addr 0.0.0.0>]
rcvd [IPCP ConfNak id=0x1 <addr 10.184.119.29>]
sent [IPCP ConfReq id=0x2 <addr 10.184.119.29>]
rcvd [IPCP ConfReq id=0x1]
sent [IPCP ConfAck id=0x1]
rcvd [IPCP ConfAck id=0x2 <addr 10.184.119.29>]
Could not determine remote IP address: defaulting to 10.64.64.74
local IP address 10.184.119.29
remote IP address 10.64.64.74
+ route add default ppp10
~ >:
如果ppp拨号成功,就会产生网络设备ppp10
~>: ifconfig
eth0 Link encap:Ethernet HWaddr00:E5:49:83:76:1A
inetaddr:192.168.1.168 Bcast:192.168.1.255 Mask:255.255.255.0
UP BROADCAST RUNNINGMULTICAST MTU:1500 Metric:1
RX packets:64 errors:0 dropped:0overruns:0 frame:0
TX packets:0 errors:0 dropped:0overruns:0 carrier:0
collisions:0 txqueuelen:1000
RX bytes:8805 (8.5 KiB) TXbytes:0 (0.0 B)
Interrupt:51 Base address:0x4300
lo Link encapocalLoopback
inetaddr:127.0.0.1 Mask:255.0.0.0
UP LOOPBACKRUNNING MTU:16436 Metric:1
RX packets:0 errors:0 dropped:0overruns:0 frame:0
TX packets:0 errors:0 dropped:0overruns:0 carrier:0
collisions:0 txqueuelen:0
RX bytes:0 (0.0 B) TXbytes:0 (0.0 B)
mon.wlan0 Link encap:UNSPEC HWaddr00-0C-43-30-72-81-01-00-00-00-00-00-00-00-00-00
UP BROADCAST RUNNINGMULTICAST MTU:1500 Metric:1
RX packets:3657 errors:0 dropped:0overruns:0 frame:0
TX packets:0 errors:0 dropped:0overruns:0 carrier:0
collisions:0 txqueuelen:1000
RX bytes:429682 (419.6KiB) TX bytes:0 (0.0 B)
ppp10 Link encapoint-to-PointProtocol
inetaddr:10.184.119.29 P-t-P:10.64.64.74 Mask:255.255.255.255
UP POINTOPOINT RUNNING NOARPMULTICAST MTU:1500 Metric:1
RX packets:4 errors:0 dropped:0overruns:0 frame:0
TX packets:4 errors:0 dropped:0 overruns:0carrier:0
collisions:0 txqueuelen:3
RX bytes:28 (28.0 B) TXbytes:34 (34.0 B)
wlan0 Link encap:Ethernet HWaddr00:0C:43:30:72:81
inetaddr:192.168.5.1 Bcast:192.168.5.255 Mask:255.255.255.0
UP BROADCAST RUNNINGMULTICAST MTU:1500 Metric:1
RX packets:0 errors:0 dropped:0overruns:0 frame:0
TX packets:0 errors:0 dropped:0overruns:0 carrier:0
collisions:0 txqueuelen:1000
RX bytes:0 (0.0 B) TXbytes:0 (0.0 B)
~ >:
使用ping命令测试GPRS拨号网络的连通性:
~ >: ping -c 4-I ppp10 -s 1024 4.2.2.2
PING 4.2.2.2 (4.2.2.2): 1024 data bytes
1032 bytes from 4.2.2.2: seq=0 ttl=51 time=1195.062 ms
1032 bytes from 4.2.2.2: seq=1 ttl=51 time=1113.194 ms
1032 bytes from 4.2.2.2: seq=2 ttl=51 time=1186.090 ms
1032 bytes from 4.2.2.2: seq=3 ttl=51 time=941.224 ms
--- 4.2.2.2 ping statistics ---
4 packets transmitted, 4 packets received, 0% packet loss
round-trip min/avg/max = 941.224/1108.892/1195.062 ms
至此3G拨号正式完成。


 4263
4263

 被折叠的 条评论
为什么被折叠?
被折叠的 条评论
为什么被折叠?
 到【灌水乐园】发言


