


Unity中默认距离单位是米,Plane的长宽为10米,胶囊的高度为2米
新建一个Plane,将x和z方向的规模设为2,新建小球,新建平行光调节摄像机

添加材质

给小球添加脚本
首先添加施力运动的方法,在Unity里查看摄像机视角的左右前后方向对应的是哪个轴的正负方向

using System.Collections;
using System.Collections.Generic;
using UnityEngine;

public class PlayerCtrl : MonoBehaviour
{
    public float moveForce = 5;
    public float jumeForce = 50;
    // Start is called before the first frame update
    void Start()
    {

    }

    // Update is called once per frame
    void FixedUpdate()//Update在模型被渲染前调用,FixedUpdate在所有物理计算之前被调用
    {
        if (Input.GetKey(KeyCode.LeftArrow))//按左键则在X轴负方向施加力
        {
            GetComponent<Rigidbody>().AddForce(-moveForce*Time.fixedDeltaTime, 0, 0);
        }
        if (Input.GetKey(KeyCode.RightArrow))
        {
            GetComponent<Rigidbody>().AddForce(moveForce*Time.fixedDeltaTime, 0, 0);
        }
        if (Input.GetKey(KeyCode.UpArrow))
        {
            GetComponent<Rigidbody>().AddForce(0, 0, moveForce*Time.fixedDeltaTime);
        }
        if (Input.GetKey(KeyCode.DownArrow))
        {
            GetComponent<Rigidbody>().AddForce(0, 0, -moveForce*Time.fixedDeltaTime);
        }
        if (Input.GetKey(KeyCode.Space))//按空格键跳起来
        {
            GetComponent<Rigidbody>().AddForce(0, jumeForce*Time.fixedDeltaTime, 0);
        }
    }
}
给场景增加四面墙

添加弹性:新建一个Physic Material,将Bounciness设为0.7

设置让摄像机跟着小球运动

给摄像机增加脚本
using System.Collections;
using System.Collections.Generic;
using UnityEngine;

public class CameraCtrl : MonoBehaviour
{
    private Vector3 offset;
    public Transform player;
    // Start is called before the first frame update
    void Start()
    {
        offset = this.transform.position - player.position;
    }

    // Update is called once per frame
    void Update()//刷新摄像机位置,使其跟踪小球的位置
    {
        this.transform.position = player.position+offset;
    }
}
保存以后,在Unity里给Player拖拽小球
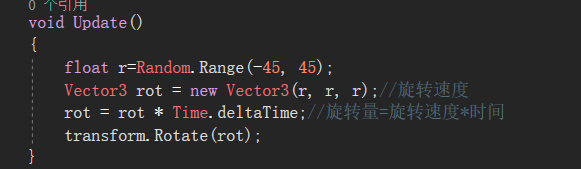
创建道具并旋转
新建PickUp来管理道具,在下面新建cube,并调节位置和旋转角度

选择Global视图,复制cube(这样才能使复制出来的cube在同一水平面)

新建脚本,选中所有cube并把脚本拖拽到他们下面。编写随机旋转代码
为了更好地控制,创建预制体文件夹,并把一个cube拖到下面,使得场景的物体随预制体而更改。删掉PickUp下除了拖到预制体文件夹中的其他cube,并复制留下的cube执行之前相同的步骤

给cube勾上is Trigger
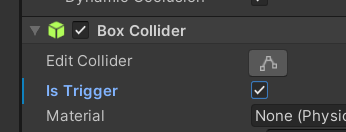
并选择Apply All

性能调优:


给小球的脚本添加
private void OnTriggerEnter(Collider other)
    {

        other.gameObject.SetActive(false);//不能直接other.SetActive(false),因为这样只会将碰撞器设为false
        //方法二是不设置触发器,而是利用tag过滤:给所有cube设置tag为Pick Up
        // if(other.gameObject.tag=="Pick up")
    }
(不用过滤地面、墙的碰撞是因为地面、墙不是触发器,只对方块有效)
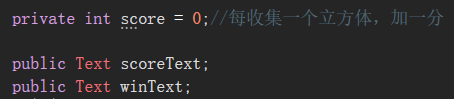
给小球的代码添加分数变量和得分以及显示胜利的文字:
保存后,在unity中创建ScoreText和WinText

并将WinText的Text勾掉

在代码中添加得分和显示胜利的方法,并设置胜利后暂停游戏
using System.Collections;
using System.Collections.Generic;
using UnityEngine;
using UnityEngine.UI;


public class PlayerCtrl : MonoBehaviour
{
    public float moveForce = 5;
    public float jumeForce = 50;

    private int score = 0;//每收集一个立方体,加一分

    public Text scoreText;
    public Text winText;

    public void AddScore()
    {
        this.score += 1;
        scoreText.text = string.Format("Score:{0}", this.score);
        if (this.score == 8)
        {
            winText.enabled = true;
            Time.timeScale = 0;//游戏暂停
        }
    }

    private void OnTriggerEnter(Collider other)
    {
        other.gameObject.SetActive(false);
        //不能直接other.SetActive(false),因为这样只会将碰撞器设为false
        //方法二是不设置触发器,而是利用tag过滤:给所有cube设置tag为Pick Up
        // if(other.gameObject.tag=="Pick up")
        Invoke("AddScore", 0.1f);//0.1秒后再调用AddScore


    }


    void FixedUpdate()
    {
        if (Input.GetKey(KeyCode.LeftArrow))//按左键则在X轴负方向施加力
        {
            GetComponent<Rigidbody>().AddForce(-moveForce*Time.fixedDeltaTime, 0, 0);
        }
        if (Input.GetKey(KeyCode.RightArrow))
        {
            GetComponent<Rigidbody>().AddForce(moveForce*Time.fixedDeltaTime, 0, 0);
        }
        if (Input.GetKey(KeyCode.UpArrow))
        {
            GetComponent<Rigidbody>().AddForce(0, 0, moveForce*Time.fixedDeltaTime);
        }
        if (Input.GetKey(KeyCode.DownArrow))
        {
            GetComponent<Rigidbody>().AddForce(0, 0, -moveForce*Time.fixedDeltaTime);
        }
        if (Input.GetKey(KeyCode.Space))//按空格键跳起来
        {
            GetComponent<Rigidbody>().AddForce(0, jumeForce*Time.fixedDeltaTime, 0);
        }
    }
}
控制摄像机的视角范围,使其不能往下超过这个视角

在Camera的脚本中进行修改
using System.Collections;
using System.Collections.Generic;
using UnityEngine;

public class CameraCtrl : MonoBehaviour
{
    private Vector3 offset;
    private Vector3 initialPos;//摄像机最开始的位置
    public Transform player;
    // Start is called before the first frame update
    void Start()
    {
        offset = this.transform.position - player.position;
        initialPos = this.transform.position;
    }

    // Update is called once per frame
    void Update()//刷新摄像机位置,使其跟踪小球的位置
    {
        if (player.position.z < 0)
        {
            Vector3 pos = transform.position;
            pos.z = initialPos.z;
            pos.x = player.position.x+ offset.x;
            pos.y = player.position.y+ offset.y;
            this.transform.position = pos;
        }

        else
            this.transform.position=player.position+offset;
    }
}
(注:不能直接修改transform.position的成员的值,如果要修改,要另外实例化一个Vector3向量,对其赋值后再赋给原先的transform.position)
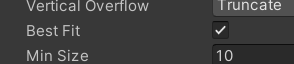
新建一个按钮,设置Text为Restart,调节大小和位置,并在其Text中选择Best Fit使文字和边框最佳匹配

给Button添加代码
using System.Collections;
using System.Collections.Generic;
using UnityEngine;
using UnityEngine.SceneManagement;

public class RestartButtonCtrl : MonoBehaviour
{
    public void OnClick()
    {
        SceneManager.LoadScene(0);//重新载入场景
        Time.timeScale = 1;//正常执行代码
    }
}
Time.timeScale详解
1、timeScale是时间流逝速度的缩放比例。
2、timeScale为1.0时,时间是正常速度。timeScale为0.5时,时间流逝速度会降为正常速度的一半。
3、timeScale为0时,所有基于帧率的功能都将被暂停。
4、Time.realtimeSinceStartup这个值不受timeScale影响。
5、修改timeScale时,推荐同时以相同比例修改Time.fixedDeltaTime。
6、timeScale为0时,FixedUpdate函数不再执行。
1、timeScale的范围是0到100之间的浮点数,超过此范围时,Unity会给出一条错误信息。这个在实验中没有体现,读者可以自己赋值试试。
2、timeScale 会影响 FixedUpdate的执行速度,但 不会影响 Update、LateUpdate(要测试的话把上函数Update改为LateUpdate即可)的执行速度。timeScale为0时,FixedUpdate完全停止。
3、timeScale 不会影响 Coroutine本身的执行速度。当timeScale为0时,如果Coroutine中yield了某个WaitForSeconds或者WaitForFixedUpdate,那么该Coroutine会在此处停下。如果想要等待一个不受timeScale影响的时间,请用WaitForSecondsRealtime。在实验中将ChangeColor函数中的yield return 0;替换成其他的等待的表达式即可测试。
4、timeScale改变时,会对以下值产生影响:time、deltaTime、fixedTime以及fixedUnscaledDeltaTime。
5、timeScale改变时,不会对以下值产生影响:realtimeSinceStartup、unscaledTime、unscaledDeltaTime、fixedUnscaledTime、fixedDeltaTime。
6、当timeScale为0时,fixedUnscaledTime将停止,但是当timeScale由0变为非0值时,这个值将会有个跳跃,接近于unscaledTime和realtimeSinceStartup。
7、当timeScale改变时,fixedUnscaledDeltaTime会按反比进行改变;例外是当timeScale变为0时,fixedUnscaledDeltaTime的值不会发生改变。


 2291
2291


 被折叠的 条评论
为什么被折叠?
被折叠的 条评论
为什么被折叠?
 到【灌水乐园】发言


