


书接上回,我们既然直接运行例程成功了,接下来就是了解如何实现例程中的每个环节。当然,我们先从简单的做起,一般编程语言都会找个helloworld例子,而我们的显卡是不会说话的,只能做一些简单的加减乘除运算。所以,CUDA程序的helloworld,我想应该最合适不过的就是向量加了。
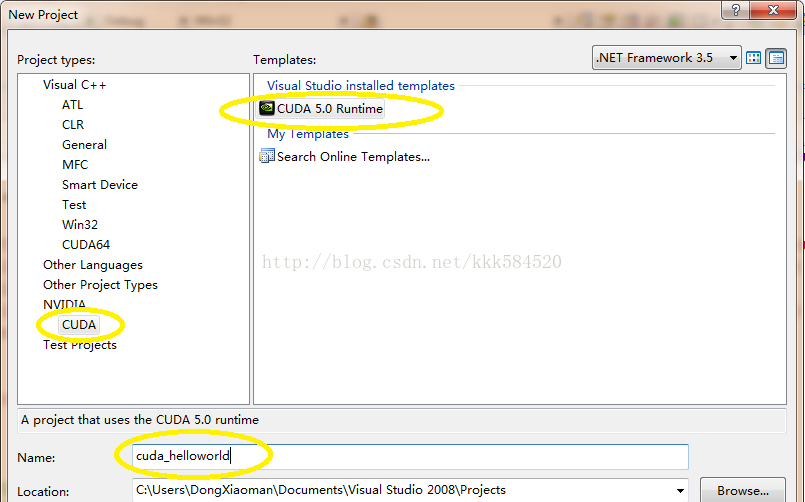
打开VS2008,选择File->New->Project,弹出下面对话框,设置如下:
之后点OK,直接进入工程界面。
工程中,我们看到只有一个.cu文件,内容如下:
#include "cuda_runtime.h"
#include "device_launch_parameters.h"

#include <stdio.h>

cudaError_t addWithCuda(int *c, const int *a, const int *b, size_t size);

__global__ void addKernel(int *c, const int *a, const int *b)
{
    int i = threadIdx.x;
    c[i] = a[i] + b[i];
}

int main()
{
    const int arraySize = 5;
    const int a[arraySize] = { 1, 2, 3, 4, 5 };
    const int b[arraySize] = { 10, 20, 30, 40, 50 };
    int c[arraySize] = { 0 };

    // Add vectors in parallel.
    cudaError_t cudaStatus = addWithCuda(c, a, b, arraySize);
    if (cudaStatus != cudaSuccess) {
        fprintf(stderr, "addWithCuda failed!");
        return 1;
    }

    printf("{1,2,3,4,5} + {10,20,30,40,50} = {%d,%d,%d,%d,%d}\n",
        c[0], c[1], c[2], c[3], c[4]);

    // cudaThreadExit must be called before exiting in order for profiling and
    // tracing tools such as Nsight and Visual Profiler to show complete traces.
    cudaStatus = cudaThreadExit();
    if (cudaStatus != cudaSuccess) {
        fprintf(stderr, "cudaThreadExit failed!");
        return 1;
    }

    return 0;
}

// Helper function for using CUDA to add vectors in parallel.
cudaError_t addWithCuda(int *c, const int *a, const int *b, size_t size)
{
    int *dev_a = 0;
    int *dev_b = 0;
    int *dev_c = 0;
    cudaError_t cudaStatus;

    // Choose which GPU to run on, change this on a multi-GPU system.
    cudaStatus = cudaSetDevice(0);
    if (cudaStatus != cudaSuccess) {
        fprintf(stderr, "cudaSetDevice failed!  Do you have a CUDA-capable GPU installed?");
        goto Error;
    }

    // Allocate GPU buffers for three vectors (two input, one output)    .
    cudaStatus = cudaMalloc((void**)&dev_c, size * sizeof(int));
    if (cudaStatus != cudaSuccess) {
        fprintf(stderr, "cudaMalloc failed!");
        goto Error;
    }

    cudaStatus = cudaMalloc((void**)&dev_a, size * sizeof(int));
    if (cudaStatus != cudaSuccess) {
        fprintf(stderr, "cudaMalloc failed!");
        goto Error;
    }

    cudaStatus = cudaMalloc((void**)&dev_b, size * sizeof(int));
    if (cudaStatus != cudaSuccess) {
        fprintf(stderr, "cudaMalloc failed!");
        goto Error;
    }

    // Copy input vectors from host memory to GPU buffers.
    cudaStatus = cudaMemcpy(dev_a, a, size * sizeof(int), cudaMemcpyHostToDevice);
    if (cudaStatus != cudaSuccess) {
        fprintf(stderr, "cudaMemcpy failed!");
        goto Error;
    }

    cudaStatus = cudaMemcpy(dev_b, b, size * sizeof(int), cudaMemcpyHostToDevice);
    if (cudaStatus != cudaSuccess) {
        fprintf(stderr, "cudaMemcpy failed!");
        goto Error;
    }

    // Launch a kernel on the GPU with one thread for each element.
    addKernel<<<1, size>>>(dev_c, dev_a, dev_b);

    // cudaThreadSynchronize waits for the kernel to finish, and returns
    // any errors encountered during the launch.
    cudaStatus = cudaThreadSynchronize();
    if (cudaStatus != cudaSuccess) {
        fprintf(stderr, "cudaThreadSynchronize returned error code %d after launching addKernel!\n", cudaStatus);
        goto Error;
    }

    // Copy output vector from GPU buffer to host memory.
    cudaStatus = cudaMemcpy(c, dev_c, size * sizeof(int), cudaMemcpyDeviceToHost);
    if (cudaStatus != cudaSuccess) {
        fprintf(stderr, "cudaMemcpy failed!");
        goto Error;
    }

Error:
    cudaFree(dev_c);
    cudaFree(dev_a);
    cudaFree(dev_b);

    return cudaStatus;
}
可以看出,CUDA程序和C程序并无区别,只是多了一些以"cuda"开头的一些库函数和一个特殊声明的函数:
__global__ void addKernel(int *c, const int *a, const int *b)
{
    int i = threadIdx.x;
    c[i] = a[i] + b[i];
}
这个函数就是在GPU上运行的函数,称之为核函数,英文名Kernel Function,注意要和操作系统内核函数区分开来。
我们直接按F7编译,可以得到如下输出:
1>------ Build started: Project: cuda_helloworld, Configuration: Debug Win32 ------
1>Compiling with CUDA Build Rule...
1>"C:\Program Files\NVIDIA GPU Computing Toolkit\CUDA\v5.0\\bin\nvcc.exe"  -G   -gencode=arch=compute_10,code=\"sm_10,compute_10\" -gencode=arch=compute_20,code=\"sm_20,compute_20\"  --machine 32 -ccbin "C:\Program Files (x86)\Microsoft Visual Studio 9.0\VC\bin"    -Xcompiler "/EHsc /W3 /nologo /O2 /Zi   /MT  "  -I"C:\Program Files\NVIDIA GPU Computing Toolkit\CUDA\v5.0\\include" -maxrregcount=0   --compile -o "Debug/kernel.cu.obj" kernel.cu
1>tmpxft_000000ec_00000000-8_kernel.compute_10.cudafe1.gpu
1>tmpxft_000000ec_00000000-14_kernel.compute_10.cudafe2.gpu
1>tmpxft_000000ec_00000000-5_kernel.compute_20.cudafe1.gpu
1>tmpxft_000000ec_00000000-17_kernel.compute_20.cudafe2.gpu
1>kernel.cu
1>kernel.cu
1>tmpxft_000000ec_00000000-8_kernel.compute_10.cudafe1.cpp
1>tmpxft_000000ec_00000000-24_kernel.compute_10.ii
1>Linking...
1>Embedding manifest...
1>Performing Post-Build Event...
1>copy "C:\Program Files\NVIDIA GPU Computing Toolkit\CUDA\v5.0\\bin\cudart*.dll" "C:\Users\DongXiaoman\Documents\Visual Studio 2008\Projects\cuda_helloworld\Debug"
1>C:\Program Files\NVIDIA GPU Computing Toolkit\CUDA\v5.0\\bin\cudart32_50_35.dll
1>C:\Program Files\NVIDIA GPU Computing Toolkit\CUDA\v5.0\\bin\cudart64_50_35.dll
1>已复制         2 个文件。
1>Build log was saved at "file://c:\Users\DongXiaoman\Documents\Visual Studio 2008\Projects\cuda_helloworld\cuda_helloworld\Debug\BuildLog.htm"
1>cuda_helloworld - 0 error(s), 105 warning(s)
========== Build: 1 succeeded, 0 failed, 0 up-to-date, 0 skipped ==========
可见,编译.cu文件需要利用nvcc工具。该工具的详细使用见后面博客。
直接运行,可以得到结果图如下:
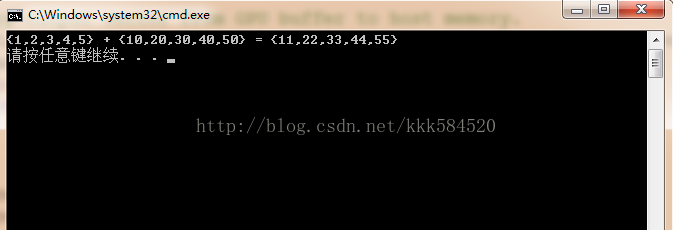
如果显示正确,那么我们的第一个程序宣告成功!


 738
738

 被折叠的 条评论
为什么被折叠?
被折叠的 条评论
为什么被折叠?
 到【灌水乐园】发言


