


前言
地上断了翅的蝶,雾散之后的满月,原来爱跟心碎,都可以很细节。
简介
这两天时间比较充裕,所以实现了项目里的沉浸式状态栏效果,这样可以使得我们的app主题显得更加统一。所以今天就带领大家实现下不同情况下的状态栏效果显示。
一 状态栏颜色改变
1. SystemBarTint的使用
对于状态栏颜色改变的实现,github上有一个开源的项目SystemBarTint可以帮我们很容易实现状态栏颜色的改变,我们直接在项目中添加依赖:
dependencies {
compile 'com.readystatesoftware.systembartint:systembartint:1.0.3'
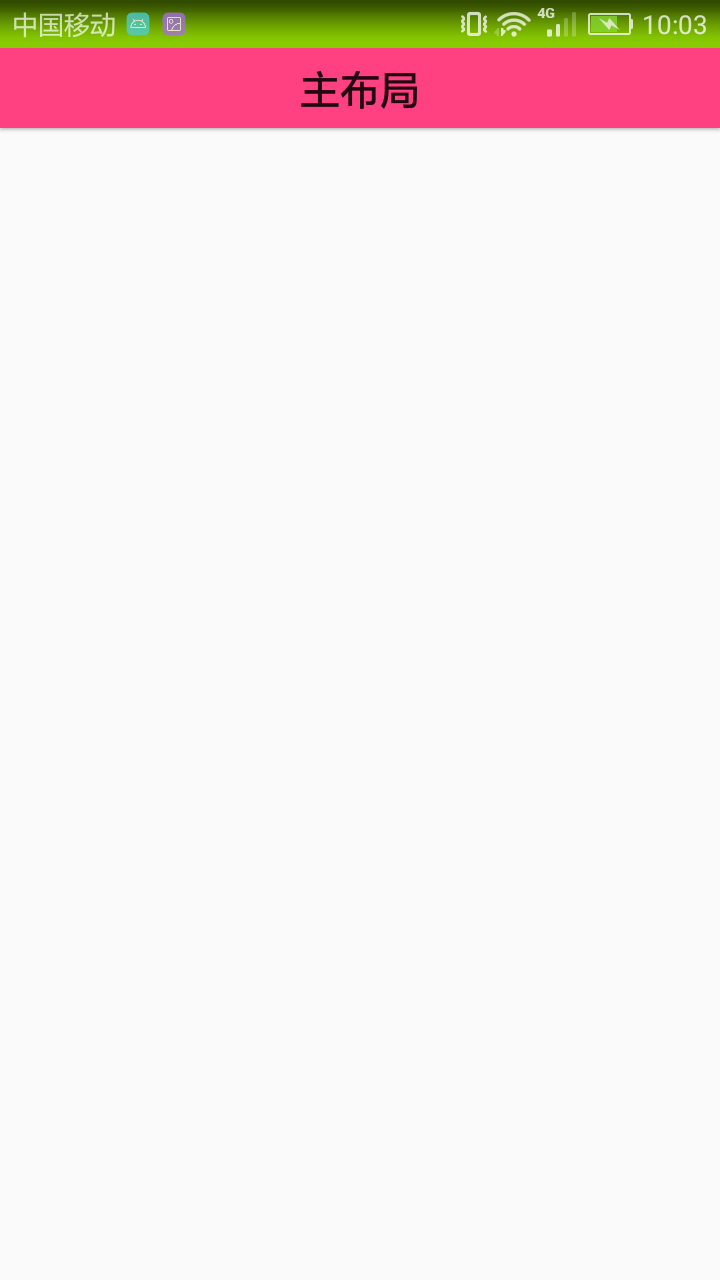
}2. 主布局
<?xml version="1.0" encoding="utf-8"?>
<RelativeLayout xmlns:android="http://schemas.android.com/apk/res/android"
    xmlns:tools="http://schemas.android.com/tools"
    android:id="@+id/activity_main"
    android:layout_width="match_parent"
    android:layout_height="match_parent"
    tools:context="com.asiatravel.atstaybar.MainActivity">

    <Button
        android:layout_width="match_parent"
        android:layout_height="40dp"
        android:background="@color/colorAccent"
        android:text="主布局"
        android:textSize="20sp" />
</RelativeLayout>
3. MainActivity中添加代码
private void setStatusColor() {
        if (Build.VERSION.SDK_INT >= Build.VERSION_CODES.KITKAT) {
            getWindow().addFlags(WindowManager.LayoutParams.FLAG_TRANSLUCENT_STATUS);
            SystemBarTintManager tintManager = new SystemBarTintManager(this);
            tintManager.setStatusBarTintColor(getResources().getColor(R.color.colorGreen));
            tintManager.setStatusBarTintEnabled(true);
        }
    }
由于这里状态栏的改变只限于api版本19及以上,所以我们需要判断当前手机的系统版本号。
4. 运行效果图

这里很明显,布局被挤到状态栏上了,所以我们需要给activity的style加上一个属性android:fitsSystemWindows设置为true
<style name="AppTheme" parent="Theme.AppCompat.Light.NoActionBar">
        <item name="android:fitsSystemWindows">true</item>
</style>
再来看效果图:
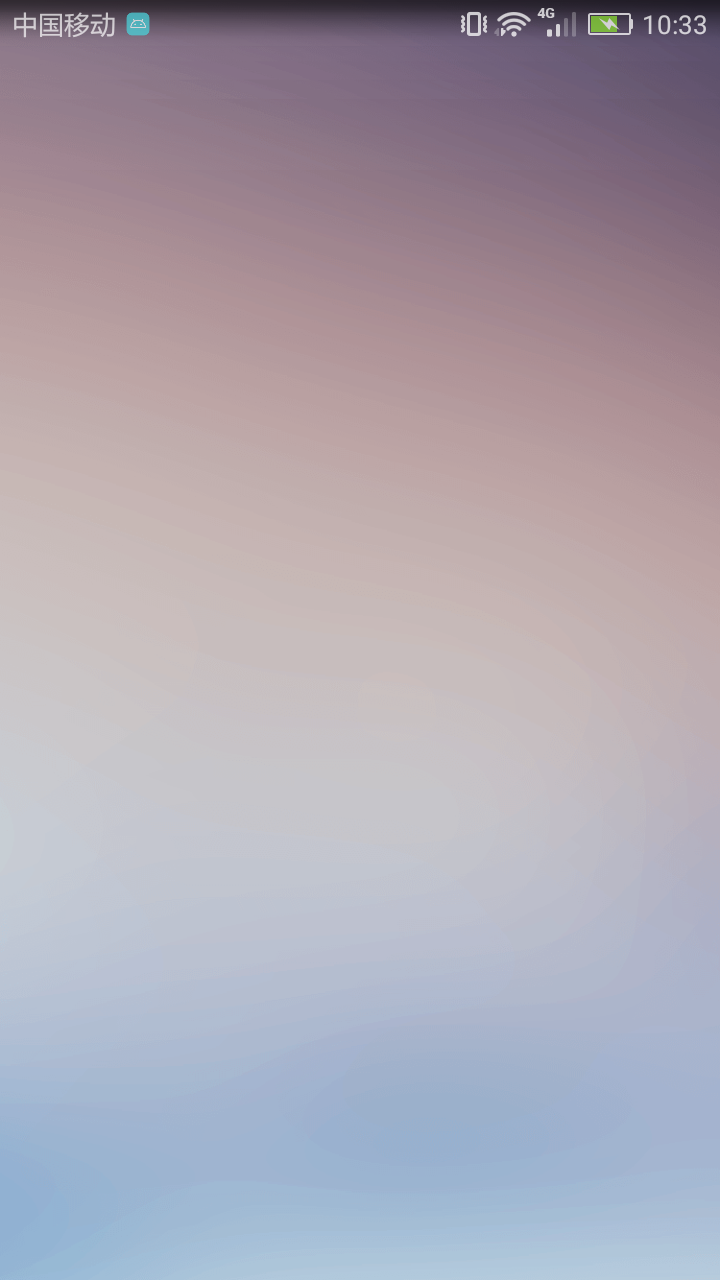
二 背景图片全屏显示
对于背景图片全屏显示的应用场景也很多,比如登陆注册页面我们喜欢给页面一个背景图片显得更为美观,这时我们就不应该设置状态栏的颜色改变来实现其效果了。
1. 主布局
<?xml version="1.0" encoding="utf-8"?>
<RelativeLayout xmlns:android="http://schemas.android.com/apk/res/android"
    xmlns:tools="http://schemas.android.com/tools"
    android:id="@+id/activity_main"
    android:layout_width="match_parent"
    android:background="@drawable/login_image"
    android:layout_height="match_parent"
    tools:context="com.asiatravel.atstaybar.MainActivity">

</RelativeLayout>
这里我们只给最外层布局设置了一张背景图片login_image。
2. MainActivity代码
public void setOuterLayoutFullScreen() {
        if (Build.VERSION.SDK_INT >= Build.VERSION_CODES.KITKAT) {
            getWindow().addFlags(WindowManager.LayoutParams.FLAG_TRANSLUCENT_STATUS);
            ViewGroup rootView = (ViewGroup) ((ViewGroup) findViewById(android.R.id.content)).getChildAt(0);
            rootView.setFitsSystemWindows(true);
            rootView.setClipToPadding(true);
        }
    }
3. 效果图
三 里层布局全屏显示
这种场景多用于首页界面,比如上面是banner轮播图,下面是我们的一些功能入口,这时我们就需要里层布局全屏显示。
1. 主布局
<?xml version="1.0" encoding="utf-8"?>
<RelativeLayout xmlns:android="http://schemas.android.com/apk/res/android"
    xmlns:tools="http://schemas.android.com/tools"
    android:id="@+id/activity_main"
    android:layout_width="match_parent"
    android:layout_height="match_parent"
    tools:context="com.asiatravel.atstaybar.MainActivity">

    <ImageView
        android:id="@+id/login_image"
        android:layout_width="match_parent"
        android:layout_height="200dp"
        android:scaleType="fitXY"
        android:src="@drawable/login_image" />

    <LinearLayout
        android:layout_width="match_parent"
        android:layout_height="wrap_content"
        android:layout_below="@id/login_image"
        android:layout_marginTop="20dp"
        android:background="@color/colorGreen"
        android:orientation="horizontal">

        <TextView
            android:layout_width="0dp"
            android:layout_height="40dp"
            android:layout_weight="1"
            android:gravity="center"
            android:text="Tab1" />

           省略重复代码...
    </LinearLayout>
</RelativeLayout>
这里我们省略了一些重复代码。
2. MainActivity实现
private void setInnerLayoutFullScreen() {
        getWindow().addFlags(WindowManager.LayoutParams.FLAG_TRANSLUCENT_STATUS);
        getWindow().getDecorView().setSystemUiVisibility(View.SYSTEM_UI_FLAG_LAYOUT_FULLSCREEN);
}
3. 效果图
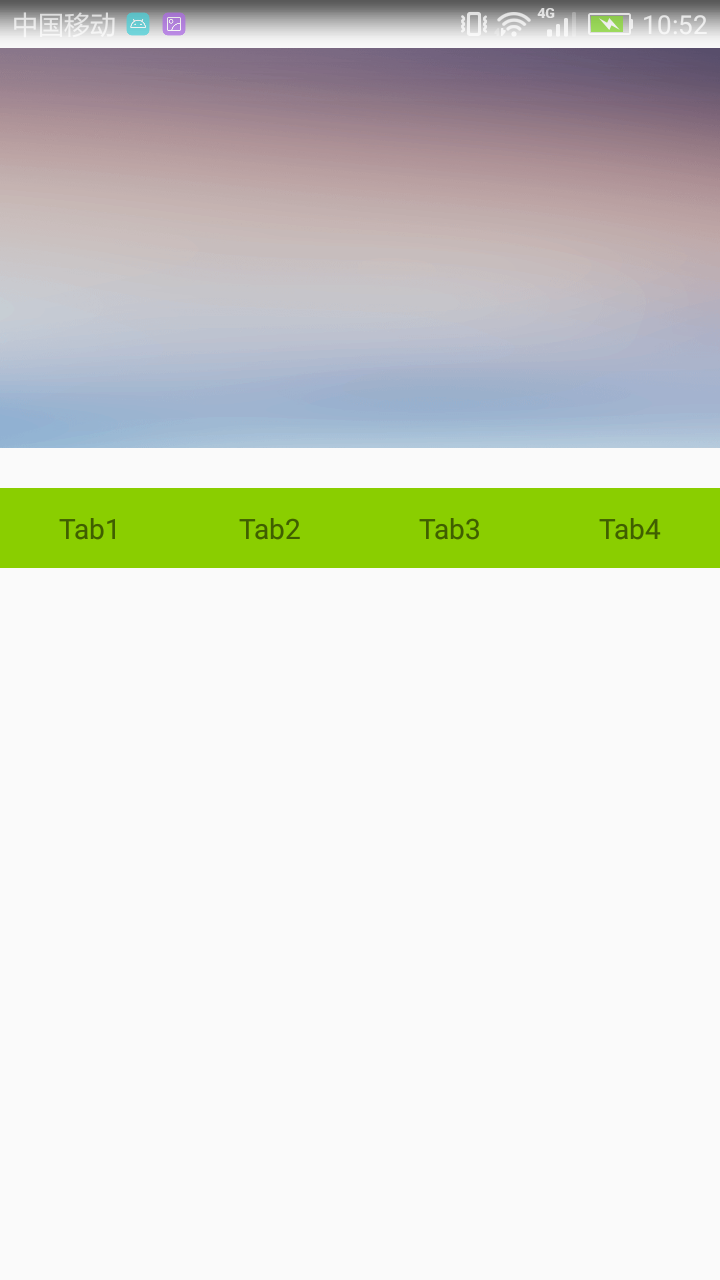
好像效果并不像我们预期的那样,是因为我们之前给它的style设置了android:fitsSystemWindows属性为true,这里我们改为false或者是直接删掉这行代码。
 <style name="AppTheme" parent="Theme.AppCompat.Light.NoActionBar">
        <item name="android:fitsSystemWindows">false</item>
 </style>
再来看效果图
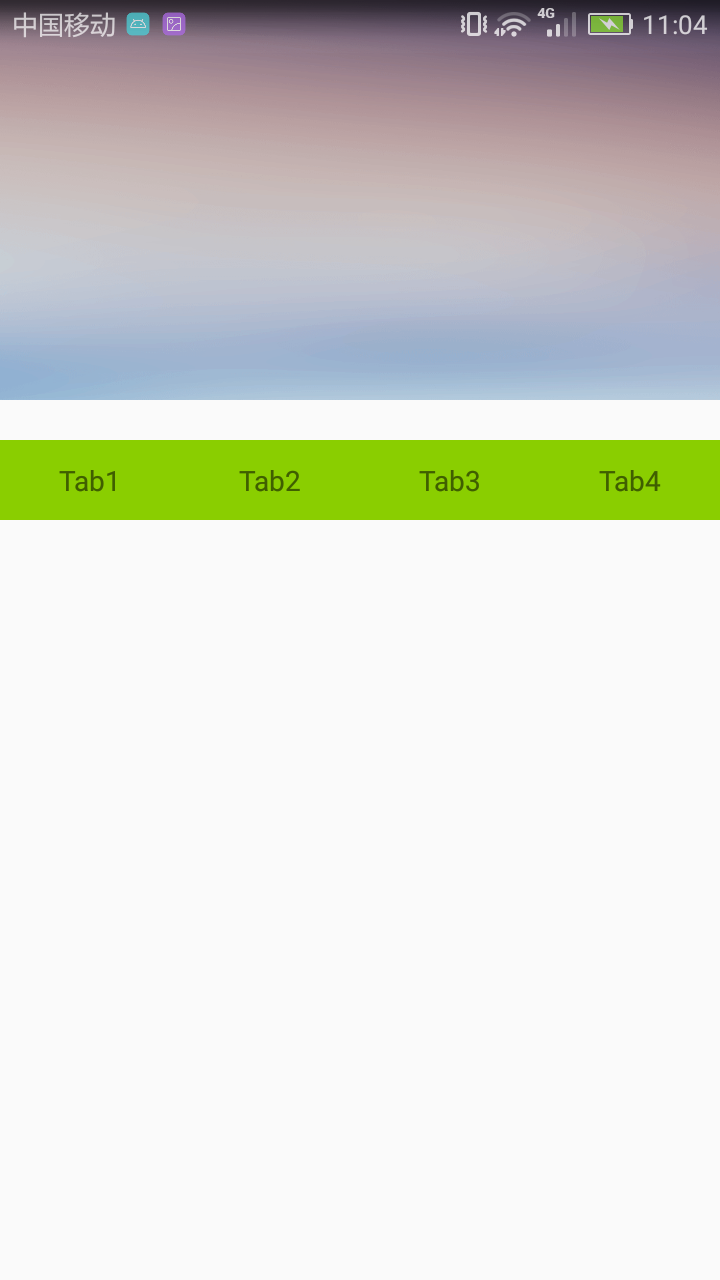
这才是我们所期望看到的结果。
总结
这就是我们今天所讲的沉浸式状态栏的全部内容,有哪里不理解的童鞋可以在下面留言或者发邮件给我,定会及时回复。另外有需要项目源码的童鞋可以去https://github.com/kuangxiaoguo0123/ATStayBar 下载。


 9万+
9万+


 被折叠的 条评论
为什么被折叠?
被折叠的 条评论
为什么被折叠?
 到【灌水乐园】发言


