


一、模板匹配
模板匹配是指在当前图像A内寻找图像B最相似的部分,一般将图像A称为输入图像,将图像B称为模板图像。模板匹配的操作方法是将模板图像B在图像A上滑动,遍历所有像素以完成匹配
1.案例解读。
1.1导入需要的库
import cv2
import numpy as np
#Matplotlib是RGB
import matplotlib.pyplot as plt
%matplotlib inline

#定义显示图片的函数,避免重复代码
def cv_show(name, img):
    cv2.imshow(name, img)
    cv2.waitKey()
    cv2.destroyAllWindows()
1.2读取模板图片

#读取模板图片
template = cv2.imread("lena_eye.jpg")
cv_show("template",template)
1.3读取检测图片
img = cv2.imread("lena.jpg")
cv_show("img", img)
1.4获取模板的大小
#获取到我们模板的大小h,w
h, w = template.shape[:2]
1.5进行匹配
#开始模板匹配过程(采用计算归一化平方不同,计算值越接近0,越相关)
res = cv2.matchTemplate(img, template, cv2.TM_SQDIFF_NORMED)
min_val, max_val, min_loc, max_loc = cv2.minMaxLoc(res)
top_left = min_loc
bottom_right = (top_left[0] + w, top_left[1] + h)
#画出检测到的部分
imgcpy = img.copy()
cv2.rectangle(imgcpy, top_left, bottom_right, 255, 2)
#因为matplotlib显示为RGB图像,做一次色彩空间空间转换
imgcpy = cv2.cvtColor(imgcpy, cv2.COLOR_BGR2RGB)
plt.imshow(imgcpy, cmap='gray')

二、霍夫变换
霍夫变换是一种在图像中寻找直线,圆形以及其他简单形状的方法。霍夫变换采用类似于投票的方式来获取当前图像内的形状集合,该变换由Paul Hough于1962年首次提出。
1.案例解读
1.1HoughLines
import cv2
import numpy
img = cv2.imread("shape.png")
# 1.轮廓检测算法检测出轮廓
gray = cv2.cvtColor(img, cv2.COLOR_BGR2GRAY)
edges = cv2.Canny(gray, 50, 150)
# 2.投射到Hough空间进行形状检测
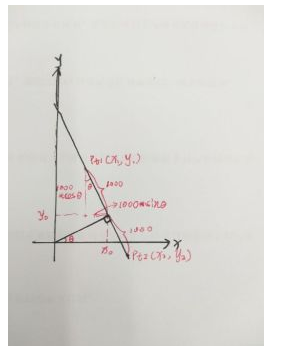
# 任何一条线都可以用(ρ,θ)这两个术语表示。
# 1)先定义一个累加器,(ρ,θ)对应直线,ρ和θ都分别依次增大(根据精度),计算每对(ρ,θ)的投票数。
# 其中,ρ以像素为单位,θ以弧度为单位。rho和theta是ρ和θ的精度。
# 2)然后,根据threshold(阈值,最低投票数)来判断是否归为一条直线
lines = cv2.HoughLines(edges, 1, np.pi / 180, 50)
# 画线
for line in lines:
rho, theta = line[0]
a = numpy.cos(theta)
b = numpy.sin(theta)
x0 = rho * a
y0 = rho * b
x1 = int(x0 + 1000 * (-b)) #这里的1000是为了求延长线,其他数值也可以
y1 = int(y0 + 1000 * a)
x2 = int(x0 - 1000 * (-b))
y2 = int(y0 - 1000 * a)
# 画线
cv2.line(img, (x1, y1), (x2, y2), (0, 255, 0), 2)
cv2.imshow("img", img)
cv2.imshow("gray", gray)
cv2.imshow("edges", edges)
cv2.waitKey(0)
cv2.destroyAllWindows()
1.2HoughLinesP
import cv2
import numpy

img = cv2.imread("shape.png")
# 1.轮廓检测算法检测出轮廓
gray = cv2.cvtColor(img, cv2.COLOR_BGR2GRAY)
edges = cv2.Canny(gray, 50, 150)

minLineLength = 10
maxLineGap = 30
lines = cv2.HoughLinesP(edges, 1, np.pi / 180, 10,minLineLength,maxLineGap)

# 画线
for line in lines:
    x1, y1, x2, y2 = line[0]
    cv2.line(img, (x1, y1), (x2, y2), (0, 255, 0), 2)

cv2.imshow("img", img)
cv2.imshow("gray", gray)
cv2.imshow("edges", edges)
cv2.waitKey(0)
cv2.destroyAllWindows()
1.3 HoughCircles
# 2.圆检测
import cv2
import numpy

img = cv2.imread("shape.png")

# 1.轮廓检测算法检测出轮廓
gray = cv2.cvtColor(img, cv2.COLOR_BGR2GRAY)
edges = cv2.Canny(gray, 50, 100)

# 2.投射到Hough空间进行形状检测
circles = cv2.HoughCircles(edges, cv2.HOUGH_GRADIENT, 1, 30,\
                           param1=40, param2=20, minRadius=5, maxRadius=100)

# 画圆
if not circles is None:
    # 转换为int
    circles = np.uint16(numpy.around(circles))
    for circle in circles:
        x, y, r = circle[0]
        # 画圆
        cv2.circle(img, (x, y), r, (0, 0, 255), 2)

cv2.imshow("gray", gray)
cv2.imshow("edges", edges)
cv2.imshow("img", img)
cv2.waitKey(0)
cv2.destroyAllWindows()
2.实战演练:车道检测
import cv2
import numpy as np

def canny(image):
    #gray = cv2.cvtColor(image,cv2.COLOR_RGB2GRAY)
    blur = cv2.GaussianBlur(image,(5,5),0)#降低噪点
    canny = cv2.Canny(blur,50,150)
    return canny

def region_of_interest(image):#应用遮罩
    height = image.shape[0]
    ploygons = np.array([[(200,height),(1100,height),(550,250)]])
    mask = np.zeros_like(image)
    cv2.fillPoly(mask,ploygons,255)

    return mask

# read image
image = cv2.imread('test_image.jpg',0)
imgcopy = image.copy()
# copy not reference to
lane_image = np.copy(image)
canny = canny(lane_image)
roi = region_of_interest(canny)#ROI
masked_image = cv2.bitwise_and(image,roi)#通过 bitwise_and 对两个图像的每一个像素做与运算,来将遮罩应用图像

cv2.imshow('canny',canny)
cv2.imshow('region_of_interest(canny)',roi)
cv2.imshow('masked_image',masked_image)
cv2.waitKey(0)
cv2.destroyAllWindows()
# 应用图像阈值化
ret, thresh = cv2.threshold(masked_image, 130, 145, cv2.THRESH_BINARY)
cv2.imshow('thresh',thresh)
lines = cv2.HoughLinesP(thresh, 1, np.pi/180, 30, maxLineGap=200)
# 画图

for line in lines:
    x1, y1, x2, y2 = line[0]
    cv2.line(imgcopy, (x1, y1), (x2, y2), (255, 0, 0), 3)
cv2.imshow('image',imgcopy)
cv2.waitKey(0)
cv2.destroyAllWindows()
© Fu Xianjun. All Rights Reserved.


 272
272


 被折叠的 条评论
为什么被折叠?
被折叠的 条评论
为什么被折叠?
 到【灌水乐园】发言


