


项目开发中,往往需要从多个数据库(源)中取数的场景。
本文演示SpringBoot整合多数据源,并基于自定义注解形式和大家一起学习基本使用。
一、项目搭建
新建一个SpringBoot项目,引入依赖:
<properties>
        <java.version>1.8</java.version>
    </properties>

    <dependencies>
        <dependency>
            <groupId>org.springframework.boot</groupId>
            <artifactId>spring-boot-starter</artifactId>
        </dependency>

        <dependency>
            <groupId>org.springframework.boot</groupId>
            <artifactId>spring-boot-starter-test</artifactId>
            <scope>test</scope>
        </dependency>

        <dependency>
            <groupId>mysql</groupId>
            <artifactId>mysql-connector-java</artifactId>
            <scope>8.0.22</scope>
        </dependency>

        <dependency>
            <groupId>org.mybatis.spring.boot</groupId>
            <artifactId>mybatis-spring-boot-starter</artifactId>
            <version>2.1.3</version>
        </dependency>

        <!--swagger配置-->
        <dependency>
            <groupId>io.springfox</groupId>
            <artifactId>springfox-swagger2</artifactId>
            <version>2.8.0</version>
        </dependency>
        <dependency>
            <groupId>io.springfox</groupId>
            <artifactId>springfox-swagger-ui</artifactId>
            <version>2.8.0</version>
        </dependency>

        <dependency>
            <groupId>com.github.xiaoymin</groupId>
            <artifactId>swagger-bootstrap-ui</artifactId>
            <version>1.9.6</version>
        </dependency>

        <dependency>
            <groupId>org.springframework.boot</groupId>
            <artifactId>spring-boot-starter-web</artifactId>
        </dependency>

        <dependency>
            <groupId>com.baomidou</groupId>
            <artifactId>dynamic-datasource-spring-boot-starter</artifactId>
            <version>3.4.1</version>
        </dependency>

        <dependency>
            <groupId>org.projectlombok</groupId>
            <artifactId>lombok</artifactId>
        </dependency>

    </dependencies>
二、配置文件及库表准备
①配置文件:
server:
  port: 8088

spring:
  datasource:
    jdbc-url: jdbc:mysql://localhost:3306/db1?useUnicode=true&characterEncoding=utf-8&useSSL=false&serverTimezone=UTC
    username: ********
    password: ********
    driver-class: com.mysql.cj.jdbc.Driver
    db2:
      jdbc-url: jdbc:mysql://localhost:3306/db2?useUnicode=true&characterEncoding=utf-8&useSSL=false&serverTimezone=UTC
      username: ********
      password: ********
      driver-class: com.mysql.cj.jdbc.Driver
  mvc:
    pathmatch:
      matching-strategy: ant_path_matcher
mybatis:
  mapper-locations: classpath:mapper/*.xml
  type-aliases-package: com.example.demo.mapper
②库表准备:

三、编码实现
①自定义注解相关类
@Target({ElementType.METHOD, ElementType.TYPE})
@Retention(RetentionPolicy.RUNTIME)
@Documented
public @interface DataSource {
    //指定默认数据源
    DataSourceType value() default DataSourceType.DS_ONE;
}

//切面类
@Aspect
@Order(1)
@Component
public class DataSourceAspect {
    /**
     * TODO 基于项目路径需要调整
     */
    @Pointcut("@annotation(com.example.demo.config.DataSource)")
    public void dsPointCut() {
    }

    @Around("dsPointCut()")
    public Object around(ProceedingJoinPoint point) throws Throwable {
        MethodSignature signature = (MethodSignature) point.getSignature();
        Method method = signature.getMethod();
        DataSource dataSource = method.getAnnotation(DataSource.class);
        if (dataSource != null) {
            DynamicDataSourceContextHolder.setDataSourceType(dataSource.value().name());
        }
        try {
            return point.proceed();
        } finally {
            DynamicDataSourceContextHolder.clearDataSourceType();
        }
    }
}

//配置类
@Configuration
public class DataSourceConfig {

    @Bean
    @ConfigurationProperties("spring.datasource")
    public DataSource db1DataSource() {
        return DataSourceBuilder.create().build();
    }

    @Bean
    @ConfigurationProperties("spring.datasource.db2")
    public DataSource db2DataSource() {
        return DataSourceBuilder.create().build();
    }

    @Bean(name = "dynamicDataSource")
    @Primary
    public DynamicDataSource dataSource(DataSource db1DataSource, DataSource db2DataSource) {
        Map<Object, Object> targetDataSources = new HashMap<>(4);
        targetDataSources.put(DataSourceType.DS_ONE.name(), db1DataSource);
        targetDataSources.put(DataSourceType.DS_TWO.name(), db2DataSource);
        DynamicDataSource dynamicDataSource = new DynamicDataSource();
        // 注入目标数据源,可以是多个
        dynamicDataSource.setTargetDataSources(targetDataSources);
        // 注入默认数据源,只能是一个
        dynamicDataSource.setDefaultTargetDataSource(db1DataSource);
        return dynamicDataSource ;
    }
}

//枚举类
public enum DataSourceType {
    DS_ONE,
    DS_TWO
}

//获取多数据源
public class DynamicDataSource extends AbstractRoutingDataSource {
    @Override
    protected Object determineCurrentLookupKey() {
        return DynamicDataSourceContextHolder.getDataSourceType();
    }
}

//上下文
public class DynamicDataSourceContextHolder {
    private static final ThreadLocal<String> CONTEXT_HOLDER = new ThreadLocal<>();

    public static void setDataSourceType(String dataSourceType){
        CONTEXT_HOLDER.set(dataSourceType);
    }

    public static String getDataSourceType(){
        return CONTEXT_HOLDER.get();
    }

    public static void clearDataSourceType(){
        CONTEXT_HOLDER.remove();
    }
}
②swagger配置
@Configuration
@EnableSwagger2
public class Swagger2Configure {

    @Bean
    public Docket createRestApi() {
        return new Docket(DocumentationType.SWAGGER_2).apiInfo(apiInfo()).select()
                .apis(RequestHandlerSelectors.basePackage("com.example.demo.controller"))
                .paths(PathSelectors.any()).build();
    }
    /**
     * 展示信息
     * @return
     */
    private ApiInfo apiInfo() {
        return new ApiInfoBuilder().title("api文档")
                .version("1.0").build();
    }
}
③访问层
@Api(tags = "多数据源测试")
@RestController
public class TestController {

    @Autowired
    private TestService testService;

    @ApiOperation("test")
    @PostMapping("/list")
    public UserAndProjectVO test(){
        return testService.list();
    }
}
④服务层
public interface TestService {

    /**
     * 多数据源获取数据
     * @return
     */
    UserAndProjectVO list();
}
//调用服务
@Service
public class TestServiceImpl implements TestService {

    @Autowired
    private UserService userService;

    @Autowired
    private ProjectService projectService;

    @Override
    public UserAndProjectVO list() {
        return UserAndProjectVO.builder()
                .users(userService.list())
                .projects(projectService.list())
                .build();
    }
}

//user服务
public interface UserService {
    /**
     * DB1获取用户数据
     * @return
     */
    List<User> list();
}

//user服务实现层
@Service
public class UserServiceImpl implements UserService {
    @Autowired
    private UserMapper userMapper;

    @Override
    /**
     * @DataSource(value = DataSourceType.DS_ONE)
     * 默认数据源,可以不使用注解
     */
    public List<User> list() {
        return userMapper.list();
    }
}

//project服务
public interface ProjectService {
    /**
     * DB2获取项目数据
     * @return
     */
    List<Project> list();
}

//project服务实现层
@Service
public class ProjectServiceImpl implements ProjectService {
    @Autowired
    private ProjectMapper projectMapper;

    @Override
    @DataSource(value = DataSourceType.DS_TWO)
    public List<Project> list() {
        return projectMapper.list();
    }

}
⑤持久层
@Repository
public interface UserMapper {
    /**
     * DB1获取用户数据
     * @return
     */
    List<User> list();
}


@Repository
public interface ProjectMapper {
    /**
     * DB2获取项目数据
     * @return
     */
    List<Project> list();

}
⑥实体层
//user实体
@Data
public class User {
    private Integer id;
    private String name;
}


//project实体
@Data
public class Project {
    private Integer id;
    private String name;
}
⑦映射文件
<!DOCTYPE mapper PUBLIC "-//mybatis.org//DTD Config 3.0//EN" "http://mybatis.org/dtd/mybatis-3-mapper.dtd">
<mapper namespace="com.example.demo.mapper.UserMapper">
    <resultMap id="BaseResultMap" type="com.example.demo.entity.User" >
        <id column="id" property="id" jdbcType="BIGINT" />
        <result column="name" property="name" jdbcType="VARCHAR" />
    </resultMap>
    <select id="list" resultMap="BaseResultMap">
        select id,name from user;
    </select>
</mapper>

<!DOCTYPE mapper PUBLIC "-//mybatis.org//DTD Config 3.0//EN" "http://mybatis.org/dtd/mybatis-3-mapper.dtd">
<mapper namespace="com.example.demo.mapper.ProjectMapper">
    <resultMap id="BaseResultMap" type="com.example.demo.entity.Project" >
        <id column="id" property="id" jdbcType="BIGINT" />
        <result column="name" property="name" jdbcType="VARCHAR" />
    </resultMap>
    <select id="list" resultMap="BaseResultMap">
        select id,name from project;
    </select>
</mapper>
⑧启动类
@EnableSwagger2
@EnableSwaggerBootstrapUI
@SpringBootApplication
@MapperScan("com.example.demo.mapper")
public class DemoApplication {

    public static void main(String[] args) {
        ConfigurableApplicationContext application = SpringApplication.run(DemoApplication.class, args);
        Environment env = application.getEnvironment();
        String ip = "localhost";
        String port = env.getProperty("server.port");
        log.info("\n----------------------------------------------------------\n\t" +
                "Application  is running! Access URLs:\n\t" +
                "Local: \t\thttp://localhost:" + port  + "/\n\t" +
                "External: \thttp://" + ip + ":" + port  + "/\n\t" +
                "Doc: \t\thttp://" + ip + ":" + port + "/swagger-ui.html\n" +
                "----------------------------------------------------------");
    }

}
四、测试
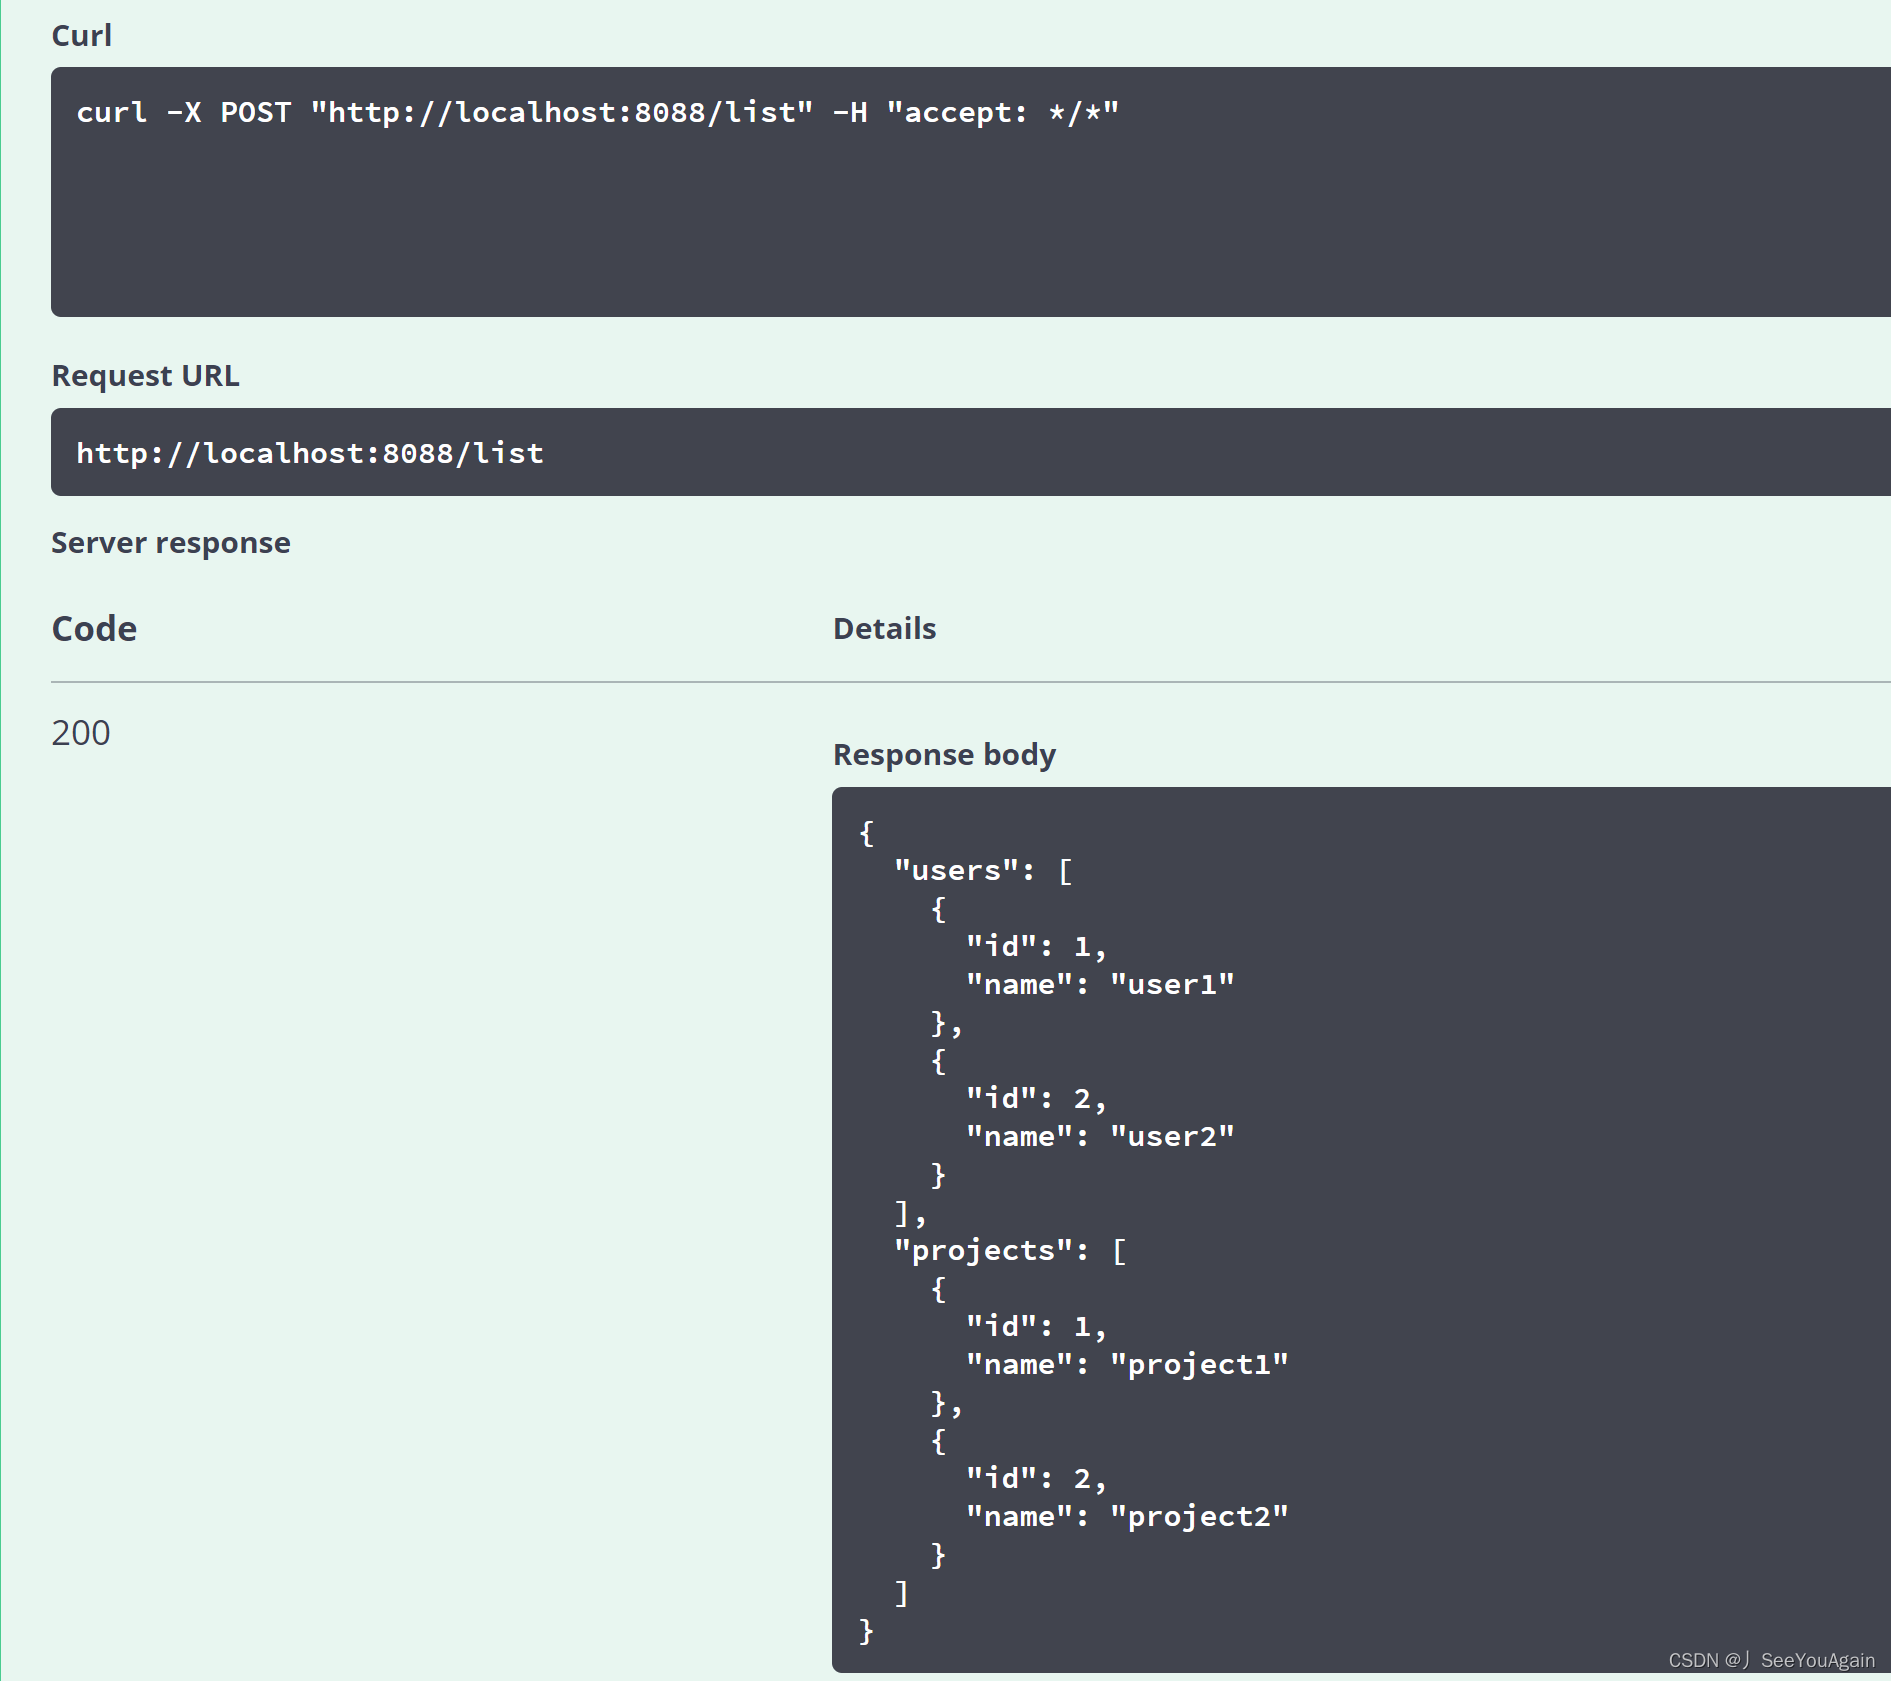
至此,SpringBoot整合多数据源演示完毕。


 1367
1367


 被折叠的 条评论
为什么被折叠?
被折叠的 条评论
为什么被折叠?
 到【灌水乐园】发言


