


view tree
下面这幅图是非常经典的view tree视图,其中叶子节点都是一个个实际的View,而ViewGroup作为View的容器,用来填充ViewGroup或者叶子节点View。
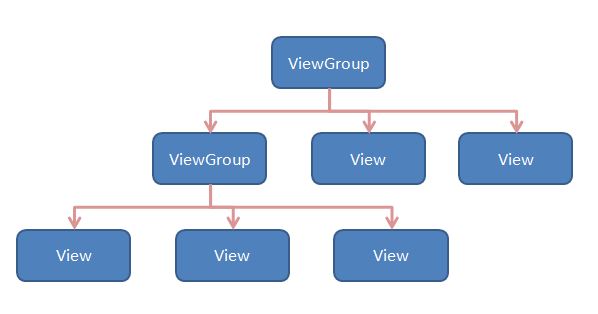
其中,各元素之间都有父子关系,这个父子关系在tree“遍历”的时候非常重要,从子到父,直到根节点(ViewRootImpl的performTraversals())。
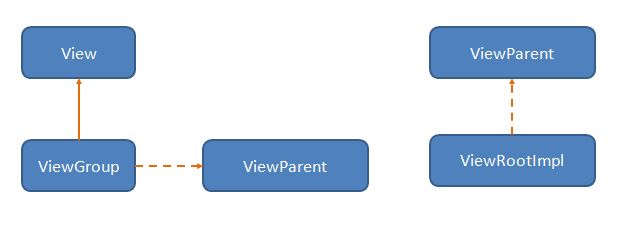
ViewParent是继承tree中的一个关键接口,定义了作为一个View的parent的所有职责,View用来和其parent交互。
/**
   ViewParent----
 * Defines the responsibilities for a class that will be a parent of a View.
 * This is the API that a view sees when it wants to interact with its parent.
 *
*/ViewGroup继承自View,实现了ViewParent。ViewRootImpl不算是一个View,因为没有继承View,但是实现了ViewParent接口,是该view tree的先祖,和window manager service做交互。
view tree的构成
下面分析一个view tree创建的过程,在http://blog.csdn.net/lewif/article/details/50735460中分析了activity申请surface的流程,其中主要包括:
1.当Activity调用完setContentView后,其成员mWindow,即PhoneWindow中现存的View如下图所示,
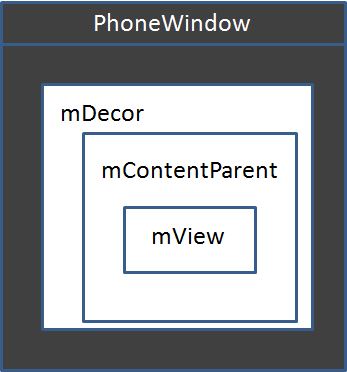
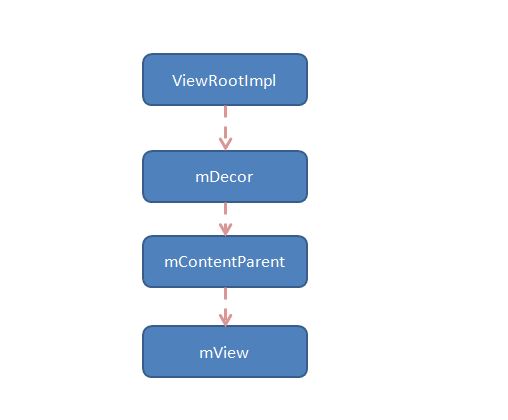
其中,DecorView(父)mDecor是一个FrameLayout,一个ViewGroup,用来“盛放”其他的view组件,例如mContentParent(子),而mContentParent(父)也是一个ViewGroup,用来“盛放”mView(子)。
下面简要分析下上述过程,利用setContentView()添加用户自定义的mView时,
    public void setContentView(View view, ViewGroup.LayoutParams params) {
        //① mContentParent开始肯定为空,首先执行 installDecor()
        if (mContentParent == null) {
            installDecor();
        } else {
            mContentParent.removeAllViews();
        }
        //②将用户自己的mView添加到mContentParent这个ViewGroup
        mContentParent.addView(view, params);
        final Callback cb = getCallback();
        if (cb != null && !isDestroyed()) {
            cb.onContentChanged();
        }
    }
private void installDecor() {
if (mDecor == null) {
//创建DecorView mDecor
mDecor = generateDecor();
}
//创建mContentParent ,输入为其父view,mDecor
if (mContentParent == null) {
mContentParent = generateLayout(mDecor);
}
}
protected ViewGroup generateLayout(DecorView decor) {
View in = mLayoutInflater.inflate(layoutResource, null);
//添加DecorView的子view
decor.addView(in, new ViewGroup.LayoutParams(MATCH_PARENT, MATCH_PARENT));
//contentParent 就是decor的子view
ViewGroup contentParent = (ViewGroup)findViewById(ID_ANDROID_CONTENT);
}
public View findViewById(int id) {
return getDecorView().findViewById(id);
}而decor.addView()和mContentParent.addView()最终会调用addViewInner(),在这里会去设置mDecor的子view、用户自定义view的父view为mContentParent。
private void addViewInner(View child, int index, LayoutParams params,
            boolean preventRequestLayout) {

            // tell our children
        if (preventRequestLayout) {
            child.assignParent(this);
        } else {
           //自定义mView的mParent为mContentParent
            child.mParent = this;
        }

        onViewAdded(child);

    }
2.在windowmanagerglobal的addView(decor)中,
    public void addView(View view, ViewGroup.LayoutParams params,
            Display display, Window parentWindow) {

       //新建一个ViewRootImpl
            root = new ViewRootImpl(view.getContext(), display);

            view.setLayoutParams(wparams);

            mViews.add(view);
            mRoots.add(root);
            mParams.add(wparams);
    //将decor设置到ViewRootImpl中
    root.setView(view, wparams, panelParentView);

}
    /**
     * We have one child
     */
    public void setView(View view, WindowManager.LayoutParams attrs, View panelParentView) {
    //将decor的父view设置为ViewRootImpl
    view.assignParent(this);
  }
    void assignParent(ViewParent parent) {
        if (mParent == null) {
            mParent = parent;
        } else if (parent == null) {
            mParent = null;
        } else {
            throw new RuntimeException("view " + this + " being added, but"
                    + " it already has a parent");
        }
    }
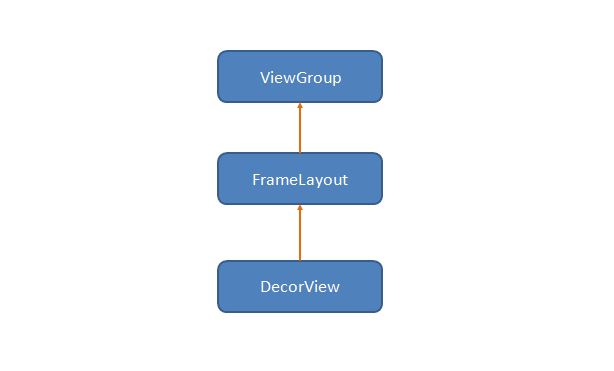
所以经过上面的2步,最终形成的view tree如下图所示,从上到下依次是父子关系,而ViewRootImpl是祖先,用来和window manager service交互。


 412
412

 被折叠的 条评论
为什么被折叠?
被折叠的 条评论
为什么被折叠?
 到【灌水乐园】发言


