


 本文档详细介绍了如何在Tegra Ventana (Android 3.0) 上利用Microsoft Kinect进行NDK程序开发的过程。文中提供了环境搭建步骤、硬件连接方法及代码结构说明,并附带源代码链接。
Environment Setup (Ubuntu/Debian):
To get started, first you need to install Nvidia Tegra Android Development Kit on your machine. In our setup, we have used the Ubuntu-Linux (64-bit) version.
The setup shall be straight forward.
chmod +x TADP-1.0-gbhc-linux-x64-2011-06-23.runMy default installation path is ~/NVPACK. Please make sure you flash the Ventana board with Android 3.0 (if you haven't done so before) at the end of the installation process. Also, please do backup the data before doing so.
./TADP-1.0-gbhc-linux-x64-2011-06-23.run
Now once the setup is completed, you shall have the android ndk, eclipse, and TDK sample code, etc... installed.
raymondlo84@ealab_corei7:~/NVPACK$ ls -C
android-ndk-r5c android-sdk-linux_x86 eclipse oprofile TDK_Samples
Android_OS_Images apache-ant-1.8.2 nvsample_workspace readme.txt uninstall
Now to verify if we have setup everything correctly, we will run eclipse (the one in NVPACK directory), compile the source code (use Build Projects or Ctrl+B), and run the multitouch source code on the device (right click on the project name, Run, and Run As Application). Now you can touch the screen and see your fingers (up to 10) being tracked in real-time. Pretty amazing.
Important: Please make sure you uninstall the multitouch application after testing. Else, it will conflict with our current application.
Hardware setup:
At this step, we shall be able to run the sample code on the Ventana and confirm that the development environment is setup properly. If not, please check if the Ventana is connected to the PC properly.
The easiest way to know is to run
$adb shellThis shall bring you to the shell on the Ventana.
Next, we plug the Microsoft Kinect to the Ventana's USB port. To check if the camera is detected properly, we can check the dmesg with the following commands. ($ - bash shell, # the shell on the Ventana).
$adb shellThen, we shall see the device is detected and mounted. Notice that Kinect is actually recognized as multiple devices: Xbox NUI Cameraand Xbox NUI Audio.Looks like the Microsoft Kinect has a usb hub internally.
#dmesg
<6>[70990.661082] usb 2-1.1: new high speed USB device using tegra-ehci and address 9
< 6>[70990.696832] usb 2-1.1: New USB device found, idVendor=045e, idProduct=02ad
< 6>[70990.703809] usb 2-1.1: New USB device strings: Mfr=1, Product=2, SerialNumber=4
< 6>[70990.711490] usb 2-1.1: Product: Xbox NUI Audio
< 6>[70990.716013] usb 2-1.1: Manufacturer: Microsoft
< 6>[70990.720483] usb 2-1.1: SerialNumber: A44887C10800045A
< 6>[70992.181268] usb 2-1.3: new high speed USB device using tegra-ehci and address 10
< 6>[70992.224649] usb 2-1.3: New USB device found, idVendor=045e, idProduct=02ae
< 6>[70992.240886] usb 2-1.3: New USB device strings: Mfr=2, Product=1, SerialNumber=3
< 6>[70992.256521] usb 2-1.3: Product: Xbox NUI Camera
< 6>[70992.274979] usb 2-1.3: Manufacturer: Microsoft
< 6>[70992.280051] usb 2-1.3: SerialNumber: A00367A07065045A
#ls /dev/bus/usb/002/*To override the permission problem temporarily, we can run the following commands. (IMPORTANT: We have to run this command every time we restart the machine, unplug the Kinect, or if the device goes to sleep! oh well!)
001
002
004
009
010
$adb shellOnce we have confirmed that the Kinect is detected successfully, we shall then replace the multitouch source code in the ~/NVPACK/TDK_Samples/Android_NVIDIA_samples_2_20110315/apps directory with the one we have provided below.
#chmod -R 777 /dev/bus/usb/002/
Now, we will go back to eclipse, and then refresh the project. (click on the project folder in eclipse and then press F5). Again. #chmod -R 777 /dev/bus/usb/002/if you haven't done so, or you will see a blank screen). Rebuild and run!
If everything goes well, we shall have the application running like the following video. To change the tilt angle on the Kinect, we can simply use the touchscreen as shown below.
Code Structure and Optimization:
In this section, we will explain the structure of the source code, the optimization steps and customization that we have made to make the code runs as efficient as possible.
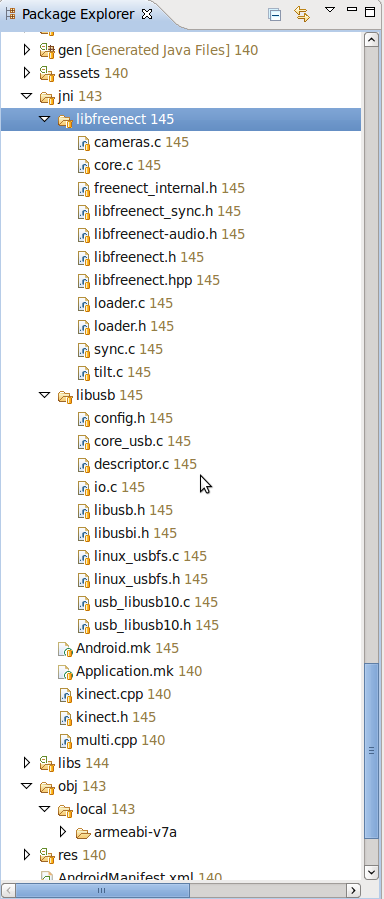
Figure 1. The source code structure of our demo application.
Instead of recompiling the libfreenect and the libusb libraries from external sources (of course we can do that with static linked library approach or so), in this tutorial we provide a complete source tree, which includes the libfreenect and libusb libraries. (Note: Free feel to contact us if we shall not include this in our package.).
As we can see from Figure 1, the structure of the source code is fairly simple.
- multi.cpp - the main code which handles OpenGL rendering, key/touchscreen events, and other logics (adopted from the TDK sample code).
- kinect.cpp - a wrapper for the kinect driver, convert depth map to RGB and handles other callback functions from libfreenect (adopted from the libfreenect sample code)
- libusb/* - the libusb source code for the USB interface.
- libfreenect/* - the libfreenect source code which interfaces with the Microsoft Kinect.
Performance:
The runtime of the rendering loop is ~16ms, which translates to ~60fps. The key bottleneck of the algorithm is the texture loading step which costs about ~14ms to perform.
struct timeval start, end;Total run time (averaged 100 trials) :
double t1,t2;
static double elapsed_sec=0;
static int count=0;
gettimeofday(&start, NULL);
getDepthData(depth_info);
loadTexture_depth(depth_info);
displayTexture();
gettimeofday(&end, NULL);
t1=start.tv_sec+(start.tv_usec/1000000.0);
t2=end.tv_sec+(end.tv_usec/1000000.0);
elapsed_sec += (t2-t1);
count++;
if(count>=100){
char buf[512];
sprintf(buf, "Display loop %f (s)\n", (elapsed_sec)/100.0);
elapsed_sec=0;
count=0;
__android_log_write(ANDROID_LOG_INFO, "Render Loop:", buf);
}
I/Render Loop:( 4026): Display loop 0.016168 (s)
...
Requirements:
Tegra Android Development Pack
libfreenect
libusb
Tested Platform:
Tegra Ventana Development Kit (from Nvidia)
Ubuntu 10.04.2 (64 bits)
Source Code:
https://sourceforge.net/projects/openvidia/files/tegra_kinect/
or
svn co https://openvidia.svn.sourceforge.net/svnroot/openvidia/tegra_kinect multitouch
for the latest source.
Other Demo video:
Blind navigation with a wearable range camera and vibrotactile helment:
This work is accepted and will be published in the proceeding of ACM Multimedia 2011 (ACMM2011).
See: http://wearcam.org/blindvision/ and http://www.eyetap.org/publications/index.html for a list of our publications.
Known Issues:
1. The application will crash when we change the orientation of the device.
2. The application does not wake up properly if it were sent to the background.
Special Thanks:
James Fung, Nvidia Technology Development for supplying the Ventana Development Kit.
... to be continued.


 268
268

 被折叠的 条评论
为什么被折叠?
被折叠的 条评论
为什么被折叠?
 到【灌水乐园】发言


