


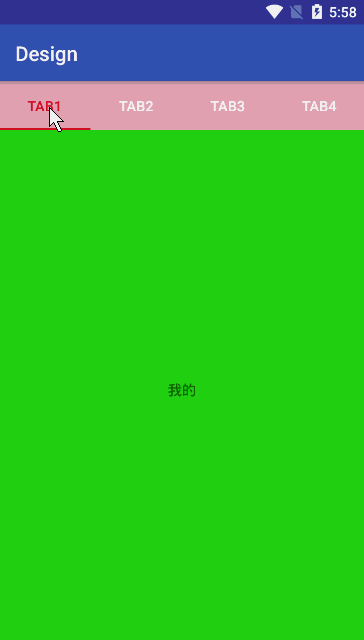
TabLayout是design包的一个组件,常与viewpager搭配使用,主要是因为用法简单,而且效果也好。下面是效果图
接下来说说用法:首先导入依赖 compile
'com.android.support:design:25.3.1'
布局文件:activity_main.xml
<?xml version="1.0" encoding="utf-8"?>
<LinearLayout xmlns:android="http://schemas.android.com/apk/res/android"
    xmlns:app="http://schemas.android.com/apk/res-auto"
    xmlns:tools="http://schemas.android.com/tools"
    android:layout_width="match_parent"
    android:layout_height="match_parent"
    android:orientation="vertical"
    tools:context="com.example.design.MainActivity">

    <android.support.design.widget.TabLayout
        android:id="@+id/tab"
        android:layout_width="match_parent"
        android:layout_height="wrap_content"
        android:background="#4ad71348"
        app:tabTextColor="#ffffff"
        app:tabSelectedTextColor="#fcd7132d"
        app:tabIndicatorColor="#fcd7132d"
        />

    <android.support.v4.view.ViewPager
        android:id="@+id/page"
        android:layout_width="match_parent"
        android:layout_height="0dp"
        android:layout_weight="1"
        />


</LinearLayout>
类文件:
public class MainActivity extends AppCompatActivity{

    public ViewPager viewPager;
    public MPagerAdapter mPagerAdapter;
    public TabLayout tab;

    @Override
    protected void onCreate(Bundle savedInstanceState) {
        super.onCreate(savedInstanceState);
        setContentView(R.layout.activity_main);

        init();
        setTab();
    }

    public void init(){

        tab= (TabLayout) findViewById(R.id.tab);
        viewPager= (ViewPager) findViewById(R.id.page);
        mPagerAdapter=new MPagerAdapter(getSupportFragmentManager());

        viewPager.setAdapter(mPagerAdapter);
        viewPager.setCurrentItem(0);

    }

    public void setTab(){
//        tab.addTab(tab.newTab().setText("tab1"));
//        tab.addTab(tab.newTab().setText("tab2"));
//        tab.addTab(tab.newTab().setText("tab3"));
//        tab.addTab(tab.newTab().setText("tab4"));

        tab.setupWithViewPager(viewPager);

        tab.getTabAt(0).setText("tab1");
        tab.getTabAt(1).setText("tab2");
        tab.getTabAt(2).setText("tab3");
        tab.getTabAt(3).setText("tab4");
    }
其中主要代码就是setTab函数里的代码。这里有一个坑,TabLayout与viewpager联动只要一行语句
tab.setupWithViewPager(
viewPager); 然后addTab方法就是添加导航栏中的项的,但是运行后你会发现text显示不出来,联动效果有。这是为什么呢?其实viewpager是有title的,你可试试把addTab都去掉,他依然会有Tabviewpager有几个页面就会生成几个Tab,任何你添加的Tab都被挤没了。既然如此。那我直接获取Tab再改text,也就是上面的代码。然后就OK了。
下面再说说TabLayout的一些属性。
app:tabIndicatorColor="@color/white" // 下方滚动的下划线颜色
app:tabSelectedTextColor="@color/gray" // tab被选中后,文字的颜色
app:tabSelectedTextColor="@color/gray" // tab被选中后,文字的颜色
app:tabTextColor="@color/white" // tab默认的文字颜色
app:tabBackground="color" //.整个TabLayout的颜色
app:tabTextAppearance="@android:style/TextAppearance.Holo.Large" //设置文字的样式
app:tabIndicatorHeight="4dp" //指示器下标的高度
app:tabMode="scrollable" //设置tab可以滑动
app:tabPadding="xxdp"
app:tabPaddingTop="xxdp"
app:tabPaddingStart="xxdp"
app:tabPaddingEnd="xxdp"
app:tabPaddingBottom="xxdp" //tab内部子控件的padding
app:paddingEnd="xxdp"
app:paddingStart="xxdp" //整个TabLayout的padding
app:tabGravity="center" //居中显示,如果是fill,则是充满
还有一些其他属性用的少,就不说明了。


 4759
4759


 被折叠的 条评论
为什么被折叠?
被折叠的 条评论
为什么被折叠?
 到【灌水乐园】发言


