


Converting a fisheye image into a panoramic, spherical or perspective projection
Written by Paul BourkeNovember 2004, updated July 2016
The source code implementing the projections below is only available on request for a small fee. It includes a demo application and an invitation to convert an image of your choice to verify the code does what you seek. For more information please contact the author.
See also (August 2016): Converting a pair of fisheye images to a 360 equirectangular panorama .
The following documents various transformations from fisheye into other projection types, specifically standard perspective as per a pinhole camera, panorama and spherical projections. Fisheye images capture a wide field of view, traditionally one thinks of 180 degrees but the mathematical definition extends past that and indeed there are many physical fisheye lenses that extend past 180 degrees. The two main applications for the following are: the inspection of images/video from security cameras where panorama or perspective views may be more natural to view, creating panorama or spherical images that are blended together to form even wider field of view images.
The general options for the software include the dimensions of the output image as well as the aperture of the output panoramic or perspective frustum. Some other requirements arise from imperfect fisheye capture such as the fisheye not being centered on the input image, the fisheye not be aligned with the intended axis, and the fisheye being of any angle. Another characteristic of real fisheye images is their lack of linearity with radius on the image, while this is not addressed here as it requires a lens calibration, it is a straightforward correction to make.
The usual approach for such image transformations is to perform the inverse mapping. That is, one needs to consider each pixel in the output image and map backwards to find the closest pixel in the input image (fisheye). In this way every pixel in the output image is found (compared to a forward mapping), it also means that the performance is governed by the resolution of the output image (and supersampling) irrespective of the size of the input image. A key aspect of these mappings is also to perform some sort of antialiasing, the solutions here use a simple supersampling approach.
The code here are all plain vanilla C tested on Unix style gcc systems (specifically Mac and Linux), but the algorithms/code can readily be modified for other operating systems and programming languages. This is not meant to be a final application but rather something you integrate into your code base. Having said that it is wrapped up in a simple TGA image reader/writer for the purposes of algorithm testing, the intent is that one would be implementing the function into ones own code base. They all operate on a RGB buffer (fisheye image) in memory. For each test utility the usage message is provided. The source images for the examples provided are provided along with the command line that generated them.
Fisheye to perspective transformation
Software: fish2perspUsage: fish2persp [options] fisheyeimage Options -w n perspective image width, default = 800 -h n perspective image height, default = 600 -t n aperture of perspective (degrees), default = 100 -s n aperture of fisheye (degrees), default = 180 -c x y center of the fisheye image, default is center of image -r n fisheye radius (horizontal), default is half width of fisheye image -ry n fisheye radius (vertical) for anamophic lens, default is circular fisheye -x n tilt angle (degrees), default: 0 -y n roll angle (degrees), default: 0 -z n pan angle (degrees), default: 0 -a n antialiasing level, default = 2 -d verbose mode, default: off
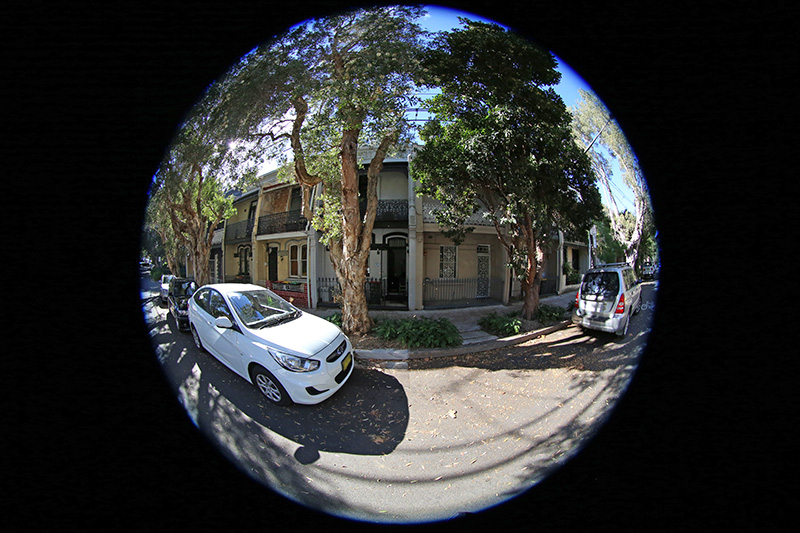
It should be noted at the outset that a fisheye projection is not a "distorted" image, and the process isn't a "dewarping". A fisheye like other projections is one of many ways of mapping a 3D world onto a 2D plane, it is no more or less "distorted" than other projections including a rectangular perspective projection ... it is what it is.
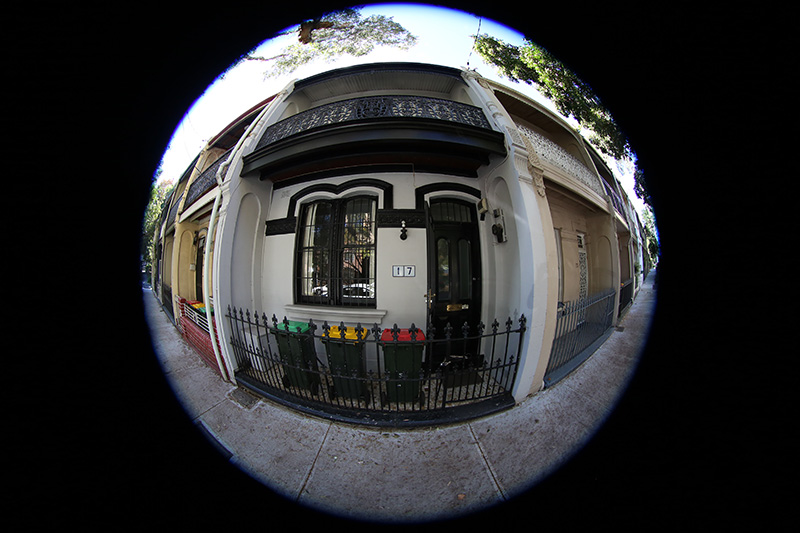
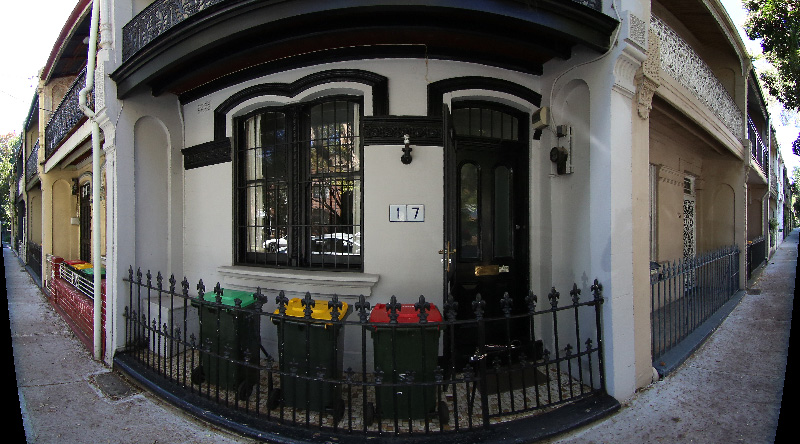
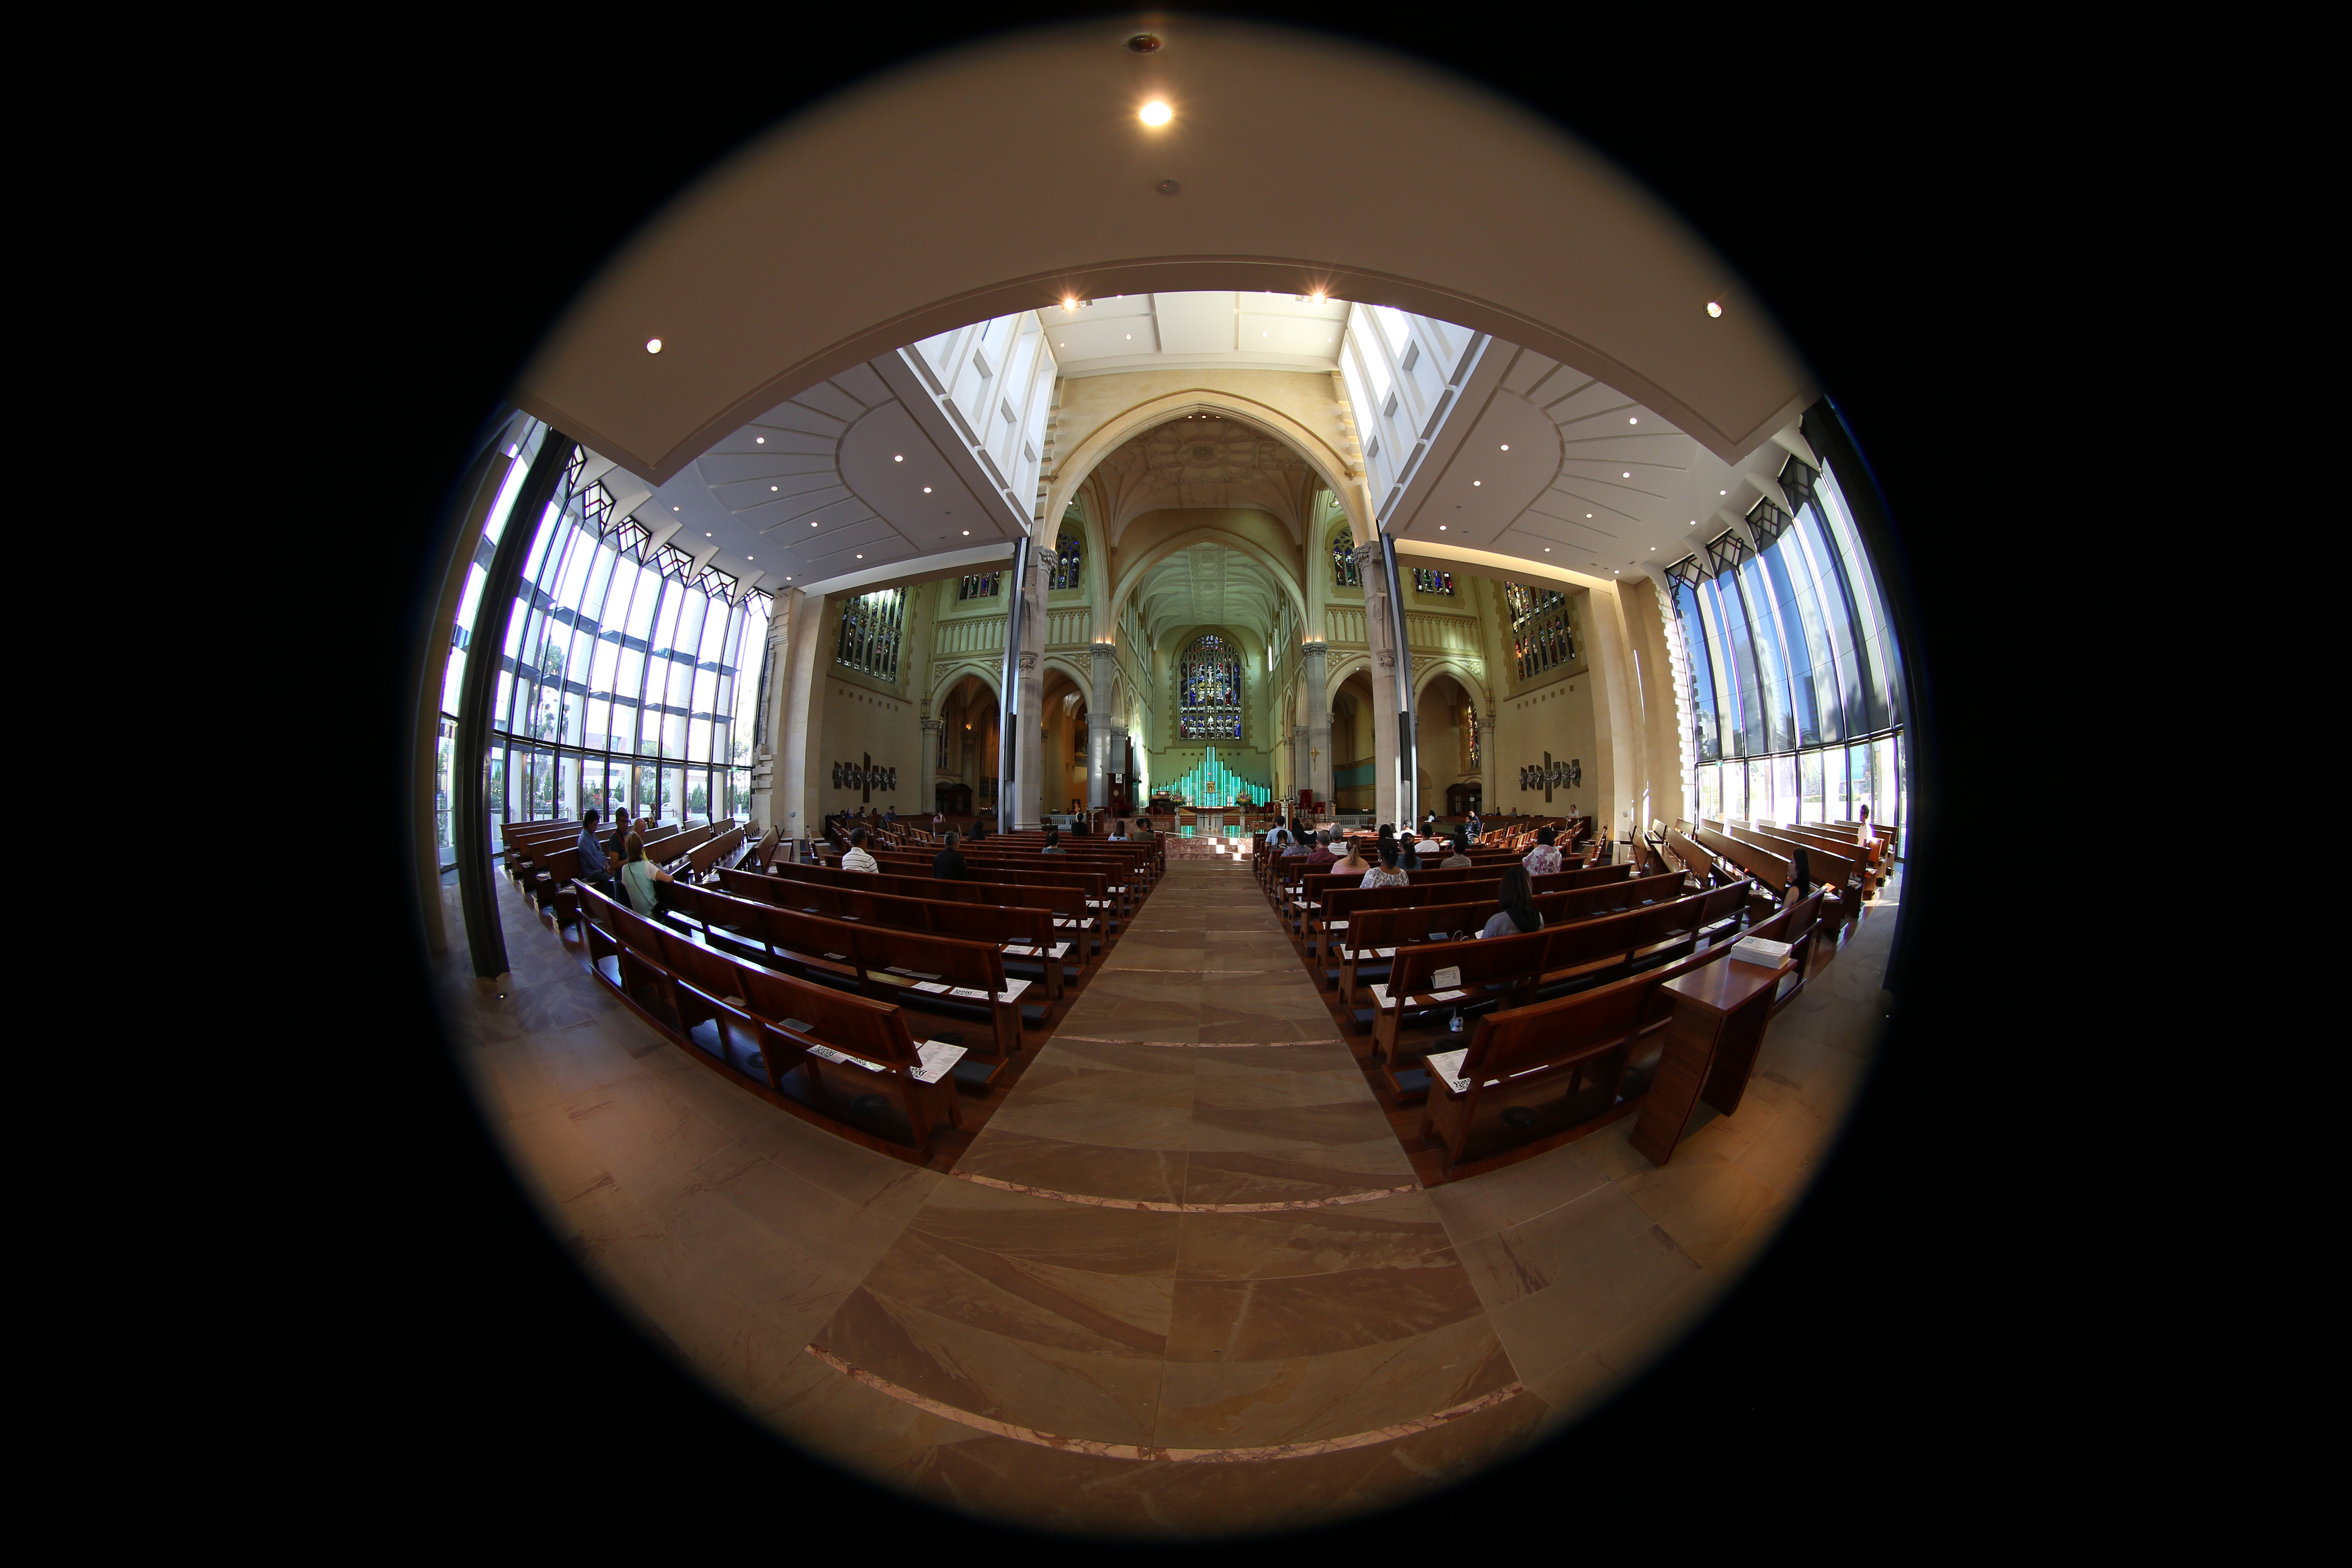
Example source fisheye image.
A critical consideration is antialiasing, required when sampling any discrete signal. The approach here is a simple supersampling antialiasing, that is, each pixel in the output image is subdivided into a 2x2, 3x3....grid and the inverse mapping applied to the subsamples. The final value for the output pixel is the weighted average of the inverse mapped subsamples. There is a sense in which the image plane is considered to be a continuous function. Since the number of samples that are inverse mapped is the principle determinant of performance, high levels of antialiasing can be very expensive, typically 2x2 or 3x3 are sufficient especially for images captured from video in which neighbouring pixels are not independent in the first place. For example a 3x3 antialiasing is 9 times slower than no antialiasing. In general the jagged edges are more noticeable in features with a sharp colour/intensity boundary.
Default perspective view looking forwards, 100 degrees horizontal field of view.
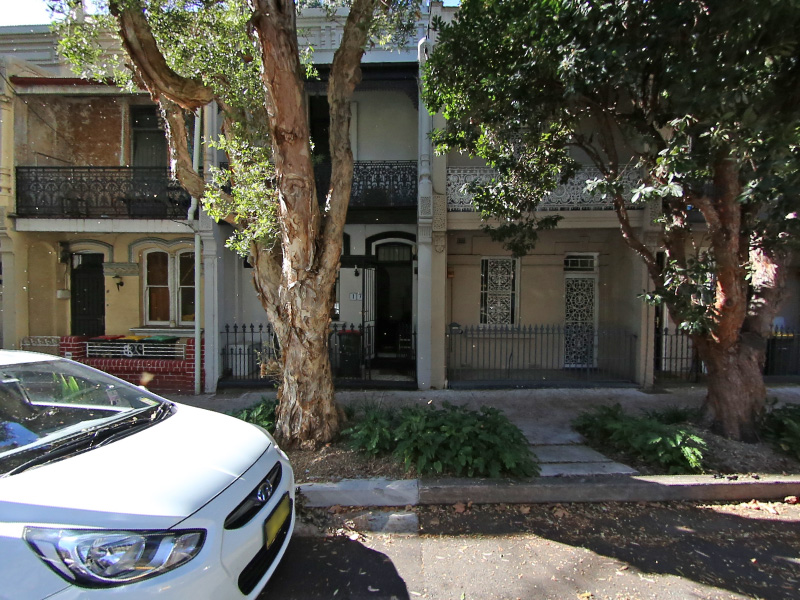
fish2persp -w 800 -a 3
The vertical aperture is automatically adjusted to match the width and height. Controls are provided for any angle fisheye as well as fisheyes that are not level or tilted, noting that the exact order of the correction rotations may need to be considered for particular cases. Note that a perspective projection is not defined for greater than 180 degrees, indeed it gets increasingly inefficient past around 140 degrees. The field of view can be adjusted as well as the viewing direction. The following example is a 120 degrees horizontal field of view and looking upwards by 30 degrees.
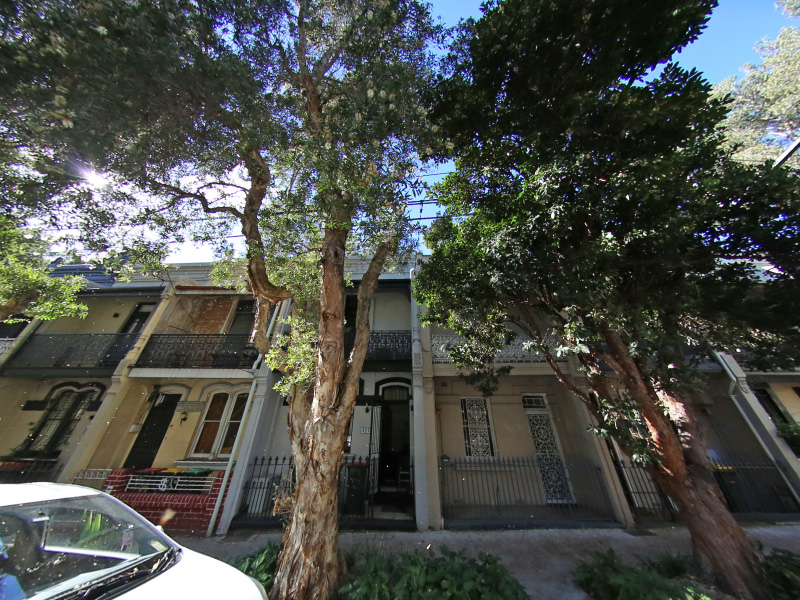
fish2persp -w 800 -a 3 -x 30 -t 120
If "straight" lines are not straight that normally means the fisheye center or radius are not specified correctly or the angle is not defined correctly. Curvature in what should be straight lines near the rim of the fisheye normally means the fisheye lens has non-linearities near the rim (a deviation from the mathematically pure fisheye projection) and corrections need to be applied. The following is looking right by 40 degrees and a narrower field of view of 80 degrees.
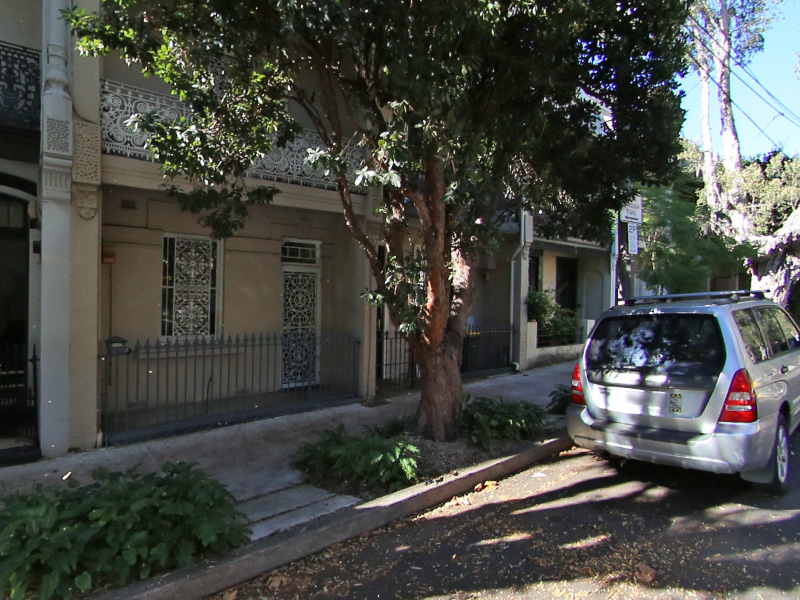
fish2persp -w 800 -a 3 -z 40 -t 80
The center of the fisheye on the input image can be found by projecting lines along vertical structure in the scene. Where these lines intersect is a close approximation to the center of the fisheye, assuming the camera is mounted vertically. Alternatively, and perhaps easier, is to identify the edges of the fisheye and assume a perfect circular inscribed circle. Note that for the example utilities provided here the origin is assumed to be the bottom left corner, unlike the more common top right that image editing programs use.
To test the algorithm a fisheye rendering inside a gridded cube is a good example, see image on left below. Any correct perspective projection should result in straight lines.
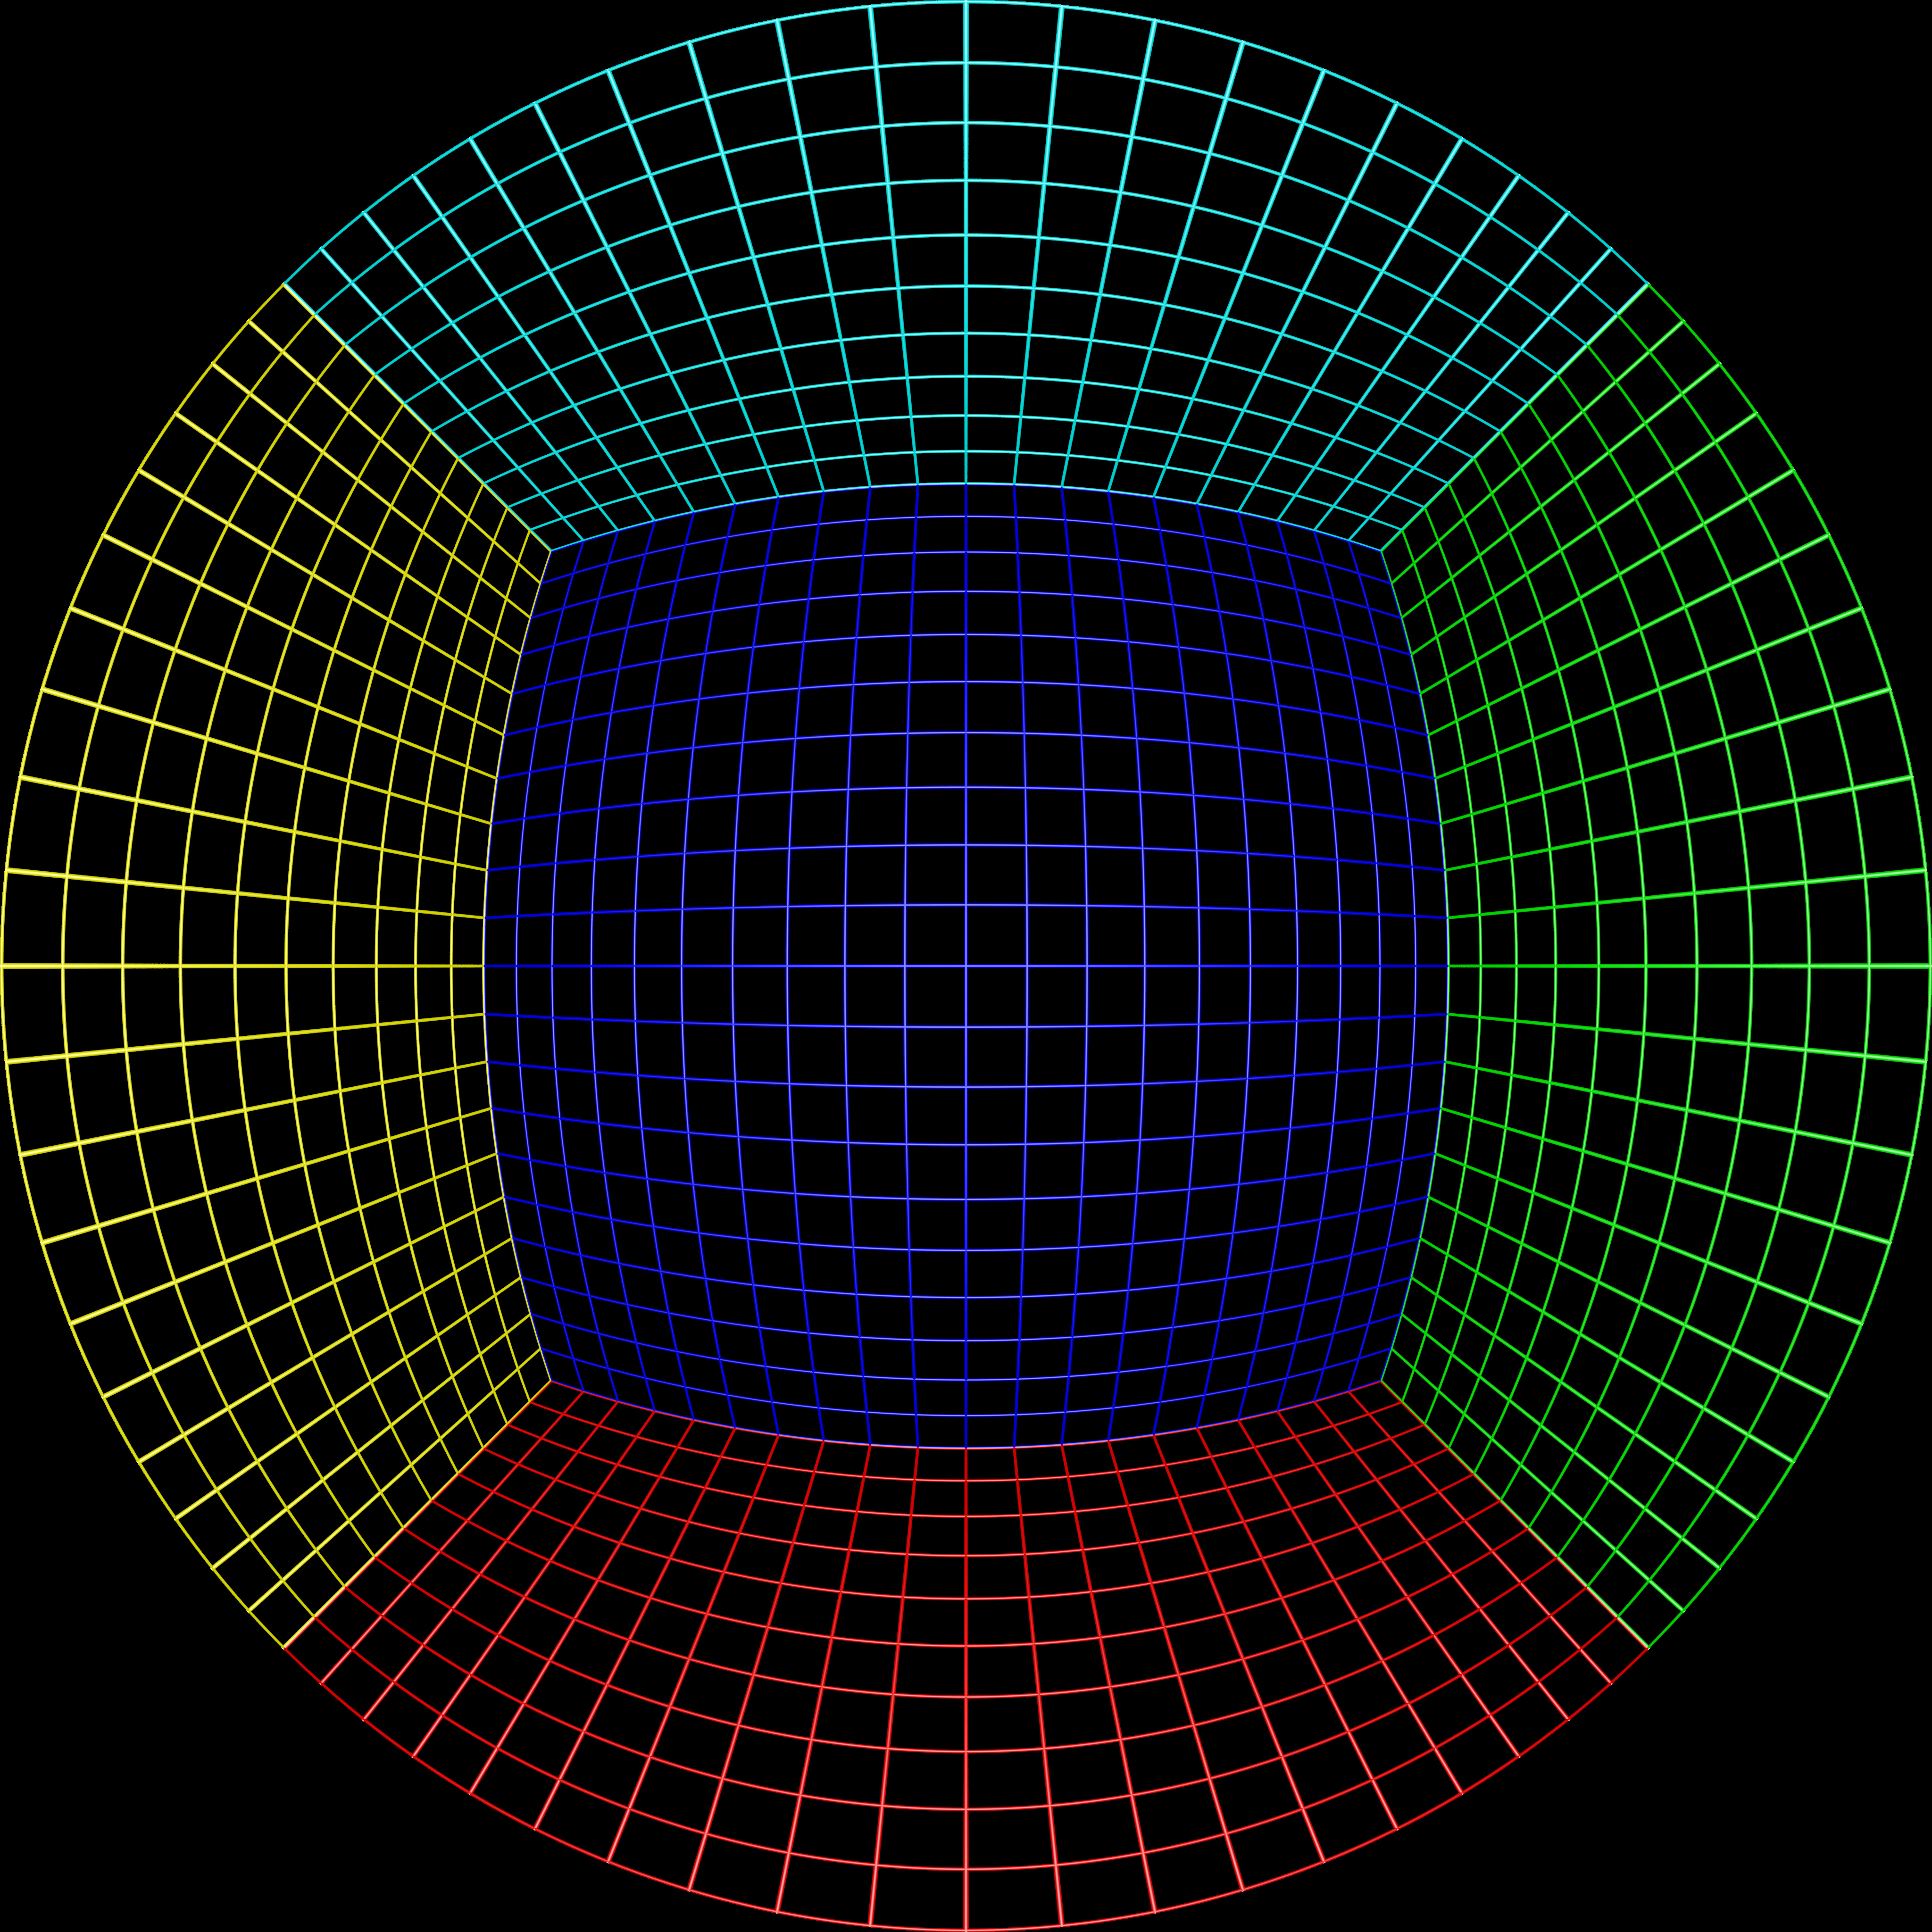 Sample input image | 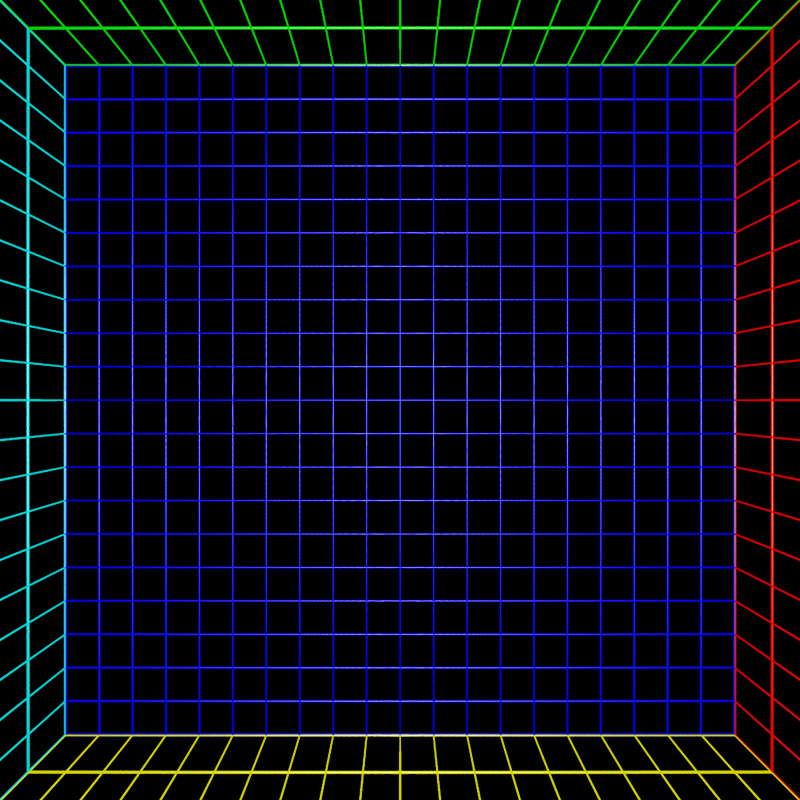 |
 | 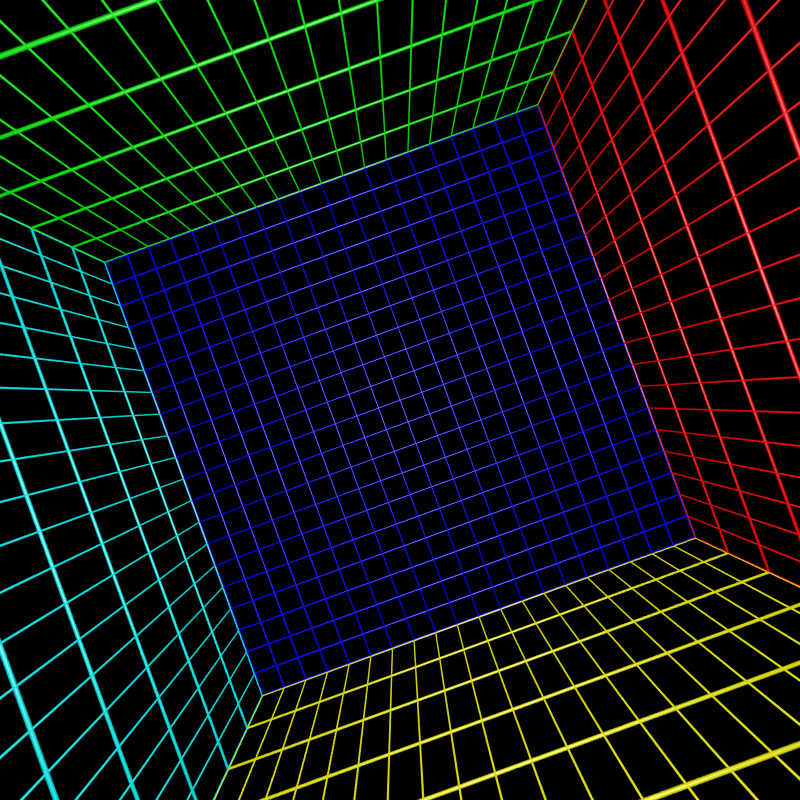 |
Front fisheye to panorama
Software: frontfish2panoUpdate November 2016: frontfish2pano is now redundant, fisheye orientation can now be controlled withfish2pano, see later.
This case is developed mainly for "front pointing" fisheyes although it does have application for other orientations. The projection is more correctly called a cylindrical panorama.
Usage: frontfish2pano [options] fisheyeimage
Options
   -w n     panoramic image width, default = 800
   -h n     panoramic image height, default = -1
  -ap n     vertical aperture of panoramic, default = 100
  -af n     aperture of fisheye (degrees), default = 180
  -cf x y   center of the fisheye image, default is image center
   -r n     radius of the fisheye image, default is half the image width
  -fa n     angle for tilted fisheye, default = 0
  -fb n     angle for rotated fisheye, default = 0
   -a n     antialiasing level, default = 1 (no antialising)
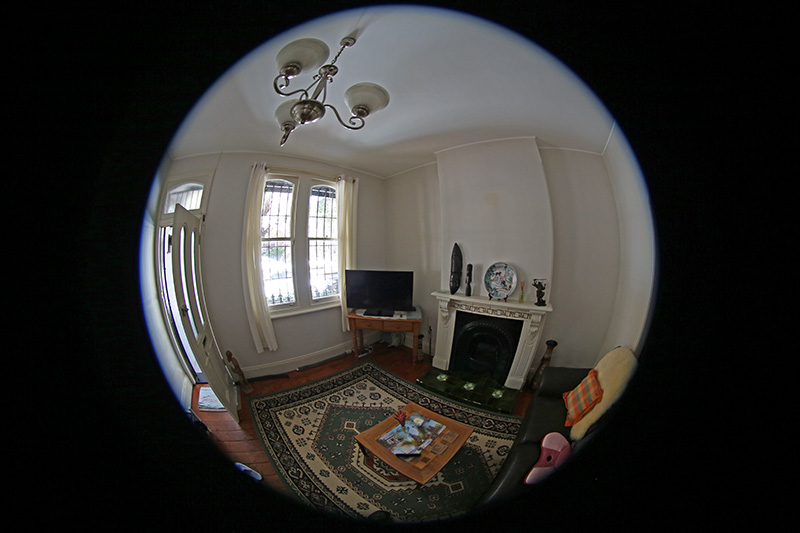
Source fisheye image.
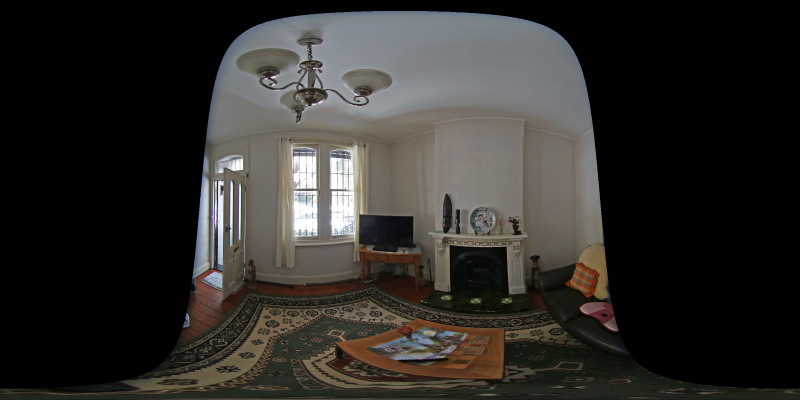
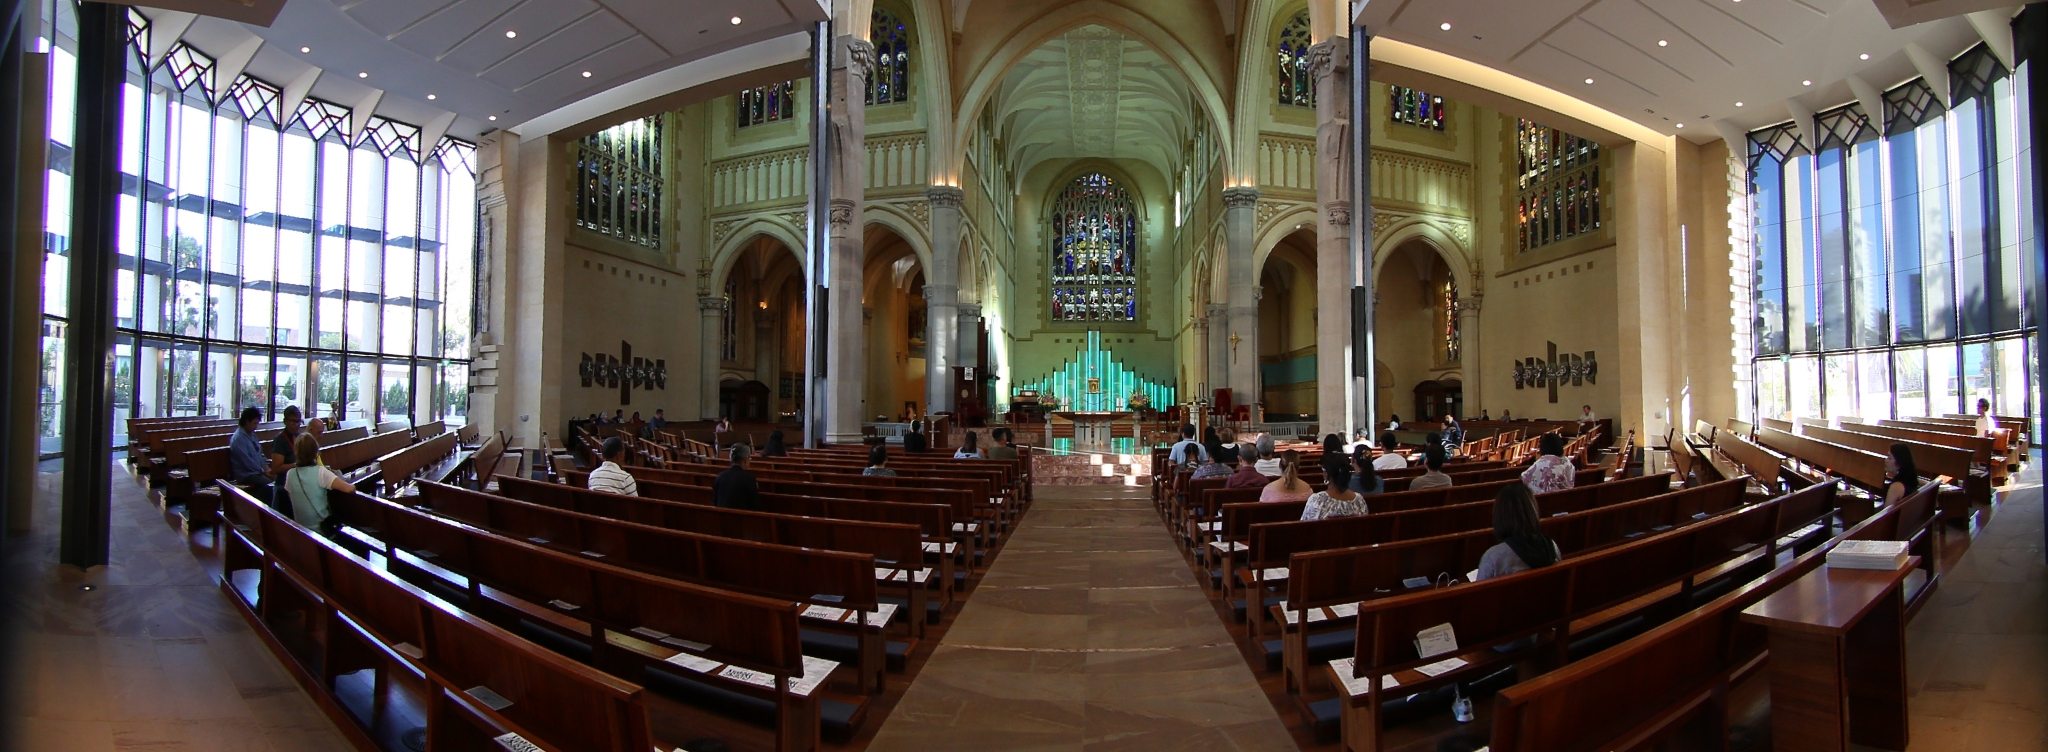
Transformation with the default settings is shown below.

frontfish2pano -a 3 -w 800
Correct for the fact that the camera is not quite horizontal, this is the reason the vertical structure doesn't appear vertical in the panoramic projection. Of course nothing is for free, one looses a bit of the image in the bottom left and right corners.
frontfish2pano -a 3 -w 800 -fa -20
Set the vertical field of view of the panorama, in the following cases narrowed from the default of 100 degrees to 80 degrees. As with perspective projections there is a limit, in this case, to the vertical field of view, a hard limit at 180 degrees but increasingly inefficient past 140 degrees.

frontfish2pano -a 3 -w 800 -fa -20 -ap 80
Fisheye to (partial) spherical projection
Software: fish2sphereUsage: fish2sphere [options] tgafile Options -w n sets the output image size, default: 4 fisheye image width -a n sets antialiasing level, default: 2 -s n fisheye aperture (degrees), default: 180 -c x y fisheye center, default: center of image -r n fisheye radius, default: half the fisheye image width -x n tilt camera, default: 0 -y n roll camera, default: 0 -z n pan camera, default: 0 -b n n longitude range for blending, default: no blending -o n create a textured mesh as OBJ model, three types: 0,1,2 -d debug mode
Updates July/August 2016
- Added export of textured hemisphere as OBJ file.
- Added variable order of rotations, occur in the order they appear in the command line.
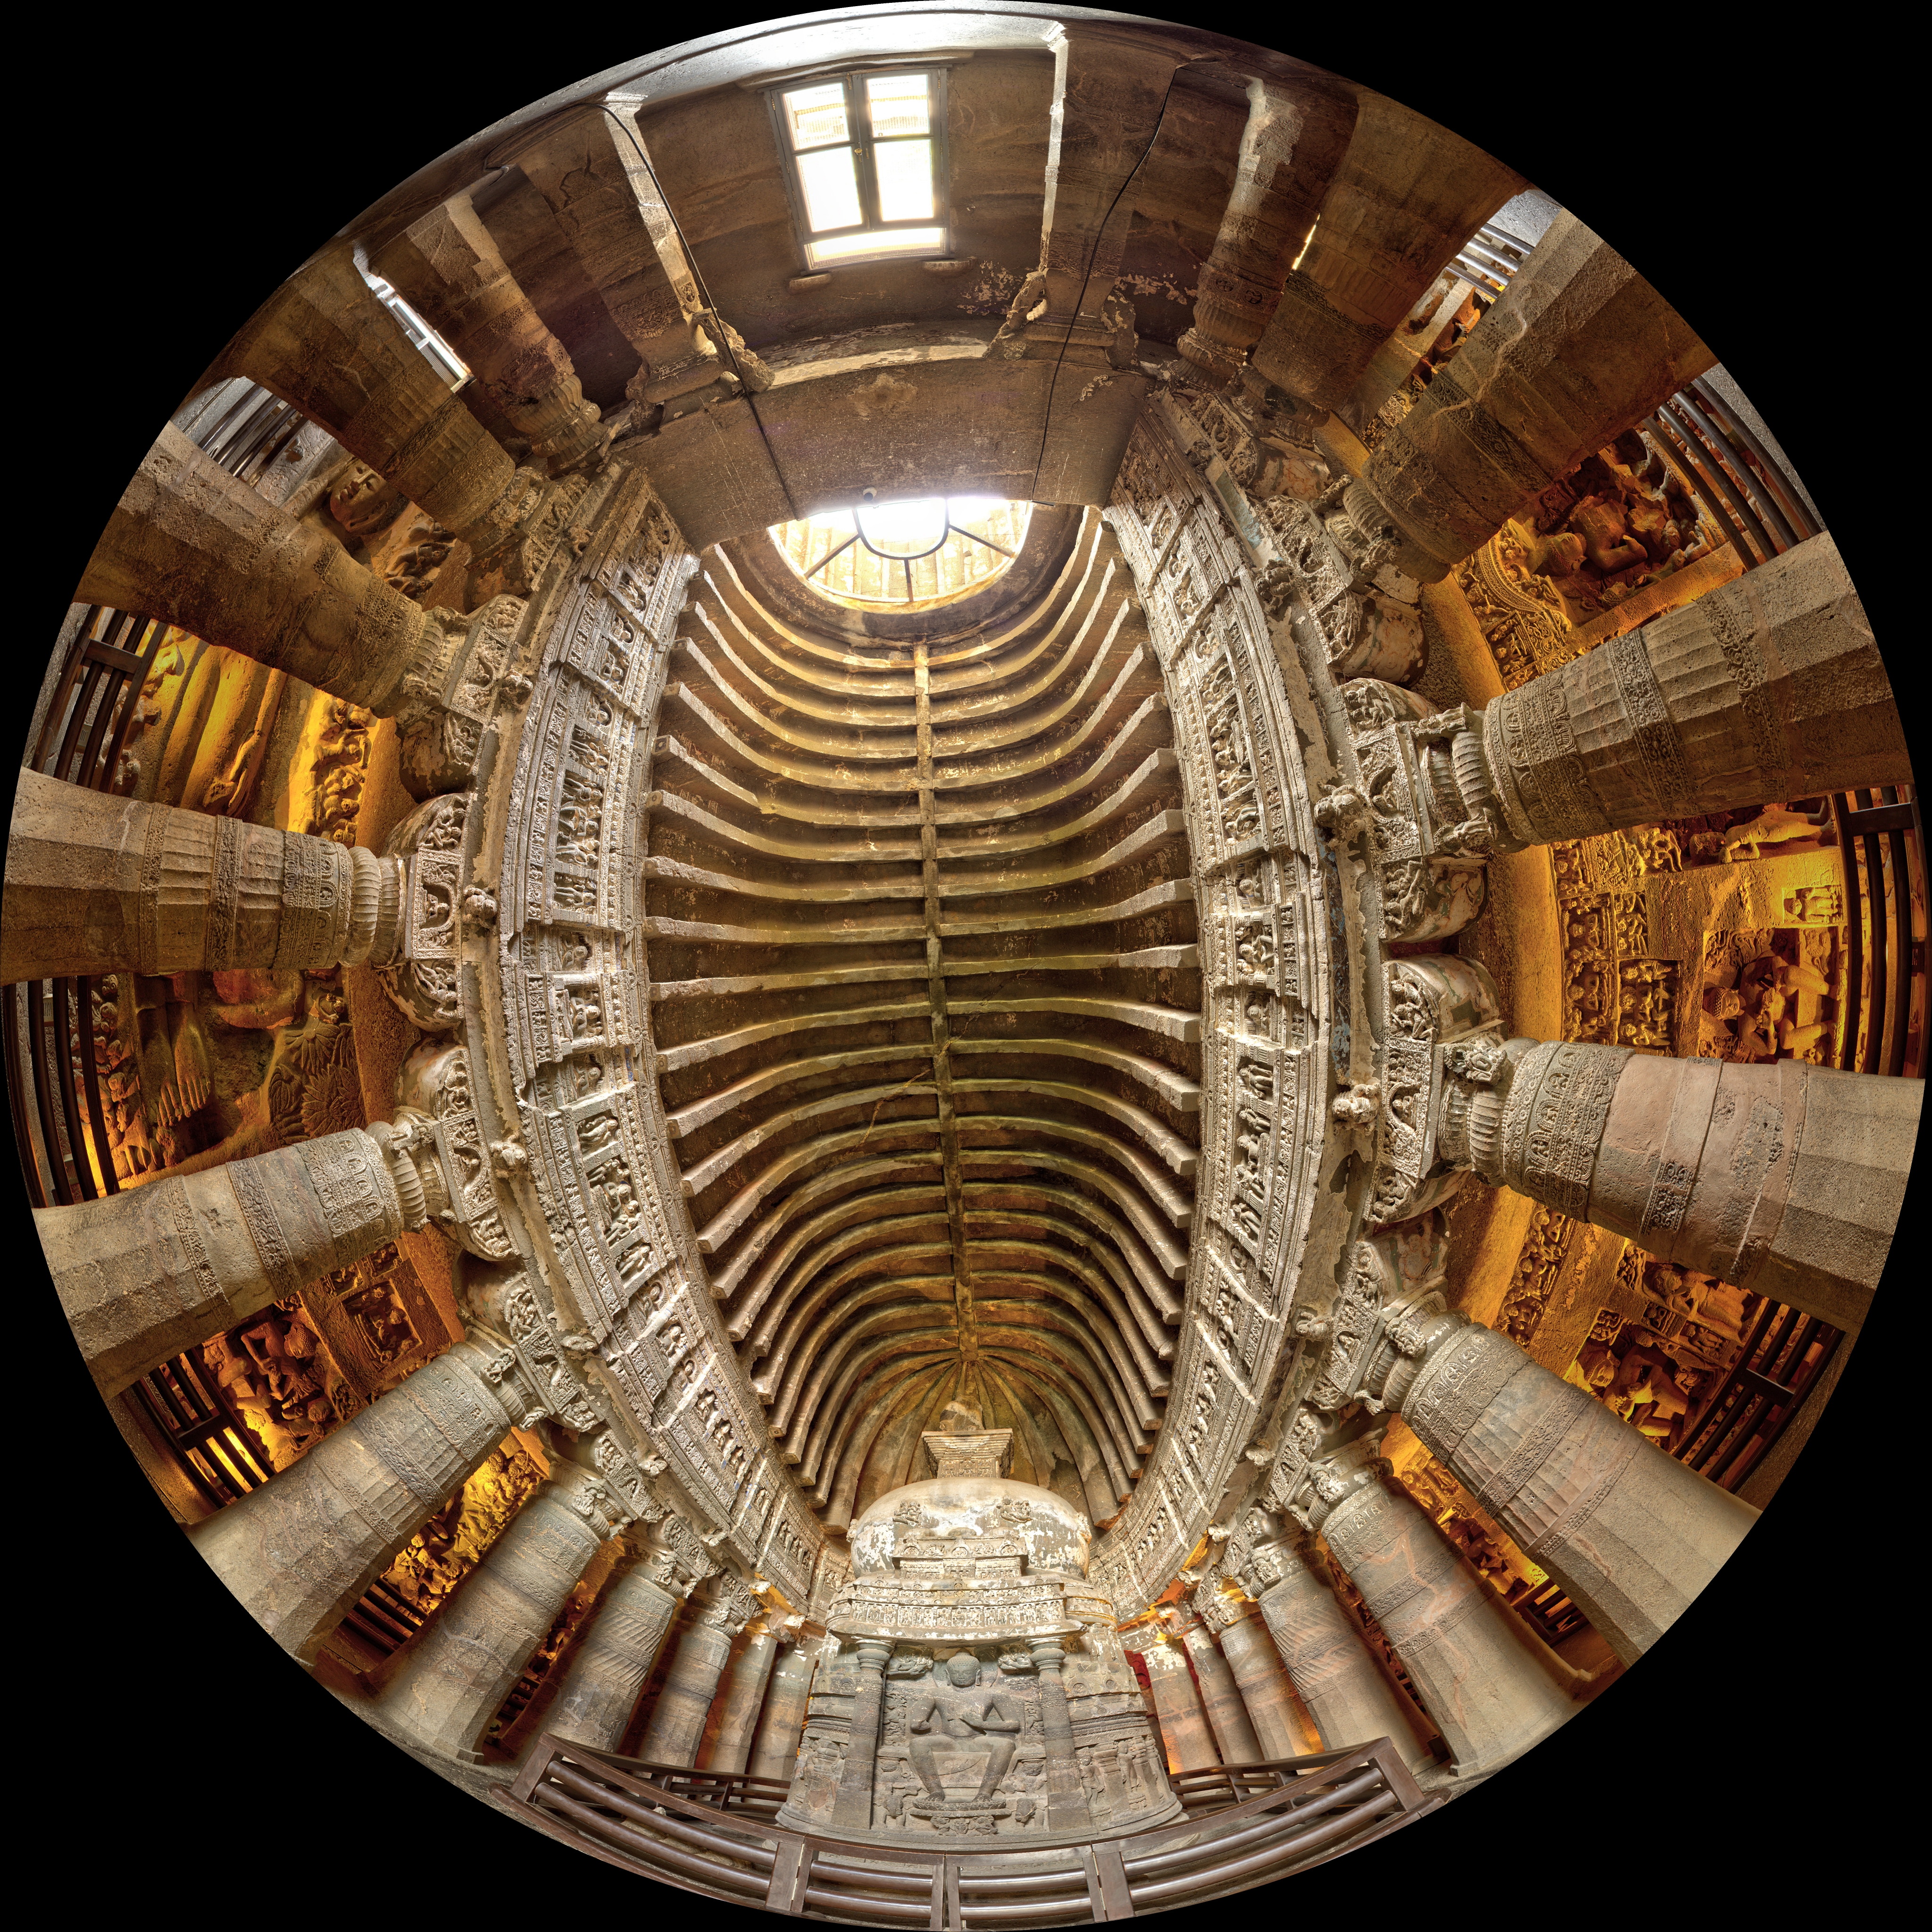
Source fisheye image.
Transformation using the default settings. Since a 180 degree (in this case) fisheye captures half the visible universe from a single position, so it makes sense that it occupies half of a spherical (equirectangular) projection, which captures the entire visible universe from a single position.
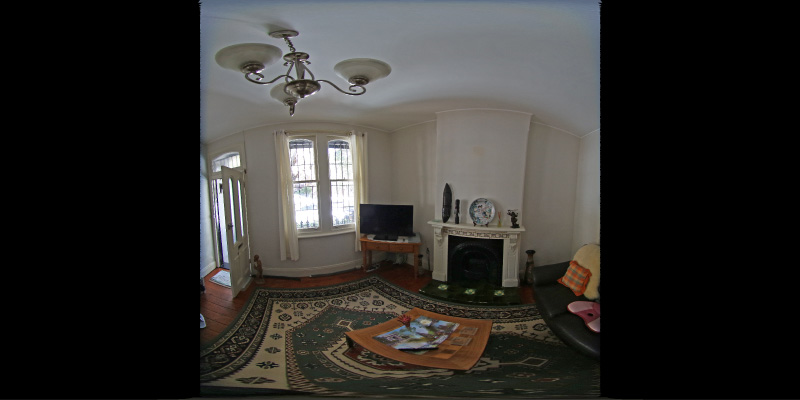
In this case the camera is not perfectly horizontal, this and other adjustments can be made. In the example here the lens was pointing downwards slightly, the correction results in more of the south pole being visible and less of the north pole.
Note that the fisheye angle is not limited to 180 degrees, indeed one application for this is in the pipeline to create 360 spherical panoramas from 2 cameras, each with a fisheye lens with a field of view greater than 180 to provide a blend zone.
This can be readily implemented in the OpenGL Shader Language, the following example was created in the Quartz Composer Core Image Filter.
// Fisheye to spherical conversion
// Assumes the fisheye image is square, centered, and the circle fills the image.
// Output (spherical) image should have 2:1 aspect.
// Strange (but helpful) that atan() == atan2(), normally they are different.

kernel vec4 fish2sphere(sampler src)
{
	vec2 pfish;
	float theta,phi,r;
	vec3 psph;

	float FOV = 3.141592654; // FOV of the fisheye, eg: 180 degrees
	float width = samplerSize(src).x;
	float height = samplerSize(src).y;

	// Polar angles
	theta = 2.0 * 3.14159265 * (destCoord().x / width - 0.5); // -pi to pi
	phi = 3.14159265 * (destCoord().y / height - 0.5);	// -pi/2 to pi/2

	// Vector in 3D space
	psph.x = cos(phi) * sin(theta);
	psph.y = cos(phi) * cos(theta);
	psph.z = sin(phi);

	// Calculate fisheye angle and radius
	theta = atan(psph.z,psph.x);
	phi = atan(sqrt(psph.x*psph.x+psph.z*psph.z),psph.y);
	r = width * phi / FOV;

	// Pixel in fisheye space
	pfish.x = 0.5 * width + r * cos(theta);
	pfish.y = 0.5 * width + r * sin(theta);

	return sample(src, pfish);
}
The transformation can be performed in realtime using warp mesh files for software such as warpplayeror the VLC equivalent VLCwarp. A sample mesh file is given here: fish2sph.data. Showing the result in action is below.

| Test cases for various fisheye apertures. | |
| 180 degree fisheye | |
 |  |
| 120 degree fisheye | |
 |  |
| 220 degree fisheye | |
 |  |
| 220 degree fisheye and 90 degree latitude rotation | |
| |
| 220 degree fisheye and 60 degree latitude rotation | |
| |
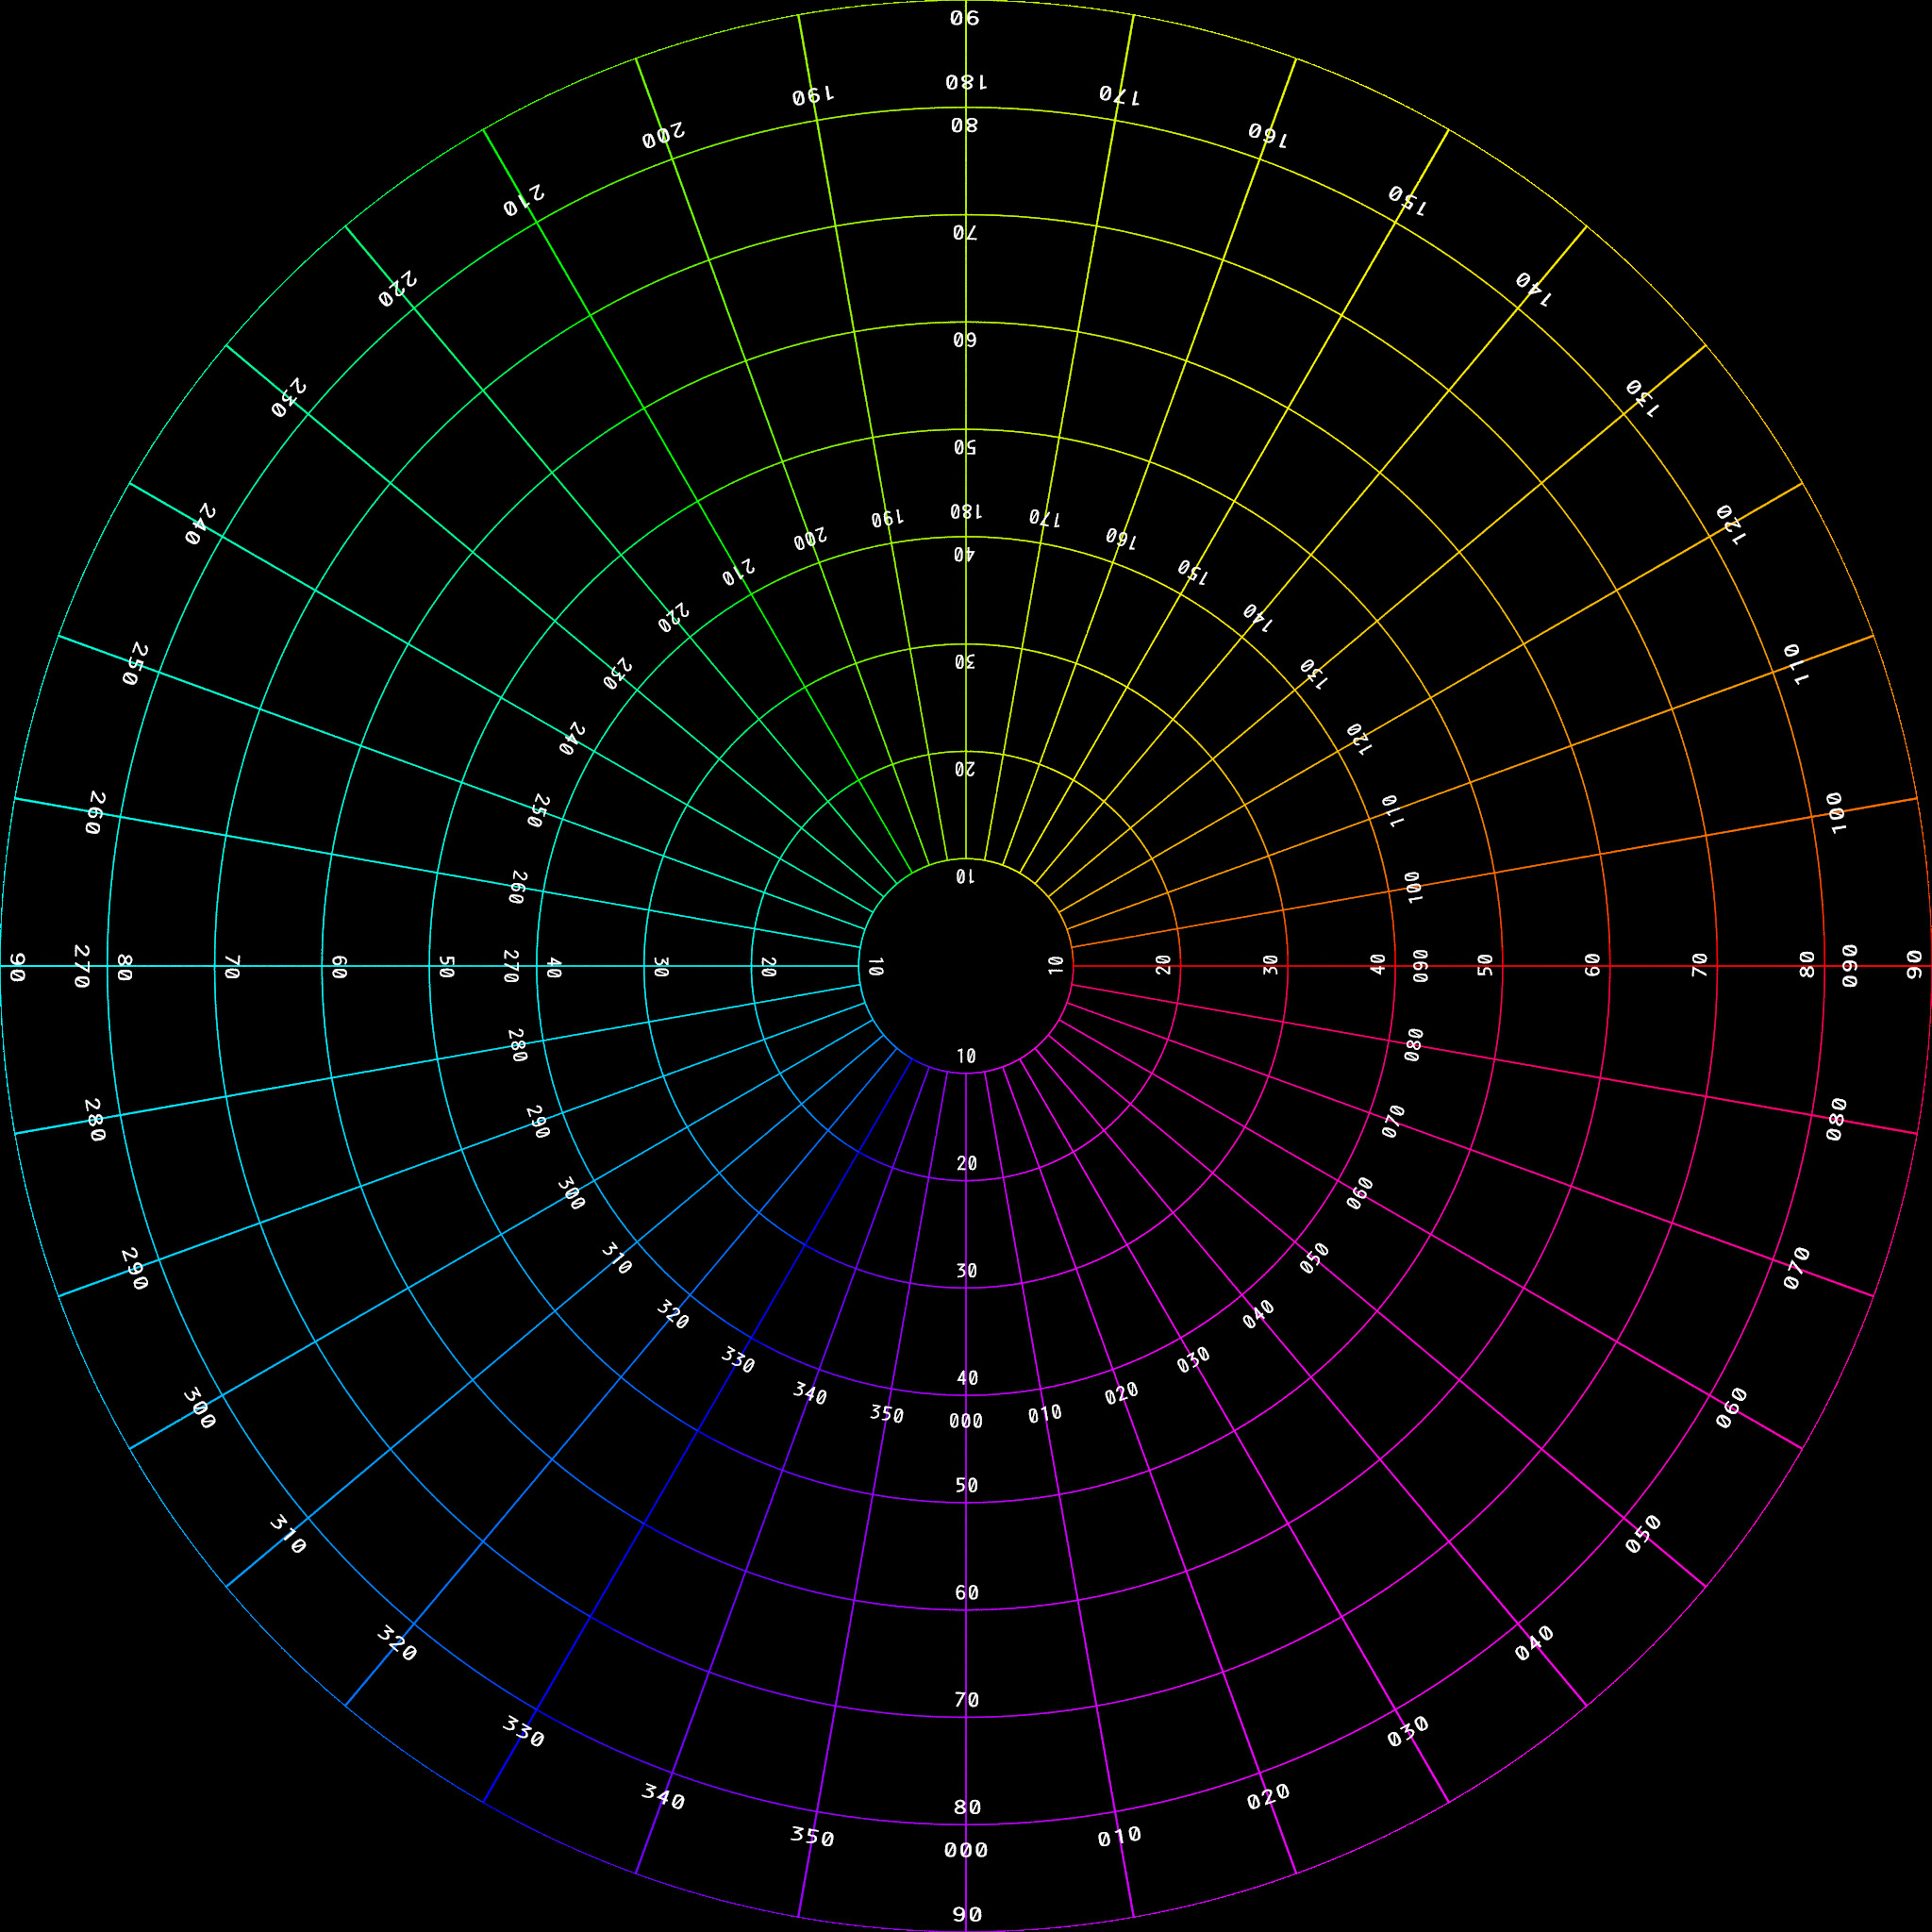
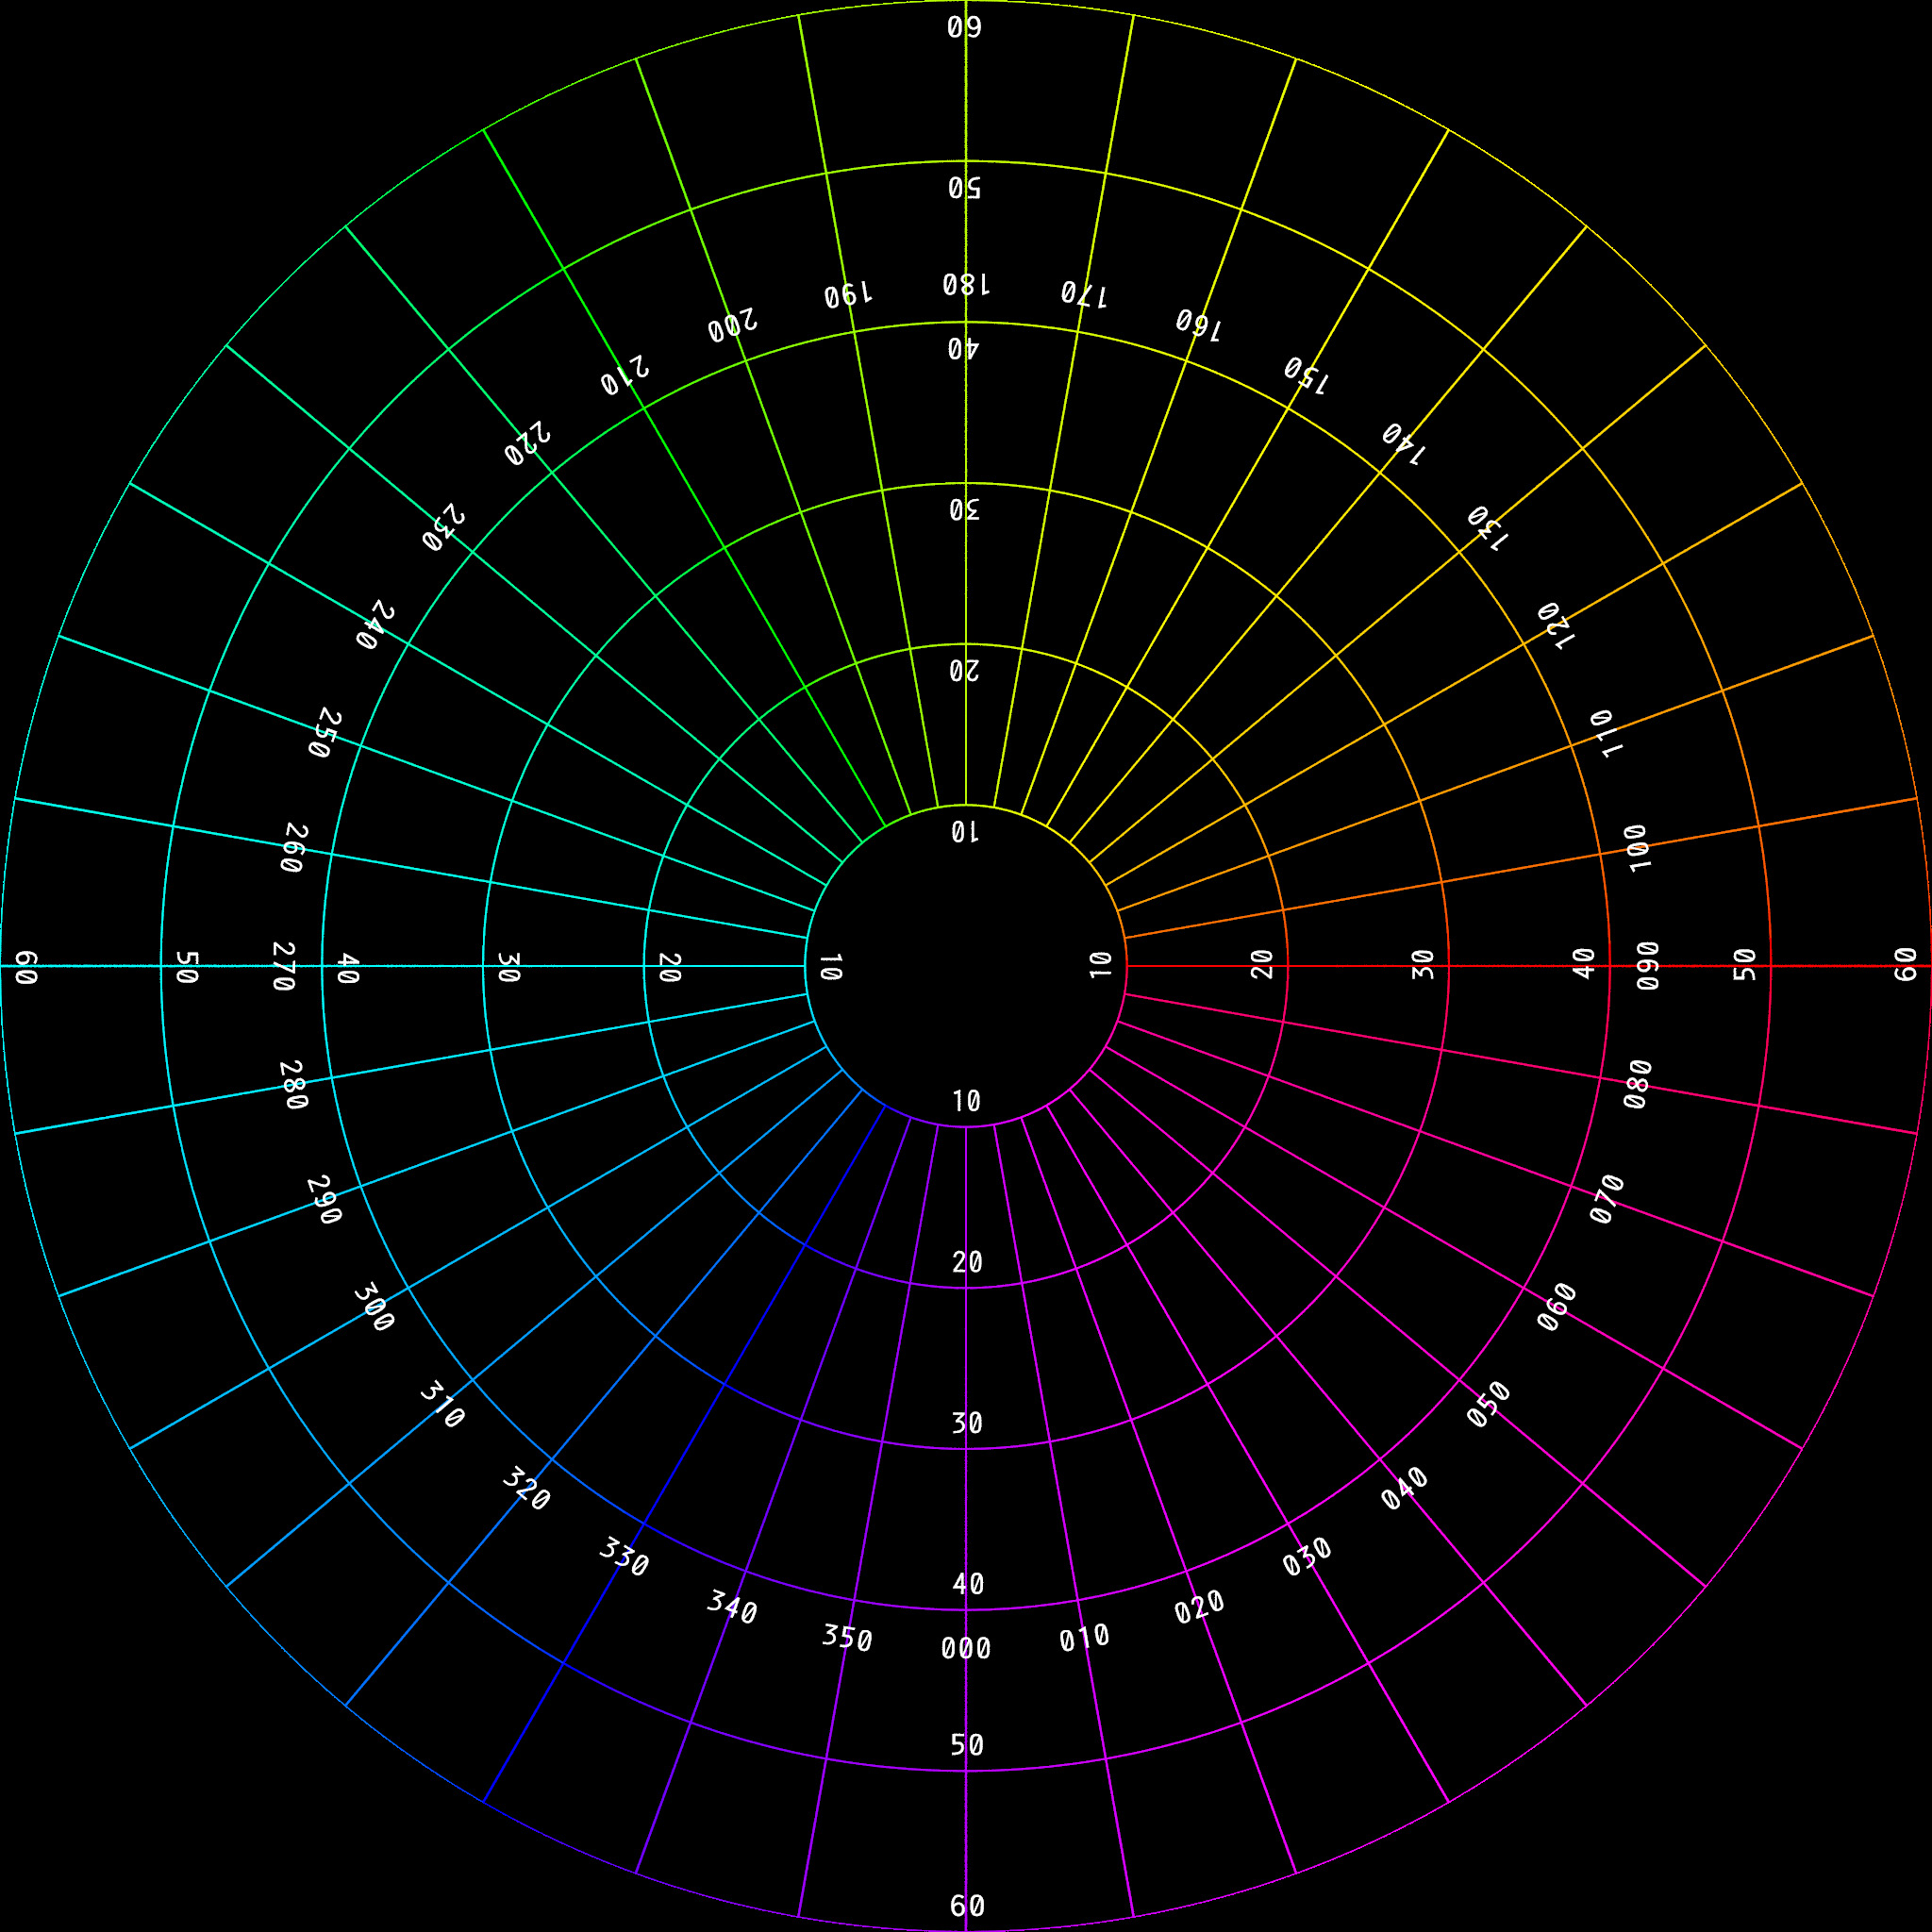
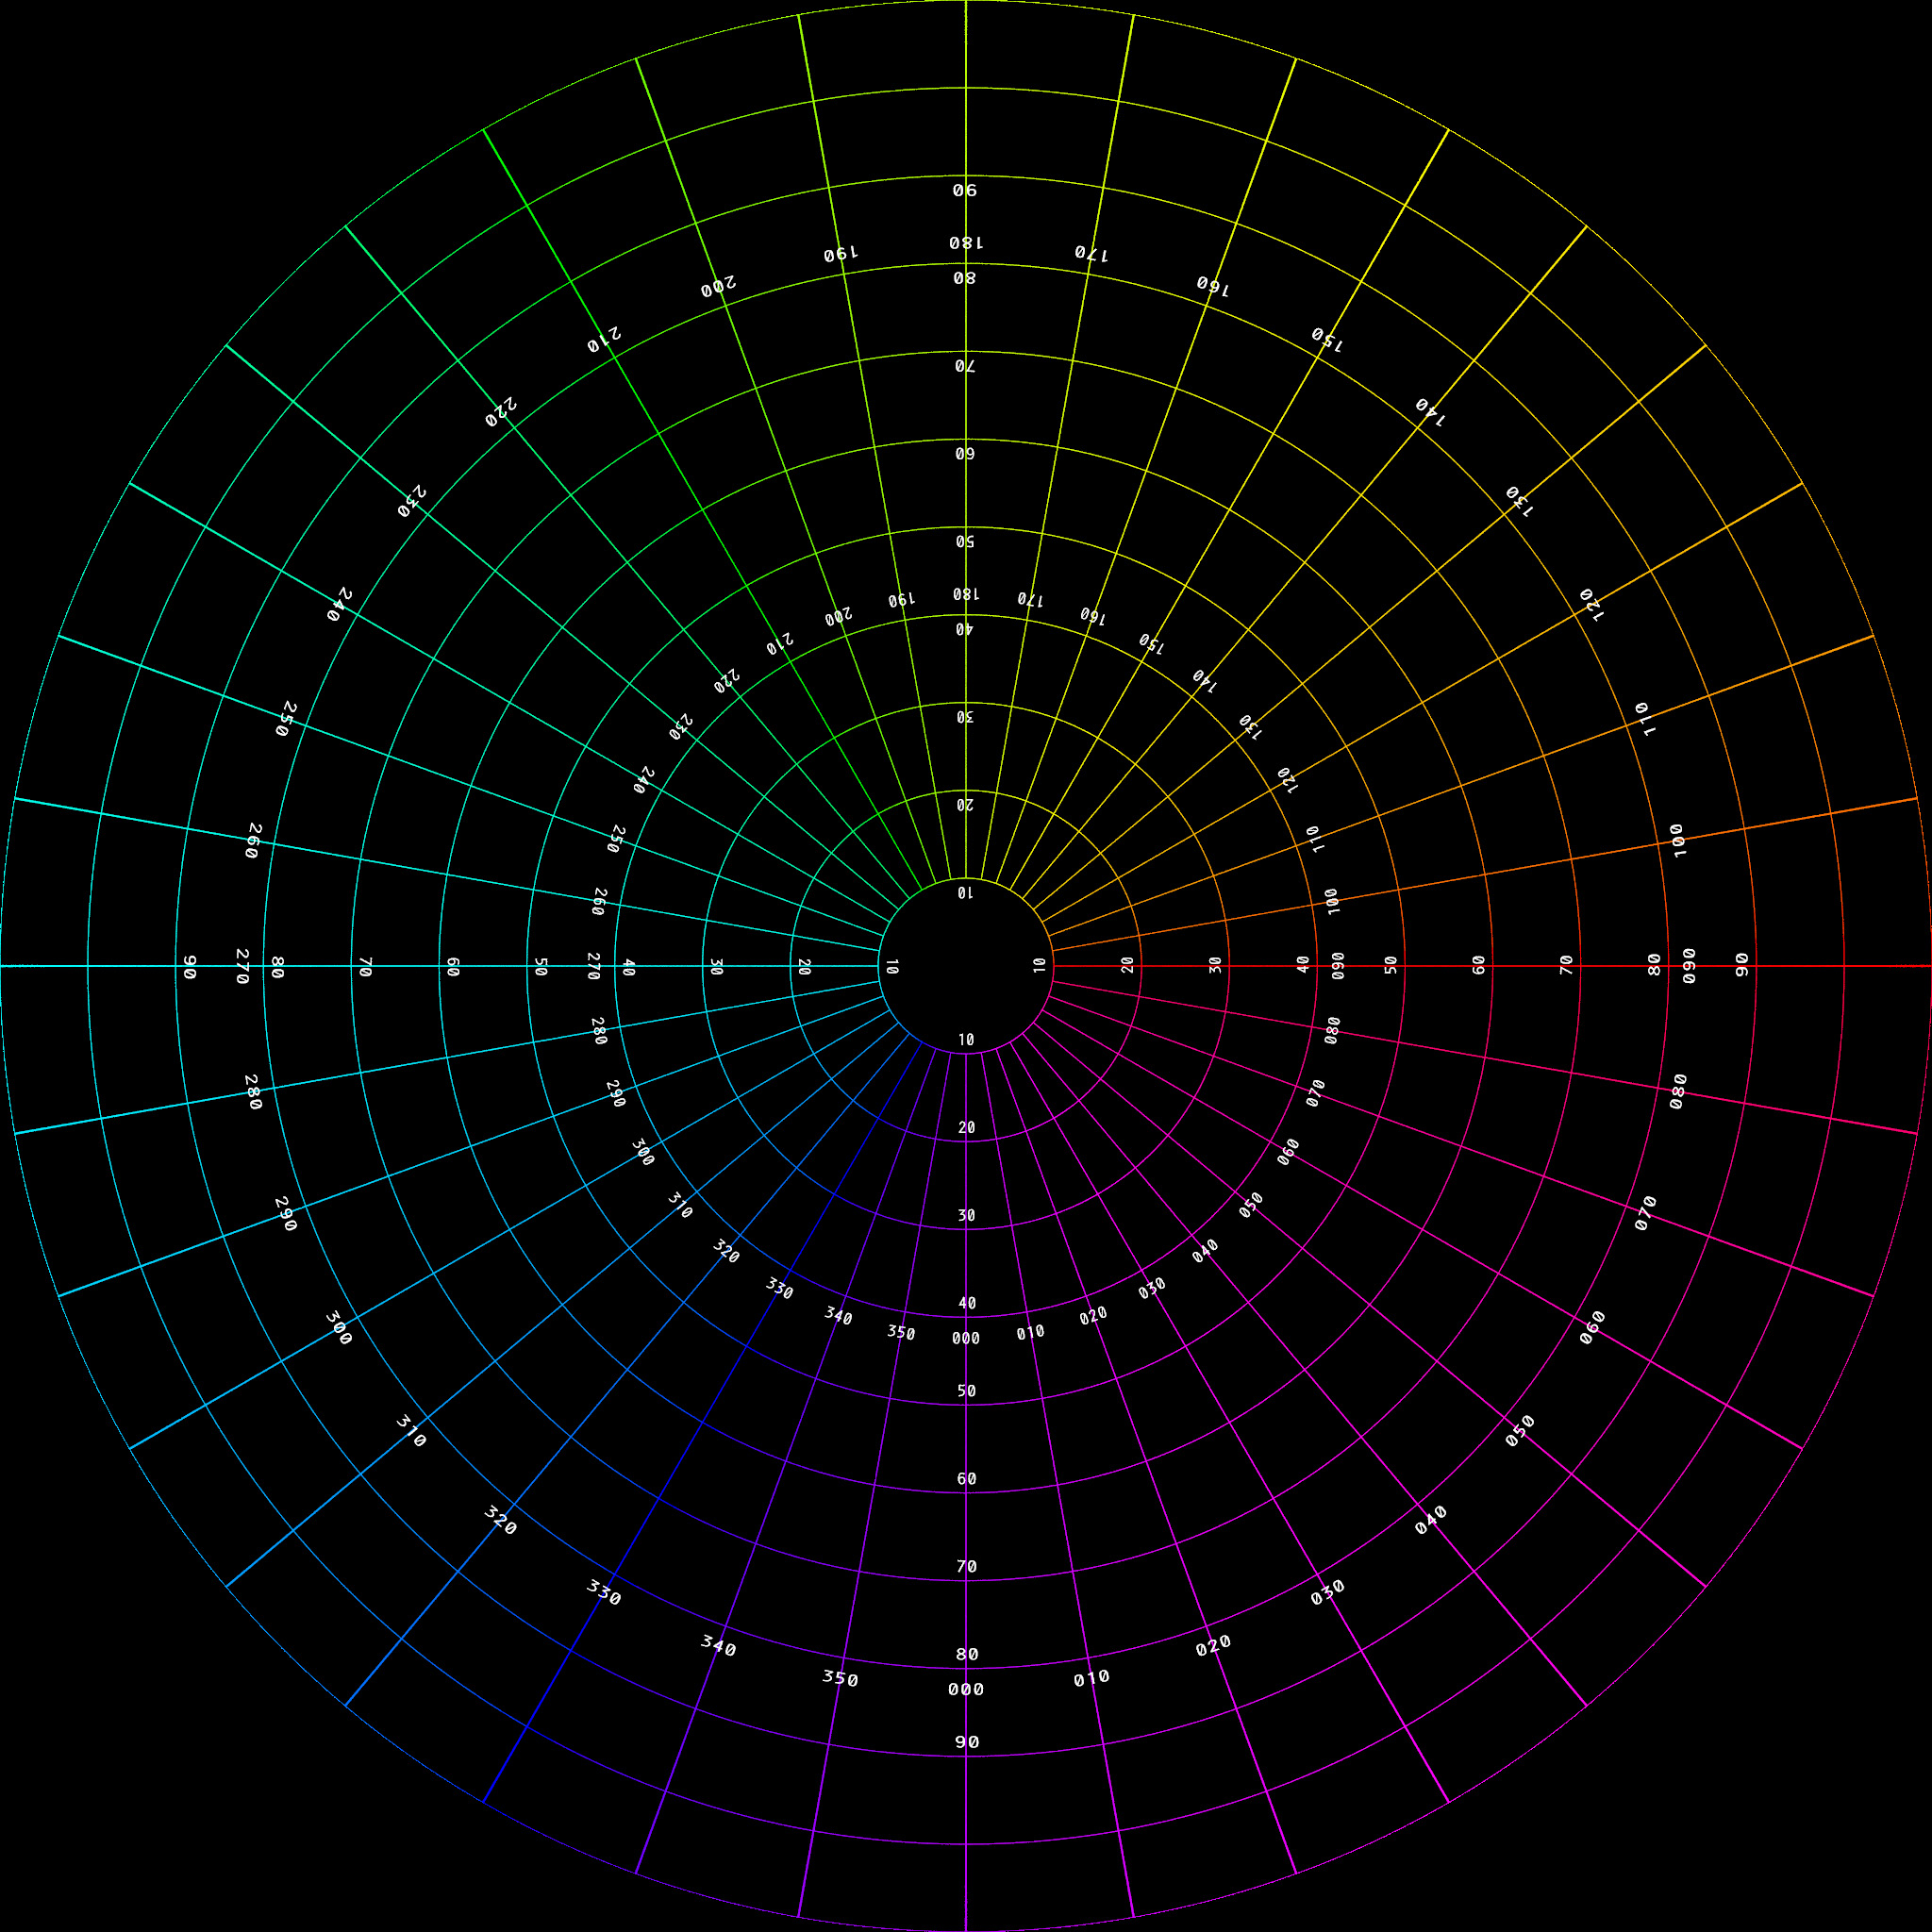
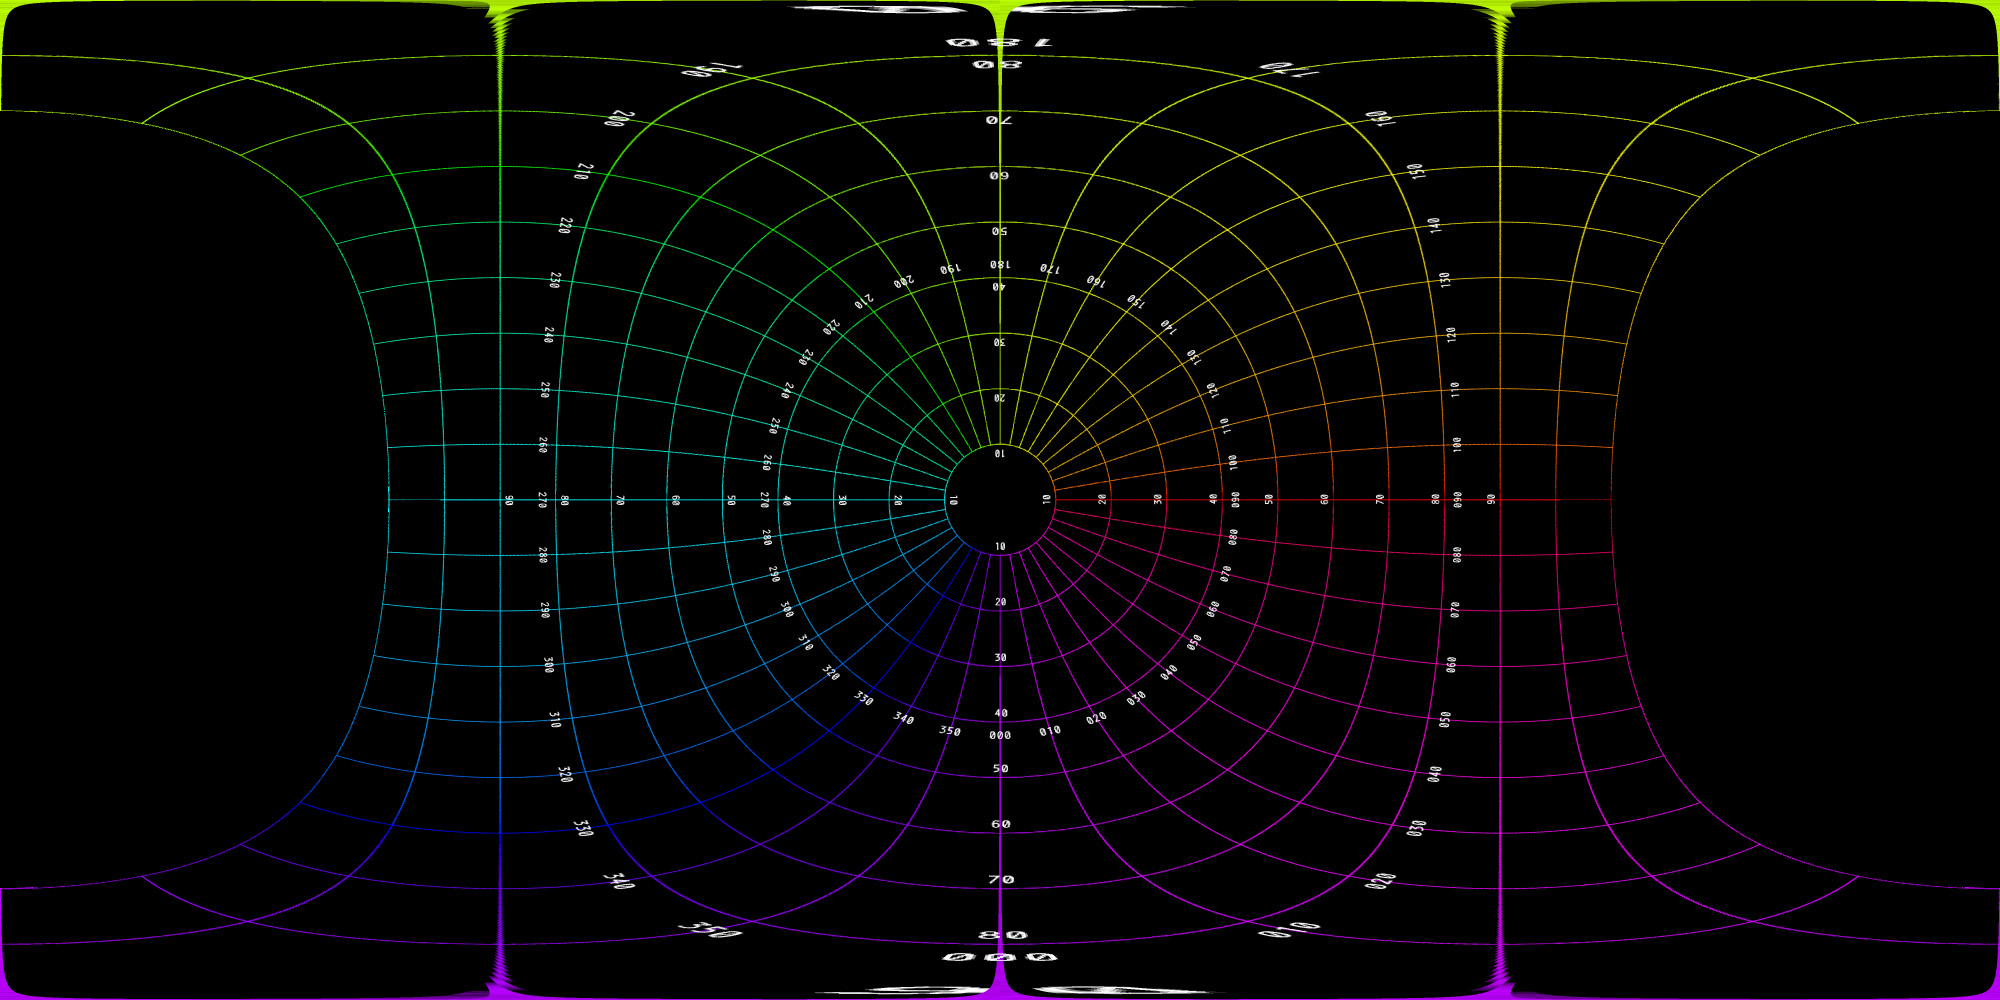
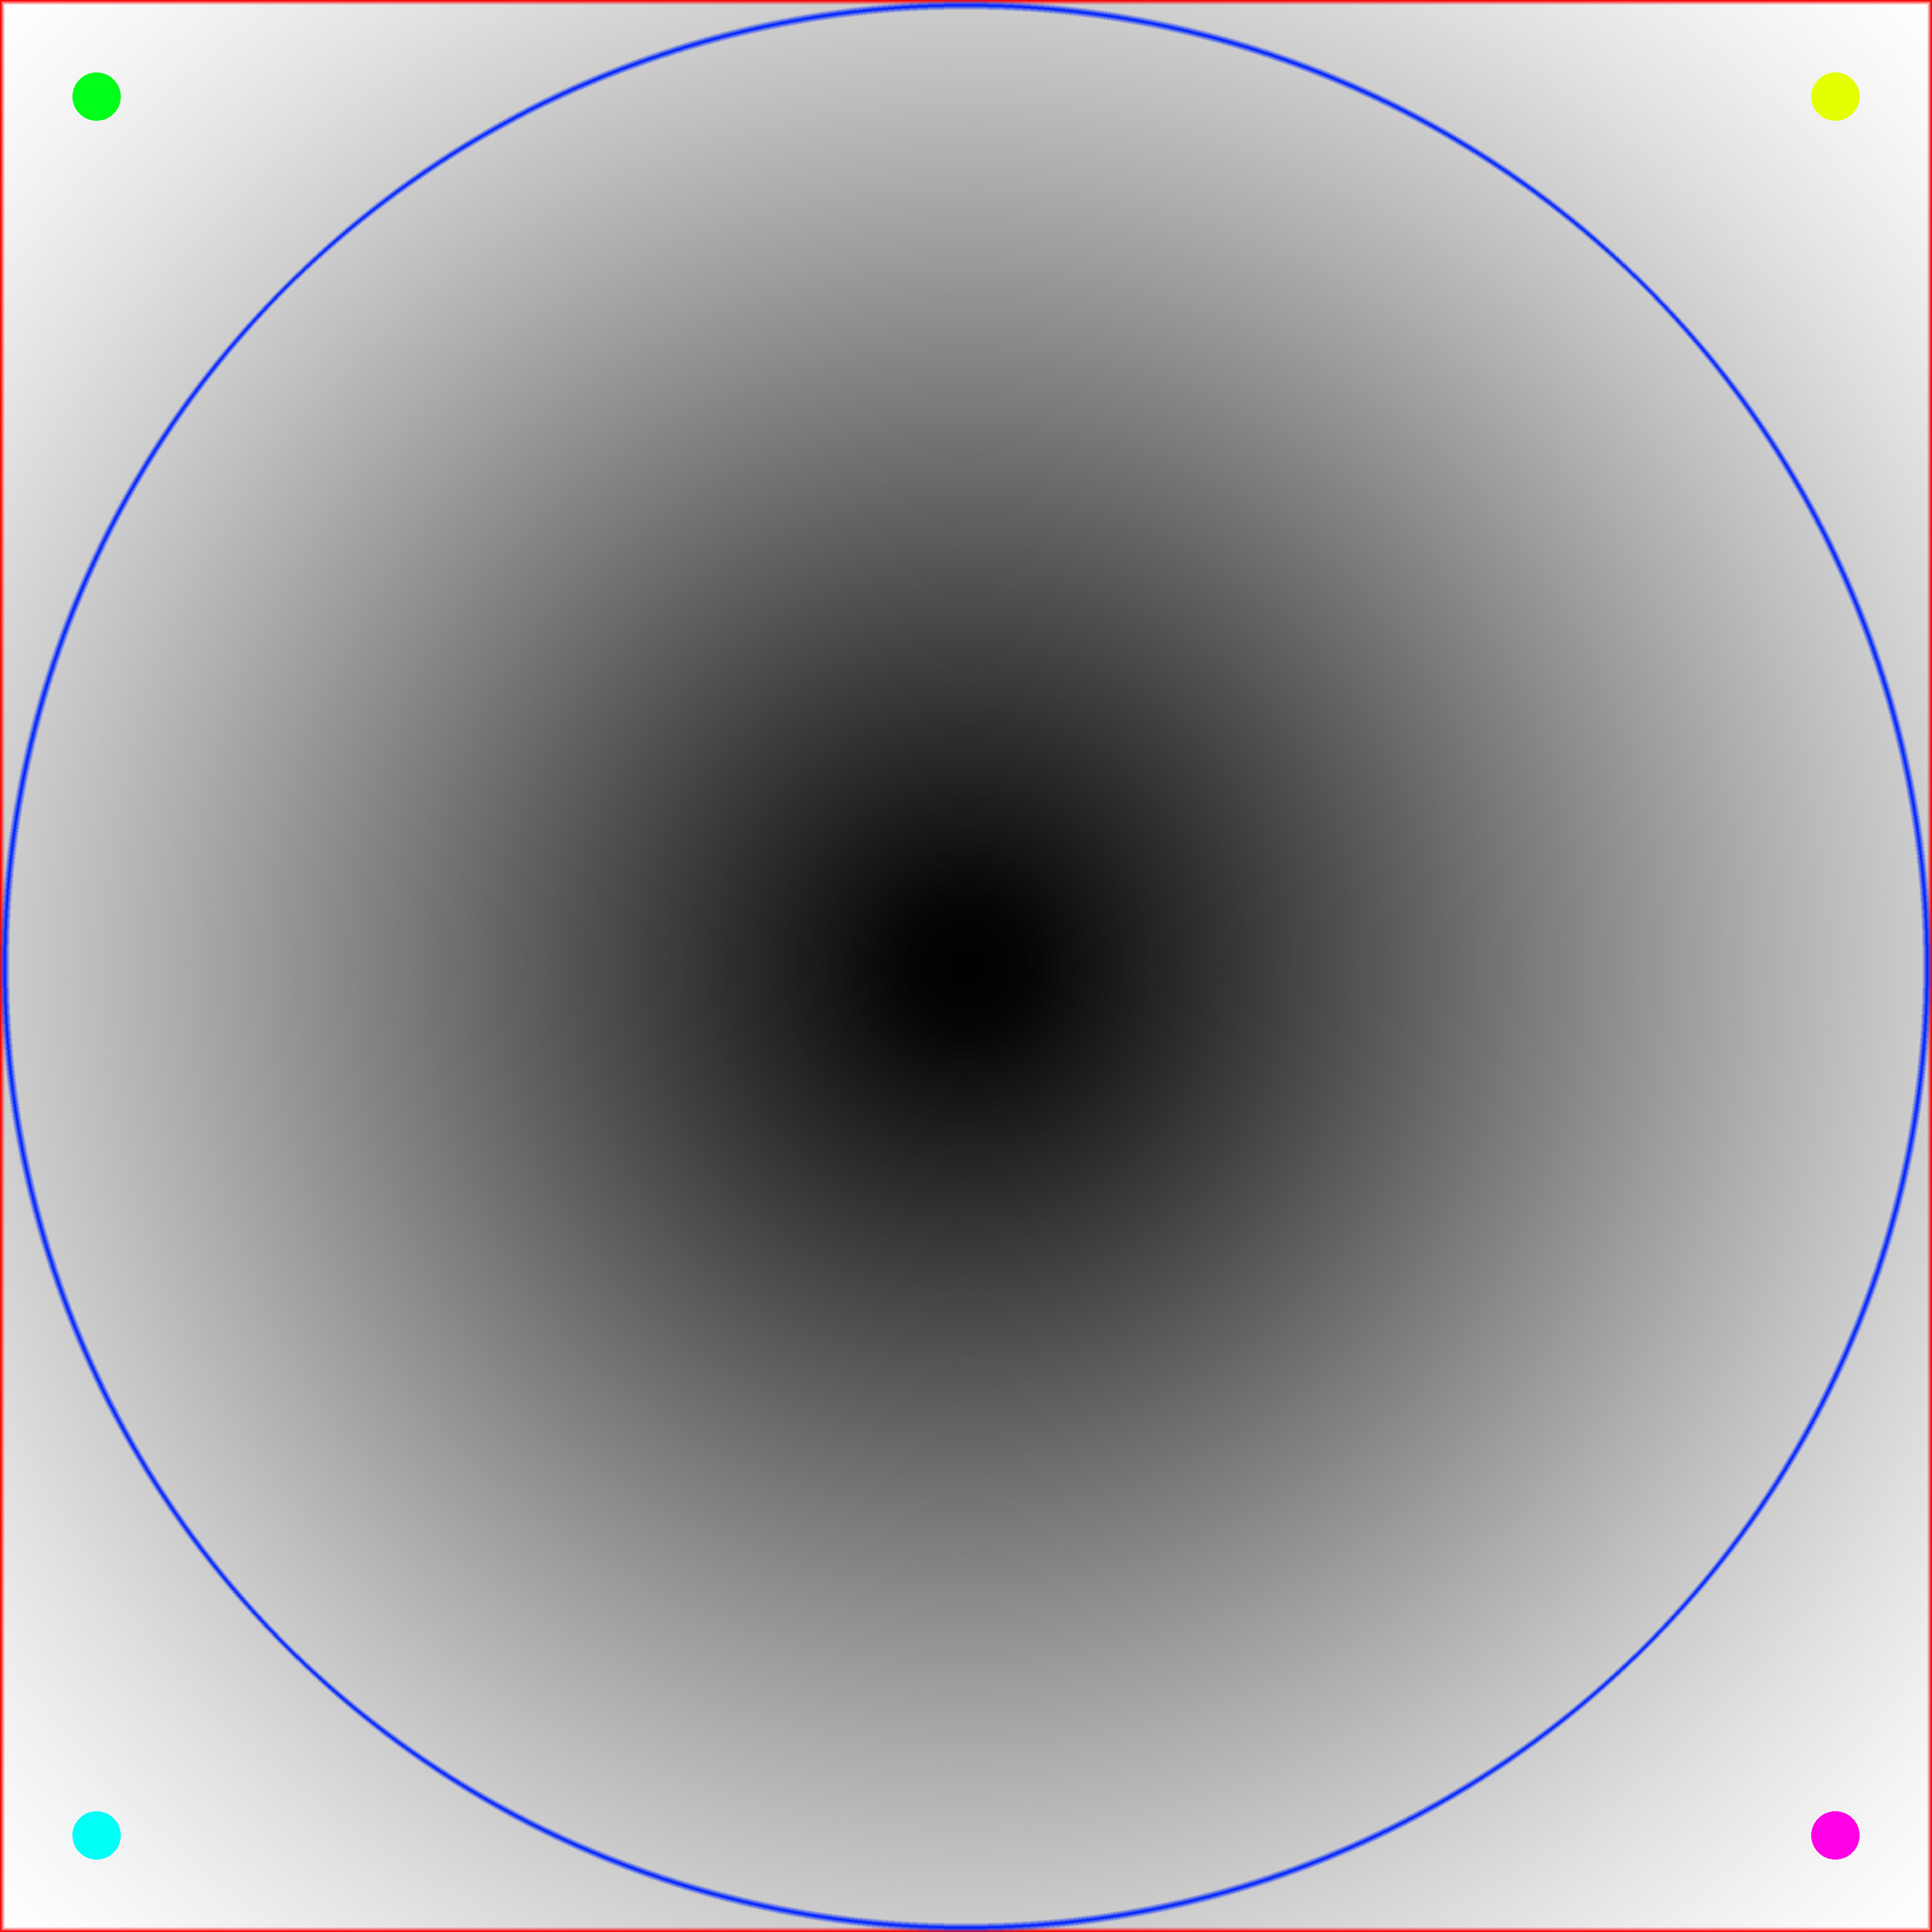
It can be illustrative to visualise where each part of the fisheye maps to especially for fisheyes greater than 180 degrees. The following image will be used to illustrate this, the image is surrounded by a red frame and the fisheye circle a blue frame. Note that the area between the blue and red frame can still be considered to be part of the fisheye, just with wider angles.
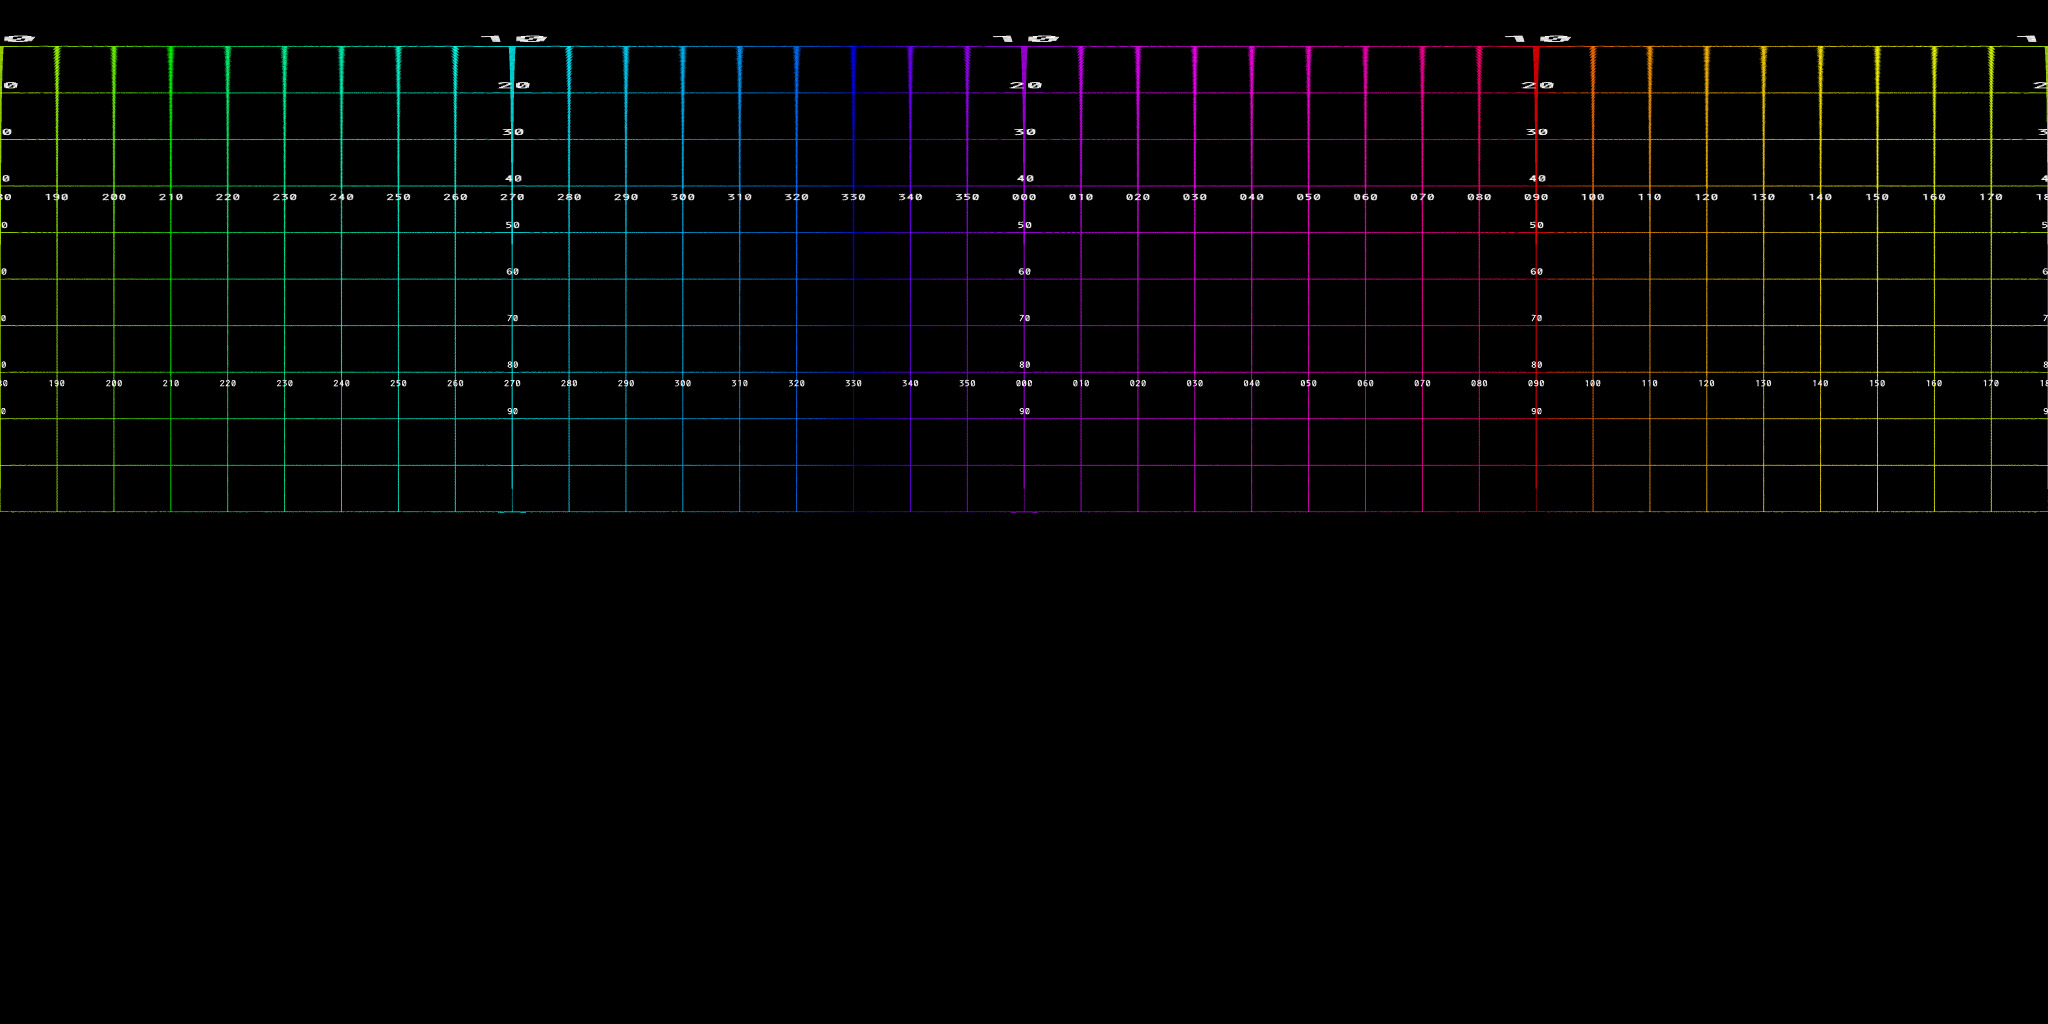
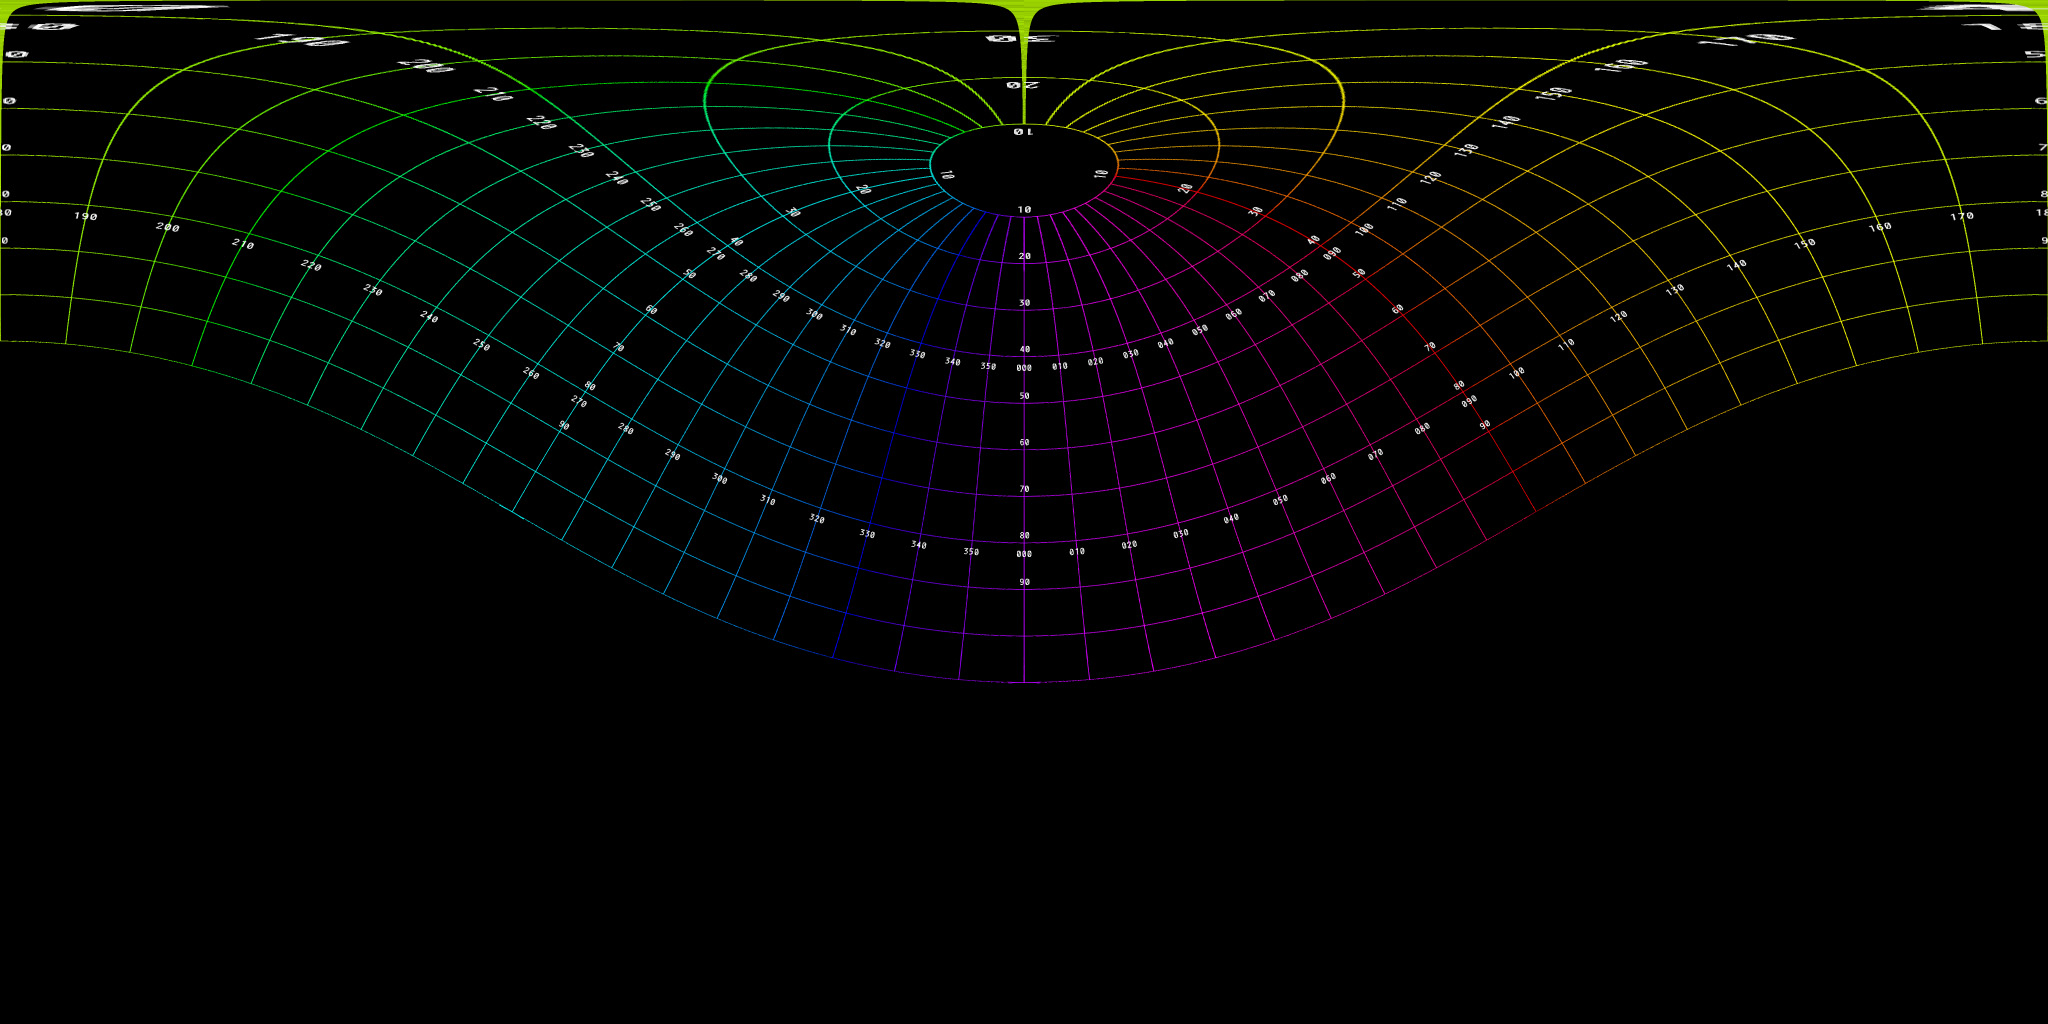
Considering the fisheye circle to be 160, 180, 200, 220 degrees gives the following equirectangular images. Note the light grey surround correspond to angles in the equirectangular that are not mapped.
160 degrees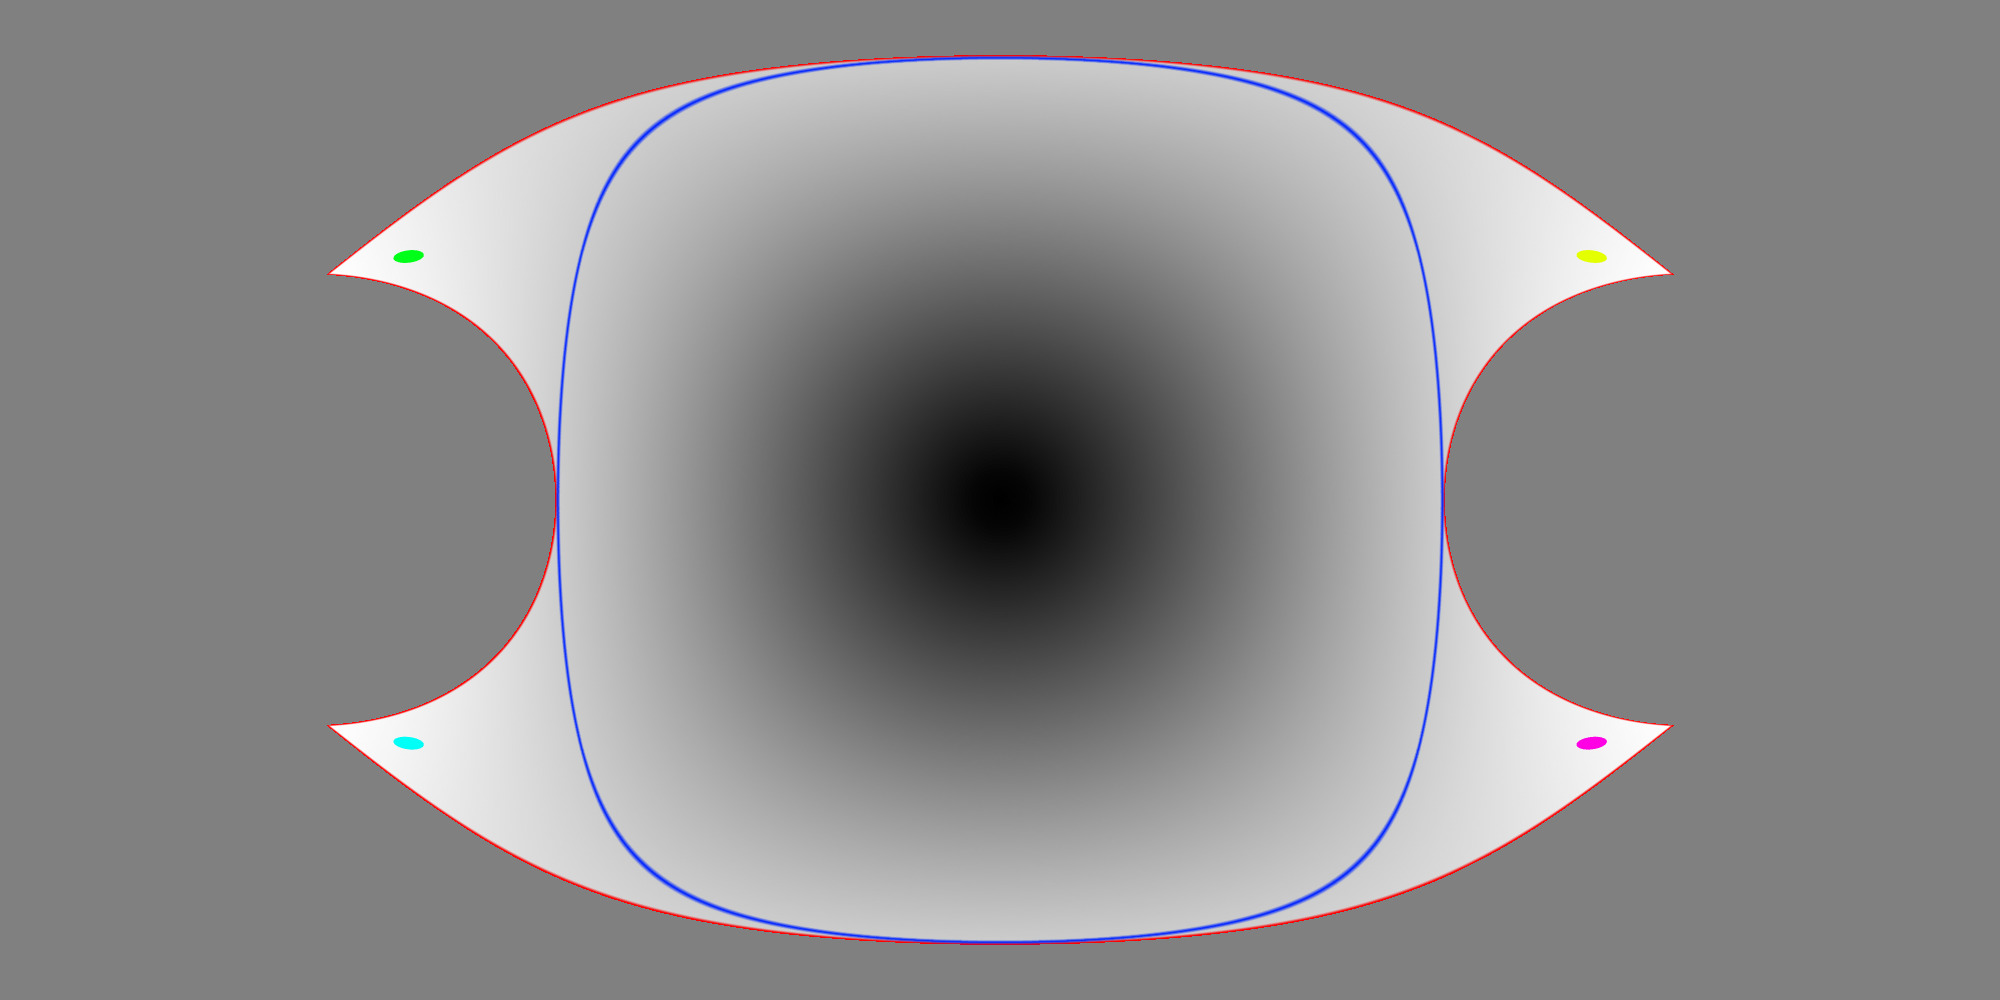 | 180 degrees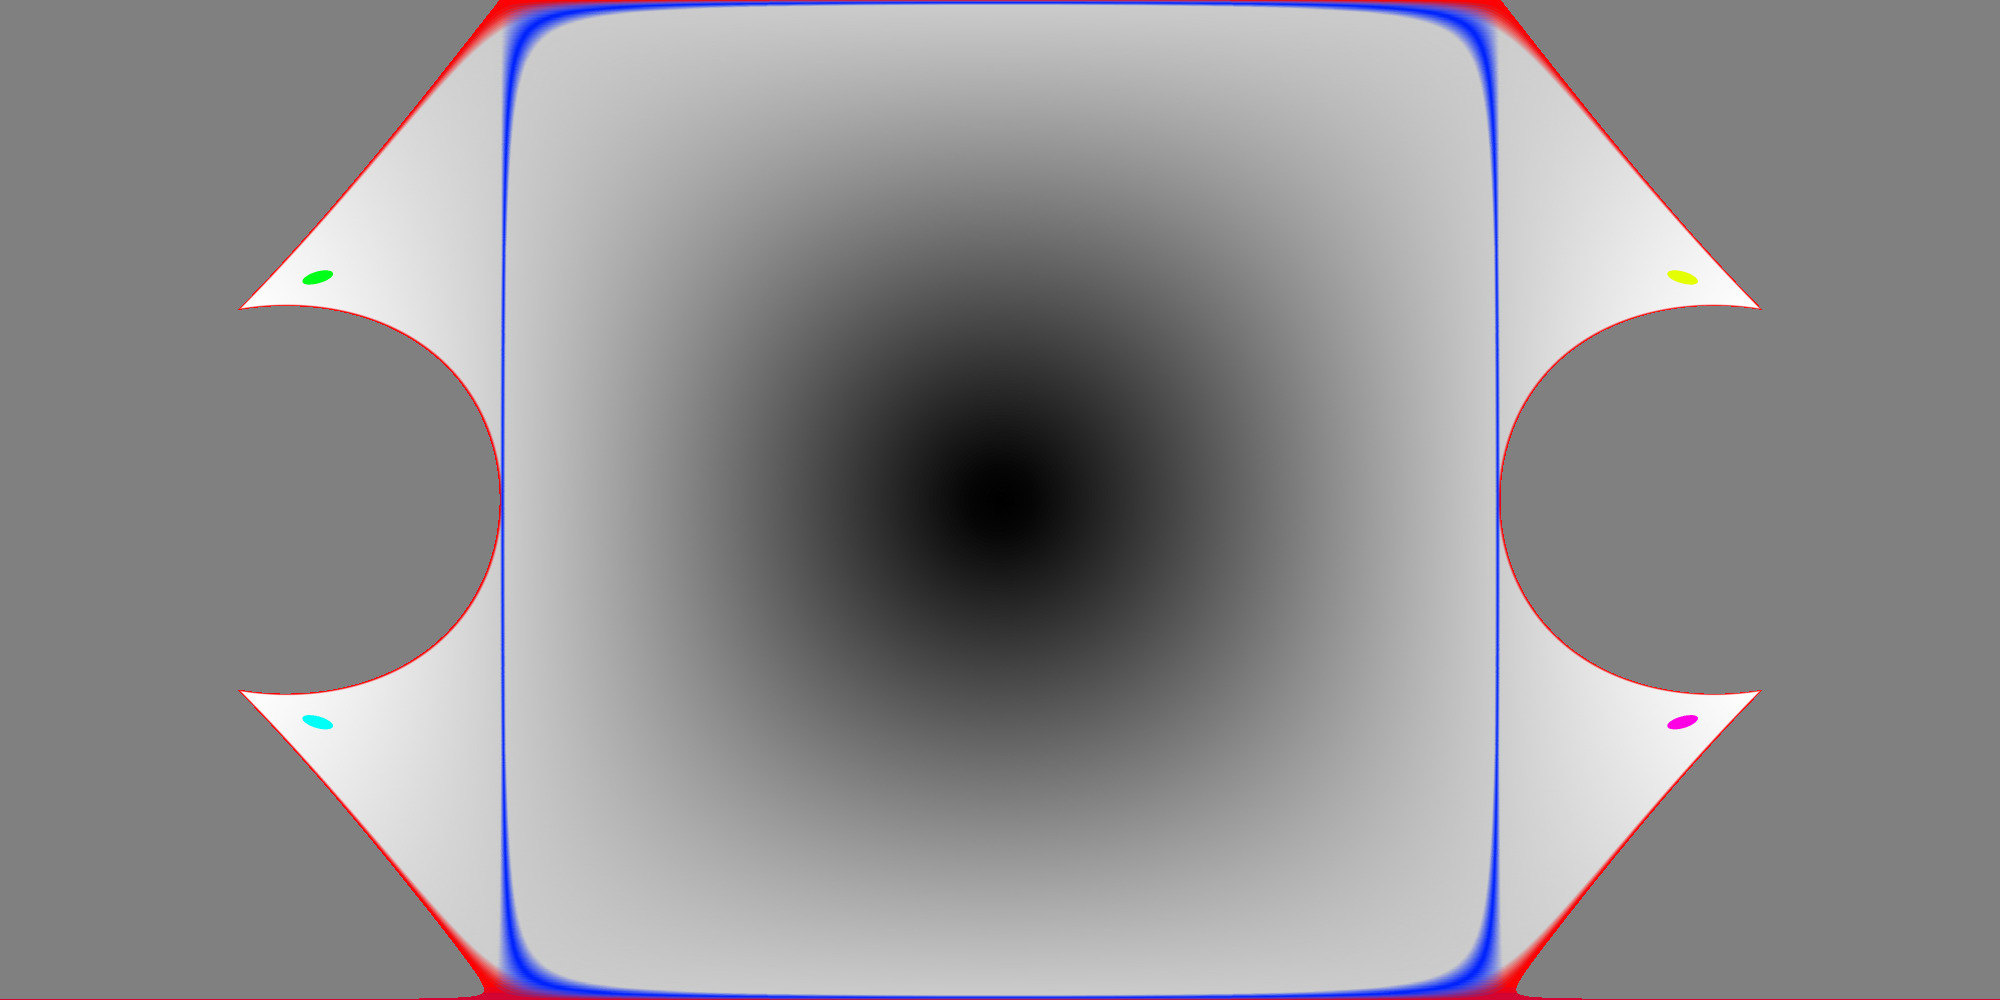 |
200 degrees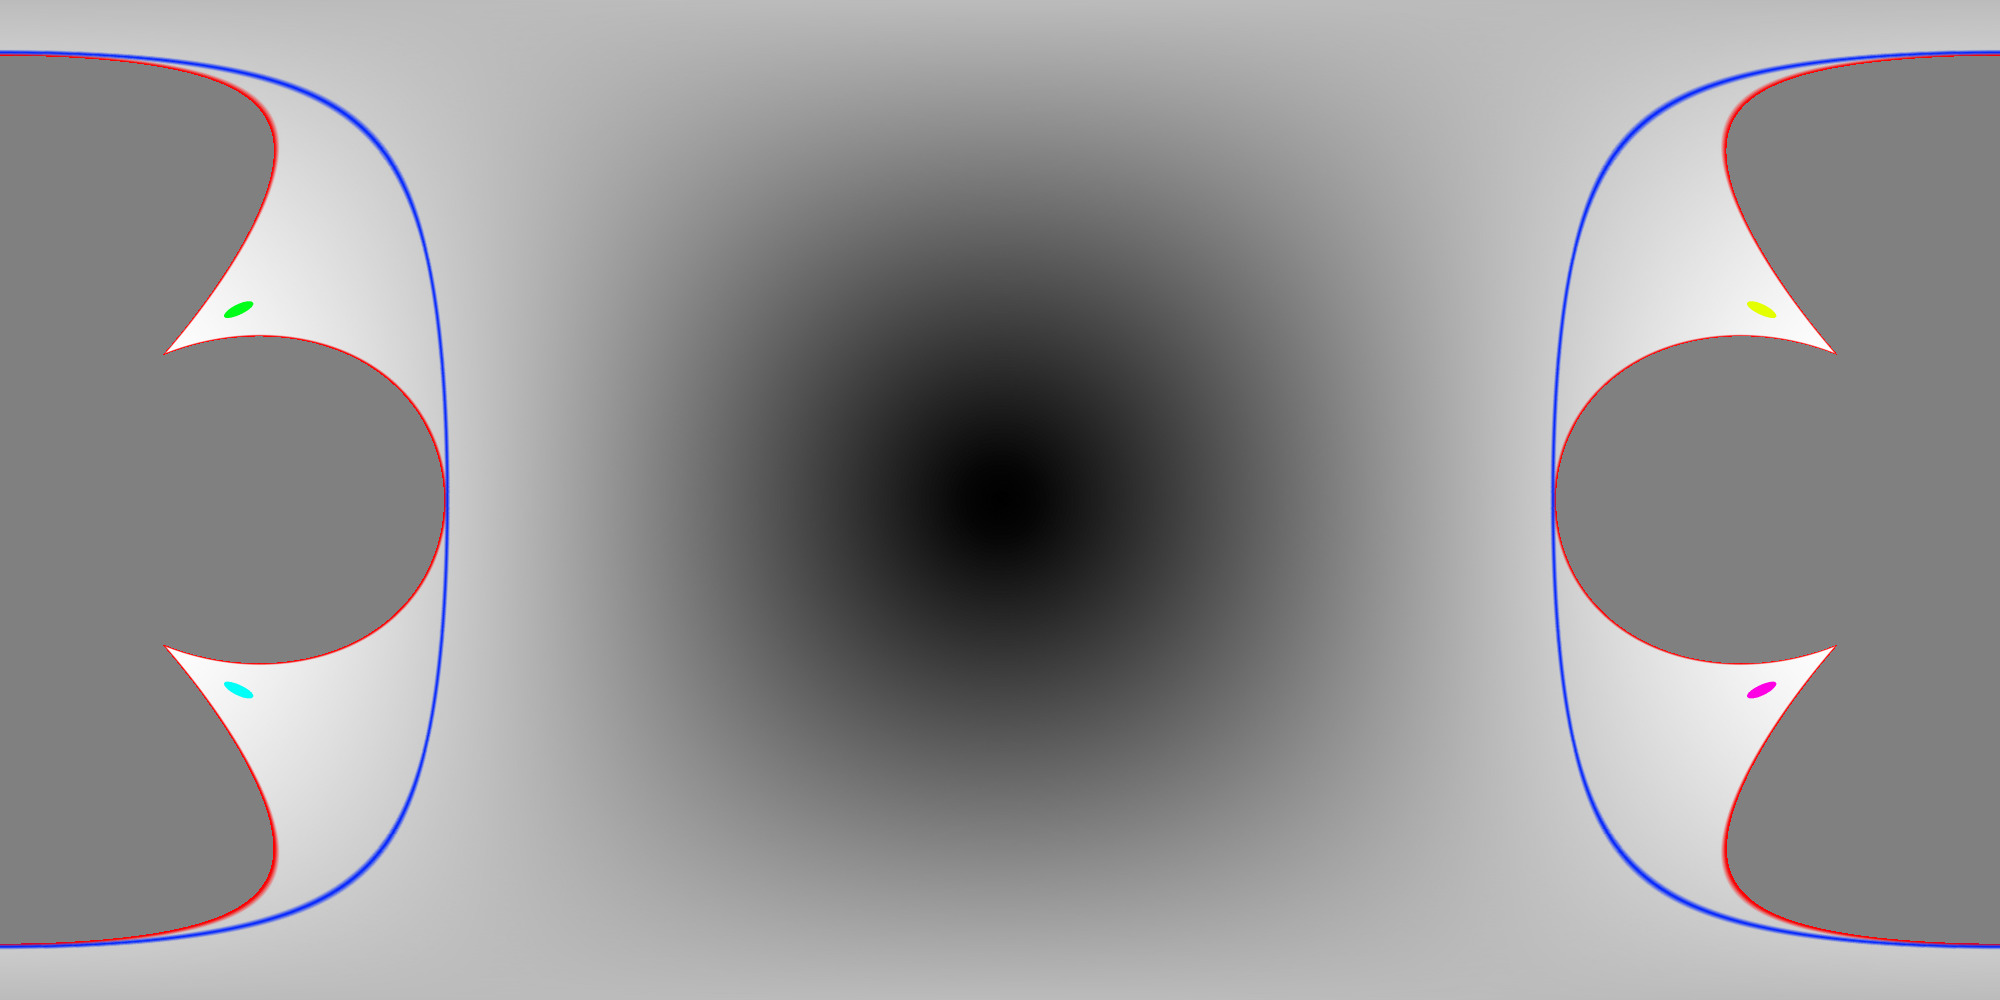 | 220 degrees |
Fisheye to (full) panorama
Software: fish2panoUpdate December 2016: This function now only creates cylindrical panoramas and fish2sphere only creates spherical (equirectangular) projections.
The following is a slightly more general version of conversion to a panoramic projection. It creates cylindrical projections, handles different fisheye orientations but the main difference is it is designed to image into a full 360 projection obviously with parts not covered because of the limited field of view of a fisheye compared to a full spherical projection.
Usage: fish2pano [options] fisheyeimage
Options
   -w n     panoramic image width, default = 1024
   -h n     panoramic image height, default = derived
   -s n     aperture of fisheye (degrees), default = 180
   -c x y   center of the fisheye image, default is image center
   -x n     tilt the fisheye about x (right) axis, default = 0
   -y n     roll the fisheye about the y (forward) axis, default = 0
   -z n     pan the fisheye about the z (up) axis, default = 0
   -r n     horizontal radius of the fisheye image, default is half the image width
   -r2 n    vertical radius of the fisheye if not circular, default is same as horizontal
   -a n     antialiasing level, default = 2
   -v n     vertical aperture, default: 60
   -la n n  latitude range in degrees, negative to positive angle, default: -30 to 30
   -lo n n  longitude range in degrees, default: 0 to 360
   -o       enable textured mesh output, default: off
   -2       enable split screen, half pano on top, half on bottom, default: off
   -d       enable debug mode
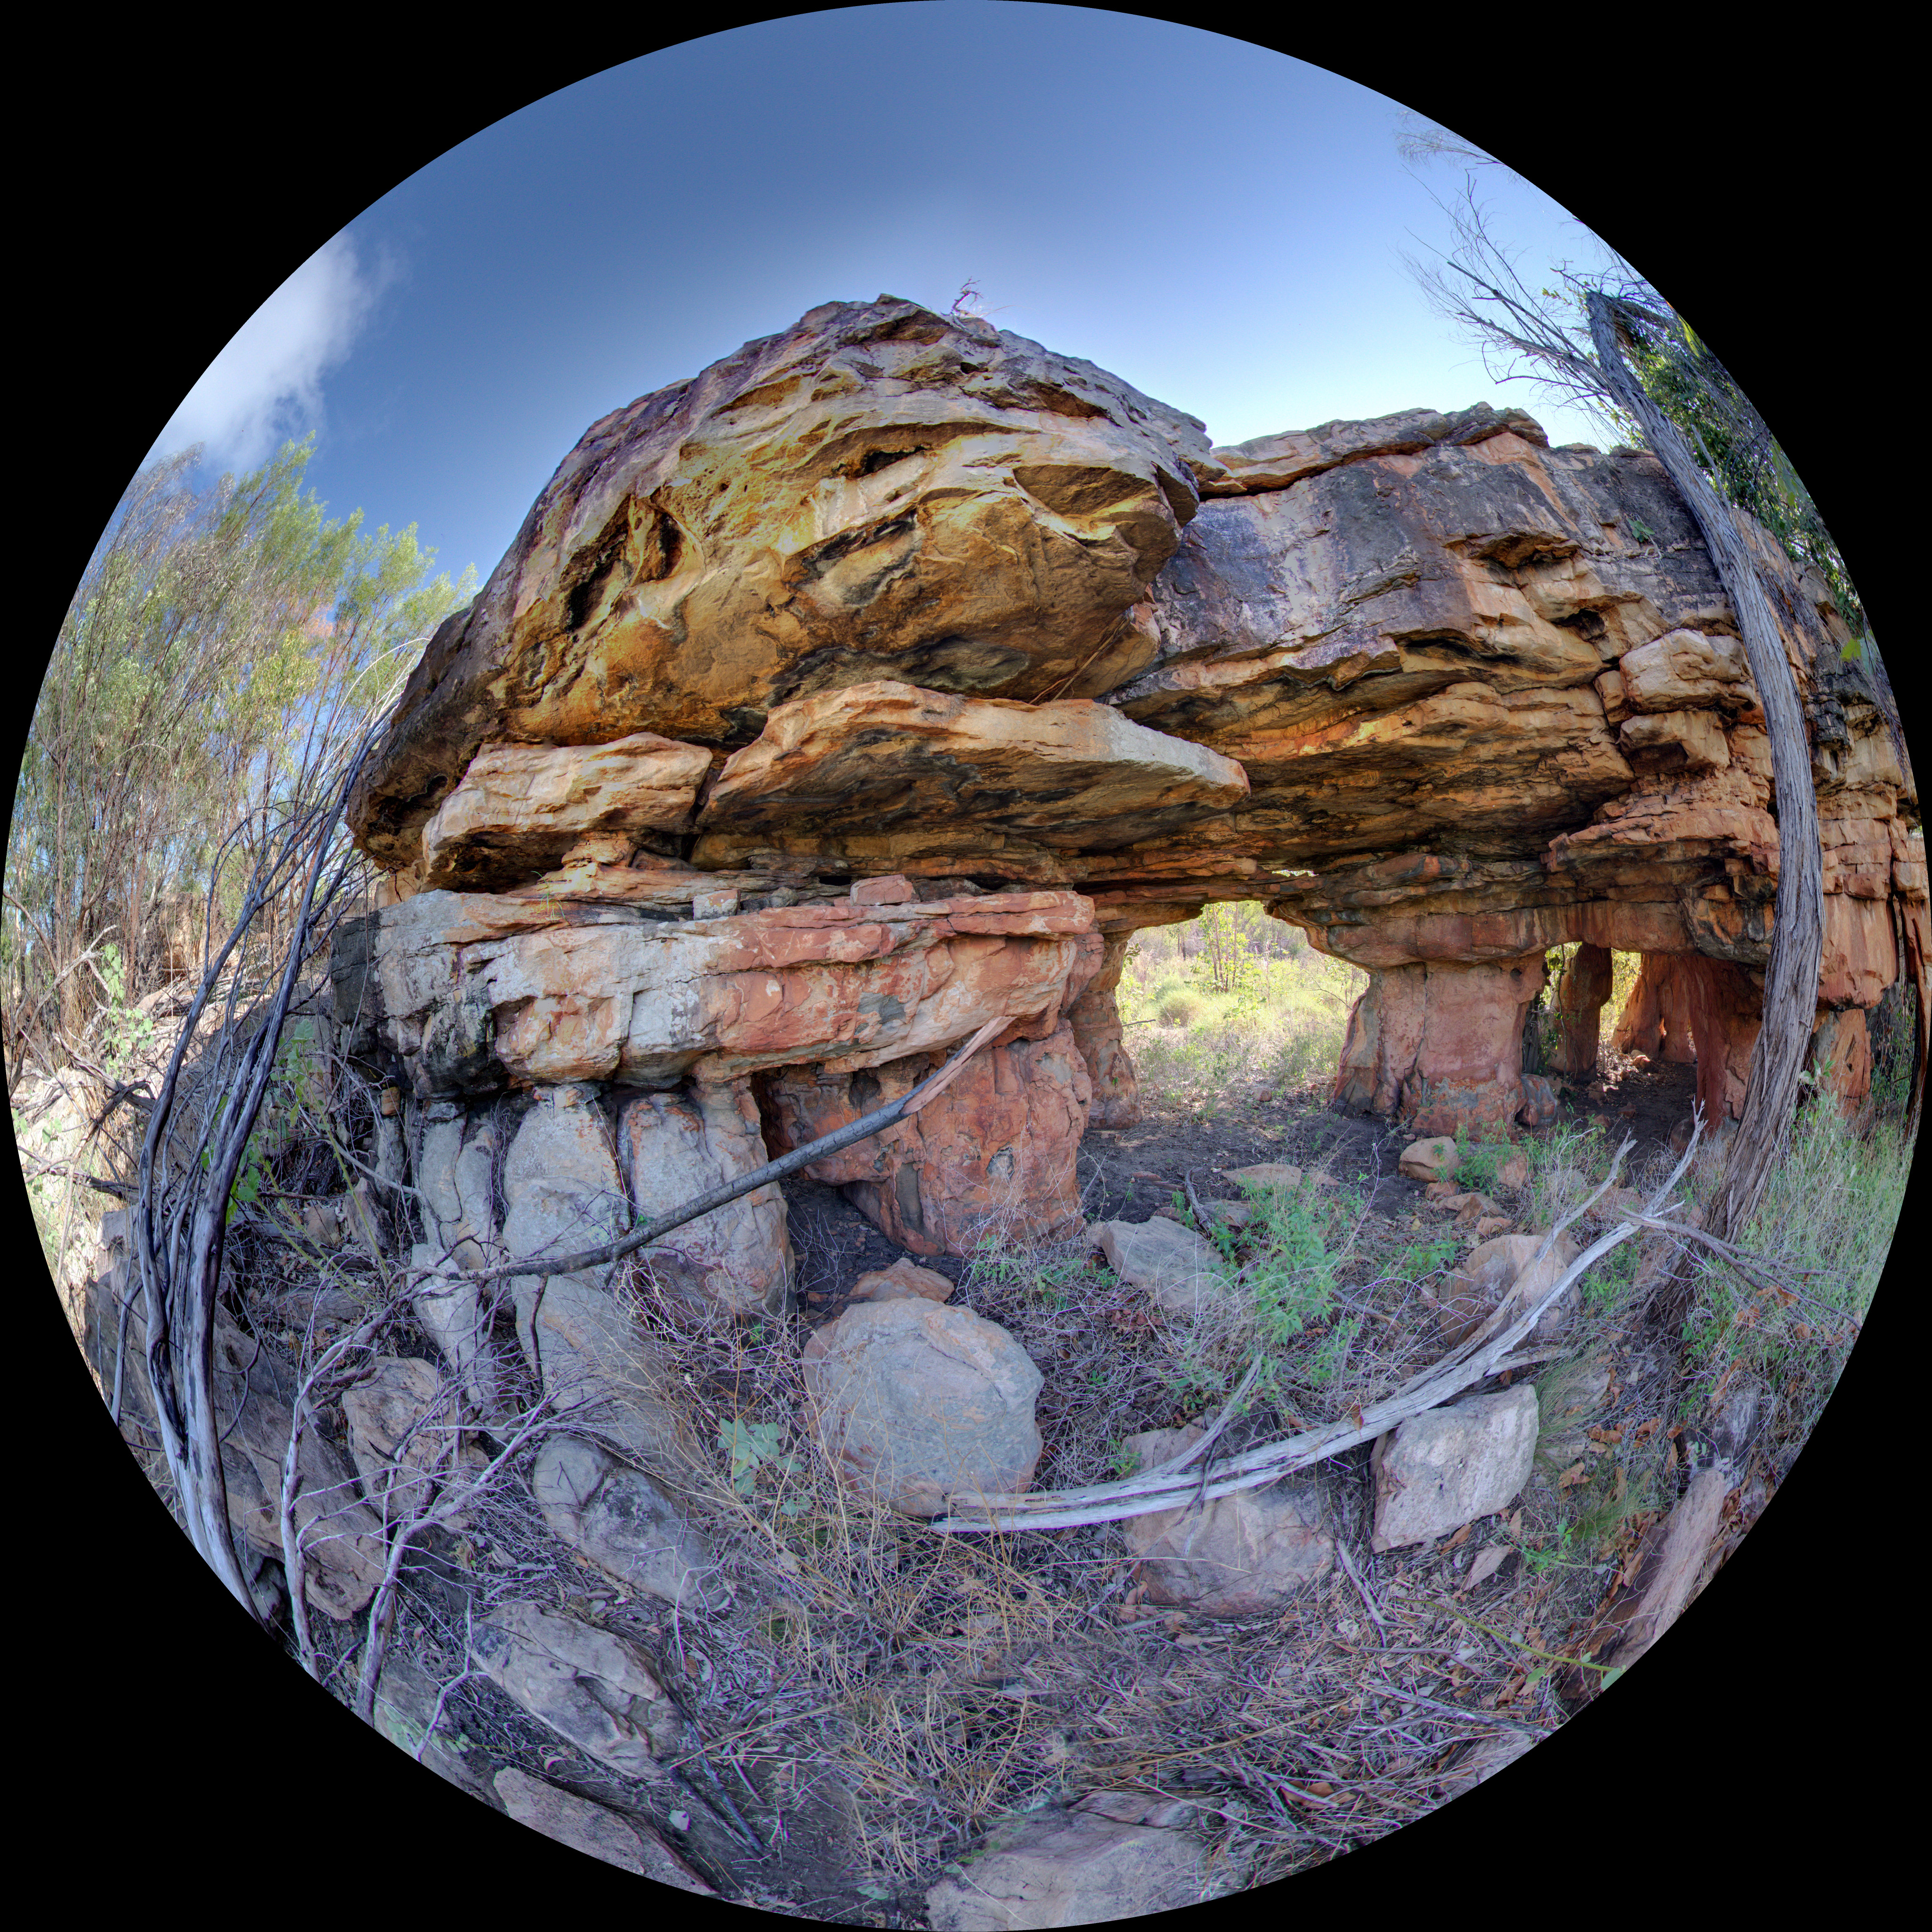
Example 1: Source fisheye image.
Black refers to the corners of the fisheye image and the grey to the unavailable data, that is, data outside the fisheye rectangle in which the circular fisheye is inscribed. Note that for a wider than 180 degree fisheye the black and grey regions will be correspondingly smaller. The "x" axis is to the right, the 90 degree rotation here gives the desired result for a forward pointing fisheye. A fisheye pointing straight up or straight down would more normally be transformed with "-x 0".

fish2pano -a 3 -w 800 -x 90
Cylindrical projection, vertical field 60 degrees and 100 degrees respectively. The vertical extent of the image is, normally, determined correctly given the vertical field of view requested but that can be overruled if desired.

fish2pano -a 3 -w 800 -x 90 -c
fish2pano -a 3 -w 800 -x 90 -c -v 100
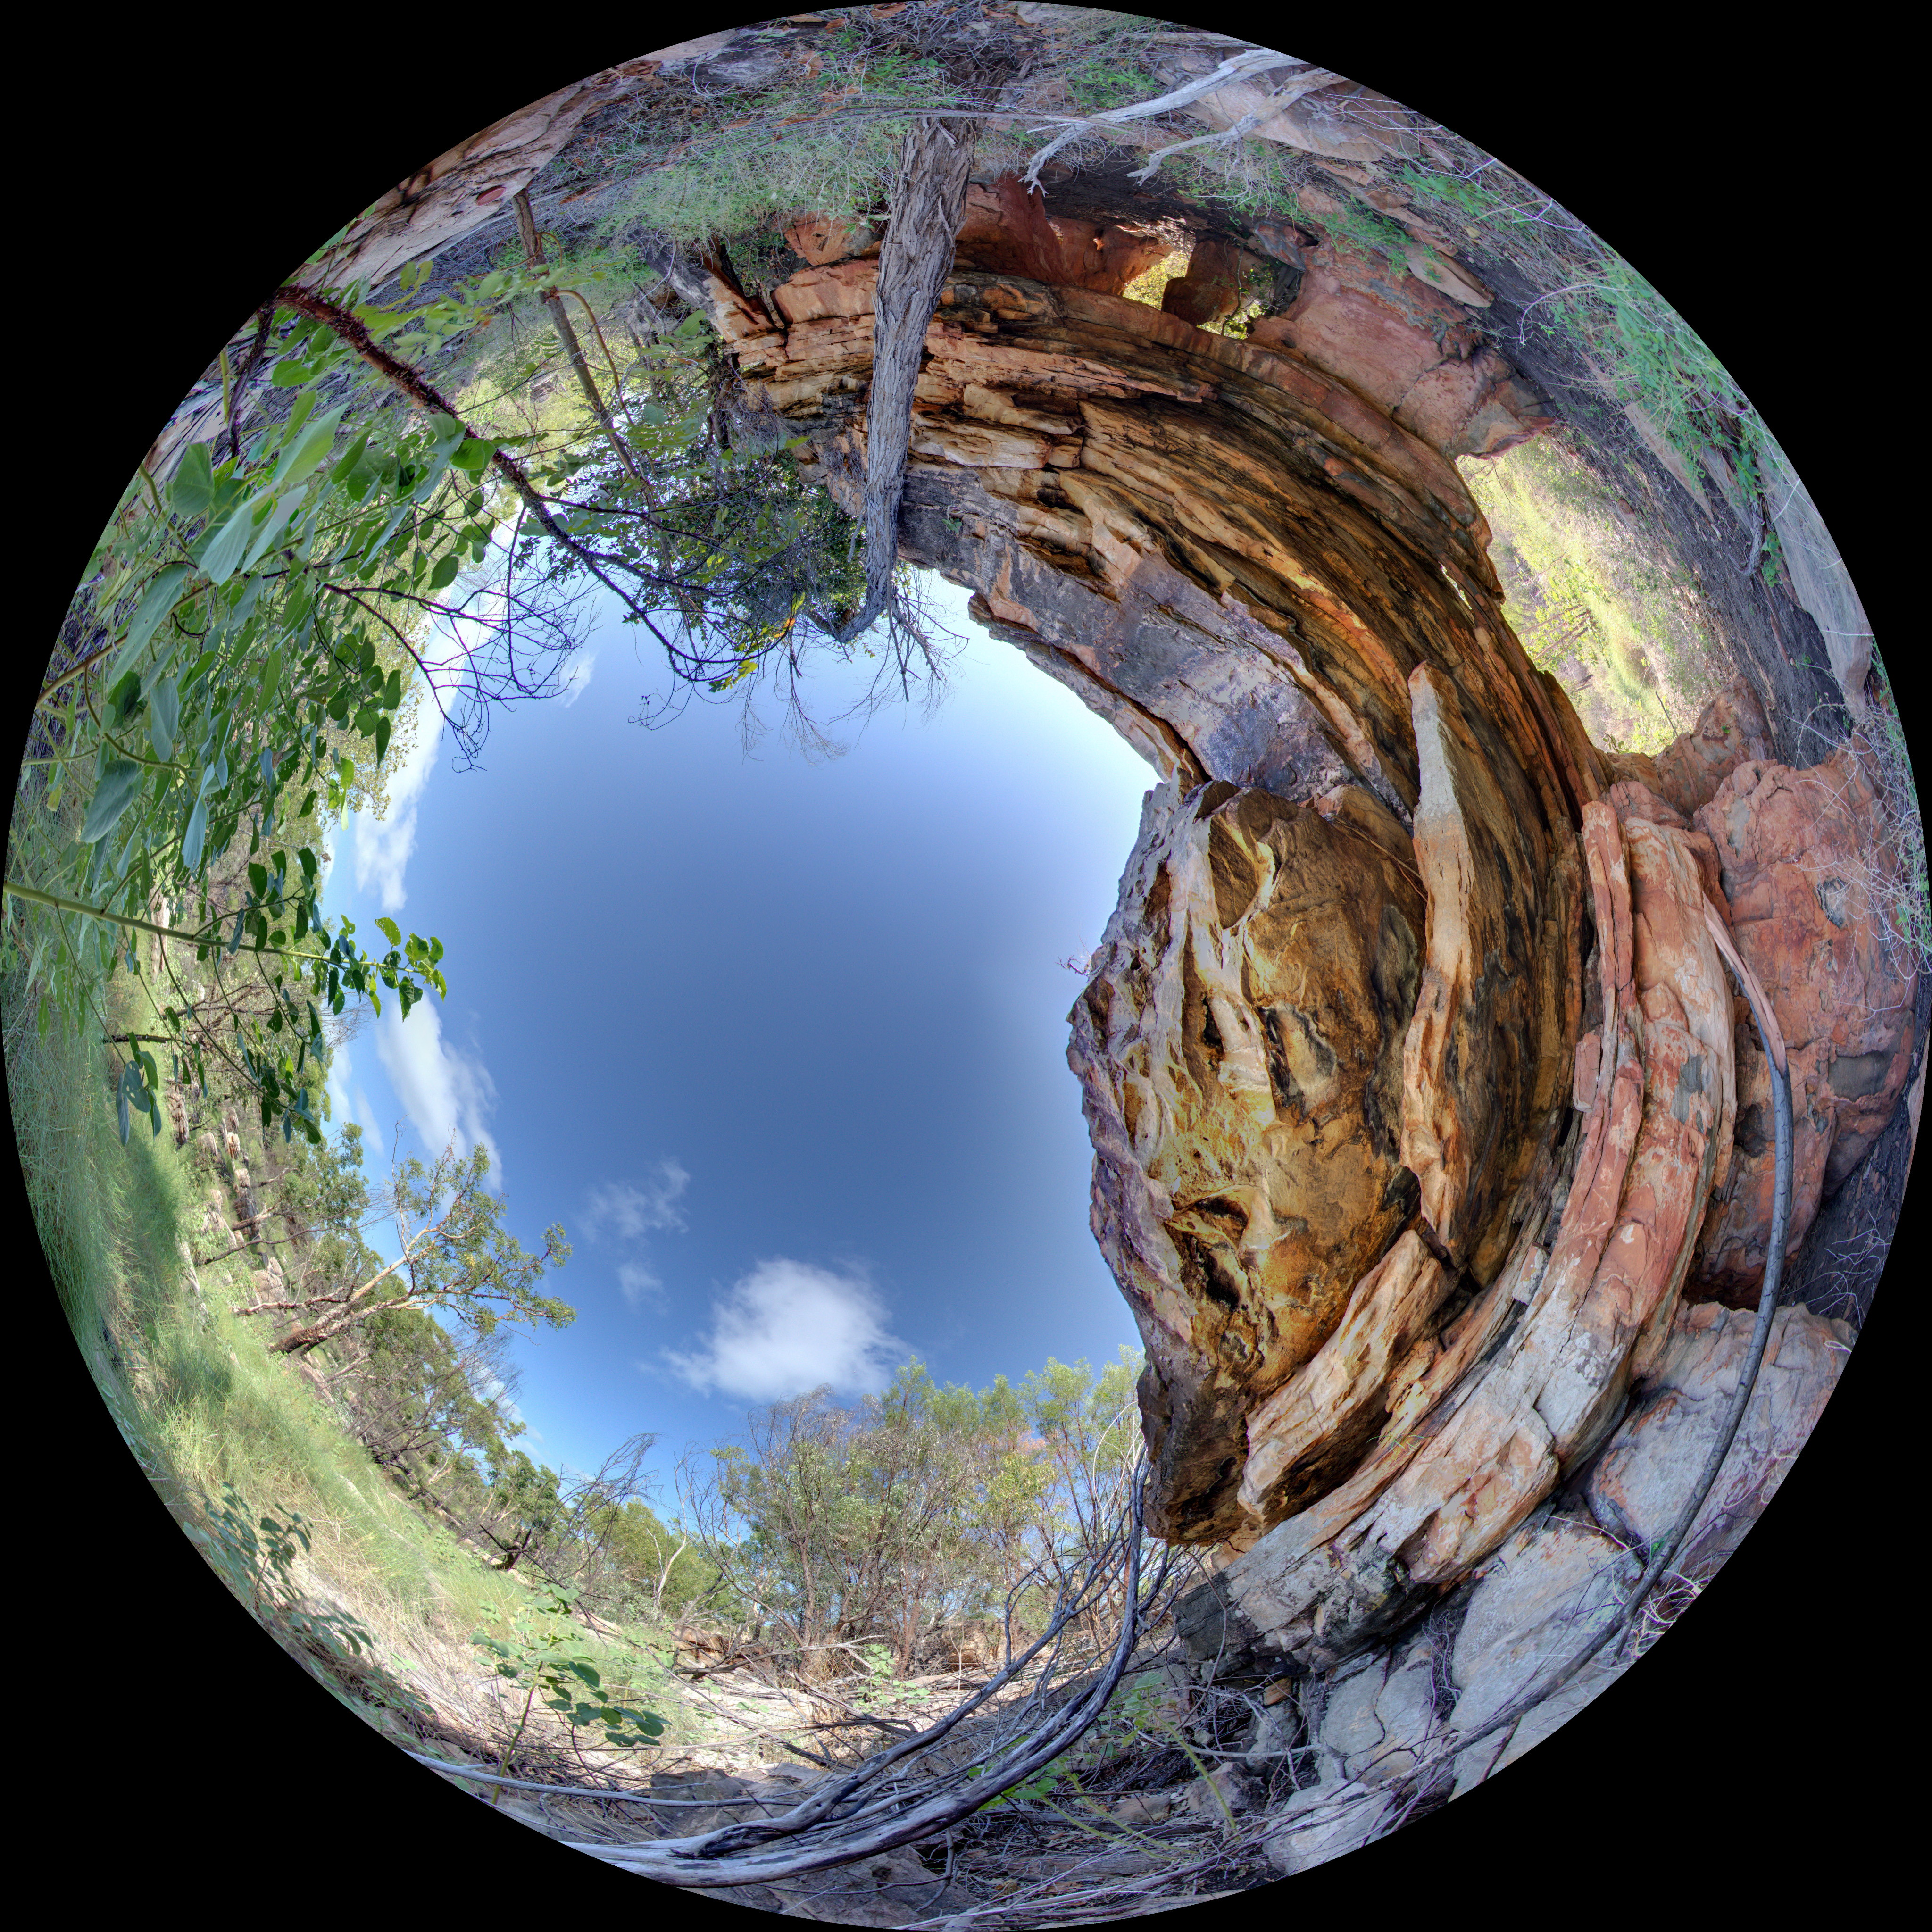
Example 2: Source fisheye image
The default settings (no x axis rotation) provide what one expects for an upper hemisphere as per a standard Earth map. Note the apparent distortion towards the north pole, which again is not a strictly distortion but a natural consequence of the mathematics behind the projection.

fish2pano -a 3 -w 800
Cylindrical panorama with a 100 degree vertical field of view, that is, from the equator (0 degrees latitude) to 100 degrees latitude.

fish2pano -a 3 -w 800 -c -v 100
Fisheye to cube maps
Software: fish2cubeUsage: fish2cube [options] fisheyeimage Options -w n output image size, default: quarter fisheye width -r n radius of the fisheye circle, default: half fisheye height -c n n centre of the fisheye circle, default: center of fisheye image -s n field of view of fisheye (degrees), default: 180 -a n antialiasing level, default: 2 -x n rotate fisheye through right axis by n degrees (tilt) -y n rotate fisheye through forward axis by n degrees (roll) -z n rotate fisheye through up axis by n degreess (pan)
Front facing fisheye example, although note the fisheye can be rotated to any angle within the cube.
Input image, a 220 degree fisheye pointing forwards.
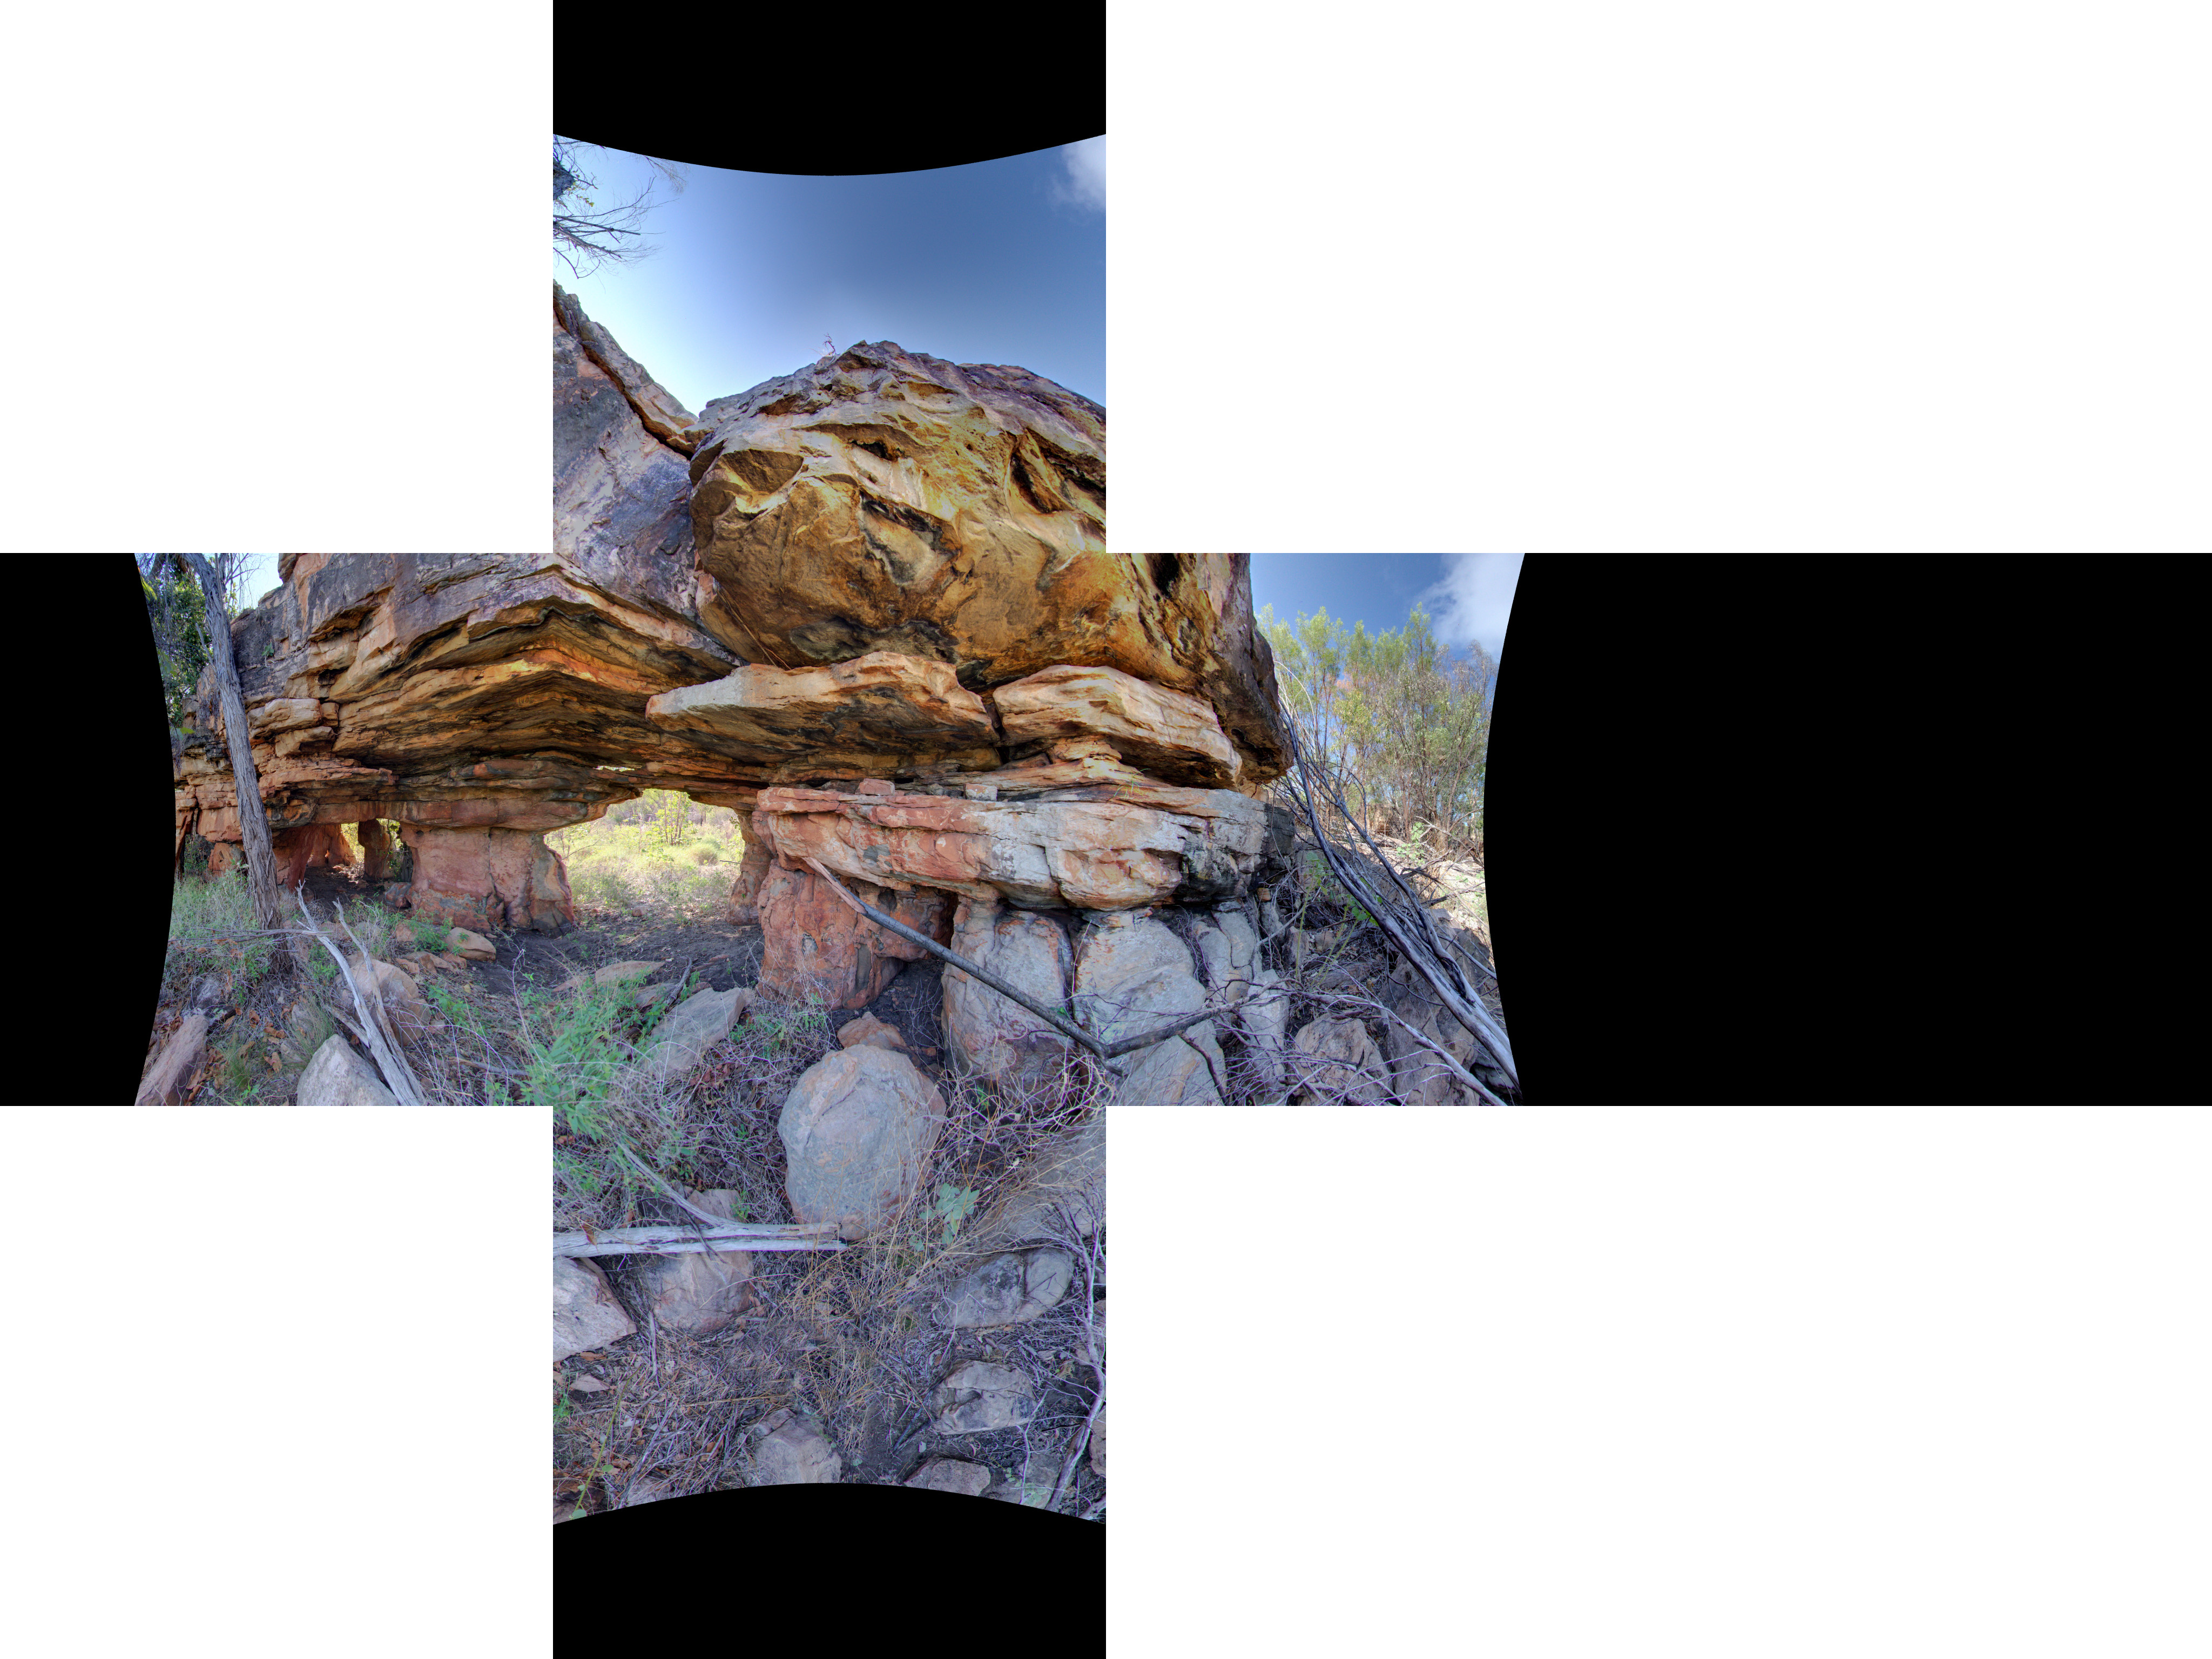
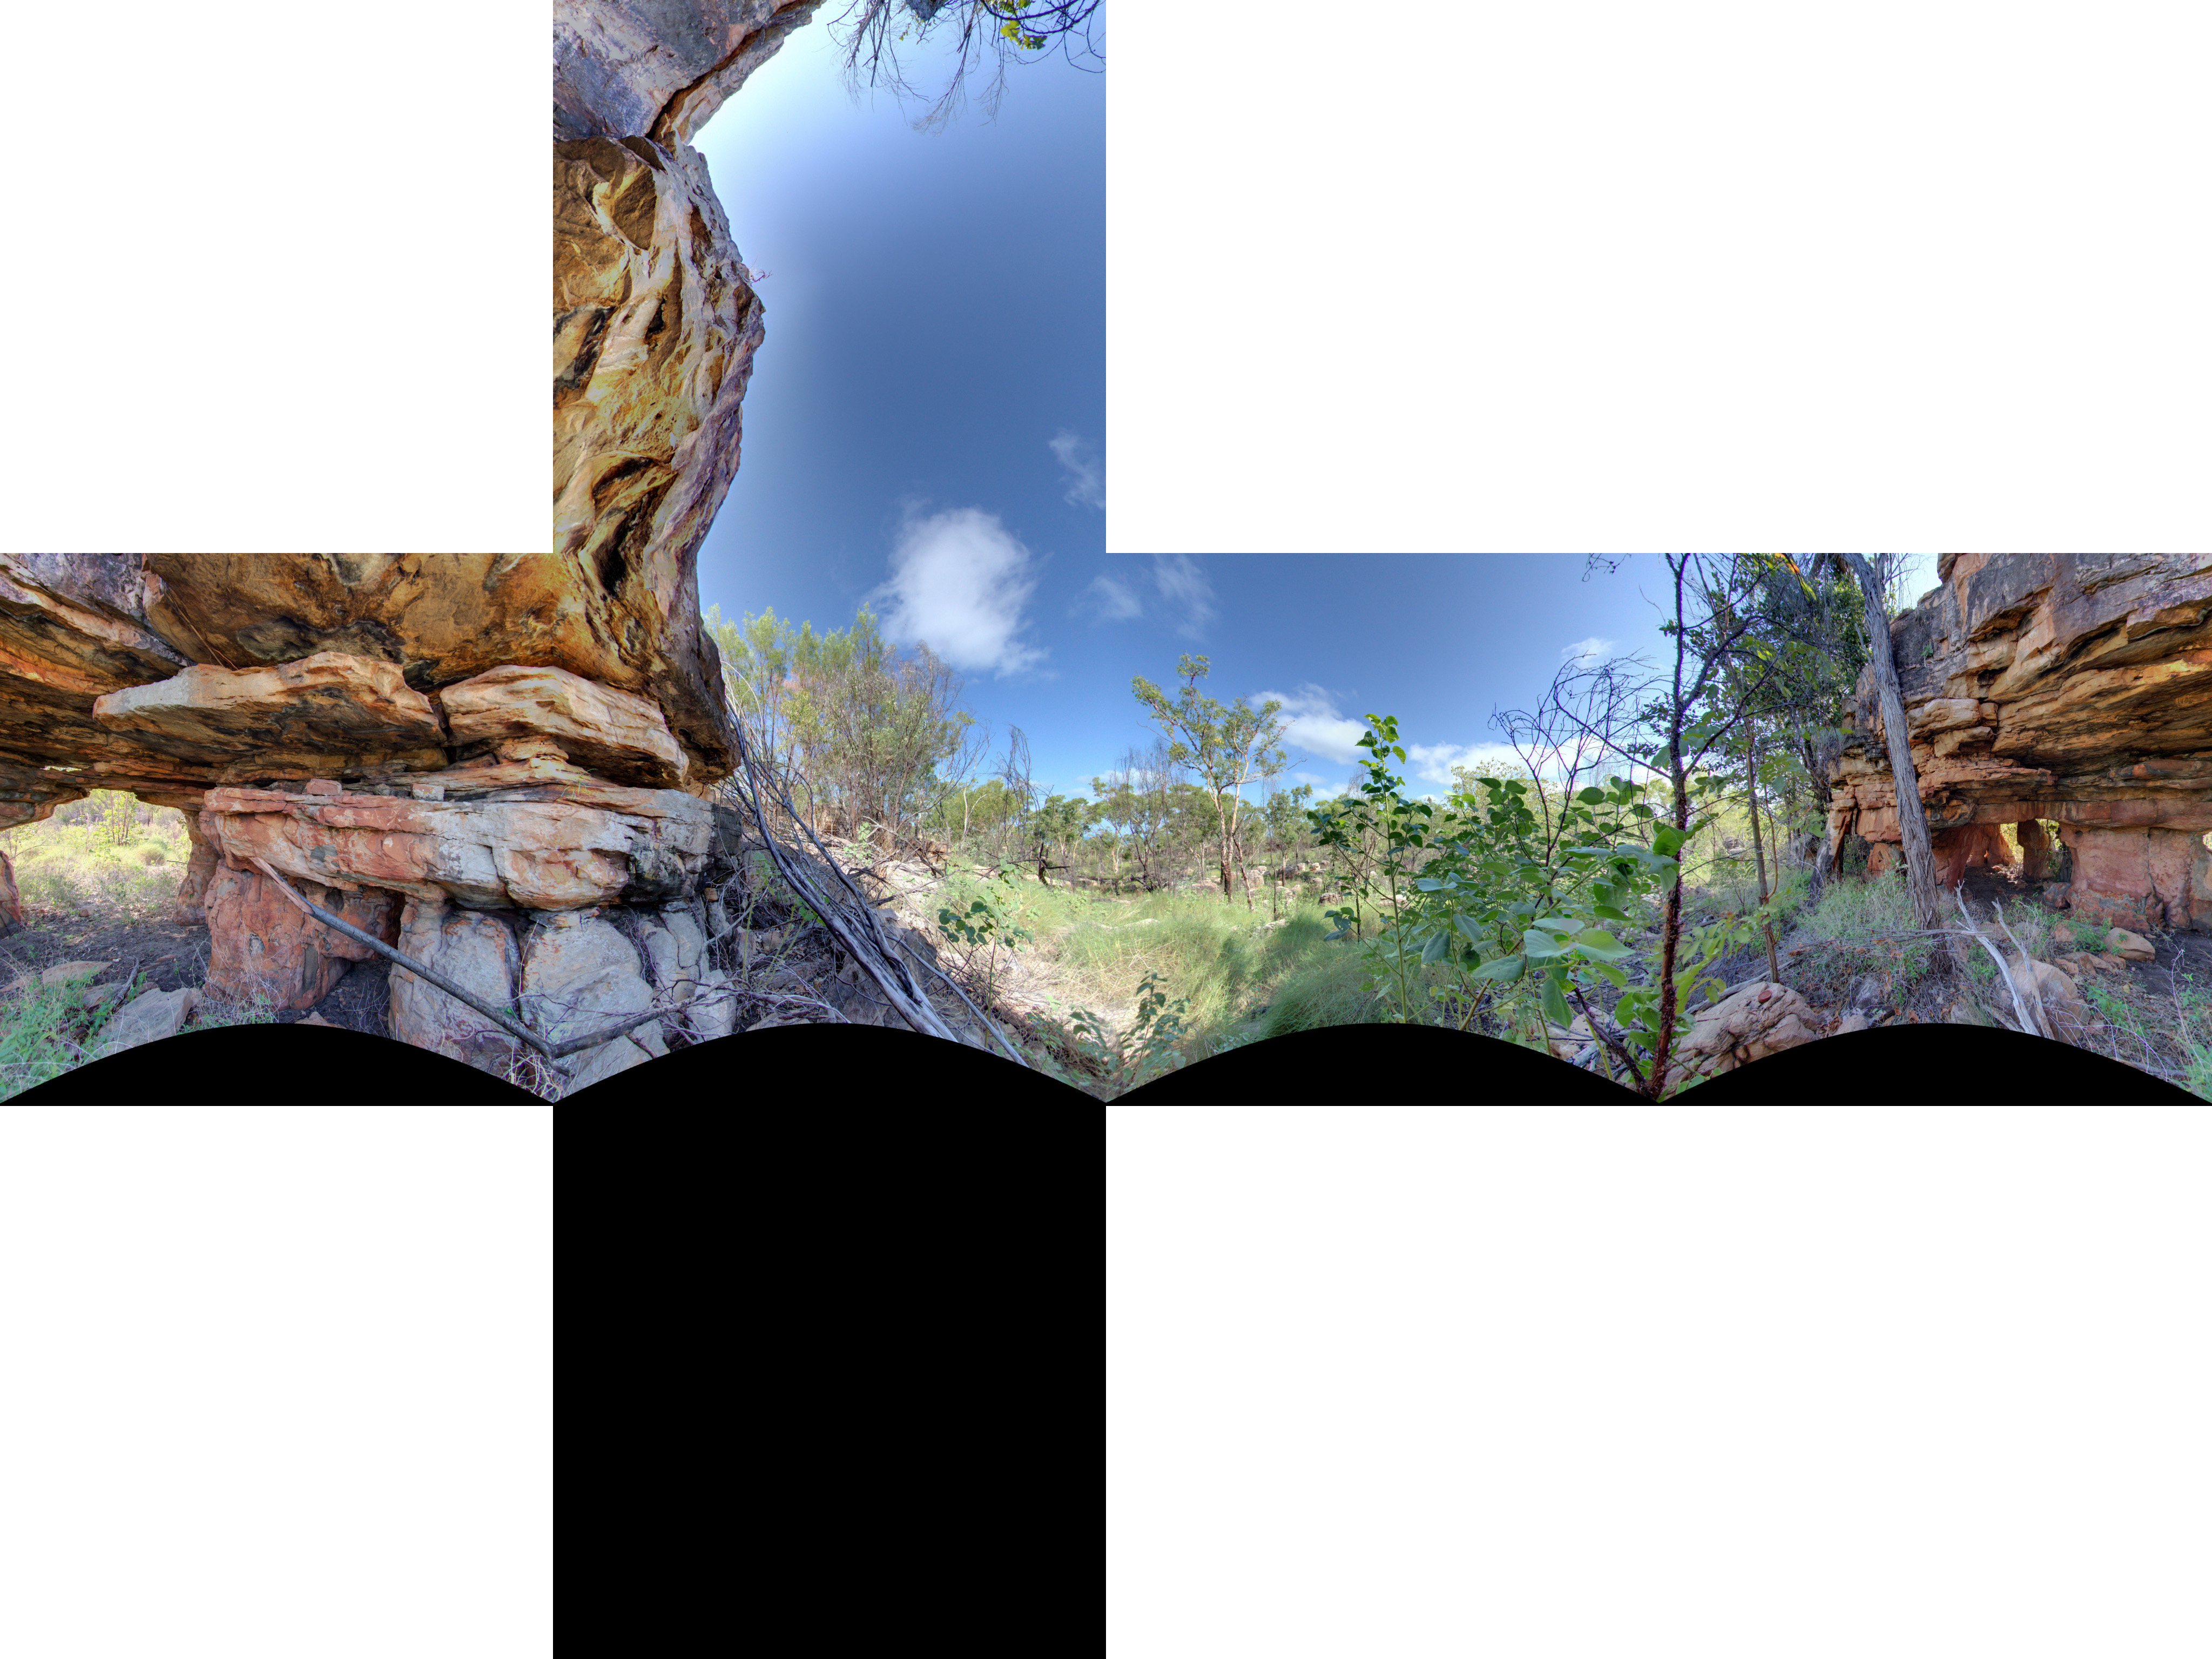
The resulting cube maps with command line "fish2cube -w 1024 -s 220 test220.tga" noting that the faces are provided as separate files, they have been manually combined here.
Front facing fisheye example, although note the fisheye can be rotated to any angle within the cube.
Input image, a 250 degree fisheye pointing upwards.
The resulting cube maps with command line "fish2cube -w 1024 -s 250 -x 90 test250up.tga".


 218
218


 被折叠的 条评论
为什么被折叠?
被折叠的 条评论
为什么被折叠?
 到【灌水乐园】发言


