


一.使用Designer软件制作界面
使用命令下载pyqt5和pyqt5-tools
pip install pyqt5
pip install pyqt5-tools
软件在pyqt5-tools库中

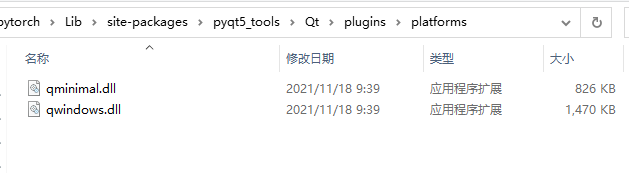
打开pyqt5-tools,进入.\pyqt5_tools\Qt\plugins\platforms路径复制里面所有文件到路径pyqt5_tools\Qt\bin\platforms中

进入pyqt5_tools\Qt\bin路径中,打开designer软件

设计一个简单的昆虫识别界面

二.使用yolo3-pytorch框架识别昆虫
解压kunchong.ui文件生成kunchong.py文件
使用如下命令解压
python -m PyQt5.uic.pyuic kunchong.ui -o kunchong.py
提前训练好昆虫识别模型

写出代码连接昆虫识别界面,代码如下
from PyQt5 import QtGui
from PyQt5.QtWidgets import QMainWindow, QApplication
import cv2
import numpy as np
from yolo import YOLO
from PIL import Image
import numpy as np
import cv2
import time
from kunchong import Ui_MainWindow
import sys
yolo = YOLO()

class UsingTest(QMainWindow, Ui_MainWindow):
    def __init__(self, *args, **kwargs):
        super(UsingTest, self).__init__(*args, **kwargs)
        self.setupUi(self)  # 初始化ui
        self.slot_init()

    def slot_init(self):
        self.pushButton.clicked.connect(self.storage)
        self.pushButton_2.clicked.connect(self.storage1)

    def storage(self):
        capture = cv2.VideoCapture("2.mp4")
        fps = 0.0
        while (True):
            t1 = time.time()
            # 读取某一帧
            ref, frame = capture.read()
            # 格式转变,BGRtoRGB
            print(ref)
            if ref == True:
                frame = cv2.cvtColor(frame, cv2.COLOR_BGR2RGB)
                # 转变成Image
                frame = Image.fromarray(np.uint8(frame))

                # 进行检测
                t2 = time.time()
                frame = np.array(yolo.detect_image(frame))
                t3 = time.time()
                print(t3 - t2)

                # RGBtoBGR满足opencv显示格式
                frame = cv2.cvtColor(frame, cv2.COLOR_RGB2BGR)

                fps = (fps + (1. / (time.time() - t1))) / 2
                print("fps= %.2f" % (fps))
                frame = cv2.putText(frame, "fps= %.2f" % (fps), (0, 40), cv2.FONT_HERSHEY_SIMPLEX, 1, (0, 255, 0), 2)
                show = cv2.resize(frame, (640, 480))  # 把读到的帧的大小重新设置为 640x480
                show = cv2.cvtColor(show, cv2.COLOR_BGR2RGB)  # 视频色彩转换回RGB,这样才是现实的颜色
                showImage = QtGui.QImage(show.data, show.shape[1], show.shape[0],
                                         QtGui.QImage.Format_RGB888)  # 把读取到的视频数据变成QImage形式
                self.label.setPixmap(QtGui.QPixmap.fromImage(showImage))  # 往显示视频的Label里 显示QImage
                self.label.setScaledContents(True)
                c = cv2.waitKey(20) & 0xff
                if c == 27:
                    break
            else:
                quit()
        capture.release()
        cv2.destroyAllWindows()
    def storage1(self):
        quit()


if __name__ == '__main__':  # 程序的入口
    app = QApplication(sys.argv)
    win = UsingTest()
    win.show()
    sys.exit(app.exec_())
打包一下,代码如下,-w是不打开窗口,-i是设置图标
pyinstaller -F -w -i 1.ico main.py
运行结果展示


记录一下实战


 1075
1075


 被折叠的 条评论
为什么被折叠?
被折叠的 条评论
为什么被折叠?
 到【灌水乐园】发言


