


1. 引言
近年来,随着人工智能的发展,文本检测在很多任务中都是一项基本任务,比如广告牌中文字识别、智能驾驶路牌的检测、身份证识别、快递地址识别等。这些任务中首先的一项就是文本检测,即检测出文本在图像中的位置,这样才能便于后续的文本识别。
文本检测的任务类似目标检测,但是又要比目标检测难,因为目标检测只需对物体进行分类,当只看到物体的半个区域时,其实就基本可以识别出物体是什么类别,但是对于文本检测来说,当只看到局部区域时,可能只是看到一个单词中的个别字母或者一个汉字中的偏旁部首,因此,很难识别出对应的文本是什么,因此,对于文本检测来说,它的精度要求比目标检测要高得多。
文本检测目前主要分为两种,一种是OCR(Optical Character Recognition, 光学字符识别),一种是STR(Scene Text Recognition,场景文本识别),前者主要是用于对一些扫描文档的文本检测,要求背景必须比较干净,并且识别的精度比较低,速度也比较慢,而后者则是对一些自然场景的文本检测,其难度更大,一方面是背景信息及其复杂,另一方面是文字的角度、字体、颜色等千变万化,因此,面临的挑战也更大。
这几年来,随着卷积神经网络的发展,场景文本识别得到了很大的发展,其中,最经典是16年Zhi Tian等人提出来的CTPN(Connectionist Text Proposal Network)模型,该模型极大的简化了检测的流程,也使文本检测的效果、速度、稳健性得到了质的提升。因此,本文将对这个模型进行介绍,并用tensorflow进行实现。
2. CTPN模型介绍
2.1 CTPN的模型结构
CTPN模型主要包括三个部分,分别是卷积层、Bi-LSTM层、全连接层,其结构如下图所示。
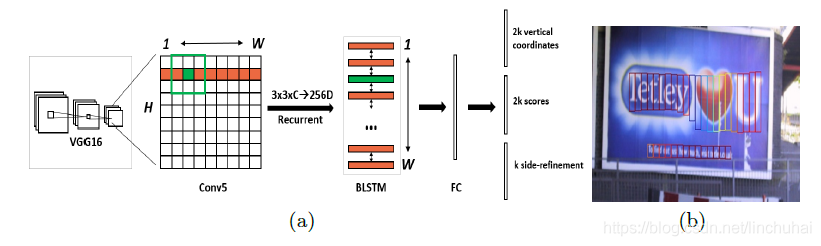
首先,在卷积层部分,CTPN选取的是16年比较火的VGG16模型进行特征提取,作者选择了VGG16模型中conv5的feature maps作为图像最后的特征,假设此时feature maps的尺寸为;
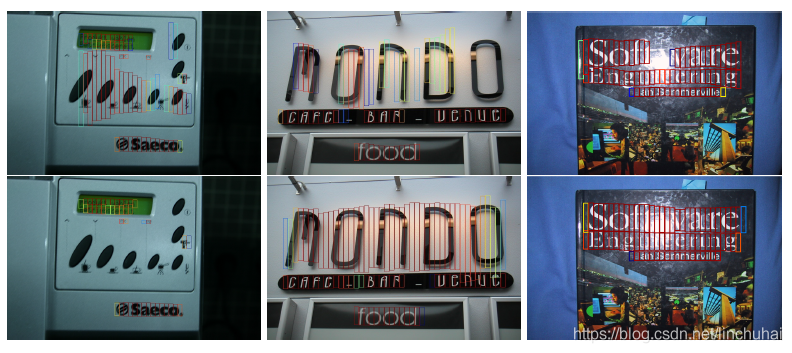
接着,由于文本之间存在序列关系,因此,作者引入了递归神经网络,采用的是一层Bi-LSTM层,作者发现引入了递归神经网络对文本检测的效果有一个很大的提升,如下图所示,第一行是不采用递归神经网络的效果,第二行是采用了Bi-LSTM后的效果。具体的做法是采用一个的滑动窗口,提取feature maps上每个点周围
的区域作为该点的特征向量表示,此时,图像的尺度变为
,然后将每一行作为序列的长度,高度作为batch_size,传入一个128维的Bi-LSTM,得到Bi-LSTM层的输出为
;
最后,将Bi-LSTM的输出接入全连接层,在这一部分,作者引入了anchor的机制,即对每一个点用k个anchor进行预测,每个anchor就是一个盒子,其高度由[273,390,...,11]逐渐递减,每次除以0.7,总共有10个。作者采用的是三个全连接层分支。
第一个分支是对k个auchor的纵坐标,每一个anchor的纵坐标有两个,分别是盒子的y坐标中心和高度,因此,总共的维度是2k。具体表示如下:
其中,、
分别是预测的坐标和真实的坐标,
和
分别是一个anchor的y坐标中心和高度,
和
分别是预测出来的y坐标中心和高度,
和
分别是真实的y坐标中心和高度。
第二个分支是对k个anchor的score进行预测,即该盒子是否包含文本的概率,每个盒子对应一个二分类,因此,总共是2k个维度。当score>0.7时,认为该auchor包含文本。
第三个分支是对k个anchor的横坐标进行预测,可以在每个anchor盒子的左侧或右侧的横坐标,因此,k个盒子对应的维度就是k。之所以需要这个分支主要是为了修正anchor的水平位置。坐标的具体表示如下:
其中,是预测出来的距离anchor水平坐标(左或右坐标)最近的坐标,
是真实的x坐标,
是anchor的x坐标中心,
是anchor的宽度,也就是16。
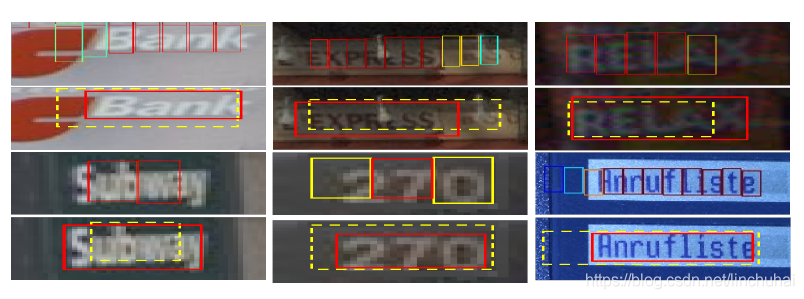
2.2 side-refinement
当模型预测完成后,由于是对feature-map上每个点进行预测,因此,其预测出来只是对应一个anchor,其形式就如上图所示,因此,还需要将这些anchor进行连接,将其连接成一个完整的文本线。因此,作者又引入了一个叫做side-refinement的算法,用于文本线构造,其思想大致如下:
首先,对于第i个text proposal,记为,寻找其配对的邻居
,记配对后关系为
,其中,要求
满足以下条件:
-
距离
的长度在50个像素点以内,并且其score最大
-
接着,对进行反向寻找近邻,当其近邻也刚好是
时,则
和
的文本线构建成功。
下图是用了refinement和不用refinement的对比,红色线是用了refinement的效果,黄色线是不用refinement的效果。
2.3 模型的损失函数
由于全连接层对应的是三个分支,因此,其损失也对应着有三个,作者将这三个损失进行了加权,其形式如下:
其中,分别为score、坐标、side-refinement对应的损失函数,其中,
采用的是softmax loss,
采用的是regression loss。
分别是预测的score和真实的score,
分别对应预测的垂直方向坐标和真实的垂直方向坐标,
分别对应预测的side-refinement和真实的side-refinement,
分别对应anchor的个数,这里anchor的个数是不一样的,
考虑的是score>0.7的anchor,
考虑的是
或者与真实anchor的重合度大于0.5的anchor,
考虑的是分布在距离真实文本线左右两侧32个像素范围内的anchor。
分别对应着
惩罚参数,采用经验值1和2。
3. CTPN的tensorflow实现
本文利用tensorflow对CTPN进行了复现,参考的代码主要是LI Mingfan的,其原始链接如下:
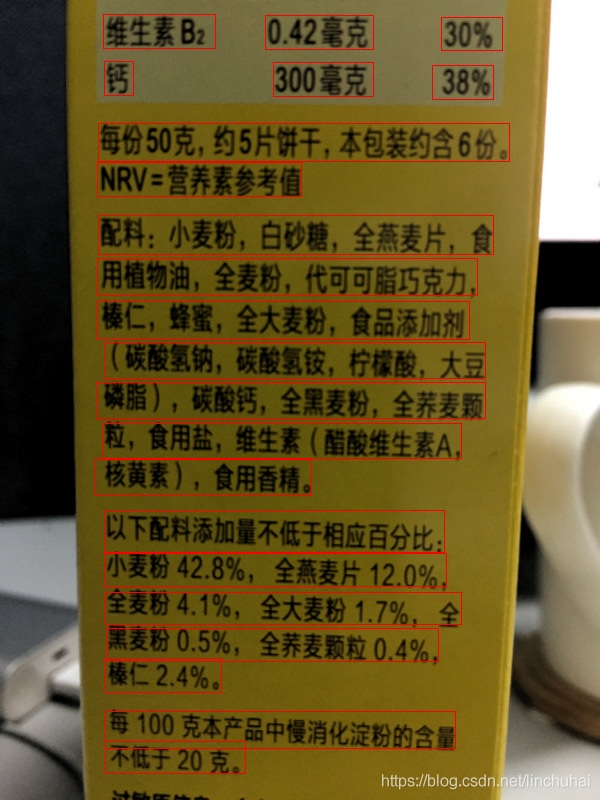
本文将其代码进行了规整,并做了一些改动,并将模型迁移到ICDAR的比赛数据集上进行训练,该数据集总共有7200张,里面含有英语、韩语、日语、中文等多国语言,本文在训练时主要是对英语和中文进行检测。ICDAR数据集的下载链接如下:
- ICDAR数据集链接:http://rrc.cvc.uab.es/?ch=8&com=downloads
在模型的结构部分,主要改动的是卷积层部分,引入了ResNet的结构,并且横坐标也采用的是2k的维度,另外,损失函数用到是平方损失函数,并且引入了focal-loss的思想。由于篇幅的原因,这里不对模型的结构代码进行具体解读,里面已经备注的比较详细,具体代码如下:
# -*- coding: utf-8 -*-
import os
import random
import time
import numpy as np
import tensorflow as tf
from PIL import Image
from tensorflow.python.framework import graph_util
from tensorflow.python.training.moving_averages import assign_moving_average
import data_loader
class ModelDetect:
def __init__(self,
model_detect_dir,
model_detect_pb_file,
LEARNING_RATE_BASE,
TRAINING_STEPS,
VALID_FREQ,
LOSS_FREQ,
KEEP_NEAR,
KEEP_FREQ,
anchor_heights,
MOMENTUM,
dir_results_valid,
threshold,
model_detect_name,
rnn_size,
fc_size,
keep_prob):
self.model_detect_dir = model_detect_dir
self.model_detect_pb_file = model_detect_pb_file
self.pb_file = os.path.join(model_detect_dir, model_detect_pb_file)
self.sess_config = tf.ConfigProto()
self.is_train = False
self.graph = None
self.sess = None
self.learning_rate_base = LEARNING_RATE_BASE
self.train_steps = TRAINING_STEPS
self.valid_freq = VALID_FREQ
self.loss_freq = LOSS_FREQ
self.keep_near = KEEP_NEAR
self.keep_freq = KEEP_FREQ
self.anchor_heights = anchor_heights
self.MOMENTUM = MOMENTUM
self.dir_results_valid = dir_results_valid
self.threshold = threshold
self.model_detect_name = model_detect_name
self.rnn_size = rnn_size
self.fc_size = fc_size
self.keep_prob = keep_prob
def prepare_for_prediction(self, pb_file_path=None):
"""
加载计算图
:param pb_file_path: pb文件
:return:
"""
if pb_file_path == None:
pb_file_path = self.pb_file
if not os.path.exists(pb_file_path):
print('ERROR: %s NOT exists, when load_pb_for_predict()' % pb_file_path)
return -1
self.graph = tf.Graph()
# 从pb文件导入计算图
with self.graph.as_default():
with open(pb_file_path, "rb") as f:
graph_def = tf.GraphDef()
graph_def.ParseFromString(f.read())
tf.import_graph_def(graph_def, name="")
self.x = self.graph.get_tensor_by_name('x-input:0')
self.w = self.graph.get_tensor_by_name('w-input:0')
self.rnn_cls = self.graph.get_tensor_by_name('rnn_cls:0')
self.rnn_ver = self.graph.get_tensor_by_name('rnn_ver:0')
self.rnn_hor = self.graph.get_tensor_by_name('rnn_hor:0')
print('graph loaded for prediction')
self.sess = tf.Session(graph=self.graph, config=self.sess_config)
def predict(self, img_file, out_dir=None):
"""
:param img_file: 图像路径. [str]
:param out_dir: 输出保存路径. [str]
:return:
"""
# 加载图像
img = Image.open(img_file)
# 图片预处理
# img_data = data_loader.mean_gray(img_data)
# img_data = data_loader.two_value_binary(img_data)
# img_data = data_loader.convert2rgb(img_data)
# 对图像进行放缩
img_size = img.size # (width, height)
im_size_min = np.min(img_size[0:2])
im_size_max = np.max(img_size[0:2])
im_scale = float(600) / float(im_size_min)
if np.round(im_scale * im_size_max) > 800:
im_scale = float(800) / float(im_size_max)
width = int(img_size[0] * im_scale)
height = int(img_size[1] * im_scale)
img = img.resize((width, height), Image.ANTIALIAS)
# re_im = cv2.resize(img, None, None, fx=im_scale, fy=im_scale, interpolation=cv2.INTER_LINEAR)
# 对图像进行标准化
img_data = np.array(img, dtype=np.float32) / 255
try:
img_data = [img_data[:, :, 0:3]] # rgba
except:
img_data = [img_data[:, :, 0:2]] # rgb
w_arr = np.array([width], dtype=np.int32)
# 开始预测
with self.graph.as_default():
feed_dict = {self.x: img_data, self.w: w_arr}
r_cls, r_ver, r_hor = self.sess.run([self.rnn_cls, self.rnn_ver, self.rnn_hor], feed_dict)
text_bbox, conf_bbox = data_loader.trans_results(r_cls, r_ver, r_hor, \
self.anchor_heights, self.threshold)
# refinement
conn_bbox = data_loader.do_nms_and_connection(text_bbox, conf_bbox)
if out_dir == None:
return conn_bbox, text_bbox, conf_bbox
if not os.path.exists(out_dir):
os.mkdir(out_dir)
# 绘制anchor文本线
filename = os.path.basename(img_file)
basename, _ = os.path.splitext(filename)
file_target = os.path.join(out_dir, 'predicted_' + basename + '.png')
img_target = Image.fromarray(np.uint8(img_data[0] * 255)) # .convert('RGB')
img_target.save(file_target)
data_loader.draw_text_boxes(file_target, text_bbox)
# 绘制多个anchor连接后的文本线
file_target = os.path.join(out_dir, 'connected_' + basename + '.png')
img_target = Image.fromarray(np.uint8(img_data[0] * 255)) # .convert('RGB')
img_target.save(file_target)
data_loader.draw_text_boxes(file_target, conn_bbox)
return conn_bbox, text_bbox, conf_bbox
def create_graph_all(self, training):
"""
创建计算图
:param training: 参数是否可训练. [boolean]
:return:
"""
self.is_train = training
self.graph = tf.Graph()
with self.graph.as_default():
# 初始化变量
self.x = tf.placeholder(tf.float32, (1, None, None, 3), name='x-input')
self.w = tf.placeholder(tf.int32, (1,), name='w-input') # width
self.t_cls = tf.placeholder(tf.float32, (None, None, None), name='c-input')
self.t_ver = tf.placeholder(tf.float32, (None, None, None), name='v-input')
self.t_hor = tf.placeholder(tf.float32, (None, None, None), name='h-input')
# 卷积层,结合resnet结构
self.conv_feat, self.seq_len = self.conv_feat_layers(self.x, self.w, self.is_train)
# BI_LSTM + 全连接层
self.rnn_cls, self.rnn_ver, self.rnn_hor = self.rnn_detect_layers(self.conv_feat,
self.seq_len,
len(self.anchor_heights))
# 模型的损失函数
self.loss = self.detect_loss(self.rnn_cls,
self.rnn_ver,
self.rnn_hor,
self.t_cls,
self.t_ver,
self.t_hor)
# 设置优化函数
self.global_step = tf.train.get_or_create_global_step()
self.learning_rate = tf.get_variable("learning_rate", shape=[], dtype=tf.float32, trainable=False)
optimizer = tf.train.AdamOptimizer(learning_rate=self.learning_rate, beta1=self.MOMENTUM)
grads_applying = optimizer.compute_gradients(self.loss)
self.train_op = optimizer.apply_gradients(grads_applying, global_step=self.global_step)
if self.is_train:
print('graph defined for training')
else:
print('graph defined for validation')
def train_and_valid(self, data_train, data_valid):
"""
训练模型
:param data_train: 训练集图像路径列表. [list]
:param data_valid: 测试集图像路径列表. [list]
:return:
"""
# 创建模型存储路径
if not os.path.exists(self.model_detect_dir):
os.mkdir(self.model_detect_dir)
# 构建计算图
self.create_graph_all(training=True)
# 加载和训练模型
with self.graph.as_default():
saver = tf.train.Saver()
with tf.Session(config=self.sess_config) as sess:
# 初始化变量
tf.global_variables_initializer().run()
sess.run(tf.assign(self.learning_rate, tf.constant(self.learning_rate_base, dtype=tf.float32)))
# 加载模型
ckpt = tf.train.get_checkpoint_state(self.model_detect_dir)
# 加载模型
if ckpt and ckpt.model_checkpoint_path:
saver.restore(sess, ckpt.model_checkpoint_path)
# 开始训练
print('begin to train ...')
start_time = time.time()
begin_time = start_time
step = sess.run(self.global_step)
train_step_half = int(self.train_steps * 0.5)
train_step_quar = int(self.train_steps * 0.75)
while step < self.train_steps:
# 训练次数达到总的迭代次数的一半时,将学习率设置为原来的0.1,
# 当训练次数达到总的迭代次数的3/4时,将学习率设置为原来的0.01
if step == train_step_half:
sess.run(tf.assign(self.learning_rate, tf.constant(self.learning_rate_base / 10, dtype=tf.float32)))
if step == train_step_quar:
sess.run(tf.assign(self.learning_rate, tf.constant(self.learning_rate_base / 100, dtype=tf.float32)))
# 保存和验证模型
if (step + 1) % self.valid_freq == 0:
# 保存模型
print('save model to ckpt ...')
saver.save(sess, os.path.join(self.model_detect_dir, self.model_detect_name),
global_step=step)
# 验证模型
print('validating ...')
model_v = ModelDetect(self.model_detect_dir,
self.model_detect_pb_file,
self.learning_rate_base,
self.train_steps,
self.valid_freq,
self.loss_freq,
self.keep_near,
self.keep_freq,
self.anchor_heights,
self.MOMENTUM,
self.dir_results_valid,
self.threshold,
self.model_detect_name,
self.rnn_size,
self.fc_size,
1.0)
model_v.validate(data_valid, step)
# 从训练集中随机抽选一张照片
img_file = random.choice(data_train)
if not os.path.exists(img_file):
print('image_file: %s NOT exist' % img_file)
continue
# 获取该图像的文本线文档路径
txt_file = data_loader.get_target_txt_file(img_file)
if not os.path.exists(txt_file):
print('label_file: %s NOT exist' % txt_file)
continue
# 加载图像,并获取对应的真实标签
img_data, feat_size, target_cls, target_ver, target_hor = \
data_loader.get_image_and_targets(img_file, txt_file, self.anchor_heights)
# 开始训练
img_size = img_data[0].shape # height, width, channel
w_arr = np.array([img_size[1]], dtype=np.int32)
feed_dict = {self.x: img_data,
self.w: w_arr,
self.t_cls: target_cls,
self.t_ver: target_ver,
self.t_hor: target_hor}
_, loss_value, step, lr = sess.run([self.train_op, self.loss, self.global_step, self.learning_rate],
feed_dict)
if step % self.loss_freq == 0:
curr_time = time.time()
print('step: %d, loss: %g, lr: %g, sect_time: %.1f, total_time: %.1f, %s' %
(step, loss_value, lr,
curr_time - begin_time,
curr_time - start_time,
os.path.basename(img_file)))
begin_time = curr_time
def validate(self, data_valid, step):
"""
模型验证函数
:param data_valid: 验证集图像路径列表. [list]
:param step: 当前迭代的次数. [int]
:return:
"""
# 判断验证集路径是否存在
if not os.path.exists(self.dir_results_valid):
os.mkdir(self.dir_results_valid)
# 初始化计算图
self.create_graph_all(training=False)
with self.graph.as_default():
saver = tf.train.Saver()
with tf.Session(config=self.sess_config) as sess:
# 初始化全局变量
tf.global_variables_initializer().run()
# 加载模型
ckpt = tf.train.get_checkpoint_state(self.model_detect_dir)
if ckpt and ckpt.model_checkpoint_path:
saver.restore(sess, ckpt.model_checkpoint_path)
# 将变量转化为常数,并保存到pb文件
constant_graph = graph_util.convert_variables_to_constants(sess, sess.graph_def,
output_node_names=['rnn_cls', 'rnn_ver', 'rnn_hor'])
with tf.gfile.FastGFile(self.pb_file, mode='wb') as f:
f.write(constant_graph.SerializeToString())
# 开始预测
NumImages = len(data_valid)
curr = 0
for img_file in data_valid:
print(img_file)
# 获取当前图像的文本线txt文档的存储路径
txt_file = data_loader.get_target_txt_file(img_file)
# 获取当前图像的像素矩阵、feature map维度以及三个分支的标签
img_data, feat_size, target_cls, target_ver, target_hor = \
data_loader.get_image_and_targets(img_file, txt_file, self.anchor_heights)
# 当前图像的尺寸
img_size = img_data[0].shape # height, width, channel
w_arr = np.array([img_size[1]], dtype=np.int32)
feed_dict = {self.x: img_data,
self.w: w_arr,
self.t_cls: target_cls,
self.t_ver: target_ver,
self.t_hor: target_hor}
# 获取预测到的标签和损失值
r_cls, r_ver, r_hor, loss_value = sess.run([self.rnn_cls, self.rnn_ver, self.rnn_hor, self.loss], feed_dict)
curr += 1
print('curr: %d / %d, loss: %f' % (curr, NumImages, loss_value))
# 将相对坐标转化为原始图像的绝对坐标,获取预测到的文本线坐标和分数
text_bbox, conf_bbox = data_loader.trans_results(r_cls,
r_ver,
r_hor,
self.anchor_heights,
self.threshold)
# 在图像上绘制文本线,并保存
filename = os.path.basename(img_file)
file_target = os.path.join(self.dir_results_valid, str(step) + '_predicted_' + filename)
img_target = Image.fromarray(np.uint8(img_data[0] * 255)) # .convert('RGB')
img_target.save(file_target)
data_loader.draw_text_boxes(file_target, text_bbox)
# 移除之前验证的文件
id_remove = step - self.valid_freq * self.keep_near
if id_remove % self.keep_freq:
file_temp = os.path.join(self.dir_results_valid, str(id_remove) + '_predicted_' + filename)
if os.path.exists(file_temp): os.remove(file_temp)
print('validation finished')
def norm_layer(self, x, train, eps=1e-05, decay=0.9, affine=True, name=None):
"""
批标准化
:param x:输入. [tensor]
:param train: 是否可训练. [boolean]
:param eps:
:param decay:
:param affine:
:param name:
:return:
"""
with tf.variable_scope(name, default_name='batch_norm'):
params_shape = [x.shape[-1]]
batch_dims = list(range(0, len(x.shape) - 1))
moving_mean = tf.get_variable('mean', params_shape,
initializer=tf.zeros_initializer(),
trainable=False)
moving_variance = tf.get_variable('variance', params_shape,
initializer=tf.ones_initializer(),
trainable=False)
def mean_var_with_update():
# 计算均值和方差
batch_mean, batch_variance = tf.nn.moments(x, batch_dims, name='moments')
# 更新moving_mean和moving_variance
with tf.control_dependencies([assign_moving_average(moving_mean, batch_mean, decay),
assign_moving_average(moving_variance, batch_variance, decay)]):
return tf.identity(batch_mean), tf.identity(batch_variance)
if train:
mean, variance = mean_var_with_update()
else:
mean, variance = moving_mean, moving_variance
if affine:
beta = tf.get_variable('beta', params_shape,
initializer=tf.zeros_initializer(),
trainable=True)
gamma = tf.get_variable('gamma', params_shape,
initializer=tf.ones_initializer(),
trainable=True)
x = tf.nn.batch_normalization(x, mean, variance, beta, gamma, eps)
else:
x = tf.nn.batch_normalization(x, mean, variance, None, None, eps)
return x
def conv_layer(self, inputs, params, training):
"""
定义卷积层,带有batch_normalization,relu
:param inputs: 输入数据维度为 4-D tensor: [batch_size, width, height, channels]
or [batch_size, height, width, channels]
:param params: 卷积层参数,[filters, kernel_size, strides, padding, batch_norm, relu, name]. [list]
:param training: 参数是否可以训练. [boolean]
:return:
"""
kernel_initializer = tf.contrib.layers.variance_scaling_initializer()
bias_initializer = tf.constant_initializer(value=0.0)
gamma_initializer = tf.random_normal_initializer(1, 0.02)
# conv
outputs = tf.layers.conv2d(inputs, params[0], params[1], strides=params[2],
padding=params[3],
kernel_initializer=kernel_initializer,
bias_initializer=bias_initializer,
name=params[6])
# batch_norm
if params[4]:
outputs = self.norm_layer(outputs, training, name=params[6] + '/batch_norm')
# outputs = tf.layers.batch_normalization(inputs,
# axis=3,
# epsilon=1e-5,
# momentum=0.1,
# training=training,
# gamma_initializer=gamma_initializer,
# name=params[6] + '/batch_norm')
# relu
if params[5]:
outputs = tf.nn.relu(outputs, name=params[6] + '/relu')
return outputs
def block_resnet_others(self, inputs, layer_params, relu, training, name):
"""
定义ResNet_block
:param inputs: 输入. [tensor]
:param layer_params: 卷积层参数. [list]
:param relu: 是否使用relu激活函数. [boolean]
:param training: 参数是否可以训练. [boolean]
:param name: layer name. [str]
:return:
"""
with tf.variable_scope(name):
short_cut = tf.identity(inputs)
for item in layer_params:
inputs = self.conv_layer(inputs, item, training)
outputs = tf.add(inputs, short_cut, name='add')
if relu:
outputs = tf.nn.relu(outputs, 'last_relu')
return outputs
def conv_feat_layers(self, inputs, width, training):
"""
cptn结构中的卷积层部分,用来提取feature_map.
:param inputs: 输入的图像. [placeholder]
:param width: 图像宽度. [placeholder]
:param training:是否可训练. [boolean]
:return:
"""
# 卷积层各层的参数信息
layer_params = [[64, (3, 3), (1, 1), 'same', True, True, 'conv1'],
[128, (3, 3), (1, 1), 'same', True, True, 'conv2'],
[128, (2, 2), (2, 2), 'valid', True, True, 'pool1'],
[128, (3, 3), (1, 1), 'same', True, True, 'conv3'],
[256, (3, 3), (1, 1), 'same', True, True, 'conv4'],
[256, (2, 2), (2, 2), 'valid', True, True, 'pool2'],
[256, (3, 3), (1, 1), 'same', True, True, 'conv5'],
[512, (3, 3), (1, 1), 'same', True, True, 'conv6'],
[512, (3, 2), (3, 2), 'valid', True, True, 'pool3'],
[512, (3, 1), (1, 1), 'valid', True, True, 'conv_feat']]
resnet_params = [[[128, 3, (1, 1), 'same', True, True, 'conv1'],
[128, 3, (1, 1), 'same', True, False, 'conv2']],
[[256, 3, (1, 1), 'same', True, True, 'conv1'],
[256, 3, (1, 1), 'same', True, False, 'conv2']],
[[512, 3, (1, 1), 'same', True, True, 'conv1'],
[512, 3, (1, 1), 'same', True, False, 'conv2']]]
# 构建卷积层
with tf.variable_scope("conv_comm"):
inputs = self.conv_layer(inputs, layer_params[0], training)
inputs = self.conv_layer(inputs, layer_params[1], training)
inputs = tf.pad(inputs, [[0, 0], [0, 1], [0, 1], [0, 0]], name='padd1')
inputs = tf.layers.max_pooling2d(inputs, (2, 2), (2, 2), 'valid', 'channels_last', 'pool1')
inputs = self.block_resnet_others(inputs, resnet_params[0], True, training, 'res1')
inputs = self.conv_layer(inputs, layer_params[3], training)
inputs = self.conv_layer(inputs, layer_params[4], training)
inputs = tf.pad(inputs, [[0, 0], [0, 1], [0, 1], [0, 0]], name='padd2')
inputs = tf.layers.max_pooling2d(inputs, (2, 2), (2, 2), 'valid', 'channels_last', 'pool2')
inputs = self.block_resnet_others(inputs, resnet_params[1], True, training, 'res2')
inputs = self.conv_layer(inputs, layer_params[6], training)
inputs = self.conv_layer(inputs, layer_params[7], training)
inputs = tf.pad(inputs, [[0, 0], [0, 0], [0, 1], [0, 0]], name='padd3')
inputs = tf.layers.max_pooling2d(inputs, (3, 2), (3, 2), 'valid', 'channels_last', 'pool3')
inputs = self.block_resnet_others(inputs, resnet_params[2], True, training, 'res3')
conv_feat = self.conv_layer(inputs, layer_params[9], training)
feat_size = tf.shape(conv_feat)
# 计算每个feature_map每一行的序列长度,每一行即一个序列
two = tf.constant(2, dtype=tf.float32, name='two')
w = tf.cast(width, tf.float32)
for i in range(3):
w = tf.div(w, two)
w = tf.ceil(w)
# 复制height倍,并转化为向量
w = tf.cast(w, tf.int32)
w = tf.tile(w, [feat_size[1]])
sequence_length = tf.reshape(w, [-1], name='seq_len') # [batch,height]
return conv_feat, sequence_length
def rnn_detect_layers(self, conv_feat, sequence_length, num_anchors):
"""
Bi_LSTM + 全连接层.
:param conv_feat: 卷积层提取到的feature map. [tensor]
:param sequence_length: 每一行序列的长度列表,向量长度为conv_feat的高. [tensor]
:param num_anchors: anchor的个数
:return:
"""
# 将feature map进行降维,因为batch_size设置为1,所以这里直接去掉batch那一维
conv_feat = tf.squeeze(conv_feat, axis=0)
conv_feat = tf.transpose(conv_feat, [1, 0, 2])
# Bi_LSTM层
en_lstm1 = tf.contrib.rnn.LSTMCell(self.rnn_size)
en_lstm1 = tf.contrib.rnn.DropoutWrapper(en_lstm1, output_keep_prob=self.keep_prob)
en_lstm2 = tf.contrib.rnn.LSTMCell(self.rnn_size)
en_lstm2 = tf.contrib.rnn.DropoutWrapper(en_lstm2, output_keep_prob=self.keep_prob)
# encoder_cell_fw = tf.contrib.rnn.MultiRNNCell([en_lstm1])
# encoder_cell_bw = tf.contrib.rnn.MultiRNNCell([en_lstm2])
bi_encoder_outputs, _ = tf.nn.bidirectional_dynamic_rnn(en_lstm1,
en_lstm2,
conv_feat,
sequence_length=sequence_length,
time_major=True,
dtype=tf.float32) # 2 * batch_size * seq_len * hidden_dim
conv_feat = tf.concat(bi_encoder_outputs, 2)
# 全连接层
weight_initializer = tf.contrib.layers.variance_scaling_initializer()
bias_initializer = tf.constant_initializer(value=0.0)
rnn_feat = tf.layers.dense(conv_feat, self.fc_size,
activation=tf.nn.relu,
kernel_initializer=weight_initializer,
bias_initializer=bias_initializer,
name='rnn_feat')
# 输出层,总共三个分支
rnn_cls = tf.layers.dense(rnn_feat, num_anchors * 2,
activation=tf.nn.sigmoid,
kernel_initializer=weight_initializer,
bias_initializer=bias_initializer,
name='text_cls')
rnn_ver = tf.layers.dense(rnn_feat, num_anchors * 2,
activation=tf.nn.tanh,
kernel_initializer=weight_initializer,
bias_initializer=bias_initializer,
name='text_ver')
rnn_hor = tf.layers.dense(rnn_feat, num_anchors * 2,
activation=tf.nn.tanh,
kernel_initializer=weight_initializer,
bias_initializer=bias_initializer,
name='text_hor')
rnn_cls = tf.transpose(rnn_cls, perm=[1, 0, 2], name='rnn_cls')
rnn_ver = tf.transpose(rnn_ver, perm=[1, 0, 2], name='rnn_ver')
rnn_hor = tf.transpose(rnn_hor, perm=[1, 0, 2], name='rnn_hor')
return rnn_cls, rnn_ver, rnn_hor
def detect_loss(self, rnn_cls, rnn_ver, rnn_hor, target_cls, target_ver, target_hor):
"""
模型损失函数.
:param rnn_cls:预测得到的cls,即分类概率.
:param rnn_ver:预测得到的ver,anchor的y坐标中心.
:param rnn_hor:预测得到的hor,anchor的x坐标.
:param target_cls:真实的cls
:param target_ver:真实的ver
:param target_hor:真实的hor
:return:
"""
# 计算正例和负例对应的rnn_cls
rnn_cls_posi = rnn_cls * target_cls
rnn_cls_neg = rnn_cls - rnn_cls_posi
# 计算类别的平方损失
pow_posi = tf.square(rnn_cls_posi - target_cls)
pow_neg = tf.square(rnn_cls_neg)
# 对损失进行加权
mod_posi = tf.pow(pow_posi / 0.24, 5) # 0.3, 0.2, 0.5,0.4
mod_neg = tf.pow(pow_neg / 0.24, 5) # 0.7, 0.6,
mod_con = tf.pow(0.25 / 0.2, 5)
# 统计正例和负例的个数
num_posi = tf.reduce_sum(target_cls) / 2 + 1
num_neg = tf.reduce_sum(target_cls + 1) / 2 - num_posi * 2 + 1
# 计算正例和负例的损失值
loss_cls_posi = tf.reduce_sum(pow_posi * mod_posi) / 2
loss_cls_neg = tf.reduce_sum(pow_neg * mod_neg) / 2
# 将正例和负例的损失分别计算平均值,最终加和,
# 因为同一张图像会出现较多负例,所以这样要比两者加和后再计算平均好一点
loss_cls = loss_cls_posi / num_posi + loss_cls_neg / num_neg
print('loss_cls:%s' % str(loss_cls))
# 计算正例的rnn_ver和rnn_hor
rnn_ver_posi = rnn_ver * target_cls
rnn_hor_posi = rnn_hor * target_cls
# 计算负例的rnn_ver和rnn_hor
rnn_ver_neg = rnn_ver - rnn_ver_posi
rnn_hor_neg = rnn_hor - rnn_hor_posi
# 计算正例的ver和hor平方损失
pow_ver_posi = tf.square(rnn_ver_posi - target_ver)
pow_hor_posi = tf.square(rnn_hor_posi - target_hor)
# 计算负例的ver和hor的平方损失
pow_ver_neg = tf.square(rnn_ver_neg)
pow_hor_neg = tf.square(rnn_hor_neg)
# 对正例的平方损失进行加权并计算平均,这里有点类似focal loss的思想
loss_ver_posi = tf.reduce_sum(pow_ver_posi * mod_con) / num_posi
loss_hor_posi = tf.reduce_sum(pow_hor_posi * mod_con) / num_posi
# 对负例的平方损失进行加权并计算平均
loss_ver_neg = tf.reduce_sum(pow_ver_neg * mod_neg) / num_neg
loss_hor_neg = tf.reduce_sum(pow_hor_neg * mod_neg) / num_neg
# 对正负例的ver和hor损失进行加总
loss_ver = loss_ver_posi + loss_ver_neg
loss_hor = loss_hor_posi + loss_hor_neg
loss = tf.add(loss_cls, loss_ver + 2 * loss_hor, name='loss')
return loss
下面是一些数据预处理函数,代码如下:
import os
from PIL import Image, ImageDraw
import numpy as np
from math import ceil, floor
from operator import itemgetter


def getFilesInDirect(path, str_dot_ext):
    """
    获取背景图像路径列表
    :param path: 背景图像存储路径. [str]
    :param str_dot_ext: 背景图像的存储格式. [str]
    :return:
    """
    file_list = []
    for file in os.listdir(path):
        file_path = os.path.join(path, file)
        if os.path.splitext(file_path)[1] == str_dot_ext:
            file_list.append(file_path)
    return file_list


def get_files_with_ext(path, str_ext):
    """
    获取具有str_ext结尾的文件路径列表
    :param path: 文件目录. [str]
    :param str_ext: 文件格式,如.png. [str]
    :return:
    """
    file_list = []
    for file in os.listdir(path):
        file_path = os.path.join(path, file)
        if file_path.endswith(str_ext):
            file_list.append(file_path)
    return file_list


def get_target_txt_file(img_file):
    """
    加载对应图像的文本线文档对应的路径
    :param img_file: 图像路径. [str]
    :return:
    """
    # 或者文本线存储目录
    pre_dir = os.path.abspath(os.path.dirname(img_file) + os.path.sep + "..")
    txt_dir = os.path.join(pre_dir, 'contents')

    # 加载对应图像的文本线文档
    filename = os.path.basename(img_file)
    arr_split = os.path.splitext(filename)
    filename = arr_split[0] + '.txt'
    txt_file = os.path.join(txt_dir, filename)
    return txt_file


def get_list_contents(content_file):
    """
    获取文本线文档中的坐标和标签,并转化为列表,类似[[[1,2,3,4],'hello']]
    :param content_file: 文本线文档路径. [str]
    :return:
    """
    contents = []
    if not os.path.exists(content_file):
        return contents

    with open(content_file, 'r', encoding='utf-8') as fp:
        lines = fp.readlines()

    for line in lines:
        arr_str = line.split('|')
        item = list(map(lambda x: int(x), arr_str[0].split(',')))
        contents.append([item, arr_str[1]])
    return contents


def get_image_and_targets(img_file, txt_file, anchor_heights):
    """
    加载图像,并获取图像卷积后的尺寸和真实标签
    :param img_file: 图像的路径. [str]
    :param txt_file: 图像对应的文本线文档路径. [str]
    :param anchor_heights: anchor高度列表. [list]
    :return:
    """
    # 加载图像
    img = Image.open(img_file)
    img_data = np.array(img, dtype=np.float32) / 255  # [height, width, channel]

    # 获取图像的rgb通道
    try:
        img_data = img_data[:, :, 0:3]
    except:
        img_data = img_data[:, :, 0:2]

    # 获取各个文本线的坐标和标注,并转化为列表
    txt_list = get_list_contents(txt_file)

    # targets
    img_size = img_data.shape  # height, width, channel

    # 计算卷积后feature map的高和宽
    height_feat = floor(ceil(ceil(img_size[0] / 2.0) / 2.0) / 3.0) - 2
    width_feat = ceil(ceil(ceil(img_size[1] / 2.0) / 2.0) / 2.0)

    # 初始化三个分支的目标值
    num_anchors = len(anchor_heights)
    target_cls = np.zeros((height_feat, width_feat, 2 * num_anchors))
    target_ver = np.zeros((height_feat, width_feat, 2 * num_anchors))
    target_hor = np.zeros((height_feat, width_feat, 2 * num_anchors))

    # 计算feature map上每个点的对应的真实标签
    ash = 12  # anchor stride - height
    asw = 8  # anchor stride - width
    hc_start = 18
    wc_start = 4

    for h in range(height_feat):
        hc = hc_start + ash * h  # anchor height center
        for w in range(width_feat):
            cls, ver, hor = calculate_targets_at([hc, wc_start + asw * w], txt_list, anchor_heights)
            target_cls[h, w] = cls
            target_ver[h, w] = ver
            target_hor[h, w] = hor

    return [img_data], [height_feat, width_feat], target_cls, target_ver, target_hor


def calculate_targets_at(anchor_center, txt_list, anchor_heights):
    """
    计算当前anchor的真实标签
    :param anchor_center: anchor的中心,[height_center,width_center]. [list]
    :param txt_list: 文本线列表. [list]
    :param anchor_heights: anchor高度列表. [list]
    :return:
    """
    # anchor宽度和anchor高度、宽度步伐
    anchor_width = 8
    ash = 12  # anchor stride - height
    asw = 8  # anchor stride - width

    # anchor中心
    hc = anchor_center[0]
    wc = anchor_center[1]

    # 初始化maxIoU和anchor_posi
    maxIoU = 0
    anchor_posi = 0
    text_bbox = []

    # 检测当前anchor是否包含文本,若存在,选择IoU最大的作为正例
    for item in txt_list:
        # 当前文本线的四个坐标
        bbox = item[0]

        flag = 0
        # 如果当前的anchor宽度中心刚好落在文本线内,则标记为1
        # 如果当前的文本线落在anchor宽度中心~anchor宽度中心+8范围内,并且比较靠近anchor宽度中心,则标记为1
        # 如果当前的文本线落在anchor宽度中心-8~anchor宽度中心范围内,并且比较靠近anchor宽度中心,则标记为1
        if bbox[0] < wc and wc <= bbox[2]:
            flag = 1
        elif wc < bbox[0] and bbox[2] < wc + asw:
            if bbox[0] - wc < wc + asw - bbox[2]:
                flag = 1
        elif wc - asw < bbox[0] and bbox[2] < wc:
            if bbox[2] - wc <= wc - asw - bbox[0]:
                flag = 1

        if flag == 0: continue

        # 文本线高度中心
        bcenter = (bbox[1] + bbox[3]) / 2.0

        # anchor的中心不能距离真实中心太远
        d0 = abs(hc - bcenter)
        dm = abs(hc - ash - bcenter)
        dp = abs(hc + ash - bcenter)

        if d0 < ash and d0 <= dm and d0 < dp:
            pass
        else:
            continue

        # 当检测到文本时,计算各个anchor的IoU,选择其中最大的作为正例
        posi = 0

        for ah in anchor_heights:
            hah = ah // 2  # half_ah

            IoU = 1.0 * (min(hc + hah, bbox[3]) - max(hc - hah, bbox[1])) \
                  / (max(hc + hah, bbox[3]) - min(hc - hah, bbox[1]))

            if IoU > maxIoU:
                maxIoU = IoU
                anchor_posi = posi
                text_bbox = bbox

            posi += 1
        break

    # 当检测不到文本时,三个分支的标签都用0表示
    if maxIoU <= 0:  #
        num_anchors = len(anchor_heights)
        cls = [0, 0] * num_anchors
        ver = [0, 0] * num_anchors
        hor = [0, 0] * num_anchors
        return cls, ver, hor

    # 检测出包含文本时,则最大IoU对应的anchor作为正例,其他作为负例
    cls = []
    ver = []
    hor = []
    for idx, ah in enumerate(anchor_heights):
        if not idx == anchor_posi:
            cls.extend([0, 0])
            ver.extend([0, 0])
            hor.extend([0, 0])
            continue
        cls.extend([1, 1])

        half_ah = ah // 2
        half_aw = anchor_width // 2

        # 计算anchor的绝对坐标
        anchor_bbox = [wc - half_aw, hc - half_ah, wc + half_aw, hc + half_ah]

        # 计算相对坐标,对anchor坐标进行修正
        ratio_bbox = [0, 0, 0, 0]
        ratio = (text_bbox[0] - anchor_bbox[0]) / anchor_width
        if abs(ratio) < 1:
            ratio_bbox[0] = ratio

        ratio = (text_bbox[2] - anchor_bbox[2]) / anchor_width
        if abs(ratio) < 1:
            ratio_bbox[2] = ratio

        ratio_bbox[1] = (text_bbox[1] - anchor_bbox[1]) / ah
        ratio_bbox[3] = (text_bbox[3] - anchor_bbox[3]) / ah

        ver.extend([ratio_bbox[1], ratio_bbox[3]])
        hor.extend([ratio_bbox[0], ratio_bbox[2]])

    return cls, ver, hor


def trans_results(r_cls, r_ver, r_hor, anchor_heights, threshold):
    """
    将相对坐标转化为原始图像的绝对坐标,获取预测到的文本线坐标和分数
    :param r_cls: cls标签
    :param r_ver: ver标签
    :param r_hor: hor标签
    :param anchor_heights: anchor高度列表. [list]
    :param threshold: 分类阈值. [float]
    :return:
    """
    anchor_width = 8
    ash = 12  # anchor stride - height
    asw = 8  # anchor stride - width
    hc_start = 18
    wc_start = 4
    aw = anchor_width
    list_bbox = []
    list_conf = []
    feat_shape = r_cls.shape

    for h in range(feat_shape[0]):
        for w in range(feat_shape[1]):
            if max(r_cls[h, w, :]) < threshold:
                continue

            # 获取概率最大的anchor
            anchor_posi = np.argmax(r_cls[h, w, :])  # in r_cls
            anchor_id = anchor_posi // 2  # in anchor_heights

            # 计算anchor的坐标
            ah = anchor_heights[anchor_id]  #
            anchor_posi = anchor_id * 2  # for retrieve in r_ver, r_hor

            hc = hc_start + ash * h  # anchor center
            wc = wc_start + asw * w  # anchor center

            half_ah = ah // 2
            half_aw = aw // 2

            anchor_bbox = [wc - half_aw, hc - half_ah, wc + half_aw, hc + half_ah]

            # 计算预测到的文本线的坐标
            text_bbox = [0, 0, 0, 0]
            text_bbox[0] = anchor_bbox[0] + aw * r_hor[h, w, anchor_posi]
            text_bbox[1] = anchor_bbox[1] + ah * r_ver[h, w, anchor_posi]
            text_bbox[2] = anchor_bbox[2] + aw * r_hor[h, w, anchor_posi + 1]
            text_bbox[3] = anchor_bbox[3] + ah * r_ver[h, w, anchor_posi + 1]

            list_bbox.append(text_bbox)
            list_conf.append(max(r_cls[h, w, :]))

    return list_bbox, list_conf


def draw_text_boxes(img_file, text_bbox):
    """
    对图像绘制文本线
    :param img_file: 图像对应的路径. [str]
    :param text_bbox: 文本线坐标. [list]
    :return:
    """
    img_draw = Image.open(img_file)
    draw = ImageDraw.Draw(img_draw)
    for item in text_bbox:
        xs = item[0]
        ys = item[1]
        xe = item[2]
        ye = item[3]
        line_width = 1  # round(text_size/10.0)
        draw.line([(xs, ys), (xs, ye), (xe, ye), (xe, ys), (xs, ys)],
                  width=line_width, fill=(255, 0, 0))

    img_draw.save(img_file)


def do_nms_and_connection(list_bbox, list_conf):
    """将anchor连接为文本框
    :param list_bbox: anchor list,每个anchor包含左上右下四个坐标.[list]
    :param list_conf: anchor概率list,存放每个anchor为前景的概率,同list_bbox对应.[list]
    :return: 返回连接anchor后的文本框conn_bboxlist,每个文本框包含左上右下的四个坐标,[list]
    """
    # #设置anchor连接的最大距离,两个anchor距离大于50,则处理为两个文本框,反之则连接两个文本框
    # max_margin = 50
    # len_list_box = len(list_bbox)
    # conn_bbox = []
    # head = tail = 0
    # for i in range(1, len_list_box):
    #     distance_i_j = abs(list_bbox[i][0] - list_bbox[i - 1][0])
    #     overlap_i_j = overlap(list_bbox[i][1], list_bbox[i][3], list_bbox[i - 1][1], list_bbox[i - 1][3])
    #     if distance_i_j < max_margin and overlap_i_j > 0.7:
    #         tail = i
    #         if i == len_list_box - 1:
    #             this_test_box = [list_bbox[head][0], list_bbox[head][1], list_bbox[tail][2], list_bbox[tail][3]]
    #             conn_bbox.append(this_test_box)
    #             head = tail = i
    #     else:
    #         this_test_box = [list_bbox[head][0], list_bbox[head][1], list_bbox[tail][2], list_bbox[tail][3]]
    #         conn_bbox.append(this_test_box)
    #         head = tail = i

    # 获取每个anchor的近邻,判断条件是两个anchor之间的距离必须小于50个像素点,并且在垂直方向的重合度大于0.4
    neighbor_list = []
    for i in range(len(list_bbox) - 1):
        this_neighbor_list = [i]
        for j in range(i + 1, len(list_bbox)):
            distance_i_j = abs(list_bbox[i][2] - list_bbox[j][0])
            overlap_i_j = overlap(list_bbox[i][1], list_bbox[i][3], list_bbox[j][1], list_bbox[j][3])
            if distance_i_j < 50 and overlap_i_j > 0.4:
                this_neighbor_list.append(j)
        neighbor_list.append(this_neighbor_list)

    # 对每个近邻列表进行合并,一旦两个列表之间有共同的元素,则将他们并在一起
    conn_bbox = []
    while len(neighbor_list) > 0:
        this_conn_bbox = set(neighbor_list[0])
        filter_list = [0]
        for i in range(1, len(neighbor_list)):
            if len(this_conn_bbox & set(neighbor_list[i])) > 0:
                this_conn_bbox = this_conn_bbox | set(neighbor_list[i])
                filter_list.append(i)
        min_x = min([list_bbox[i][0] for i in list(this_conn_bbox)])
        min_y = np.mean([list_bbox[i][1] for i in list(this_conn_bbox)])
        max_x = max([list_bbox[i][2] for i in list(this_conn_bbox)])
        max_y = np.mean([list_bbox[i][3] for i in list(this_conn_bbox)])

        conn_bbox.append([min_x, min_y, max_x, max_y])
        neighbor_list = [neighbor_list[i] for i in range(len(neighbor_list)) if i not in filter_list]

    return conn_bbox


def overlap(h_up1, h_dw1, h_up2, h_dw2):
    """
    计算垂直重合度
    :param h_up1:
    :param h_dw1:
    :param h_up2:
    :param h_dw2:
    :return:
    """
    overlap_value = (min(h_dw1, h_dw2) - max(h_up1, h_up2)) \
                    / (max(h_dw1, h_dw2) - min(h_up1, h_up2))
    return overlap_value


def mean_gray(img):
    """图像灰度处理,均值法(多个通道的均值)
    :param img: img为通过cv2.imread()读入的图片
    :return: 均值法灰度化的图片数组
    """
    row, col, channel = img.shape
    img_gray = np.zeros(shape=(row, col))
    for r in range(row):
        for l in range(col):
            img_gray[r, l] = img[r, l, :].mean()

    return img_gray


def two_value_binary(img_gray, threshold=100, reverse=False):
    """
    二值法数据增强.
    :param img_gray: 灰度化后的图片数组.
    :param threshold: 二值化阈值, 大于阈值设为255, 小于阈值设为0.
    :param reverse:是否将前景和背景反转,默认False.[boolean]
    :return:
    """
    threshold /= 255
    img_binary = np.zeros_like(img_gray)
    row, col = img_binary.shape
    for i in range(row):
        for j in range(col):
            if img_gray[i, j] >= threshold:
                img_binary[i, j] = 1
            if reverse:
                img_binary[i, j] = 1 - img_binary[i, j]
    return img_binary


def convert2rgb(img_binary):
    """将二值化后图片改为三通道
    :param img_binary: 二值化后的图片,维度:二维.[numpy.ndarray]
    :return:
    """
    rows, cols = img_binary.shape
    img_binary_rgb = np.zeros((rows, cols, 3))
    for i in range(rows):
        for j in range(cols):
            img_binary_rgb[i, j, 0:3] = np.tile(img_binary[i, j], 3)
    return img_binary_rgb
在ICDAR数据集上迭代250000次后,达到的效果如下:
4.CTPN的优缺点总结
首先讲一下CTPN的优点吧,大致可以总结为以下几个方面:
- 将文本检测任务转化为一系列细比例尺的文本提取,并提出了一种anchor回归机制,可以同时预测垂直位置和提取出的文本是否是文本的分数。
- 用RNN将从CNN提取出来的文本进行连接,可以获取到文本行的上下文信息,使得文本检测更加可靠。
- 可以兼容多尺度或多语言的文本检测,并且模型的pipeline比较简洁。
- 对图像的检测速度快。
但是CTPN也存在一些缺点,比如对于一些旋转的文本行,其检测效果还是一般,并且文本线的构造也是局限在矩形,当文本出现倾斜时,文本线的构造就显得不够优雅,但是总而言之,该模型还是对文本检测带来了巨大的影响。
招聘信息:
熊猫书院算法工程师:
https://www.lagou.com/jobs/4842081.html
希望对深度学习算法感兴趣的小伙伴们可以加入我们,一起改变教育!


 1万+
1万+


 被折叠的 条评论
为什么被折叠?
被折叠的 条评论
为什么被折叠?
 到【灌水乐园】发言


