


目标:基于YOLO自定义标签训练,实现安全帽是否佩戴的检测,并将检测结果输出。
一、原理
1.目标检测基本原理
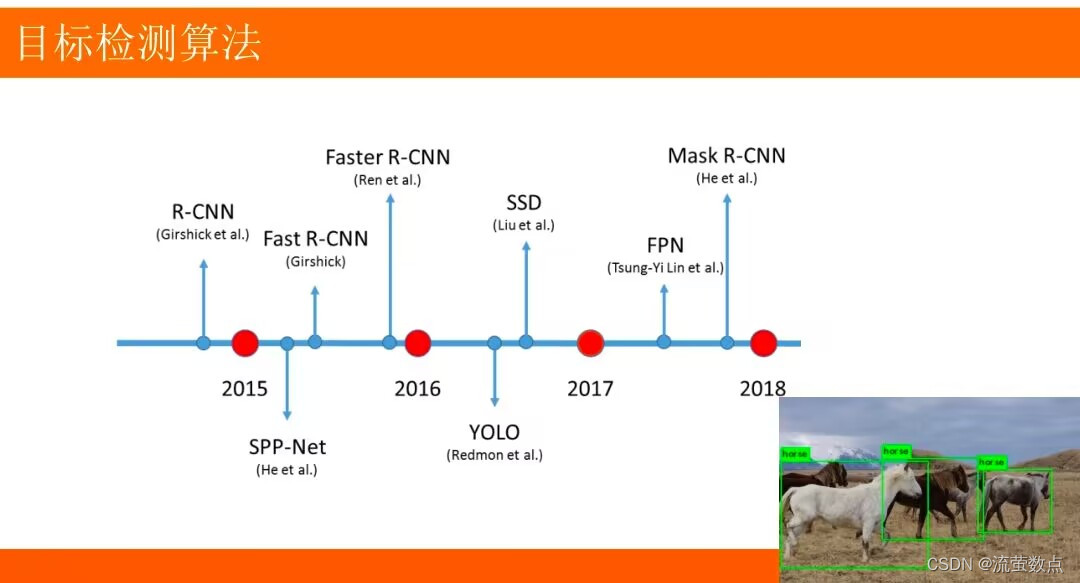
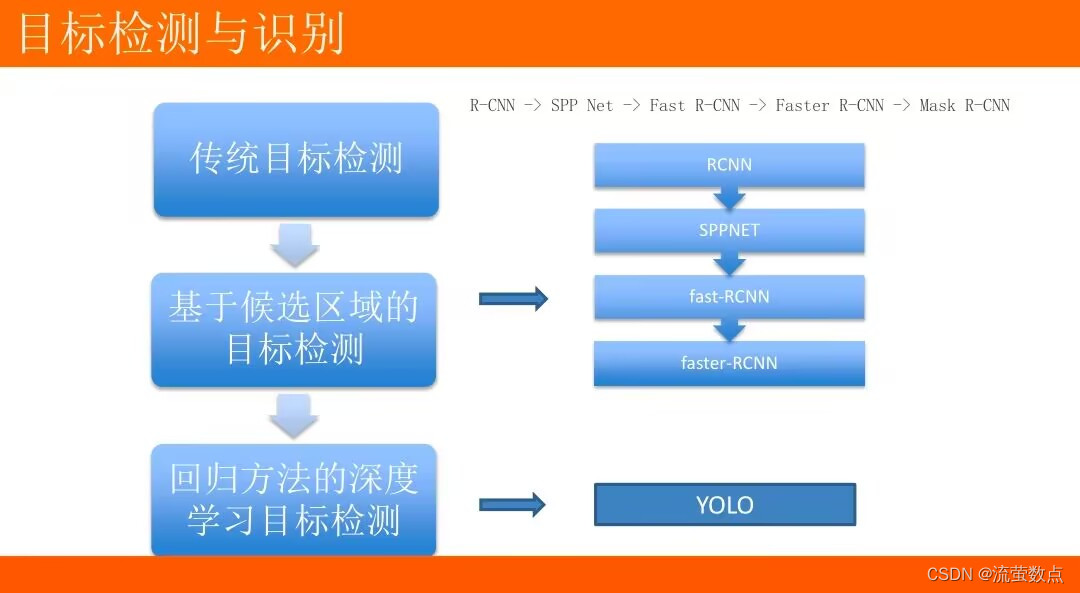
目标检测:将目标从图像中提取出来。
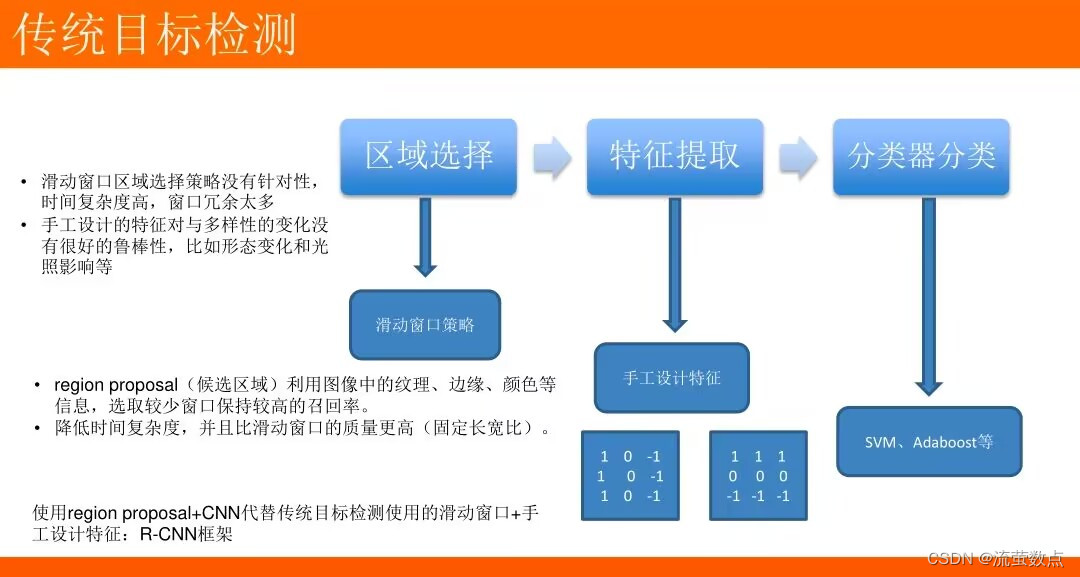
传统的目标检测一般使用滑动窗口的框架,主要步骤:
- 利用不同尺寸的滑动窗口框住图中的某一部分作为候选区域
- 提取候选区域相关的视觉特征,例如人脸检测常用的Harr特征;行人检测和普通目标检测常用的HOG特征
- 利用分类器进行识别
一些目标检测用到的概念
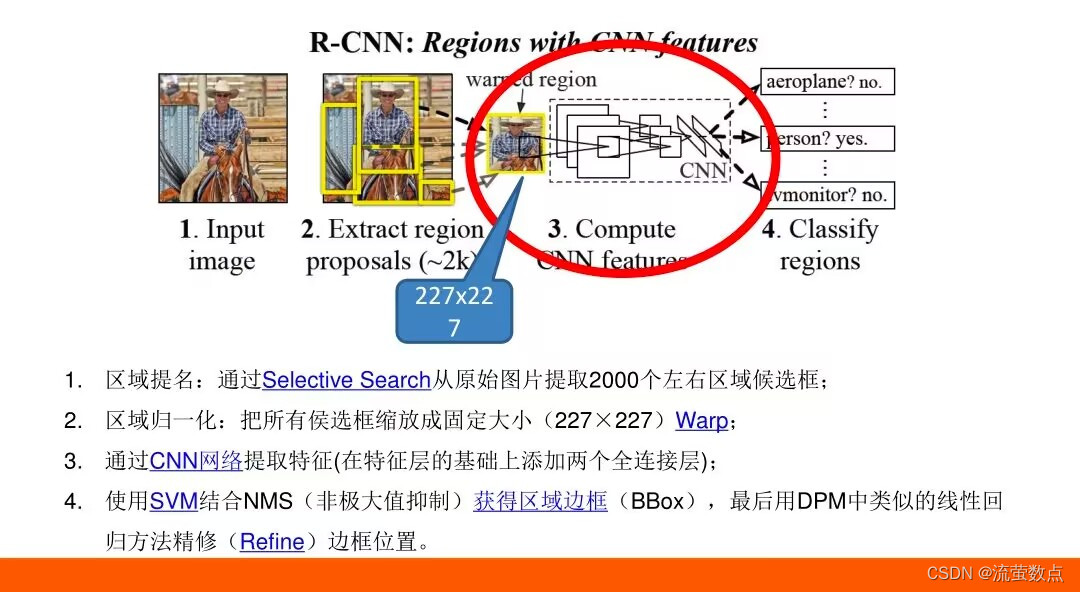
- R-CNN:Region with CNN features将检测问题转换为region proposals的分类问题
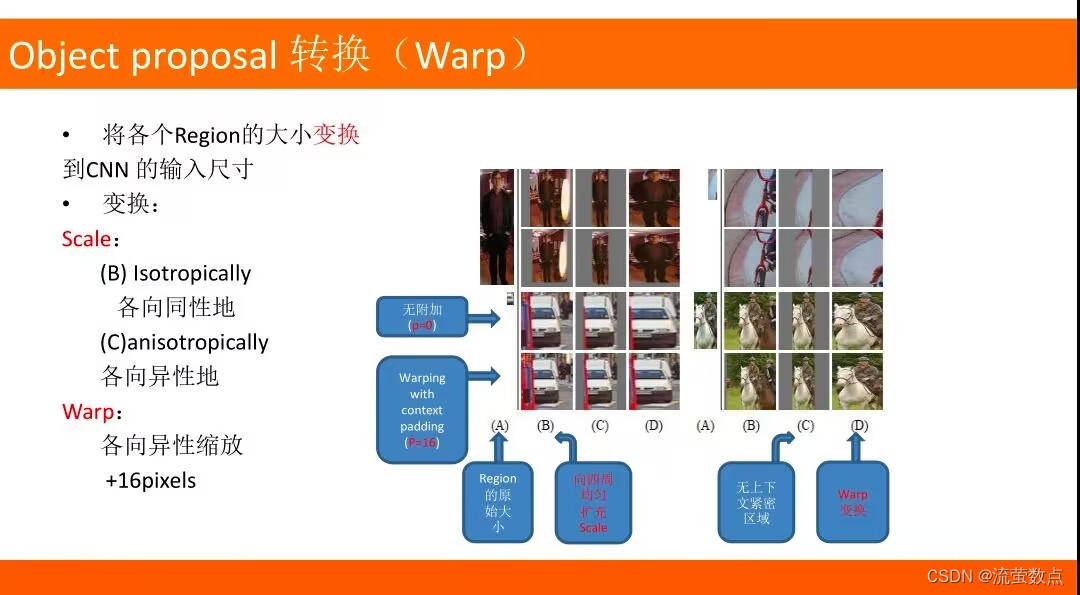
- Warp:图像Region变换
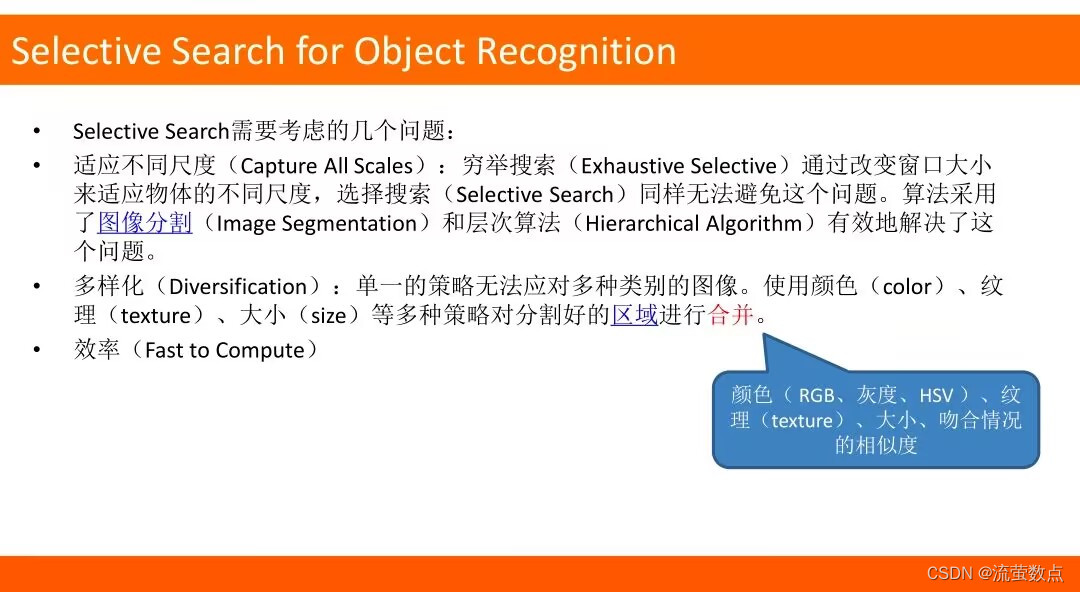
- Selective Search:选择性搜索
- Supervised pre-training:有监督预训练/迁移学习
- IOU:交并比IOU=(A∩B)/(A∪B)


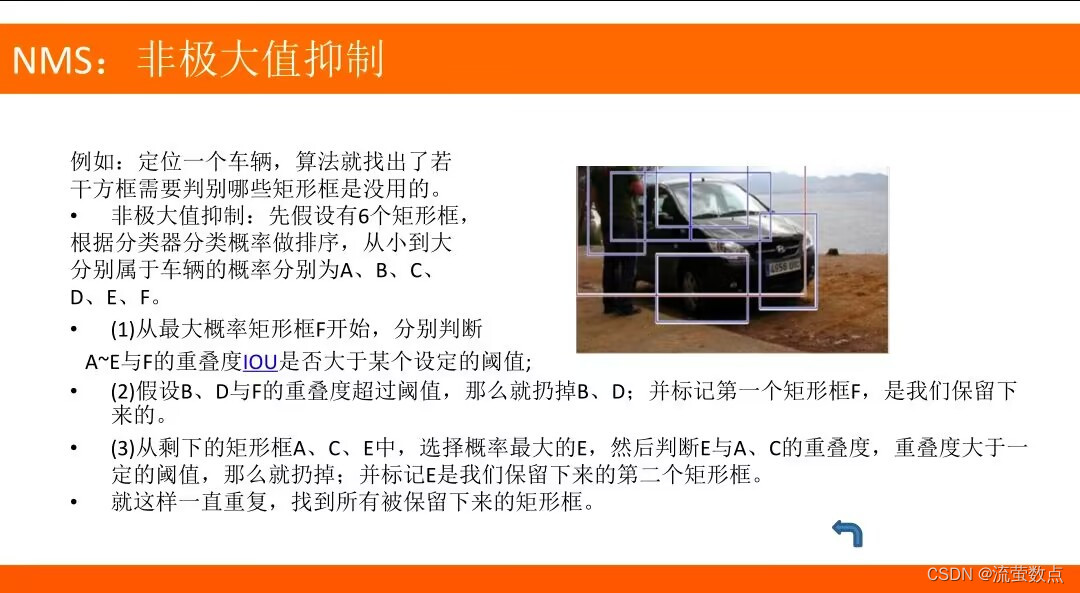
- NMS:非极大值抑制
- DPM:使用判别训练的部件模型进行目标检测
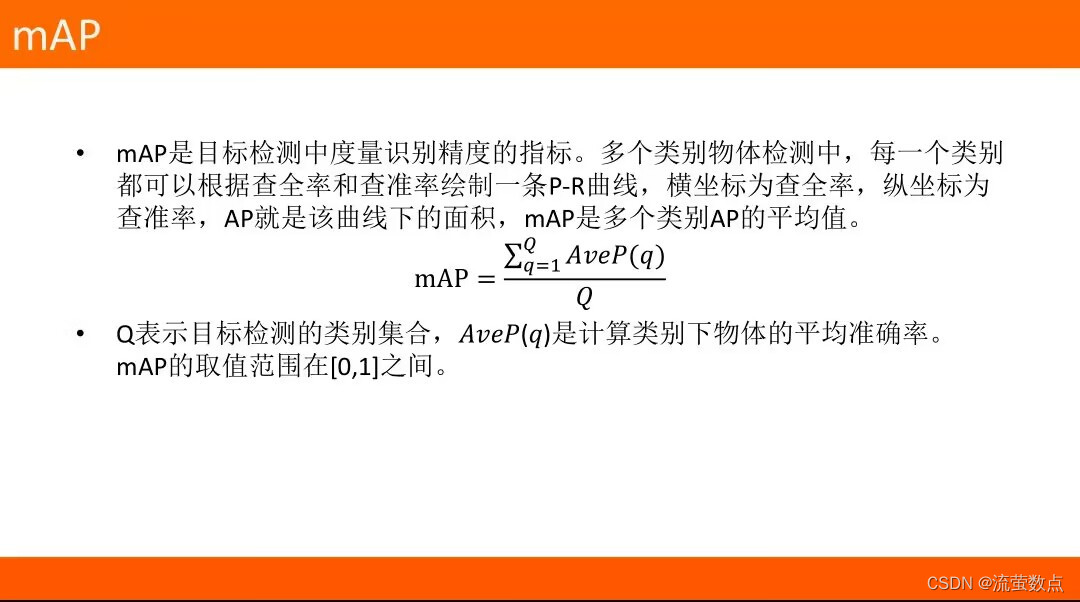
- mAP:目标检测中度量识别精度的指标
2.YOLO
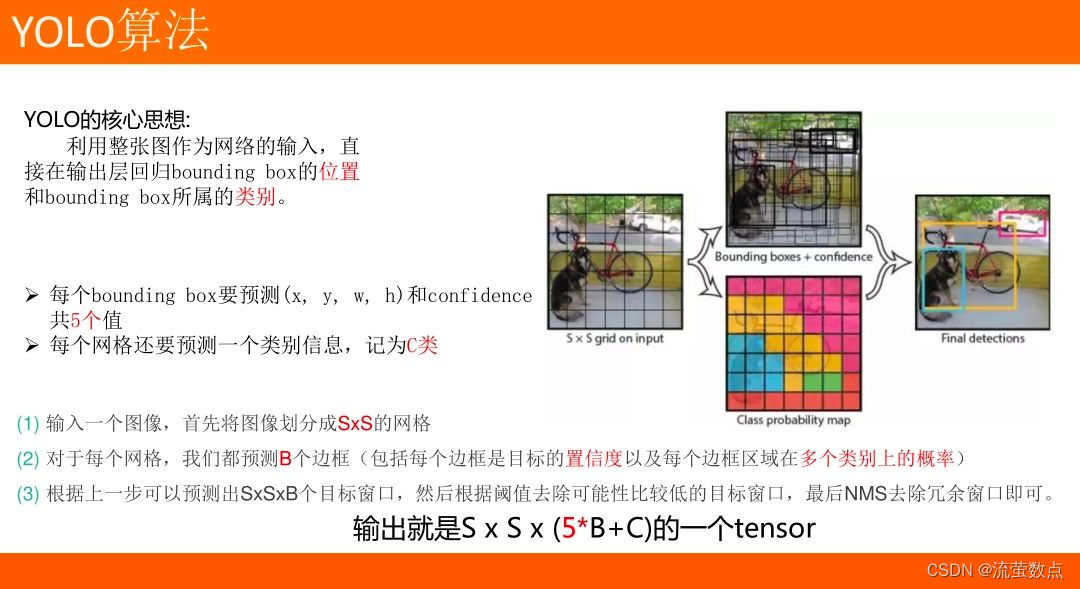
YOLO 是一种使用全卷积神经网络的实时目标检测算法,它是 You Only Look Once的缩写。与其他目标检测的算法相比,YOLO在一个网络模型中完成对图像中所有对象边界框和类别预测,避免了花费大量时间生成候选区域。它的强项是检测速度和识别能力,而不是完美地定位对象。
YOLO使用全卷积神经网络(FCN),所谓全卷积网络就是没有全连接层的CNN,优势在于支持不同大小的输入以及对全图进行端对端的训练,从而更好地学习上下文信息(context),非常适合于输出是图像的任务比如segmentation、edge detection、optical flow等。
YOLO v3的作者提出了一种新的、更深层次的特征提取器 Darknet-53架构。Darknet-53架构包含53个卷积层,每个卷积层之后是批标准化层和 Leaky ReLU 激活层。除此之外,Darknet-53借鉴了Resnet的思想,采用了大量残差块及残差连接,缓解了深层网络的梯度消散,打破了网络的对称性,从而提升了网络的表征能力。为了防止由于池化导致的低层级特征损失,作者并没有使用任何形式的池化层,而是使用步长为2的卷积层对特征图(feature maps)进行降采样。
具体可参考【yolov3详解】一文让你读懂yolov3目标检测原理_小样5411的博客-CSDN博客_yolov3原理
二、过程
1.数据准备
Safety helmet (hardhat) wearing detect dataset(安全帽佩戴检测数据集, SHWD)
(1)SHWD提供了用于安全帽佩戴和人头检测的数据集。
(2) 它包含7581张图像,其中带有9044张人类安全头盔的佩戴物(正)和111514正常头部的物品(未佩戴)。
(3)数据为Pascal VOC。
数据下载地址:GitHub - njvisionpower/Safety-Helmet-Wearing-Dataset: Safety helmet wearing detect dataset, with pretrained model
2.导入数据
#准备数据,从OSS中获取数据并解压到当前目录:

import oss2
import os
access_key_id = os.getenv('OSS_TEST_ACCESS_KEY_ID', 'LTAI4G1MuHTUeNrKdQEPnbph')
access_key_secret = os.getenv('OSS_TEST_ACCESS_KEY_SECRET', 'm1ILSoVqcPUxFFDqer4tKDxDkoP1ji')
bucket_name = os.getenv('OSS_TEST_BUCKET', 'mldemo')
endpoint = os.getenv('OSS_TEST_ENDPOINT', 'https://oss-cn-shanghai.aliyuncs.com')
# 创建Bucket对象,所有Object相关的接口都可以通过Bucket对象来进行
bucket = oss2.Bucket(oss2.Auth(access_key_id, access_key_secret), endpoint, bucket_name)
# 下载到本地文件
bucket.get_object_to_file('data/c12/person_hat_data.zip', 'person_hat_data.zip')
bucket.get_object_to_file('data/c12/VOC2028.zip', 'VOC2028.zip')
#解压数据
!unzip -o -q person_hat_data.zip
!unzip -o -q VOC2028.zip!mv VOC2028 ../
!rm -rf __MACOSX3.安装库
# 安装完成之后重启kernel
!pip install tensorflow==1.14.0
!pip3 install keras==2.2.4
!pip3 install opencv-python 
4.导入组件包
import logging

import numpy as np
import keras.backend as K
from keras.layers import Input, Lambda
from keras.models import Model
from keras.optimizers import Adam
from keras.callbacks import TensorBoard, ModelCheckpoint, ReduceLROnPlateau, EarlyStopping
import tensorflow as tf

from yolo3.model import preprocess_true_boxes, yolo_eval, yolo_loss
from yolo3.utils import get_random_data,compose
from functools import wraps
from keras.layers import Conv2D, Add, ZeroPadding2D, UpSampling2D, Concatenate, MaxPooling2D
from keras.regularizers import l2
from keras.layers.normalization import BatchNormalization
from keras.layers.advanced_activations import LeakyReLU
from PIL import Image, ImageFont, ImageDraw
%matplotlib inline 
5.数据可视化
import os
import numpy as np
import matplotlib.pyplot as plt
import random

directory = "../VOC2028/JPEGImages/"
images = random.choices(os.listdir(directory), k=18)

fig = plt.figure(figsize=(20, 10))
columns = 6
rows = 3

for x, i in enumerate(images):
    path =  os.path.join(directory,i)
    img = plt.imread(path)
    fig.add_subplot(rows, columns, x+1)
    plt.imshow(img)

plt.show() 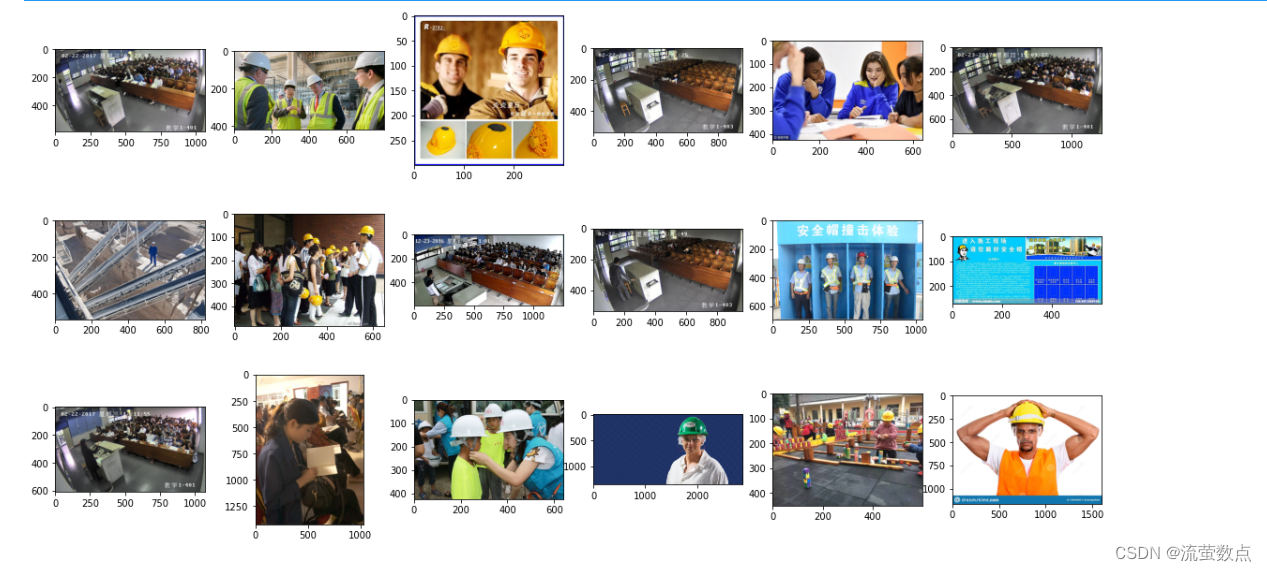
6.模型训练
weights_path='model/yolo-tiny.h5'
annotation_path = 'dataset/train.txt'

#划分训练集和验证集
val_split = 0.2
with open(annotation_path) as f:
    lines = f.readlines()

#用于演示,只训练500个
lines = lines[:500]

np.random.seed(42)
np.random.shuffle(lines)
num_val = int(len(lines)*val_split)
num_train = len(lines) - num_val
#日志存放路径
log_dir = 'logs/'
#模型存放位置
model_dir = 'final_model/'
#标签类别
class_names = ['person','hat']
num_classes = len(class_names)#模板边界框列表
anchor_array = [10,14, 23,27, 37,58, 81,82, 135,169, 344,319]
anchors = np.array(anchor_array).reshape(-1, 2)
#模型输入图片大小
input_shape = (416,416)
image_input = Input(shape=(None, None, 3))
h, w = input_shape
num_anchors = len(anchors)
y_true = [Input(shape=(h//{0:32, 1:16}[l], w//{0:32, 1:16}[l], num_anchors//2, num_classes+5)) for l in range(2)]
'''
YOLO_v3 Model Defined in Keras.
ref:https://github.com/njvisionpower/Safety-Helmet-Wearing-Dataset
'''

@wraps(Conv2D)
def DarknetConv2D(*args, **kwargs):
    """Wrapper to set Darknet parameters for Convolution2D."""
    darknet_conv_kwargs = {'kernel_regularizer': l2(5e-4)}
    darknet_conv_kwargs['padding'] = 'valid' if kwargs.get('strides')==(2,2) else 'same'
    darknet_conv_kwargs.update(kwargs)
    return Conv2D(*args, **darknet_conv_kwargs)

def DarknetConv2D_BN_Leaky(*args, **kwargs):
    """Darknet Convolution2D followed by BatchNormalization and LeakyReLU."""
    no_bias_kwargs = {'use_bias': False}
    no_bias_kwargs.update(kwargs)
    return compose(
        DarknetConv2D(*args, **no_bias_kwargs),
        BatchNormalization(),
        LeakyReLU(alpha=0.1))

def resblock_body(x, num_filters, num_blocks):
    '''A series of resblocks starting with a downsampling Convolution2D'''
    # Darknet uses left and top padding instead of 'same' mode
    x = ZeroPadding2D(((1,0),(1,0)))(x)
    x = DarknetConv2D_BN_Leaky(num_filters, (3,3), strides=(2,2))(x)
    for i in range(num_blocks):
        y = compose(
                DarknetConv2D_BN_Leaky(num_filters//2, (1,1)),
                DarknetConv2D_BN_Leaky(num_filters, (3,3)))(x)
        x = Add()([x,y])
    return x

def tiny_yolo_body(inputs, num_anchors, num_classes):
    '''Create Tiny YOLO_v3 model CNN body in keras.'''
    x1 = compose(
            DarknetConv2D_BN_Leaky(16, (3,3)),
            MaxPooling2D(pool_size=(2,2), strides=(2,2), padding='same'),
            DarknetConv2D_BN_Leaky(32, (3,3)),
            MaxPooling2D(pool_size=(2,2), strides=(2,2), padding='same'),
            DarknetConv2D_BN_Leaky(64, (3,3)),
            MaxPooling2D(pool_size=(2,2), strides=(2,2), padding='same'),
            DarknetConv2D_BN_Leaky(128, (3,3)),
            MaxPooling2D(pool_size=(2,2), strides=(2,2), padding='same'),
            DarknetConv2D_BN_Leaky(256, (3,3)))(inputs)
    x2 = compose(
            MaxPooling2D(pool_size=(2,2), strides=(2,2), padding='same'),
            DarknetConv2D_BN_Leaky(512, (3,3)),
            MaxPooling2D(pool_size=(2,2), strides=(1,1), padding='same'),
            DarknetConv2D_BN_Leaky(1024, (3,3)),
            DarknetConv2D_BN_Leaky(256, (1,1)))(x1)
    y1 = compose(
            DarknetConv2D_BN_Leaky(512, (3,3)),
            DarknetConv2D(num_anchors*(num_classes+5), (1,1)))(x2)

    x2 = compose(
            DarknetConv2D_BN_Leaky(128, (1,1)),
            UpSampling2D(2))(x2)
    y2 = compose(
            Concatenate(),
            DarknetConv2D_BN_Leaky(256, (3,3)),
            DarknetConv2D(num_anchors*(num_classes+5), (1,1)))([x2,x1])

    return Model(inputs, [y1,y2])
7.报错解决方法
第8代码报错就搜了一下加上了这句代码,成功解决AttributeError: ‘str‘ object has no attribute ‘decode‘
pip install 'h5py<3.0.0' -i https://pypi.tuna.tsinghua.edu.cn/simple
8.构建YOLO tiny模型结构
#构建YOLO tiny模型结构
model_body = tiny_yolo_body(image_input, num_anchors//2, num_classes)
print('Create Tiny YOLOv3 model with {} anchors and {} classes.'.format(num_anchors, num_classes))
#加载预训练tiny模型参数
model_body.load_weights(weights_path, by_name=True, skip_mismatch=True)
print('Load weights {}.'.format(weights_path))
#定义模型损失函数
model_loss = Lambda(yolo_loss, output_shape=(1,), name='yolo_loss',
arguments={'anchors': anchors, 'num_classes': num_classes, 'ignore_thresh': 0.7})([*model_body.output, *y_true])
model = Model([model_body.input, *y_true], model_loss)
#模型编译
model.compile(optimizer=Adam(lr=1e-4), loss={'yolo_loss': lambda y_true, y_pred: y_pred})
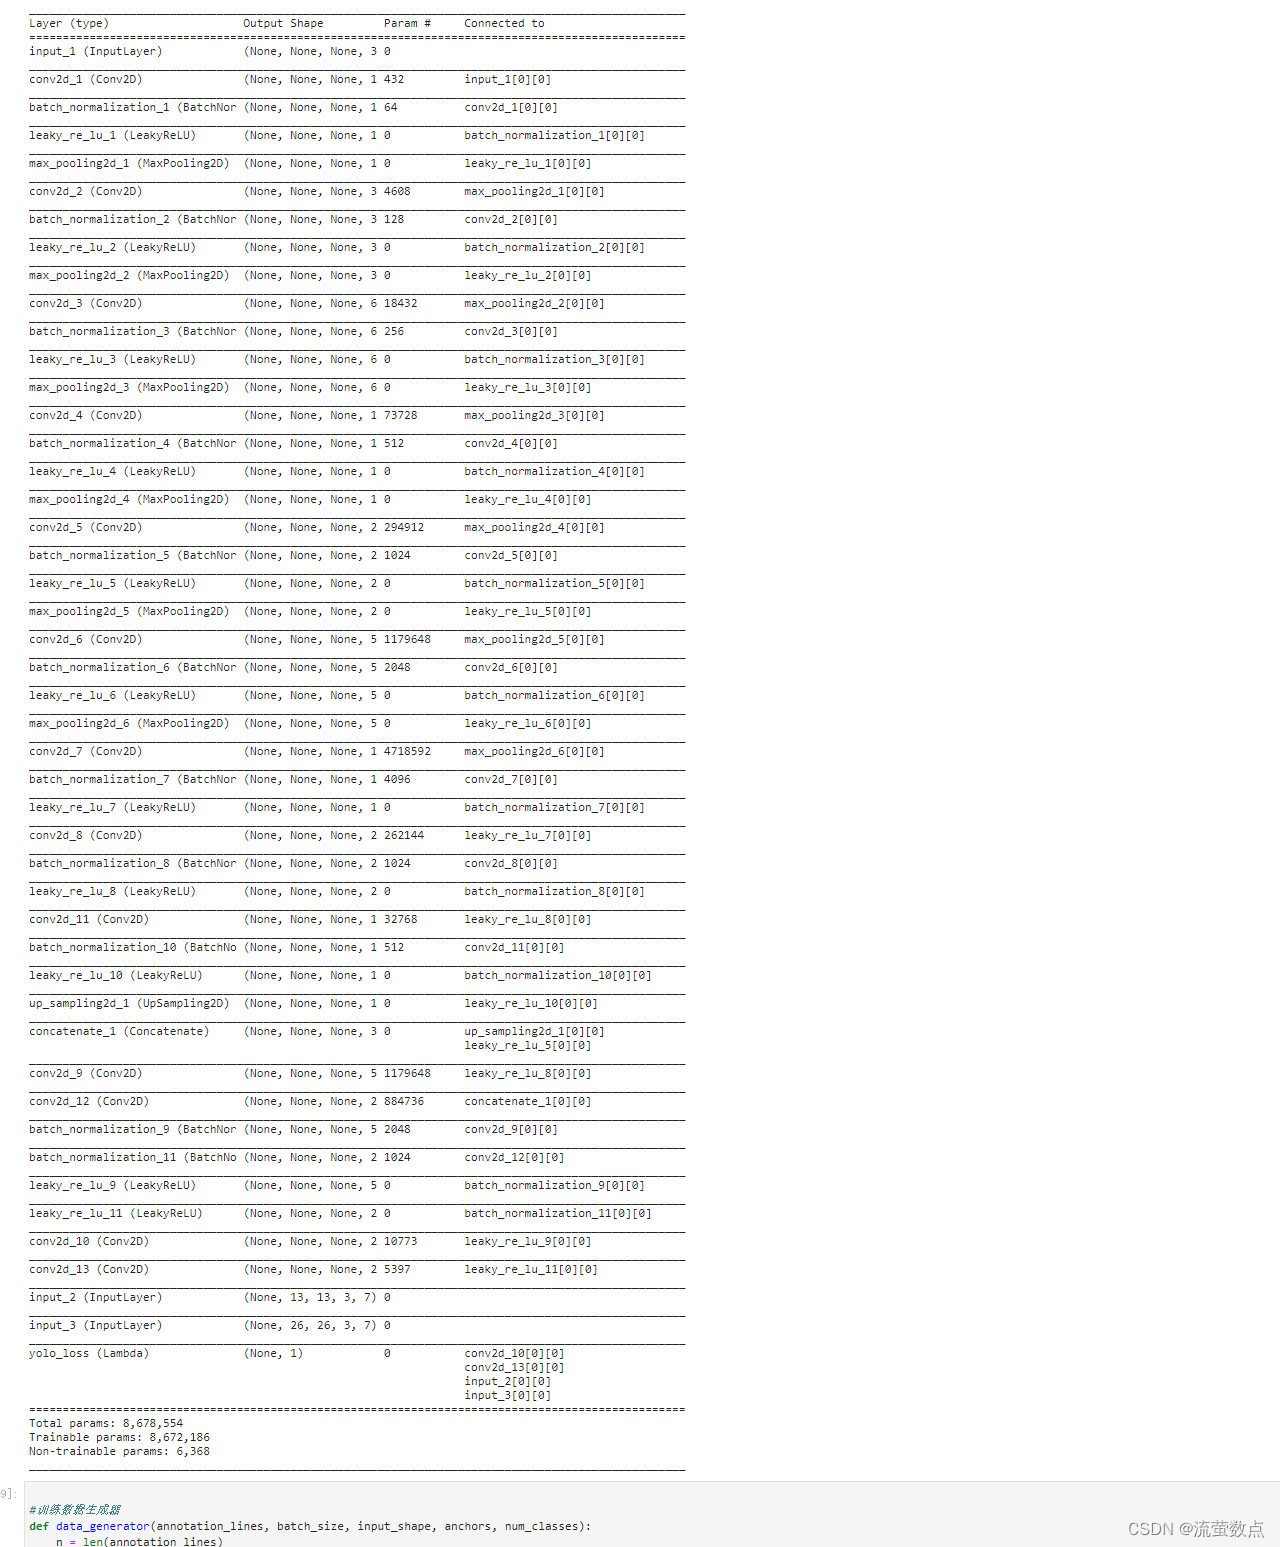
#输出模型结构
model.summary() 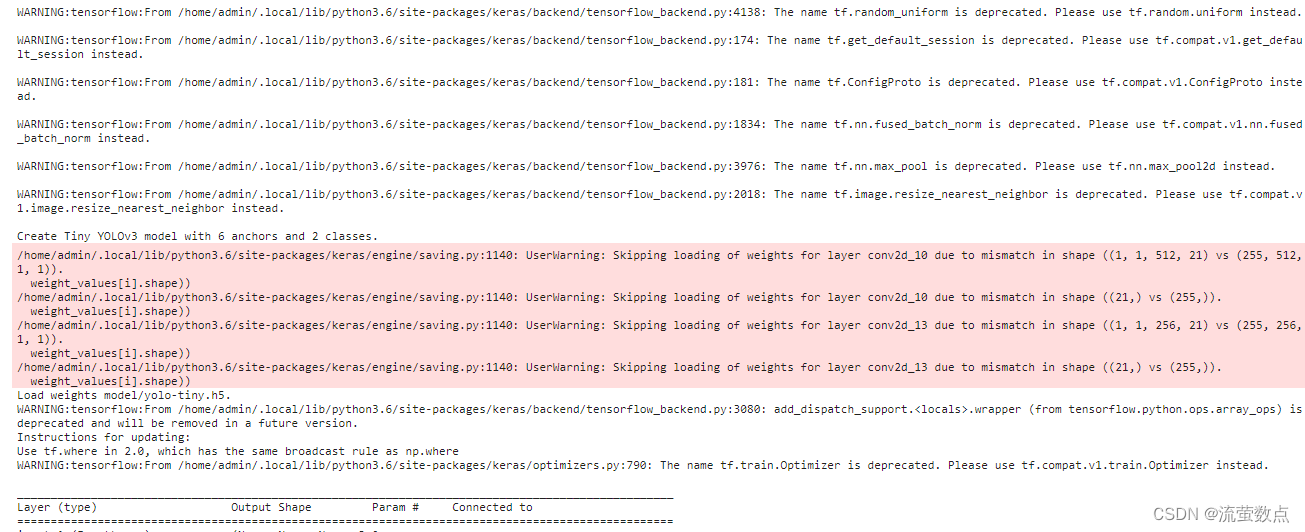
9.训练数据生成器
#训练数据生成器
def data_generator(annotation_lines, batch_size, input_shape, anchors, num_classes):
    n = len(annotation_lines)
    i = 0
    while True:
        image_data = []
        box_data = []
        for b in range(batch_size):
            if i==0:
                np.random.shuffle(annotation_lines)
            #随机获取训练样本
            image, box = get_random_data(annotation_lines[i], input_shape, random=True)
            image_data.append(image)
            box_data.append(box)
            i = (i+1) % n
        image_data = np.array(image_data)
        box_data = np.array(box_data)
        #预处理图像标记
        y_true = preprocess_true_boxes(box_data, input_shape, anchors, num_classes)
        yield [image_data, *y_true], np.zeros(batch_size)

def data_generator_wrapper(annotation_lines, batch_size, input_shape, anchors, num_classes):
    n = len(annotation_lines)
    if n==0 or batch_size<=0: return None
    return data_generator(annotation_lines, batch_size, input_shape, anchors, num_classes)
10.定义日志存储位置
#定义日志存储位置
logging = TensorBoard(log_dir=log_dir)
#定义模型存储
checkpoint = ModelCheckpoint(model_dir + 'ep{epoch:03d}-loss{loss:.3f}-val_loss{val_loss:.3f}.h5',
    monitor='val_loss', save_weights_only=True, save_best_only=True, period=3)
#定义学习率优化策略
reduce_lr = ReduceLROnPlateau(monitor='val_loss', factor=0.1, patience=3, verbose=1)
#定义提前终止模型训练
early_stopping = EarlyStopping(monitor='val_loss', min_delta=0, patience=10, verbose=1)
11.训练
#定义批大小
batch_size = 8
print('Train on {} samples, val on {} samples, with batch size {}.'.format(num_train, num_val, batch_size))
#模型训练
model.fit_generator(data_generator_wrapper(lines[:num_train], batch_size, input_shape, anchors, num_classes),
    steps_per_epoch=max(1, num_train//batch_size),
    validation_data=data_generator_wrapper(lines[num_train:], batch_size, input_shape, anchors, num_classes),
    validation_steps=max(1, num_val//batch_size),
    epochs=1,
    callbacks=[logging, checkpoint, reduce_lr, early_stopping])

12.模型使用
from keras.models import load_model
from keras import backend as K
from keras.layers import Input
import tensorflow as tf
import numpy as np
from yolo3.model import preprocess_true_boxes, yolo_eval, tiny_yolo_body, yolo_loss
from yolo3.utils import letterbox_image
from PIL import Image, ImageFont, ImageDraw
import cv2
#类别标签
class_names = ['person','hat']
#类别数量
num_classes = len(class_names)
#候选框
anchor_array = [10,14, 23,27, 37,58, 81,82, 135,169, 344,319]
anchors = np.array(anchor_array).reshape(-1, 2)
num_anchors = len(anchors)
#训练好的模型路径
model_path = 'final_model/ep078-loss21.420-val_loss21.688.h5'
#IoU阈值
iou_value = 0.5
#预测概率阀值
score = 0.4
#模型输入大小
input_shape = (416,416)13.定义模型结构及加载模型参数
#构建模型结构
yolo_model = tiny_yolo_body(Input(shape=(None,None,3)), num_anchors//2, num_classes)
#加载参数
yolo_model.load_weights(model_path)
#定义模型输入图像大小
input_image_shape = K.placeholder(shape=(2, ))
#模型输出
boxes, scores, classes = yolo_eval(yolo_model.output, anchors, num_classes, input_image_shape,
score_threshold=score, iou_threshold=iou_value) 
!ls 
14.准备数据
imgname = "129879567_15271283767121n.jpg"
image = Image.open(imgname)

#使用填充的方式改变图片大小
new_image_size = (image.width - (image.width % 32),
                  image.height - (image.height % 32))

iw, ih = image.size
w, h = new_image_size
scale = min(w/iw, h/ih)
nw = int(iw*scale)
nh = int(ih*scale)

image = image.resize((nw,nh), Image.BICUBIC)
boxed_image = Image.new('RGB', new_image_size, (128,128,128))
boxed_image.paste(image, ((w-nw)//2, (h-nh)//2))

image_data = np.array(boxed_image, dtype='float32')
#归一化图像输入
image_data /= 255.
image_data = np.expand_dims(image_data, 0)  # Add batch dimension.
15.执行推理预测
sess = K.get_session()
#模型预测
out_boxes, out_scores, out_classes = sess.run([boxes, scores, classes],
    feed_dict={
        yolo_model.input: image_data,
        input_image_shape: [image.size[1], image.size[0]],
        K.learning_phase(): 0
    })
16.结果可视化
#加载自定义字体
font = ImageFont.truetype("SimSun.ttf", 20, encoding="utf-8")
#遍历预测结果
for i, c in reversed(list(enumerate(out_classes))):
    predicted_class = class_names[c]
    box = out_boxes[i]
    score = out_scores[i]
    #构建标签和概率分值
    label = '{}:{:.2f}'.format(predicted_class, score)

    #绘制方框
    top, left, bottom, right = box
    top = max(0, np.floor(top + 0.5).astype('int32'))
    left = max(0, np.floor(left + 0.5).astype('int32'))
    bottom = min(image.size[1], np.floor(bottom + 0.5).astype('int32'))
    right = min(image.size[0], np.floor(right + 0.5).astype('int32'))

    board_height = int((bottom - top) / 5)

    image = np.array(image)
    if predicted_class == 'hat':
        border_color = (0, 255, 255)
    else:
        border_color = (255, 0, 0)


    cv2.rectangle(image, (left, top), (right, bottom),border_color , 2)
    cv2.rectangle(image, (left, bottom - board_height), (right, bottom), border_color, cv2.FILLED)

    image = Image.fromarray(image)  # 转为PIL的图片格式
    text_size = font.getsize(label)


    ImageDraw.Draw(image).text((left + ((right - left) - text_size[0]) / 2,
                                bottom - board_height + (board_height - text_size[1]) / 2),
                               label, font=font,fill="green")
image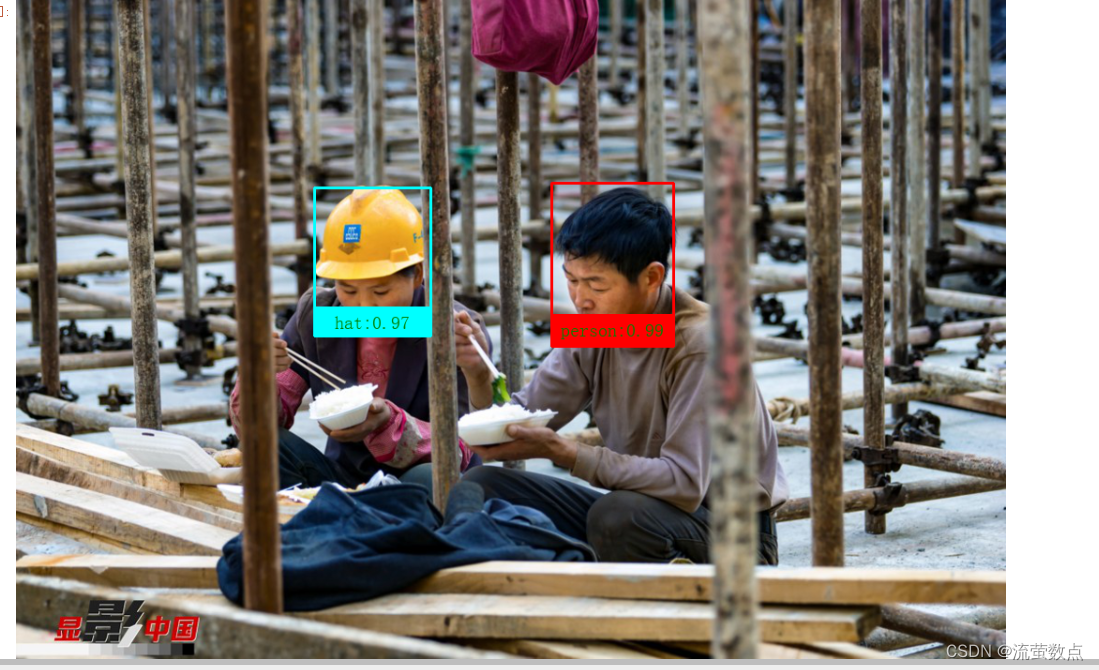


 1612
1612

 被折叠的 条评论
为什么被折叠?
被折叠的 条评论
为什么被折叠?
 到【灌水乐园】发言


