


目标检测算法广泛应用于自动驾驶、智能安防、视频监控、机器人导航、医疗影像分析等多个领域。它能够在图像或视频中准确识别和定位目标物体,对于实时性和准确性要求较高的应用尤为重要。例如,在自动驾驶中,车辆需要实时检测和识别道路上的行人、车辆、交通标志等信息,以保证行驶安全;在智能安防领域,目标检测技术可以用于识别和追踪监控视频中的可疑人物或物体,提升安全防护水平。
SSD(Single Shot MultiBox Detector)是Wei Liu在ECCV 2016上提出的一种目标检测算法。其主要特点是通过一个卷积神经网络同时进行分类和边界框回归。SSD在VOC 2007测试集上,对于300x300输入尺寸的网络,达到74.3%的mAP和59FPS;对于512x512的网络,达到了76.9%的mAP,超越了当时最强的Faster RCNN。
目标检测算法可分为两类:
- Two-stage方法:如RCNN系列,通过生成候选框,然后再对这些候选框进行分类和回归。
- One-stage方法:如YOLO和SSD,直接通过主干网络给出类别和位置信息,不需要区域生成。
SSD采用VGG16作为基础模型,在其基础上新增了卷积层来获得更多的特征图用于检测。SSD利用多尺度特征图进行检测,在不同的特征层上进行输出,使得它能够更好地检测出不同尺度的目标。
模型特点是 :
- 多尺度检测:SSD使用多个特征层,每个特征层的尺寸不同,较大的特征图用于检测小物体,而较小的特征图用于检测大物体。
- 采用卷积进行检测:SSD直接采用卷积操作进行特征提取和检测,每个特征层通过3×3卷积得到检测结果。
- 预设anchor:SSD采用预设边界框(anchor)的策略,预设不同长宽比例的anchor,并在每个输出特征层基于anchor预测多个检测框。
下面是利用Mindspore具体的实现代码
环境准备
pip install -i https://pypi.mirrors.ustc.edu.cn/simple mindspore==2.3.0rc1 download pycocotools opencv-python
数据准备与处理
from download import download

dataset_url = "https://mindspore-website.obs.cn-north-4.myhuaweicloud.com/notebook/datasets/ssd_datasets.zip"
path = "./"
download(dataset_url, path, kind="zip", replace=True)
创建数据集
from mindspore.dataset import MindDataset
from mindspore.dataset.vision import Decode, HWC2CHW, Normalize, RandomColorAdjust

def create_ssd_dataset(mindrecord_file, batch_size=32, is_training=True):
    dataset = MindDataset(mindrecord_file, columns_list=["img_id", "image", "annotation"], shuffle=is_training)
    decode = Decode()
    dataset = dataset.map(operations=decode, input_columns=["image"])
    change_swap_op = HWC2CHW()
    normalize_op = Normalize(mean=[0.485 * 255, 0.456 * 255, 0.406 * 255],
                             std=[0.229 * 255, 0.224 * 255, 0.225 * 255])
    color_adjust_op = RandomColorAdjust(brightness=0.4, contrast=0.4, saturation=0.4)

    def preprocess_fn(img_id, image, box, is_training):
        # 数据预处理和增强
        pass

    compose_map_func = (lambda img_id, image, annotation: preprocess_fn(img_id, image, annotation, is_training))

    if is_training:
        output_columns = ["image", "box", "label", "num_match"]
        trans = [color_adjust_op, normalize_op, change_swap_op]
    else:
        output_columns = ["img_id", "image", "image_shape"]
        trans = [normalize_op, change_swap_op]

    dataset = dataset.map(operations=compose_map_func, input_columns=["img_id", "image", "annotation"],
                          output_columns=output_columns, python_multiprocessing=True)
    dataset = dataset.map(operations=trans, input_columns=["image"], python_multiprocessing=True)
    dataset = dataset.batch(batch_size, drop_remainder=True)
    return dataset
模型训练
import math
import mindspore as ms
import mindspore.nn as nn
import mindspore.dataset as ds
from mindspore.common import set_seed

set_seed(1)

# 创建数据集
mindrecord_file = "./datasets/MindRecord_COCO/ssd.mindrecord0"
dataset = create_ssd_dataset(mindrecord_file, batch_size=5, rank=0, use_multiprocessing=True)
dataset_size = dataset.get_dataset_size()

# 定义网络
network = SSD300Vgg16()

# 初始化网络参数
def init_net_param(network, initialize_mode='TruncatedNormal'):
    params = network.trainable_params()
    for p in params:
        if 'beta' not in p.name and 'gamma' not in p.name and 'bias' not in p.name:
            p.set_data(initializer(TruncatedNormal(0.02), p.data.shape, p.data.dtype))

init_net_param(network)

# 定义学习率
def get_lr(global_step, lr_init, lr_end, lr_max, warmup_epochs, total_epochs, steps_per_epoch):
    lr_each_step = []
    total_steps = steps_per_epoch *  # Total steps
    warmup_steps = steps_per_epoch * warmup_epochs
    for i in range(total_steps):
        if i < warmup_steps:
            lr = lr_init + (lr_max - lr_init) * i / warmup_steps
        else:
            lr = lr_end + (lr_max - lr_end) * (1. + math.cos(math.pi * (i - warmup_steps) / (total_steps - warmup_steps))) / 2.
        lr_each_step.append(lr)
    return lr_each_step

# 设置学习率
lr = Tensor(get_lr(global_step=0, lr_init=0.001, lr_end=0.0001, lr_max=0.05, warmup_epochs=2, total_epochs=60, steps_per_epoch=dataset_size))

# 定义优化器
opt = nn.Momentum(network.trainable_params(), lr, momentum=0.9, weight_decay=0.0005)

# 定义损失函数和训练步骤
def forward_fn(x, gt_loc, gt_label):
    pred_loc, pred_label = network(x)
    loss = nn.SmoothL1Loss()(pred_loc, gt_loc) + nn.SoftmaxCrossEntropyWithLogits()(pred_label, gt_label)
    return loss

# 开始训练
for epoch in range(60):
    for data in dataset.create_dict_iterator():
        image, gt_loc, gt_label = data['image'], data['box'], data['label']
        loss = forward_fn(image, gt_loc, gt_label)
        loss.backward()
        opt.step()
        opt.zero_grad()
模型评估
from pycocotools.coco import COCO
from pycocotools.cocoeval import COCOeval

def apply_eval(eval_param_dict):
    net = eval_param_dict["net"]
    ds = eval_param_dict["dataset"]
    coco_metrics = COCOMetrics(anno_json=eval_param_dict["anno_json"], classes=train_cls, num_classes=81)
    for data in ds.create_dict_iterator(output_numpy=True, num_epochs=1):
        img_id = data['img_id']
        img_np = data['image']
        output = net(Tensor(img_np))
        pred_batch = {"boxes": output[0].asnumpy(), "box_scores": output[1].asnumpy(), "img_id": int(np.squeeze(img_id))}
        coco_metrics.update(pred_batch)
    eval_metrics = coco_metrics.get_metrics()
    return eval_metrics

def eval_net():
    mindrecord_file = "./datasets/MindRecord_COCO/ssd_eval.mindrecord0"
    ckpt_path = "./ssd-5_9.ckpt"
    anno_json = "./datasets/annotations/instances_val2017.json"
    ds = create_ssd_dataset(mindrecord_file, batch_size=1, is_training=False)
    net = SsdInferWithDecoder(SSD300Vgg16(), Tensor(default_boxes), ckpt_path)
    eval_param_dict = {"net": net, "dataset": ds, "anno_json": anno_json}
    mAP = apply_eval(eval_param_dict)
    print(f"mAP: {mAP}")

eval_net()
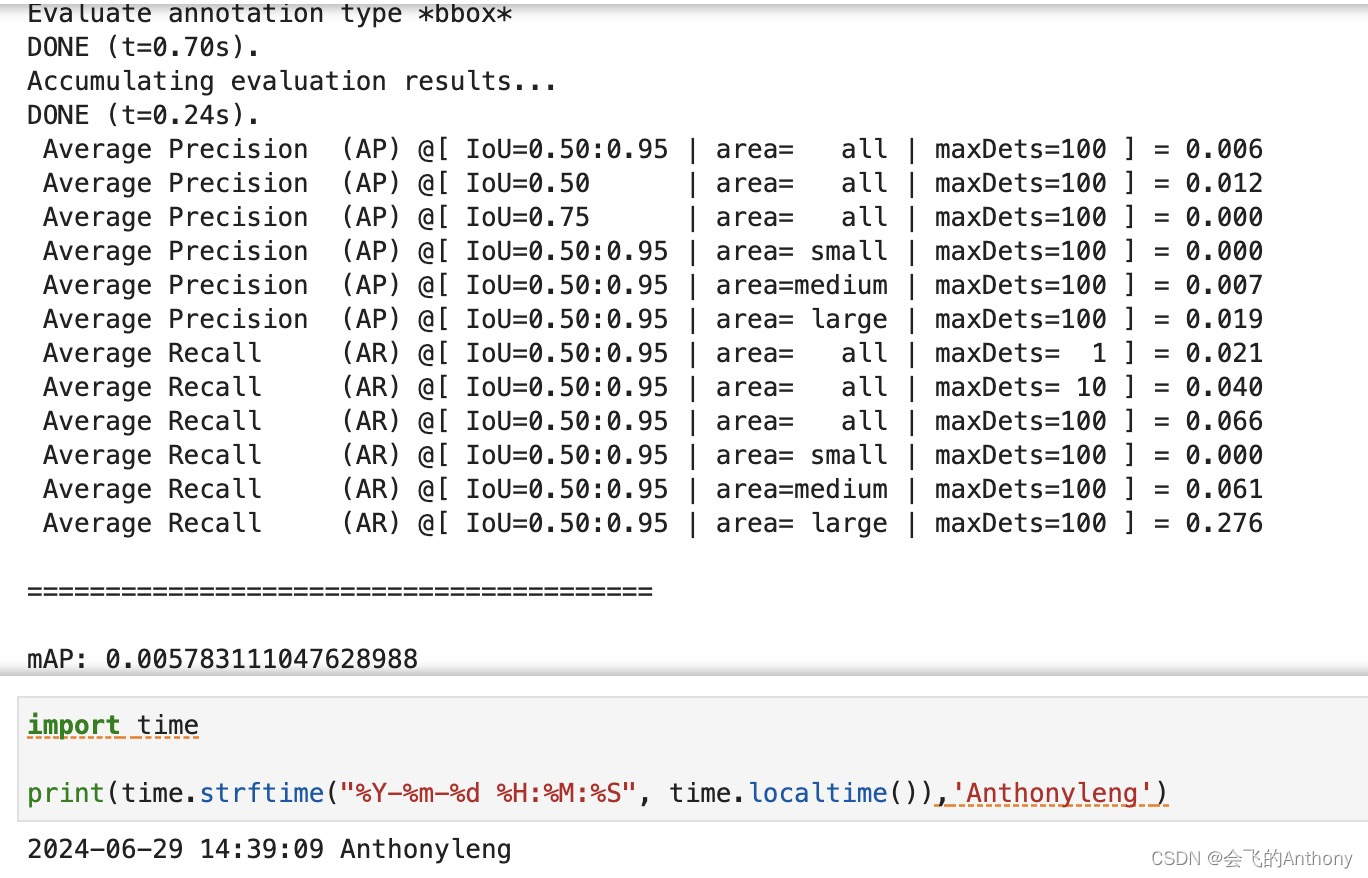
结果:
学习心得:
SSD作为一种单阶段目标检测算法,通过使用多尺度特征图和预设anchor策略,在实现高精度检测的同时,保证了较快的检测速度,适用于各种实时目标检测应用场景。通过MindSpore实现的SSD模型展示了其在COCO数据集上的优秀性能,并提供了详细的环境配置、数据处理、模型训练和评估的完整流程。
参考文献:
引用
[1] Liu W, Anguelov D, Erhan D, et al. Ssd: Single shot multibox detector[C]//European conference on computer vision. Springer, Cham, 2016: 21-37.


 589
589

 被折叠的 条评论
为什么被折叠?
被折叠的 条评论
为什么被折叠?
 到【灌水乐园】发言


