


翻译:http://docs.opencv.org/2.4/doc/tutorials/imgproc/opening_closing_hats/opening_closing_hats.html#morphology-2
参考:http://www.opencv.org.cn/opencvdoc/2.3.2/html/doc/tutorials/imgproc/opening_closing_hats/
opening_closing_hats.html#morphology-2
前一节我们讨论了两种最基本的形态学操作:
- 腐蚀 (Erosion)
- 膨胀 (Dilation)
运用这两个基本操作,我们可以实现更高级的形态学变换。这篇文档将会简要介绍OpenCV提供的5种高级形态学操作:
如何使用OpenCV函数 morphologyEx 进行形态学操作:
- 开运算 (Opening)
- 闭运算 (Closing)
- 形态梯度 (Morphological Gradient)
- 顶帽 (Top Hat)
- 黑帽(Black Hat)
morphologyEx
Performs advanced morphological transformations.
-
C++: void morphologyEx(InputArray src, OutputArray dst, int op, InputArray kernel, Point anchor=Point(-1,-1), int iterations=1, int borderType=BORDER_CONSTANT, const Scalar& borderValue=morphologyDefaultBorderValue() )
-
Python: cv2.morphologyEx(src, op, kernel[, dst[, anchor[, iterations[, borderType[, borderValue]]]]]) → dst
-
C: void cvMorphologyEx(const CvArr* src, CvArr* dst, CvArr* temp, IplConvKernel* element, int operation, intiterations=1 )
-
Parameters: - src – Source image. The number of channels can be arbitrary. The depth should be one of CV_8U,CV_16U, CV_16S, CV_32F or CV_64F.
- dst – Destination image of the same size and type as src .
- kernel – Structuring element. It can be created using getStructuringElement().
- anchor – Anchor position with the kernel. Negative values mean that the anchor is at the kernel center.
- op –Type of a morphological operation that can be one of the following:
- MORPH_OPEN - an opening operation
- MORPH_CLOSE - a closing operation
- MORPH_GRADIENT - a morphological gradient
- MORPH_TOPHAT - “top hat”
- MORPH_BLACKHAT - “black hat”
- iterations – Number of times erosion and dilation are applied.
- borderType – Pixel extrapolation method. See borderInterpolate for details.
- borderValue – Border value in case of a constant border. The default value has a special meaning.
The function can perform advanced morphological transformations using an erosion and dilation as basic operations.
Opening operation:

Closing operation:

Morphological gradient:

“Top hat”:

“Black hat”:

Any of the operations can be done in-place. In case of multi-channel images, each channel is processed independently.
See also
Note
- An example using the morphologyEx function for the morphological opening and closing operations can be found at opencv_source_code/samples/cpp/morphology2.cpp
原理
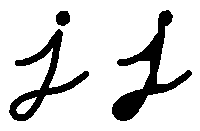
开运算 (Opening)
开运算是通过先对图像腐蚀再膨胀实现的。
-

-
能够排除小团块物体(假设物体较背景明亮)
-
请看下面,左图是原图像,右图是采用开运算转换之后的结果图。 观察发现字母拐弯处的白色空间消失。
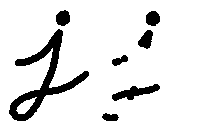
闭运算(Closing)
-
闭运算是通过先对图像膨胀再腐蚀实现的。

-
能够排除小型黑洞(黑色区域)。
形态梯度(Morphological Gradient)
-
膨胀图与腐蚀图之差

-
能够保留物体的边缘轮廓,如下所示:

顶帽(Top Hat)
-
原图像与开运算结果图之差


黑帽(Black Hat)
-
闭运算结果图与原图像之差


源码
解释
-
看一下程序的总体流程:
-
装载图像
-
创建显示形态学操作的窗口
-
创建3个trackbar获取用户参数:
-
第一个trackbar “Operator” 返回用户选择的形态学操作类型 (morph_operator).
-
第二个trackbar “Element” 返回 morph_elem, 指定内核形状:
-
第三个trackbar “Kernel Size” 返回内核大小(morph_size)
-
-
每当任一标尺被移动, 用户函数 Morphology_Operations 就会被调用,该函数获取trackbar的当前值运行指定操作并更新显示结果图像。
运行形态学操作的核心函数是 morphologyEx 。在本例中,我们使用了4个参数(其余使用默认值):
- src : 原 (输入) 图像
- dst: 输出图像
- operation: 需要运行的形态学操作。 我们有5个选项:
- Opening: MORPH_OPEN : 2
- Closing: MORPH_CLOSE: 3
- Gradient: MORPH_GRADIENT: 4
- Top Hat: MORPH_TOPHAT: 5
- Black Hat: MORPH_BLACKHAT: 6
你可以看到, 它们的取值范围是 <2-6>, 因此我们要将从tracker获取的值增加(+2):
- element: 内核,可以使用函数:get_structuring_element:getStructuringElement <> 自定义。
-
结果
-
在编译上面的代码之后, 我们可以运行结果,将图片路径输入。这里使用图像: baboon.png:

-
这里是显示窗口的两个截图。第一幅图显示了使用交错内核和 开运算 之后的结果, 第二幅图显示了使用椭圆内核和 黑帽 之后的结果。


 1万+
1万+

 被折叠的 条评论
为什么被折叠?
被折叠的 条评论
为什么被折叠?
 到【灌水乐园】发言


