


概述
https://docs.ray.io/en/latest/ray-overview/index.html
Ray是一个开源的统一框架,用于扩展AI和Python应用程序,如机器学习。它提供了并行处理的计算层,因此您不需要成为分布式系统专家。Ray通过以下组件最小化了运行您分布式单个和端到端机器学习工作流程的复杂性:
- 可扩展的库,用于常见的机器学习任务,如数据预处理、分布式训练、超参数调整、强化学习和模型服务。
- 用于并行化和扩展Python应用程序的Python式分布式计算原语。
- 与现有工具和基础设施(如Kubernetes、AWS、GCP和Azure)集成和部署Ray集群的集成和实用工具。
对于数据科学家和机器学习从业者,Ray让您无需基础设施专业知识即可扩展作业:
- 简单地将ML工作负载并行化和分布到多个节点和GPU上。
- 利用原生的和可扩展的集成利用ML生态系统。
对于ML平台构建者和ML工程师,Ray:
- 提供了创建可扩展和健壮的ML平台的计算抽象。
- 提供了统一的ML API,简化了与更广泛的ML生态系统的入职和集成。
- 通过允许相同的Python代码无缝地从笔记本电脑扩展到大型集群,减少了开发和生产之间的摩擦。
对于分布式系统工程师,Ray自动处理关键过程:
- 编排 - 管理分布式系统的各种组件。
- 调度 - 协调任务执行的时间和地点。
- 容错 - 确保任务完成,即使不可避免地出现故障点。
- 自动扩展 - 根据动态需求调整分配的资源数量。
你可以用 Ray 做什么
以下是一些个人、组织和公司利用 Ray 构建其 AI 应用程序的一些常见 ML 工作负载:
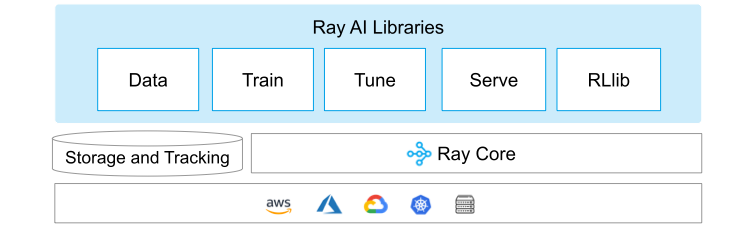
Ray 框架
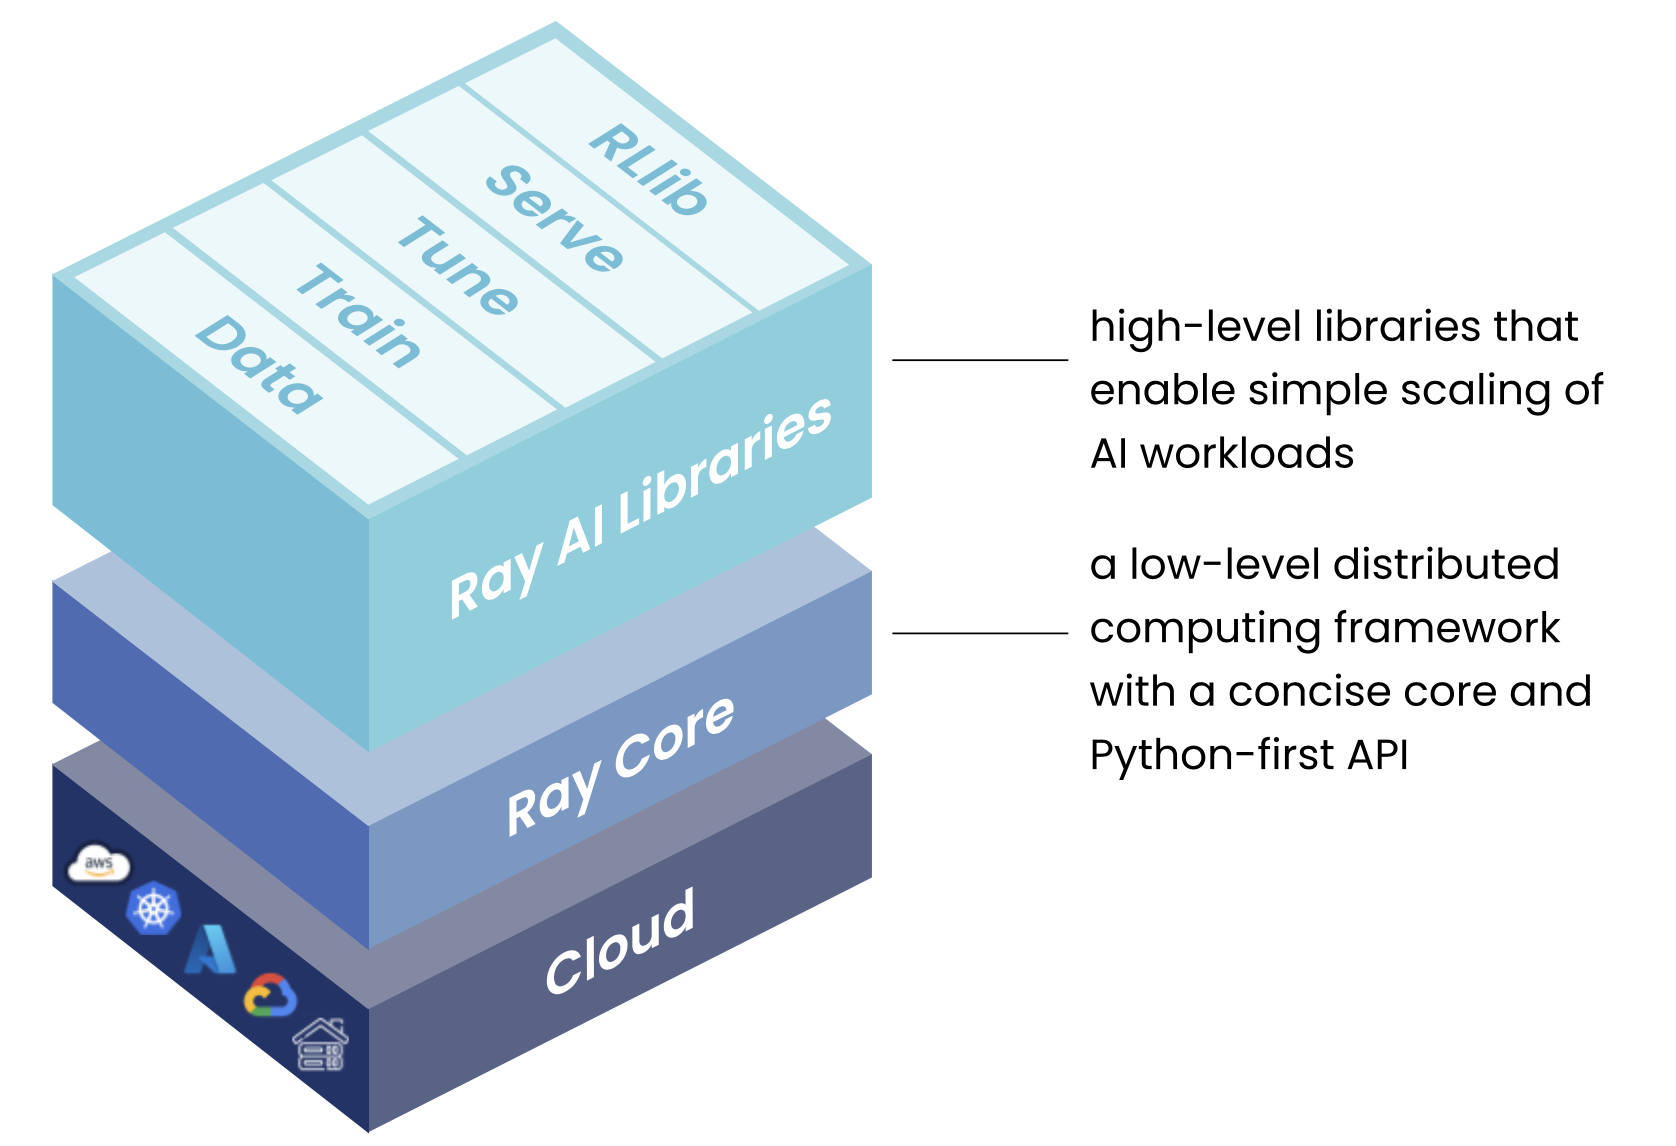
Ray 库堆栈 - 针对机器学习工作负载的统一工具包。
Ray 的统一计算框架由三个层级组成:
- Ray AI 库 – 一个开源的、Python 语言的、特定领域的库集合,为机器学习工程师、数据科学家和研究人员提供可扩展且统一的工具包,用于机器学习应用。
- Ray 核心库 – 一个开源的、Python 语言的通用、分布式计算库,使机器学习工程师和 Python 开发者能够扩展 Python 应用程序并加速机器学习工作负载。
- Ray 集群 – 一组连接到公共 Ray 头节点的工人节点。Ray 集群可以是固定大小的,也可以根据集群上运行的应用请求的资源自动扩展和缩减。
每个Ray’s 五个本机库分发特定的ML任务:
| 扩展机器学习工作负载 | 构建分布式应用程序 | 部署大规模工作负载 |
|---|---|---|
| 使用用于分布式数据处理的库工具包构建ML应用程序,模型训练,调整,强化学习,模型服务,和更多 | 使用简单灵活的API 构建和运行分布式应用程序。 并行化单一机器代码,代码更改很少到零 | 在[AWS、GCP、Azure]上部署工作负载(https://docs.ray.io/en/latest/cluster/getting-started.html)或本地。 使用光线群集管理器在现有Kubernetes 上运行 Ray,YARN,或Slurm群集 |
- 数据: 可扩展、框架无关的数据加载和转换,贯穿训练、调整和预测。
- 训练: 分布式多节点和多核模型训练,具有容错性,并集成了流行的训练库。
- 调整: 可扩展的超参数调整以优化模型性能。
- Serve: 可扩展且可编程的服务,用于部署模型进行在线推理,可选的微批处理以提高性能。
- RLlib: 可扩展的分布式强化学习工作负载。
Ray的库既适用于数据科学家也适用于机器学习工程师。对于数据科学家来说,这些库可以用来扩展个人工作负载,也可以用于端到端的机器学习应用。对于机器学习工程师来说,这些库提供了可扩展的平台抽象,可以用来轻松地引入和集成更广泛的机器学习生态系统中的工具。
对于定制应用,Ray Core 库允许 Python 开发者轻松构建可扩展的分布式系统,这些系统可以在笔记本电脑、集群、云或 Kubernetes 上运行。它是 Ray AI 库和第三方集成(Ray 生态系统)的基础。
Ray 运行在任何机器、集群、云提供商和 Kubernetes 上,并具有不断增长
社区集成生态系统
入门
Ray 是一个开源的统一框架,用于扩展 AI 和 Python 应用程序。它提供了一个简单、通用的 API,用于构建可以从笔记本电脑扩展到集群的分布式应用程序。
什么是 Ray?
Ray 通过提供以下功能简化了分布式计算:
- 可扩展的计算原语:任务和演员,用于无缝的并行编程
- 专业的 AI 库:用于常见 ML 工作负载的工具,如数据处理、模型训练、超参数调整和模型服务
- 统一的资源管理:从笔记本电脑到云的无缝扩展,具有自动资源处理
选择您的路径
选择符合您需求的指南:
- 扩展 ML 工作负载:Ray Libraries 快速入门
- 扩展通用 Python 应用:Ray Core 快速入门
- 部署到云端:Ray Clusters 快速入门
- 调试和监控应用:调试和监控快速入门
Ray AI 库快速入门
使用单个库进行机器学习工作负载。每个库都专注于 ML 工作流程的特定部分,从数据处理到模型服务。点击下方的下拉菜单选择您的工作负载。
数据:适用于机器学习的可扩展数据集
Ray Data 提供了针对机器学习和人工智能工作负载优化的分布式数据处理。它通过数据管道有效地流式传输数据。
以下是一个如何使用 Ray Data 规模化离线推理和训练摄取的示例。
注意:要运行此示例,请安装 Ray Data:
pip install -U "ray[data]"
from typing import Dict
import numpy as np
import ray

# Create datasets from on-disk files, Python objects, and cloud storage like S3.
ds = ray.data.read_csv("s3://anonymous@ray-example-data/iris.csv")

# Apply functions to transform data. Ray Data executes transformations in parallel.
def compute_area(batch: Dict[str, np.ndarray]) -> Dict[str, np.ndarray]:
    length = batch["petal length (cm)"]
    width = batch["petal width (cm)"]
    batch["petal area (cm^2)"] = length * width
    return batch

transformed_ds = ds.map_batches(compute_area)

# Iterate over batches of data.
for batch in transformed_ds.iter_batches(batch_size=4):
    print(batch)

# Save dataset contents to on-disk files or cloud storage.
transformed_ds.write_parquet("local:///tmp/iris/")
https://docs.ray.io/en/latest/data/data.html
训练:分布式模型训练
Ray Train 使分布式模型训练变得简单。它抽象化了在流行的框架(如 PyTorch 和 TensorFlow)上设置分布式训练的复杂性。
此示例展示了如何使用 Ray Train 与 PyTorch。
要运行此示例,请安装 Ray Train 和 PyTorch 软件包:
注意
pip install -U "ray[train]" torch torchvision
设置您的数据集和模型。
import torch
import torch.nn as nn
from torch.utils.data import DataLoader
from torchvision import datasets
from torchvision.transforms import ToTensor

def get_dataset():
    return datasets.FashionMNIST(
        root="/tmp/data",
        train=True,
        download=True,
        transform=ToTensor(),
    )

class NeuralNetwork(nn.Module):
    def __init__(self):
        super().__init__()
        self.flatten = nn.Flatten()
        self.linear_relu_stack = nn.Sequential(
            nn.Linear(28 * 28, 512),
            nn.ReLU(),
            nn.Linear(512, 512),
            nn.ReLU(),
            nn.Linear(512, 10),
        )

    def forward(self, inputs):
        inputs = self.flatten(inputs)
        logits = self.linear_relu_stack(inputs)
        return logits
现在定义你的单进程 PyTorch 训练函数。
def train_func():
    num_epochs = 3
    batch_size = 64

    dataset = get_dataset()
    dataloader = DataLoader(dataset, batch_size=batch_size)

    model = NeuralNetwork()

    criterion = nn.CrossEntropyLoss()
    optimizer = torch.optim.SGD(model.parameters(), lr=0.01)

    for epoch in range(num_epochs):
        for inputs, labels in dataloader:
            optimizer.zero_grad()
            pred = model(inputs)
            loss = criterion(pred, labels)
            loss.backward()
            optimizer.step()
        print(f"epoch: {epoch}, loss: {loss.item()}")
This training function can be executed with:
train_func()
将此转换为分布式多工作者训练函数。
使用 ray.train.torch.prepare_model 和 ray.train.torch.prepare_data_loader 工具函数来设置您的模型和数据以进行分布式训练。这会自动将模型包装在 DistributedDataParallel 中,并将其放置在正确的设备上,并给 DataLoaders 添加 DistributedSampler。
import ray.train.torch

def train_func_distributed():
    num_epochs = 3
    batch_size = 64

    dataset = get_dataset()
    dataloader = DataLoader(dataset, batch_size=batch_size, shuffle=True)
    dataloader = ray.train.torch.prepare_data_loader(dataloader)

    model = NeuralNetwork()
    model = ray.train.torch.prepare_model(model)

    criterion = nn.CrossEntropyLoss()
    optimizer = torch.optim.SGD(model.parameters(), lr=0.01)

    for epoch in range(num_epochs):
        if ray.train.get_context().get_world_size() > 1:
            dataloader.sampler.set_epoch(epoch)

        for inputs, labels in dataloader:
            optimizer.zero_grad()
            pred = model(inputs)
            loss = criterion(pred, labels)
            loss.backward()
            optimizer.step()
        print(f"epoch: {epoch}, loss: {loss.item()}")
实例化一个具有4个工作线程的TorchTrainer,并使用它来运行新的训练函数。
from ray.train.torch import TorchTrainer
from ray.train import ScalingConfig

# For GPU Training, set `use_gpu` to True.
use_gpu = False

trainer = TorchTrainer(
    train_func_distributed,
    scaling_config=ScalingConfig(num_workers=4, use_gpu=use_gpu)
)

results = trainer.fit()
要加速使用GPU的训练作业,请确保您已配置GPU,然后将 use_gpu 设置为 True。如果您没有GPU环境,Anyscale提供集成了自动扩展GPU集群的开发工作空间,用于此目的。
调谐:大规模超参数调优
Ray Tune 是一个适用于任何规模的超参数调优库。它使用高效的分布式搜索算法自动找到您模型的最佳超参数。使用 Tune,您可以用不到 10 行代码启动一个多节点分布式超参数扫描,支持包括 PyTorch、TensorFlow 和 Keras 在内的任何深度学习框架。
注意:要运行此示例,请安装 Ray Tune:
pip install -U "ray[tune]"
这个示例运行了一个带有迭代训练函数的小型网格搜索。
from ray import tune

def objective(config):  # ①
    score = config["a"] ** 2 + config["b"]
    return {"score": score}

search_space = {  # ②
    "a": tune.grid_search([0.001, 0.01, 0.1, 1.0]),
    "b": tune.choice([1, 2, 3]),
}

tuner = tune.Tuner(objective, param_space=search_space)  # ③

results = tuner.fit()
print(results.get_best_result(metric="score", mode="min").config)
如果已安装TensorBoard(pip install tensorboard),您可以自动可视化所有试验结果:
tensorboard --logdir ~/ray_results
https://docs.ray.io/en/latest/tune/index.html
Serve: 可扩展的模型服务
Ray Serve 提供了可扩展和可编程的机器学习模型和业务逻辑服务。使用生产级性能部署来自任何框架的模型。
注意:要运行此示例,请安装 Ray Serve 和 scikit-learn:
pip install -U "ray[serve]" scikit-learn
这个示例运行了一个scikit-learn梯度提升分类器。
import requests
from starlette.requests import Request
from typing import Dict

from sklearn.datasets import load_iris
from sklearn.ensemble import GradientBoostingClassifier

from ray import serve

# Train model.
iris_dataset = load_iris()
model = GradientBoostingClassifier()
model.fit(iris_dataset["data"], iris_dataset["target"])

@serve.deployment
class BoostingModel:
    def __init__(self, model):
        self.model = model
        self.label_list = iris_dataset["target_names"].tolist()

    async def __call__(self, request: Request) -> Dict:
        payload = (await request.json())["vector"]
        print(f"Received http request with data {payload}")

        prediction = self.model.predict([payload])[0]
        human_name = self.label_list[prediction]
        return {"result": human_name}

# Deploy model.
serve.run(BoostingModel.bind(model), route_prefix="/iris")

# Query it!
sample_request_input = {"vector": [1.2, 1.0, 1.1, 0.9]}
response = requests.get(
    "http://localhost:8000/iris", json=sample_request_input)
print(response.text)
响应显示 {"result": "versicolor"}。
https://docs.ray.io/en/latest/serve/index.html
RLlib:工业级强化学习库
RLlib 是一个强化学习 (RL) 库,提供了流行 RL 算法的高性能实现,并支持各种训练环境。RLlib 提供了高可扩展性和统一 API,适用于各种工业和研究应用。
注意:要运行此示例,请安装 rllib 和 tensorflow 或 pytorch:
pip install -U "ray[rllib]" tensorflow # or torch
您可能还需要在您的系统上安装CMake。
import gymnasium as gym
import numpy as np
import torch
from typing import Dict, Tuple, Any, Optional

from ray.rllib.algorithms.ppo import PPOConfig

# Define your problem using python and Farama-Foundation's gymnasium API:
class SimpleCorridor(gym.Env):
    """Corridor environment where an agent must learn to move right to reach the exit.

    ---------------------
 | S | 1 | 2 | 3 | G | S=start; G=goal; corridor_length=5
    ---------------------

    Actions:
        0: Move left
        1: Move right

    Observations:
        A single float representing the agent's current position (index)
        starting at 0.0 and ending at corridor_length

    Rewards:
        -0.1 for each step
        +1.0 when reaching the goal

    Episode termination:
        When the agent reaches the goal (position >= corridor_length)
    """

    def __init__(self, config):
        self.end_pos = config["corridor_length"]
        self.cur_pos = 0.0
        self.action_space = gym.spaces.Discrete(2)  # 0=left, 1=right
        self.observation_space = gym.spaces.Box(0.0, self.end_pos, (1,), np.float32)

    def reset(
        self, *, seed: Optional[int] = None, options: Optional[Dict] = None
    ) -> Tuple[np.ndarray, Dict]:
        """Reset the environment for a new episode.

        Args:
            seed: Random seed for reproducibility
            options: Additional options (not used in this environment)

        Returns:
            Initial observation of the new episode and an info dict.
        """
        super().reset(seed=seed)  # Initialize RNG if seed is provided
        self.cur_pos = 0.0
        # Return initial observation.
        return np.array([self.cur_pos], np.float32), {}

    def step(self, action: int) -> Tuple[np.ndarray, float, bool, bool, Dict]:
        """Take a single step in the environment based on the provided action.

        Args:
            action: 0 for left, 1 for right

        Returns:
            A tuple of (observation, reward, terminated, truncated, info):
                observation: Agent's new position
                reward: Reward from taking the action (-0.1 or +1.0)
                terminated: Whether episode is done (reached goal)
                truncated: Whether episode was truncated (always False here)
                info: Additional information (empty dict)
        """
        # Walk left if action is 0 and we're not at the leftmost position
        if action == 0 and self.cur_pos > 0:
            self.cur_pos -= 1
        # Walk right if action is 1
        elif action == 1:
            self.cur_pos += 1
        # Set `terminated` flag when end of corridor (goal) reached.
        terminated = self.cur_pos >= self.end_pos
        truncated = False
        # +1 when goal reached, otherwise -0.1.
        reward = 1.0 if terminated else -0.1
        return np.array([self.cur_pos], np.float32), reward, terminated, truncated, {}

# Create an RLlib Algorithm instance from a PPOConfig object.
print("Setting up the PPO configuration...")
config = (
    PPOConfig().environment(
        # Env class to use (our custom gymnasium environment).
        SimpleCorridor,
        # Config dict passed to our custom env's constructor.
        # Use corridor with 20 fields (including start and goal).
        env_config={"corridor_length": 20},
    )
    # Parallelize environment rollouts for faster training.
    .env_runners(num_env_runners=3)
    # Use a smaller network for this simple task
    .training(model={"fcnet_hiddens": [64, 64]})
)

# Construct the actual PPO algorithm object from the config.
algo = config.build_algo()
rl_module = algo.get_module()

# Train for n iterations and report results (mean episode rewards).
# Optimal reward calculation:
# - Need at least 19 steps to reach the goal (from position 0 to 19)
# - Each step (except last) gets -0.1 reward: 18 * (-0.1) = -1.8
# - Final step gets +1.0 reward
# - Total optimal reward: -1.8 + 1.0 = -0.8
print("\nStarting training loop...")
for i in range(5):
    results = algo.train()

    # Log the metrics from training results
    print(f"Iteration {i+1}")
    print(f"  Training metrics: {results['env_runners']}")

# Save the trained algorithm (optional)
checkpoint_dir = algo.save()
print(f"\nSaved model checkpoint to: {checkpoint_dir}")

print("\nRunning inference with the trained policy...")
# Create a test environment with a shorter corridor to verify the agent's behavior
env = SimpleCorridor({"corridor_length": 10})
# Get the initial observation (should be: [0.0] for the starting position).
obs, info = env.reset()
terminated = truncated = False
total_reward = 0.0
step_count = 0

# Play one episode and track the agent's trajectory
print("\nAgent trajectory:")
positions = [float(obs[0])]  # Track positions for visualization

while not terminated and not truncated:
    # Compute an action given the current observation
    action_logits = rl_module.forward_inference(
        {"obs": torch.from_numpy(obs).unsqueeze(0)}
    )["action_dist_inputs"].numpy()[
        0
    ]  # [0]: Batch dimension=1

    # Get the action with highest probability
    action = np.argmax(action_logits)

    # Log the agent's decision
    action_name = "LEFT" if action == 0 else "RIGHT"
    print(f"  Step {step_count}: Position {obs[0]:.1f}, Action: {action_name}")

    # Apply the computed action in the environment
    obs, reward, terminated, truncated, info = env.step(action)
    positions.append(float(obs[0]))

    # Sum up rewards
    total_reward += reward
    step_count += 1

# Report final results
print(f"\nEpisode complete:")
print(f"  Steps taken: {step_count}")
print(f"  Total reward: {total_reward:.2f}")
print(f"  Final position: {obs[0]:.1f}")

# Verify the agent has learned the optimal policy
if total_reward > -0.5 and obs[0] >= 9.0:
    print("  Success! The agent has learned the optimal policy (always move right).")
Ray 核心快速入门
try-anyscale-quickstart-ray-quickstart : https://www.anyscale.com/ray-on-anyscale?utm_source=ray_docs&utm_medium=docs&utm_campaign=ray-core-quickstart&redirectTo=/v2/template-preview/workspace-intro
Ray 核心提供了简单的原语,用于构建和运行分布式应用程序。它使您能够仅用几行代码就将常规的 Python 或 Java 函数和类转换为分布式无状态任务和有状态演员。
以下示例展示了您如何:
- 将 Python 函数转换为 Ray 任务以进行并行执行
- 将 Python 类转换为 Ray 演员以进行分布式有状态计算
核心功能:使用 Ray 任务并行化函数
要运行此示例,请安装 Ray 核心库:
pip install -U "ray"
导入 Ray 并使用 ray.init() 初始化它。然后使用 @ray.remote 装饰器来声明你想要在远程运行此函数。最后,使用 .remote() 而不是常规方式来调用该函数。这个远程调用产生一个 future,一个 Ray 对象引用,然后你可以使用 ray.get 来检索它。
import ray
ray.init()

@ray.remote
def f(x):
    return x * x

futures = [f.remote(i) for i in range(4)]
print(ray.get(futures)) # [0, 1, 4, 9]
https://docs.ray.io/en/latest/rllib/index.html
核心功能:使用 Ray Actors 并行化类
Ray 提供了 actors,允许您在 Python 或 Java 中并行化类的实例。当您实例化一个 Ray actor 类时,Ray 会在集群中启动该类的一个远程实例。然后,该 actor 可以执行远程方法调用并维护自己的内部状态。
要运行此示例,请安装 Ray 核心库:
pip install -U "ray"
import ray
ray.init() # Only call this once.

@ray.remote
class Counter(object):
    def __init__(self):
        self.n = 0

    def increment(self):
        self.n += 1

    def read(self):
        return self.n

counters = [Counter.remote() for i in range(4)]
[c.increment.remote() for c in counters]
futures = [c.read.remote() for c in counters]
print(ray.get(futures)) # [1, 1, 1, 1]
Ray 集群快速入门
在 AWS、GCP、Azure 等云平台上部署您的应用程序到 Ray 集群,通常只需对现有代码进行最小程度的修改。
集群:在 AWS 上启动 Ray 集群
Ray 程序可以在单台机器上运行,也可以无缝扩展到大型集群。
要运行此示例,请安装以下内容:
pip install -U "ray[default]" boto3
如果您还没有配置,请按照boto3文档中的说明进行配置。
以下是对给定 markdown 内容的翻译:
这是一个简单的示例,它等待单个节点加入集群。
example.py
import sys
import time
from collections import Counter

import ray

@ray.remote
def get_host_name(x):
    import platform
    import time

    time.sleep(0.01)
    return x + (platform.node(),)

def wait_for_nodes(expected):
    # Wait for all nodes to join the cluster.
    while True:
        num_nodes = len(ray.nodes())
        if num_nodes < expected:
            print(
                "{} nodes have joined so far, waiting for {} more.".format(
                    num_nodes, expected - num_nodes
                )
            )
            sys.stdout.flush()
            time.sleep(1)
        else:
            break

def main():
    wait_for_nodes(4)

    # Check that objects can be transferred from each node to each other node.
    for i in range(10):
        print("Iteration {}".format(i))
        results = [get_host_name.remote(get_host_name.remote(())) for _ in range(100)]
        print(Counter(ray.get(results)))
        sys.stdout.flush()

    print("Success!")
    sys.stdout.flush()
    time.sleep(20)

if __name__ == "__main__":
    ray.init(address="localhost:6379")
    main()
您也可以从 GitHub 仓库 下载此示例。将其存储在名为 example.py 的本地文件中。
要在云中执行此脚本,下载此配置文件,或将其复制到这里:
cluster.yaml
# An unique identifier for the head node and workers of this cluster.
cluster_name: aws-example-minimal

# Cloud-provider specific configuration.
provider:
    type: aws
    region: us-west-2

# The maximum number of workers nodes to launch in addition to the head
# node.
max_workers: 3

# Tell the autoscaler the allowed node types and the resources they provide.
# The key is the name of the node type, which is for debugging purposes.
# The node config specifies the launch config and physical instance type.
available_node_types:
    ray.head.default:
        # The node type's CPU and GPU resources are auto-detected based on AWS instance type.
        # If desired, you can override the autodetected CPU and GPU resources advertised to the autoscaler.
        # You can also set custom resources.
        # For example, to mark a node type as having 1 CPU, 1 GPU, and 5 units of a resource called "custom", set
        # resources: {"CPU": 1, "GPU": 1, "custom": 5}
        resources: {}
        # Provider-specific config for this node type, e.g., instance type. By default
        # Ray auto-configures unspecified fields such as SubnetId and KeyName.
        # For more documentation on available fields, see
        # http://boto3.readthedocs.io/en/latest/reference/services/ec2.html#EC2.ServiceResource.create_instances
        node_config:
            InstanceType: m5.large
    ray.worker.default:
        # The minimum number of worker nodes of this type to launch.
        # This number should be >= 0.
        min_workers: 3
        # The maximum number of worker nodes of this type to launch.
        # This parameter takes precedence over min_workers.
        max_workers: 3
        # The node type's CPU and GPU resources are auto-detected based on AWS instance type.
        # If desired, you can override the autodetected CPU and GPU resources advertised to the autoscaler.
        # You can also set custom resources.
        # For example, to mark a node type as having 1 CPU, 1 GPU, and 5 units of a resource called "custom", set
        # resources: {"CPU": 1, "GPU": 1, "custom": 5}
        resources: {}
        # Provider-specific config for this node type, e.g., instance type. By default
        # Ray auto-configures unspecified fields such as SubnetId and KeyName.
        # For more documentation on available fields, see
        # http://boto3.readthedocs.io/en/latest/reference/services/ec2.html#EC2.ServiceResource.create_instances
        node_config:
            InstanceType: m5.large
假设您已将此配置存储在名为 cluster.yaml 的文件中,您现在可以按照以下方式启动一个 AWS 集群:
ray submit cluster.yaml example.py --start
集群:在 Kubernetes 上启动 Ray 集群
Ray 程序可以在单个节点 Kubernetes 集群上运行,或者无缝扩展到更大的集群。
https://docs.ray.io/en/latest/cluster/kubernetes/index.html#kuberay-index
集群:在Anyscale上启动Ray集群
Anyscale是Ray背后的公司。Anyscale平台在您的AWS、GCP、Azure或本地Kubernetes集群上提供企业级的Ray部署。
调试和监控快速入门
使用内置的可观察性工具来监控和调试 Ray 应用程序和集群。这些工具帮助您了解应用程序的性能并识别瓶颈。
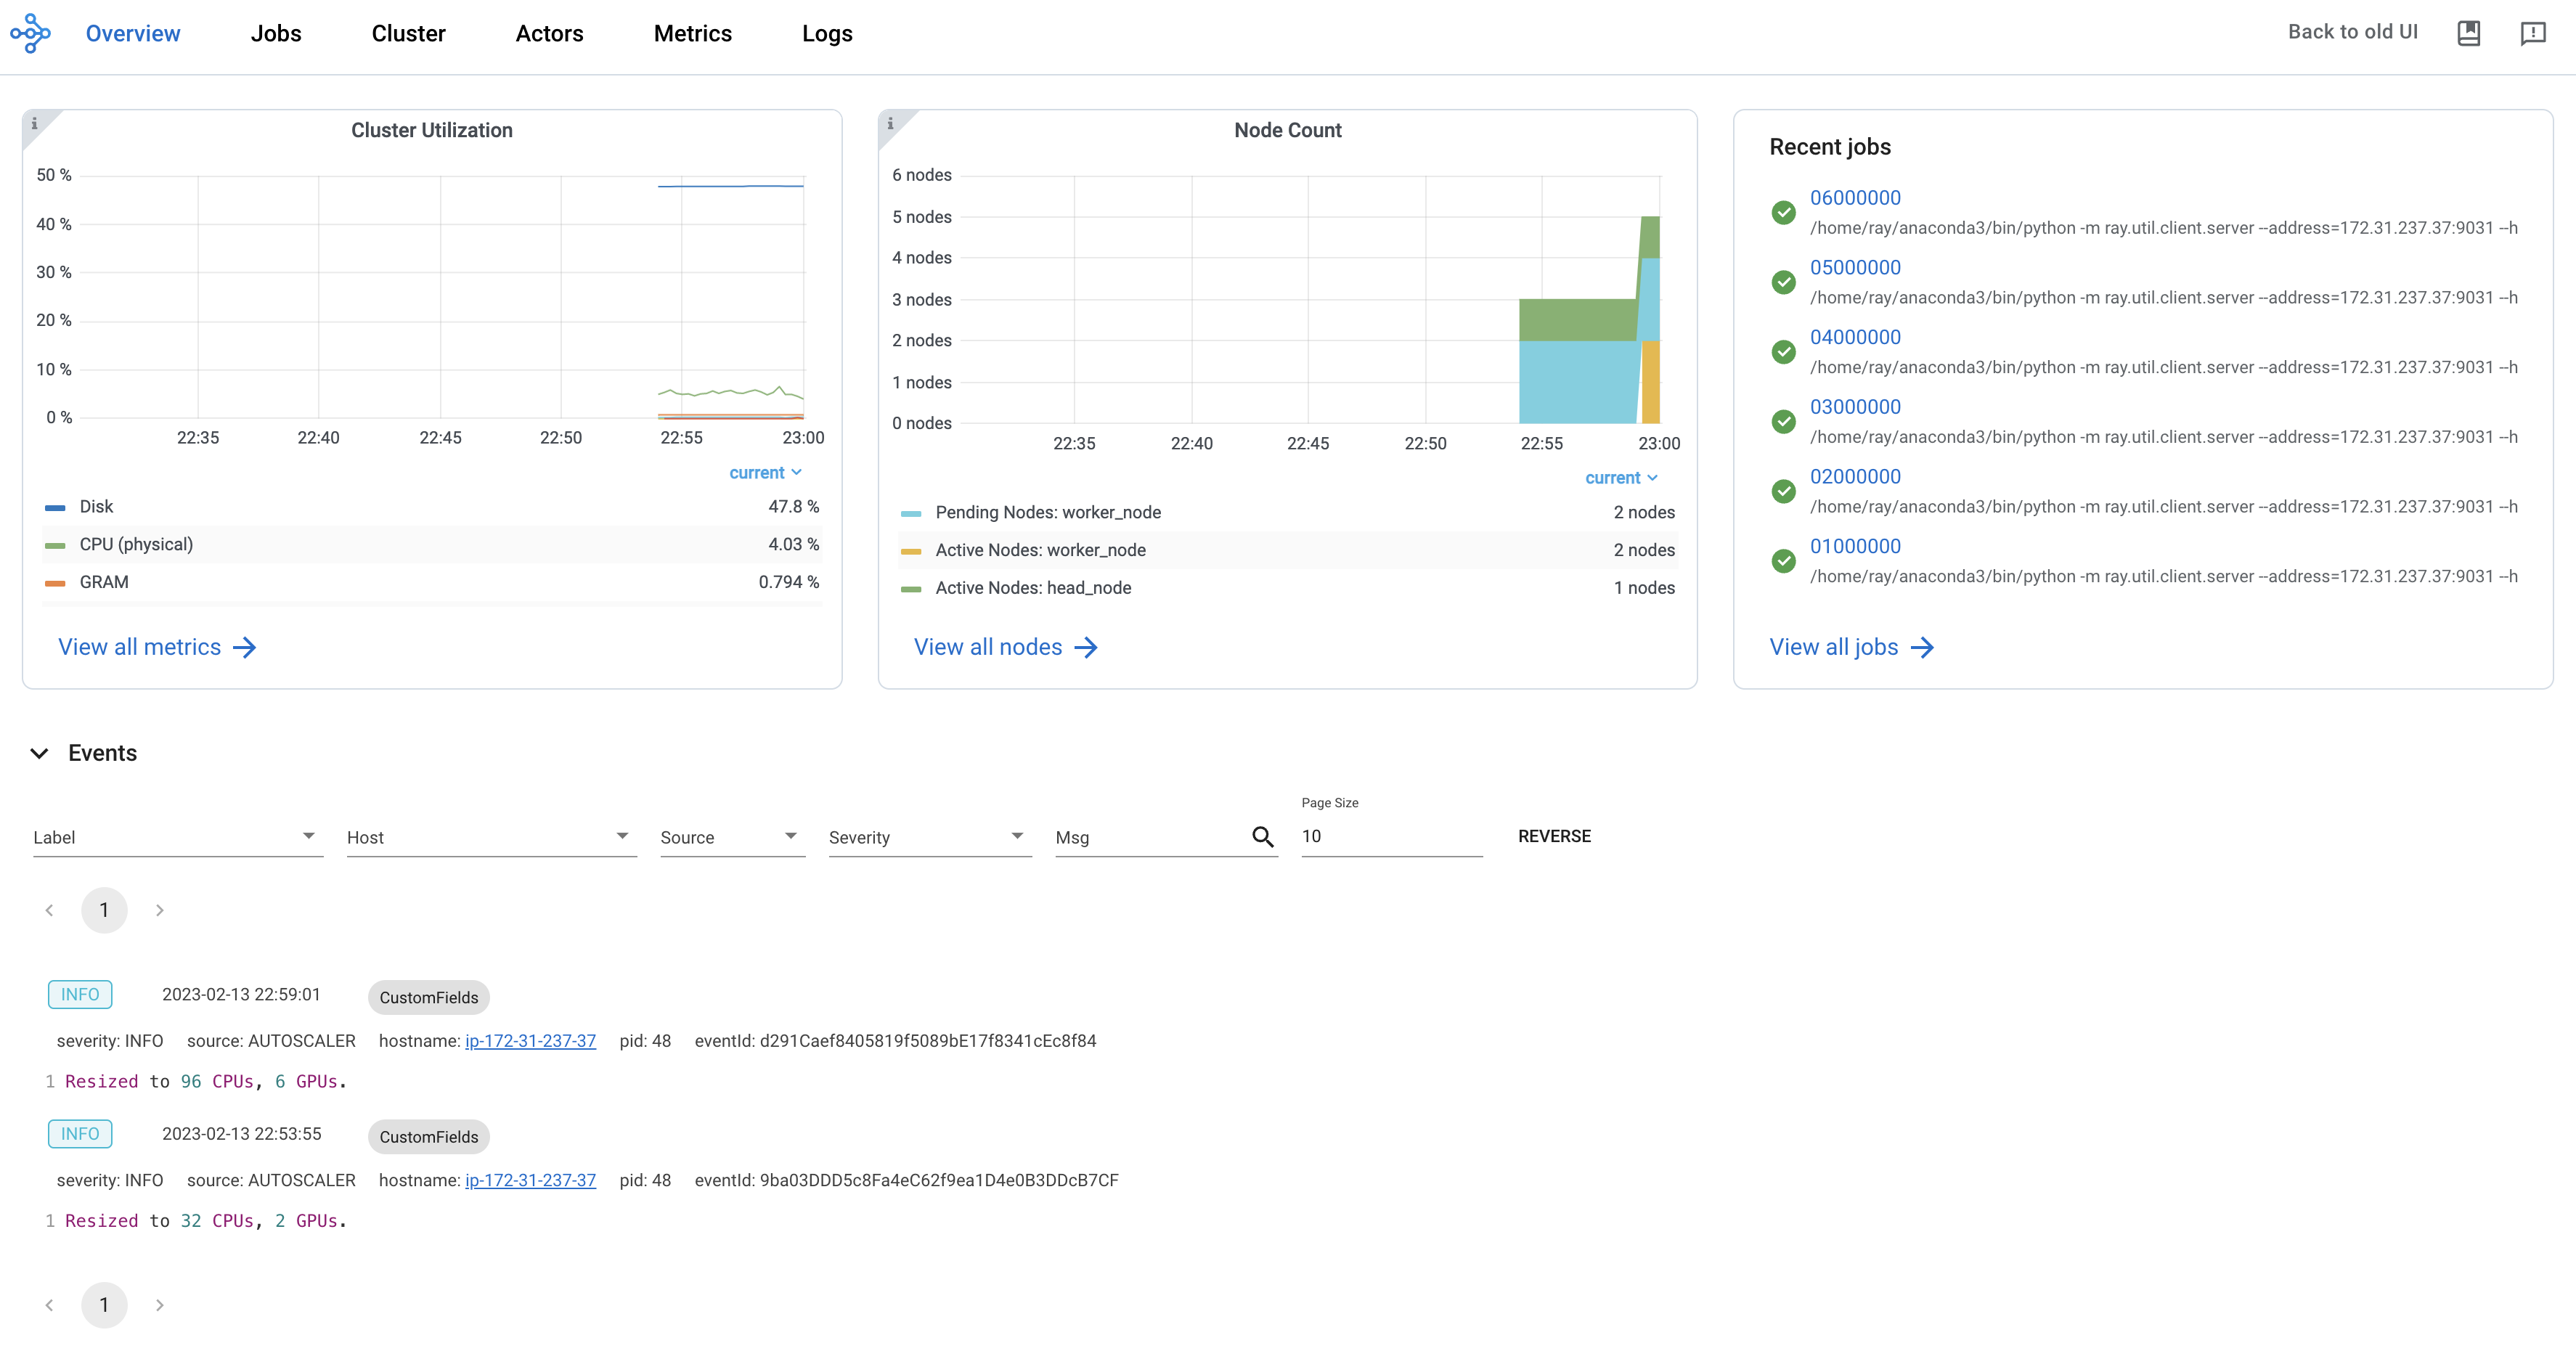
Ray仪表板:监控和调试Ray的Web GUI
Ray仪表板提供了一种可视化界面,用于显示实时系统指标、节点级资源监控、工作分析以及任务可视化。仪表板旨在帮助用户了解其Ray应用程序的性能并识别潜在问题。
要开始使用仪表板,按照以下步骤进行默认安装:
pip install -U "ray[default]"
仪表板在运行 Ray 脚本时自动可用。通过默认 URL 访问仪表板,http://localhost:8265。
Ray 状态 API:通过 CLI 访问集群状态
Ray 状态 API 允许用户通过 CLI 或 Python SDK 方便地访问 Ray 的当前状态(快照)。
要开始使用状态 API,按照以下步骤安装默认安装包:
pip install -U "ray[default]"
运行以下代码。
import ray
import time

ray.init(num_cpus=4)

@ray.remote
def task_running_300_seconds():
    print("Start!")
    time.sleep(300)

@ray.remote
class Actor:
    def __init__(self):
        print("Actor created")

# Create 2 tasks
tasks = [task_running_300_seconds.remote() for _ in range(2)]

# Create 2 actors
actors = [Actor.remote() for _ in range(2)]

ray.get(tasks)
在终端中使用 ray summary tasks 查看Ray任务的汇总统计信息。
ray summary tasks
======== Tasks Summary: 2022-07-22 08:54:38.332537 ========
Stats:
------------------------------------
total_actor_scheduled: 2
total_actor_tasks: 0
total_tasks: 2

Table (group by func_name):
------------------------------------
FUNC_OR_CLASS_NAME        STATE_COUNTS    TYPE
0   task_running_300_seconds  RUNNING: 2      NORMAL_TASK
1   Actor.__init__            FINISHED: 2     ACTOR_CREATION_TASK
更多Ray State APIs:
https://docs.ray.io/en/latest/ray-observability/user-guides/cli-sdk.html#observability-programmatic
了解更多
Ray拥有丰富的资源生态系统,可以帮助您了解更多关于分布式计算和AI扩展的知识。
博客和新闻
- 现代并行和分布式 Python:Ray 快速教程
- 为什么每个 Python 开发者都会爱上 Ray
- Ray:一个用于 AI 的分布式系统(伯克利人工智能研究,BAIR)
- 不使用 Python Multiprocessing 实现每秒 10 倍更快的并行 Python
- 使用 Ray 在 15 行 Python 代码中实现参数服务器
- Ray 分布式 AI 框架课程
- RayOnSpark:使用 Ray 和 Analytics Zoo 在大数据集群上运行新兴的 AI 应用
- Ray 初学者技巧
- Tune:一个适用于任何规模的快速超参数调优的 Python 库
- 使用 Ray Tune 的前沿超参数调优
- 新库针对高速强化学习
- 扩展多智能体强化学习
- 使用 Keras 和 Tensorflow Eager 的函数式 RL
- 如何用一行代码将 Pandas 加速 4 倍
- 快速技巧——使用 Modin 加速 Pandas
- Ray 博客
视频
- 使用 Ray Data 统一大规模数据预处理和机器学习管道 | PyData 2021 (演示文稿)
- 使用 Ray 在任何规模上进行编程 | SF Python Meetup Sept 2019
- Ray 强化学习 | Data Council 2019
- 使用 Modin 缩放交互式 Pandas 工作流程
- Ray:AI 分布式执行框架 | SciPy 2018
- Ray:强化学习应用集群计算引擎 | Spark Summit
- RLlib:Ray 强化学习库 | RISECamp 2018
- 在分布式强化学习中启用组合 | Spark Summit 2018
- Tune:分布式超参数搜索 | RISECamp 2018
幻灯片
论文
- Ray 2.0 架构白皮书
- Ray 1.0 架构白皮书(旧版)
- Exoshuffle:Ray中的大规模数据洗牌
- RLlib 论文
- RLlib 流论文
- Tune 论文
- Ray 论文(旧版)
- Ray HotOS 论文(旧版)
如果您遇到技术问题,请在上 Ray 讨论论坛 上发帖。对于一般性问题、公告和社区讨论,请加入 Ray 社区在 Slack。
https://docs.ray.io/en/latest/ray-overview/installation.html
安装 Ray
运行 Anyscale 上的快速入门 : https://www.anyscale.com/ray-on-anyscale?utm_source=ray_docs&utm_medium=docs&utm_campaign=installing_ray&redirectTo=/v2/template-preview/workspace-intro
Ray 在 Windows 上目前处于测试版。
正式发布
从 Wheels
您可以通过选择最适合您用例的选项,在 Linux、Windows 和 macOS 上从 PyPI 安装 Ray 的最新官方版本。
推荐
对于机器学习应用
pip install -U "ray[data,train,tune,serve]"

# For reinforcement learning support, install RLlib instead.
# pip install -U "ray[rllib]"
对于一般的 Python 应用
pip install -U "ray[default]"

# If you don't want Ray Dashboard or Cluster Launcher, install Ray with minimal dependencies instead.
# pip install -U "ray"
Advanced
| 命令 | 安装组件 |
|---|---|
pip install -U "ray" | 核心模块 |
pip install -U "ray[default]" | 核心功能,仪表板,集群启动器 |
pip install -U "ray[data]" | 核心库, 数据库 |
pip install -U "ray[train]" | 核心库,训练库 |
pip install -U "ray[tune]" | 核心,Tune |
pip install -U "ray[serve]" | 核心功能,仪表板,集群启动器,Serve |
pip install -U "ray[serve-grpc]" | 核心,仪表板,集群启动器,支持 gRPC 的 Serve |
pip install -U "ray[rllib]" | 核心库,Tune,RLlib |
pip install -U "ray[all]" | 核心功能,仪表板,集群启动器,数据,训练,调优,服务,RLlib. 此选项不推荐。请按照以下示例指定所需的额外功能。 |
提示:您可以组合安装额外内容。
例如,要安装带有仪表板、集群启动器和训练支持的 Ray,您可以运行:
pip install -U "ray[default,train]"
每日发布(夜间版)
您可以通过以下链接安装夜间版 Ray 轮子。这些每日发布版本通过自动化测试进行测试,但不会经过完整的发布流程。要安装这些轮子,请使用以下 pip 命令和轮子:
# Clean removal of previous install
pip uninstall -y ray
# Install Ray with support for the dashboard + cluster launcher
pip install -U "ray[default] @ LINK_TO_WHEEL.whl"

# Install Ray with minimal dependencies
# pip install -U LINK_TO_WHEEL.whl
Linux
MacOS
Windows (beta)
| Windows (beta) |
|---|
| Windows Python 3.9 |
| Windows Python 3.10 |
| Windows Python 3.11 |
| Windows Python 3.12 |
注意:在 Windows 上,对多节点 Ray 集群的支持目前是实验性的且未经测试。
如果您遇到问题,请向 ray-project/ray#issues 提交报告。
注意:使用统计 收集默认启用(可以通过 禁用 进行禁用)对于夜间轮次的构建,包括通过 ray.init() 启动的本地集群和通过 cli 启动的远程集群。
从特定提交安装
您可以使用以下模板安装 master 上的任何特定提交的 Ray 轮子。您需要指定提交哈希、Ray 版本、操作系统和 Python 版本:
pip install https://s3-us-west-2.amazonaws.com/ray-wheels/master/{COMMIT_HASH}/ray-{RAY_VERSION}-{PYTHON_VERSION}-{PYTHON_VERSION}-{OS_VERSION}.whl
例如,以下是 Python 3.9 和 MacOS 上 Ray 3.0.0.dev0 的 wheels,对应提交 4f2ec46c3adb6ba9f412f09a9732f436c4a5d0c9:
pip install https://s3-us-west-2.amazonaws.com/ray-wheels/master/4f2ec46c3adb6ba9f412f09a9732f436c4a5d0c9/ray-3.0.0.dev0-cp39-cp39-macosx_10_15_x86_64.whl
轮文件名的格式略有不同;最好与 Nightlies section 中列出的URL格式相匹配。
以下是变体的总结:
- 对于 MacOS,2021 年 8 月 7 日之前的提交将文件名中的
macosx_10_13替换为macosx_10_15。
M1 Mac (苹果 Silicon ) 支持
Ray 支持运行苹果硅(如 M1 mac)的机器。
多节点集群尚未测试。要开始本地 Ray 开发:
1、安装 miniforge。
wget https://github.com/conda-forge/miniforge/releases/latest/download/Miniforge3-MacOSX-arm64.shbash Miniforge3-MacOSX-arm64.shrm Miniforge3-MacOSX-arm64.sh # 清理。
2、确保您正在使用 miniforge 环境(您应该在终端中看到 (base))。
source ~/.bash_profileconda activate
3、按照常规方式安装 Ray。
pip install ray
Windows 支持
Windows 支持目前处于测试阶段。Ray 支持在 Windows 上运行,以下是一些注意事项(其中第一个是 Ray 特有的,其余在 Windows 使用的任何地方都适用):
- 多节点 Ray 集群尚未经过测试。
- 在 Windows 上文件名比较棘手,Ray 仍然可能在一些地方假设 UNIX 文件名而不是 Windows 文件名。这在下游包中也可能成立。
- Windows 上的性能已知较慢,因为打开文件在 Windows 上比在其他操作系统上慢得多。这可能会影响日志记录。
- Windows 没有支持写时复制的分叉模型,因此启动新进程可能需要更多内存。
将您遇到的任何问题提交到 GitHub
在 Arch Linux 上安装 Ray
注意:Project Ray 开发者没有测试在 Arch Linux 上安装 Ray。
Ray 通过 Arch User Repository (AUR) 提供,作为 python-ray。
You can manually install the package by following the instructions on the Arch Wiki or use an AUR helper like yay (recommended for ease of install) as follows:
您可以按照Arch Wiki 上的说明手动安装该软件包或使用AUR助手 像 yay(为便于安装而推荐)如下:
yay -S python-ray
要讨论与此包相关的任何问题,请参阅评论部分
在 python-ray 的 AUR 页面上 这里。
从 conda-forge 安装
Ray 也可以作为 conda 包在 Linux 和 Windows 上安装。
# also works with mamba
conda create -c conda-forge python=3.9 -n ray
conda activate ray

# Install Ray with support for the dashboard + cluster launcher
conda install -c conda-forge "ray-default"

# Install Ray with minimal dependencies
# conda install -c conda-forge ray
要安装 Ray 库,使用 pip 如上所示或 conda/mamba。
conda install -c conda-forge "ray-data"   # installs Ray + dependencies for Ray Data
conda install -c conda-forge "ray-train"  # installs Ray + dependencies for Ray Train
conda install -c conda-forge "ray-tune"   # installs Ray + dependencies for Ray Tune
conda install -c conda-forge "ray-serve"  # installs Ray + dependencies for Ray Serve
conda install -c conda-forge "ray-rllib"  # installs Ray + dependencies for Ray RLlib
对于Conda-forge上可用的完整ray库列表,请查看https://anaconda.org/conda-forge/ray-default。
注意:Ray conda 软件包由社区维护,而不是 Ray 团队。虽然
使用 conda 环境时,建议使用 PyPi 安装 Ray
pip install ray 在新创建的环境中。
从源代码构建 Ray
使用 pip 安装应足以满足大多数 Ray 用户的需求。
然而,如果您需要从源代码构建 Ray,请遵循 构建 Ray 的这些说明。
Docker 源镜像
用户可以从 rayproject/ray Docker Hub 仓库 拉取 Docker 镜像。
这些镜像包含 Ray 和所有必需的依赖项。它包含 anaconda 和各种版本的 Python。
镜像使用以下格式的 tag 标记:{Ray 版本}[-{Python 版本}][-{平台}]。Ray 版本 标记可以是以下之一:
| Ray 版本标记 | 描述 |
|---|---|
| latest | 最新的 Ray 发布版本。 |
| x.y.z | 特定的 Ray 发布版本,例如 2.31.0 |
| nightly | 最新的 Ray 开发构建(来自 Github master 的最新提交) |
可选的 Python 版本 标记指定了镜像中的 Python 版本。Ray 支持的所有 Python 版本都可用,例如 py39、py310 和 py311。如果未指定,则标记指向 Ray 版本支持的最低 Python 版本的镜像。
可选的 平台 标记指定了镜像的目标平台:
| 平台标记 | 描述 |
|---|---|
| -cpu | 这些基于 Ubuntu 镜像。 |
| -cuXX | 这些基于指定 CUDA 版本的 NVIDIA CUDA 镜像。它们需要 Nvidia Docker 运行时。 |
| -gpu | 是特定 -cuXX 标记镜像的别名。 |
| <无标记> | 是 -cpu 标记镜像的别名。 |
示例:对于基于 Python 3.9 且不带 GPU 支持的夜间镜像,标记是 nightly-py39-cpu。
如果您想调整这些镜像的一些方面并在本地构建它们,请参阅以下脚本:
cd ray
./build-docker.sh
通过列出图像来审查它们:
docker images
输出应该看起来像以下这样:
***
REPOSITORY                          TAG                 IMAGE ID            CREATED             SIZE
rayproject/ray                      dev                 7243a11ac068        2 days ago          1.11 GB
rayproject/base-deps                latest              5606591eeab9        8 days ago          512  MB
ubuntu                              22.04               1e4467b07108        3 weeks ago         73.9 MB
在 Docker 中启动 Ray
首先,启动部署容器。
docker run --shm-size=<shm-size> -t -i rayproject/ray
将 <shm-size> 替换为适合您系统的限制,例如
512M 或 2G. 一个好的估算方法是使用你可用内存的大约 30%(这是
Ray 内部使用的对象存储。这里的 -t 和 -i 选项是必需的,以支持
交互使用容器。
如果您使用的是 GPU 版本的 Docker 镜像,请记住添加 --gpus all 选项。在以下命令中将 <ray-version> 替换为您目标 ray 版本:
docker run --shm-size=<shm-size> -t -i --gpus all rayproject/ray:<ray-version>-gpu
注意: Ray 需要 大量 的共享内存,因为每个对象
商店将其所有对象存储在共享内存中,因此共享内存的量
将限制对象存储的大小。
您现在应该看到一个类似于以下提示的提示符:
root@ebc78f68d100:/ray#
测试安装是否成功
要测试安装是否成功,尝试运行一些测试。这假设你已经克隆了 git 仓库。
python -m pytest -v python/ray/tests/test_mini.py
已安装的 Python 依赖
我们的 Docker 镜像中预装了 Ray 及其库所需的 Python 依赖。
我们发布了在 Python 3.9 的 ray Docker 镜像中安装的依赖。
ray (Python 3.9)
Ray 版本:2.43.0 (ecdcdc6)
aiohttp==3.9.5 aiohttp-cors==0.7.0 aiosignal==1.3.1 annotated-types==0.6.0 anyio==3.7.1 archspec @ file:///home/conda/feedstock_root/build_artifacts/archspec_1737352602016/work async-timeout==4.0.3 attrs==25.1.0
backoff==1.10.0
boltons @ file:///home/conda/feedstock_root/build_artifacts/boltons_1733827268945/work
boto3==1.26.76
botocore==1.29.76
Brotli @ file:///home/conda/feedstock_root/build_artifacts/brotli-split_1725267488082/work
cachetools==5.3.2
certifi @ file:///home/conda/feedstock_root/build_artifacts/certifi_1739515848642/work/certifi
cffi==1.16.0
charset-normalizer==3.3.2
click==8.1.7
cloudpickle==2.2.0
colorama @ file:///home/conda/feedstock_root/build_artifacts/colorama_1733218098505/work
colorful==0.5.5
conda @ file:///home/conda/feedstock_root/build_artifacts/conda_1739917017929/work
conda-libmamba-solver @ file:///home/conda/feedstock_root/build_artifacts/conda-libmamba-solver_1737800978214/work/src
conda-package-handling @ file:///home/conda/feedstock_root/build_artifacts/conda-package-handling_1736345463896/work
conda_package_streaming @ file:///home/conda/feedstock_root/build_artifacts/conda-package-streaming_1729004031731/work
cryptography==42.0.5
cupy-cuda12x==13.1.0
Cython==0.29.37
distlib==0.3.7
distro @ file:///home/conda/feedstock_root/build_artifacts/distro_1734729835256/work
dm-tree==0.1.8
exceptiongroup==1.2.2
Farama-Notifications==0.0.4
fastapi==0.109.2
fastrlock==0.8.2
filelock==3.17.0
flatbuffers==23.5.26
frozendict @ file:///home/conda/feedstock_root/build_artifacts/frozendict_1728841359971/work
frozenlist==1.4.1
fsspec==2023.5.0
google-api-core==1.34.0
google-api-python-client==2.111.0
google-auth==2.23.4
google-auth-httplib2==0.1.1
google-oauth==1.0.1
googleapis-common-protos==1.61.0
grpcio==1.66.2
gymnasium==1.0.0
h11==0.14.0
h2 @ file:///home/conda/feedstock_root/build_artifacts/h2_1733298745555/work
hpack @ file:///home/conda/feedstock_root/build_artifacts/hpack_1733299205993/work
httplib2==0.20.4
httptools==0.6.4
hyperframe @ file:///home/conda/feedstock_root/build_artifacts/hyperframe_1733298771451/work
idna==3.7
importlib-metadata==6.11.0
Jinja2==3.1.2
jmespath==1.0.1
jsonpatch @ file:///home/conda/feedstock_root/build_artifacts/jsonpatch_1733814567314/work
jsonpointer @ file:///home/conda/feedstock_root/build_artifacts/jsonpointer_1725302957584/work
jsonschema==4.23.0
jsonschema-specifications==2024.10.1
libmambapy @ file:///home/conda/feedstock_root/build_artifacts/mamba-split_1735806506118/work/libmambapy
lz4==4.3.3
markdown-it-py==2.2.0
MarkupSafe==2.1.3
mdurl==0.1.2
memray==1.10.0
menuinst @ file:///home/conda/feedstock_root/build_artifacts/menuinst_1731146985033/work
msgpack==1.0.7
multidict==6.0.5
numpy==1.26.4
opencensus==0.11.3
opencensus-context==0.1.3
opentelemetry-api==1.1.0
opentelemetry-exporter-otlp==1.1.0
opentelemetry-exporter-otlp-proto-grpc==1.1.0
opentelemetry-proto==1.1.0
opentelemetry-sdk==1.1.0
opentelemetry-semantic-conventions==0.20b0
ormsgpack==1.7.0
packaging==23.0
pandas==1.5.3
platformdirs==3.11.0
pluggy @ file:///home/conda/feedstock_root/build_artifacts/pluggy_1733222765875/work
prometheus-client==0.19.0
protobuf==3.20.3
psutil==5.9.6
py-spy==0.4.0
pyarrow==14.0.2
pyasn1==0.5.1
pyasn1-modules==0.3.0
pycosat @ file:///home/conda/feedstock_root/build_artifacts/pycosat_1732588390546/work
pycparser==2.21
pydantic==2.9.2
pydantic_core==2.23.4
Pygments==2.18.0
pyOpenSSL==24.2.1
pyparsing==3.1.1
PySocks @ file:///home/conda/feedstock_root/build_artifacts/pysocks_1733217236728/work
python-dateutil==2.8.2
python-dotenv==1.0.1
pytz==2022.7.1
PyYAML==6.0.1
ray @ file:///home/ray/ray-2.43.0-cp39-cp39-manylinux2014_x86_64.whl#sha256=714c18d4f164e30427920addb86882913679e1d6b7ac2f22cf477b3d5c531a65
redis==4.4.2
referencing==0.36.2
requests==2.31.0
rich==13.3.2
rpds-py==0.22.3
rsa==4.7.2
ruamel.yaml @ file:///home/conda/feedstock_root/build_artifacts/ruamel.yaml_1736248037007/work
ruamel.yaml.clib @ file:///home/conda/feedstock_root/build_artifacts/ruamel.yaml.clib_1728724456970/work
s3transfer==0.6.2
scipy==1.11.4
six==1.16.0
smart-open==6.2.0
sniffio==1.3.1
starlette==0.36.3
tensorboardX==2.6.2.2
tqdm @ file:///home/conda/feedstock_root/build_artifacts/tqdm_1735661334605/work
typing_extensions==4.12.2
uritemplate==4.1.1
urllib3==1.26.19
uvicorn==0.22.0
uvloop==0.19.0
virtualenv==20.29.1
watchfiles==0.19.0
websockets==11.0.3
yarl==1.9.4
zipp==3.19.2
zstandard==0.23.0
使用 Maven 安装 Ray Java
注意:所有 Ray Java API 都是实验性的,并且仅由社区支持。
在用 Maven 安装 Ray Java 之前,您应该先使用 pip install -U ray 安装 Ray Python。请注意,Ray Java 和 Ray Python 的版本必须匹配。
请注意,如果您想安装 Ray Java 快照版本,也需要 nightly Ray Python 轮子。
查找最新的 Ray Java 版本在 中央仓库。要在您的应用程序中使用最新的 Ray Java 版本,请在您的 pom.xml 文件中添加以下条目:
<dependency>
  <groupId>io.ray</groupId>
  <artifactId>ray-api</artifactId>
  <version>${ray.version}</version>
</dependency>
<dependency>
  <groupId>io.ray</groupId>
  <artifactId>ray-runtime</artifactId>
  <version>${ray.version}</version>
</dependency>
最新的 Ray Java 快照可以在 sonatype 仓库 中找到。要在您的应用程序中使用最新的 Ray Java 快照,请在您的 pom.xml 文件中添加以下条目:
<!-- only needed for snapshot version of ray -->
<repositories>
  <repository>
    <id>sonatype</id>
    <url>https://oss.sonatype.org/content/repositories/snapshots/</url>
    <releases>
      <enabled>false</enabled>
    </releases>
    <snapshots>
      <enabled>true</enabled>
    </snapshots>
  </repository>
</repositories>

<dependencies>
  <dependency>
    <groupId>io.ray</groupId>
    <artifactId>ray-api</artifactId>
    <version>${ray.version}</version>
  </dependency>
  <dependency>
    <groupId>io.ray</groupId>
    <artifactId>ray-runtime</artifactId>
    <version>${ray.version}</version>
  </dependency>
</dependencies>
注意:当您运行 pip install 来安装 Ray 时,也会安装 Java jars。上述依赖项仅用于构建您的 Java 代码以及在本地模式下运行您的代码。
如果您想在多节点 Ray 集群中运行您的 Java 代码,最好在打包您的代码时排除 Ray jars,以避免 jar 冲突,如果版本(使用 pip install 安装的 Ray 和 Maven 依赖项)不匹配。
安装 Ray C++
注意:所有 Ray C++ API 都是实验性的,并且仅由社区支持。
您可以使用以下方式安装和使用 Ray C++ API。
pip install -U ray[cpp]

# Create a Ray C++ project template to start with.
ray cpp --generate-bazel-project-template-to ray-template
注意:如果您从源代码构建 Ray,请在运行应用程序之前从文件 cpp/example/.bazelrc 中删除构建选项 build --cxxopt="-D_GLIBCXX_USE_CXX11_ABI=0"。相关问题是 这个。
Ray 用例
https://docs.ray.io/en/latest/ray-overview/use-cases.html
本页面索引了常见的 Ray 用例,用于扩展机器学习。
它包含了对博客、示例和教程的高亮引用,这些内容也位于 Ray 文档的其他位置。
大型语言模型(LLMs)和生成式AI
大型语言模型(LLMs)和生成式AI正在迅速改变着行业,对计算能力的需求以惊人的速度增长。Ray提供了一个分布式计算框架,用于扩展这些模型,允许开发者更快、更高效地训练和部署模型。通过提供专门用于数据流、训练、微调、超参数调整和服务的库,Ray简化了开发和部署大规模AI模型的过程。
探索 LLMs 和 Gen AI 示例 : https://docs.ray.io/en/latest/ray-overview/examples.html?tags=llm
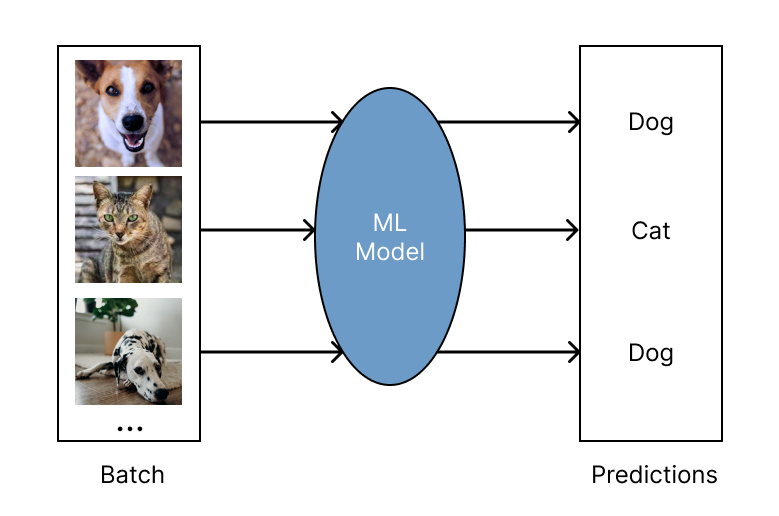
批量推理
批量推理是在大量“批次”输入数据上生成模型预测的过程。
Ray 的批量推理功能与任何云提供商和机器学习框架兼容,对于现代深度学习应用来说,它既快速又经济。
它可以从单机扩展到大型集群,而无需进行太多代码更改。
作为一个以 Python 为首的框架,您可以在 Ray 中轻松表达并交互式地开发您的推理工作负载。
要了解更多关于使用 Ray 运行批量推理的信息,请参阅批量推理指南。
探索批量推理示例 : https://docs.ray.io/en/latest/ray-overview/examples.html?tags=inference
模型服务
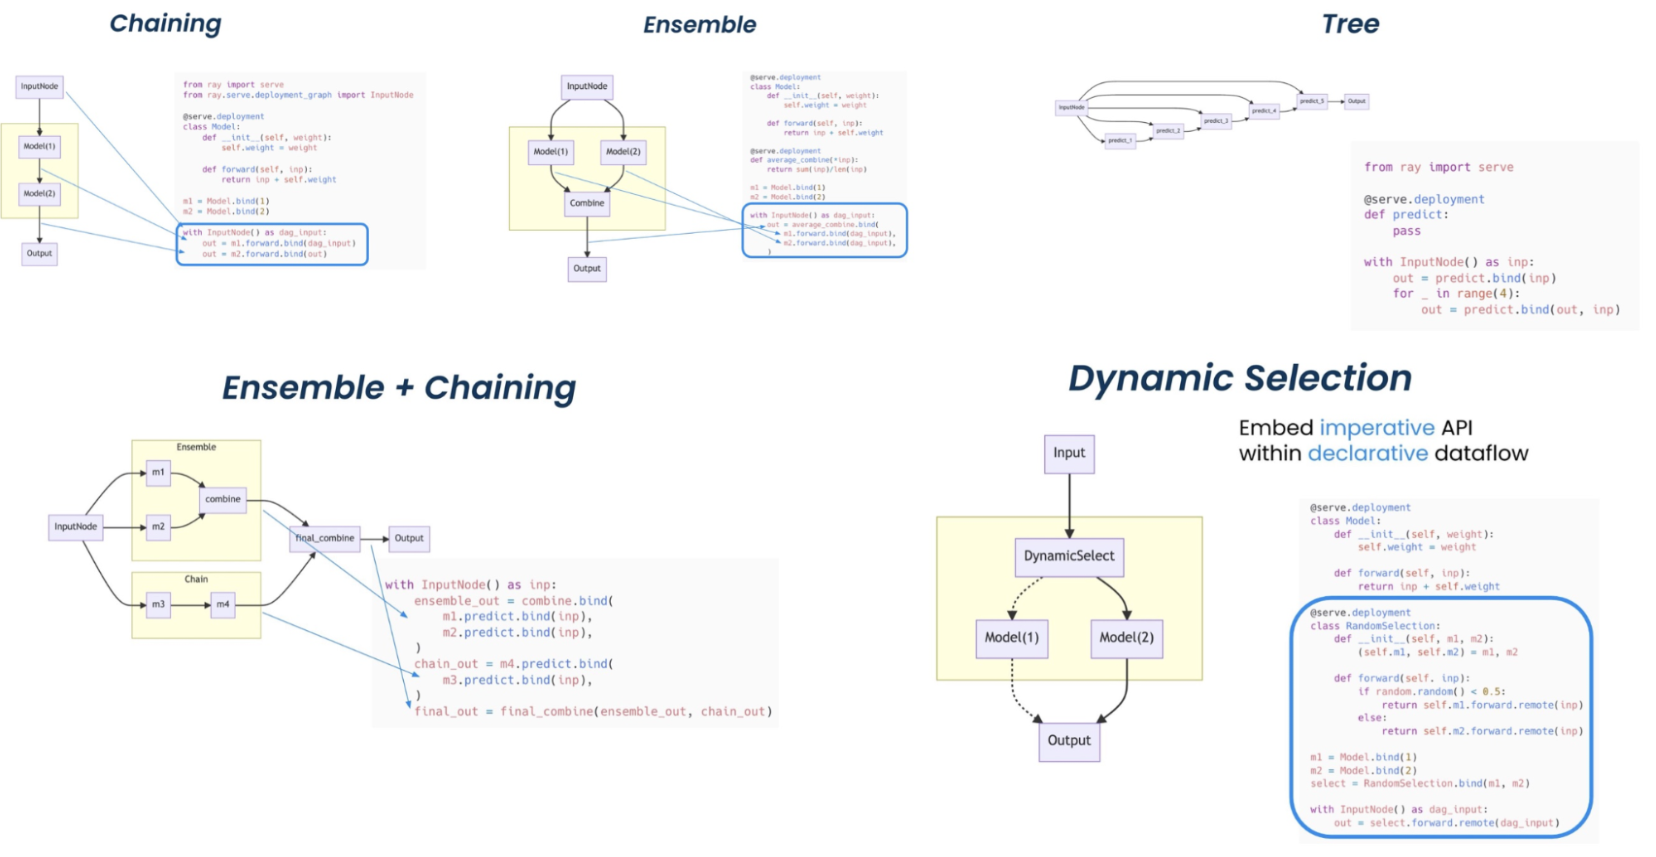
Ray Serve 支持复杂的模型部署模式,需要协调多个Ray演员,其中不同的演员为不同的模型提供推理。Serve可以处理批量推理和在线推理,并且可以扩展到生产环境中的数千个模型。
使用 Ray Serve 的部署模式。(点击图片放大。)
了解有关模型服务的更多信息,请参阅以下资源。
- [Talk] 以 Ray Serve 规模化生产化机器学习
- [博客] 使用 Ray 和 Ray Serve 简化您的 MLOps
- [指南] Ray Serve 入门
- [指南] Serve 中的模型组合
- [Gallary] Serve 示例图库
- [[Gallary] 博客上的更多 Serve 用例]
超参数调整
Ray Tune 库允许任何并行 Ray 工作负载在超参数调整算法下运行。
运行多个超参数调整实验是适用于分布式计算的模式,因为每个实验彼此独立。Ray Tune 处理了分布超参数优化的难题,并提供了关键特性,如检查点存储最佳结果、优化调度和指定搜索模式。
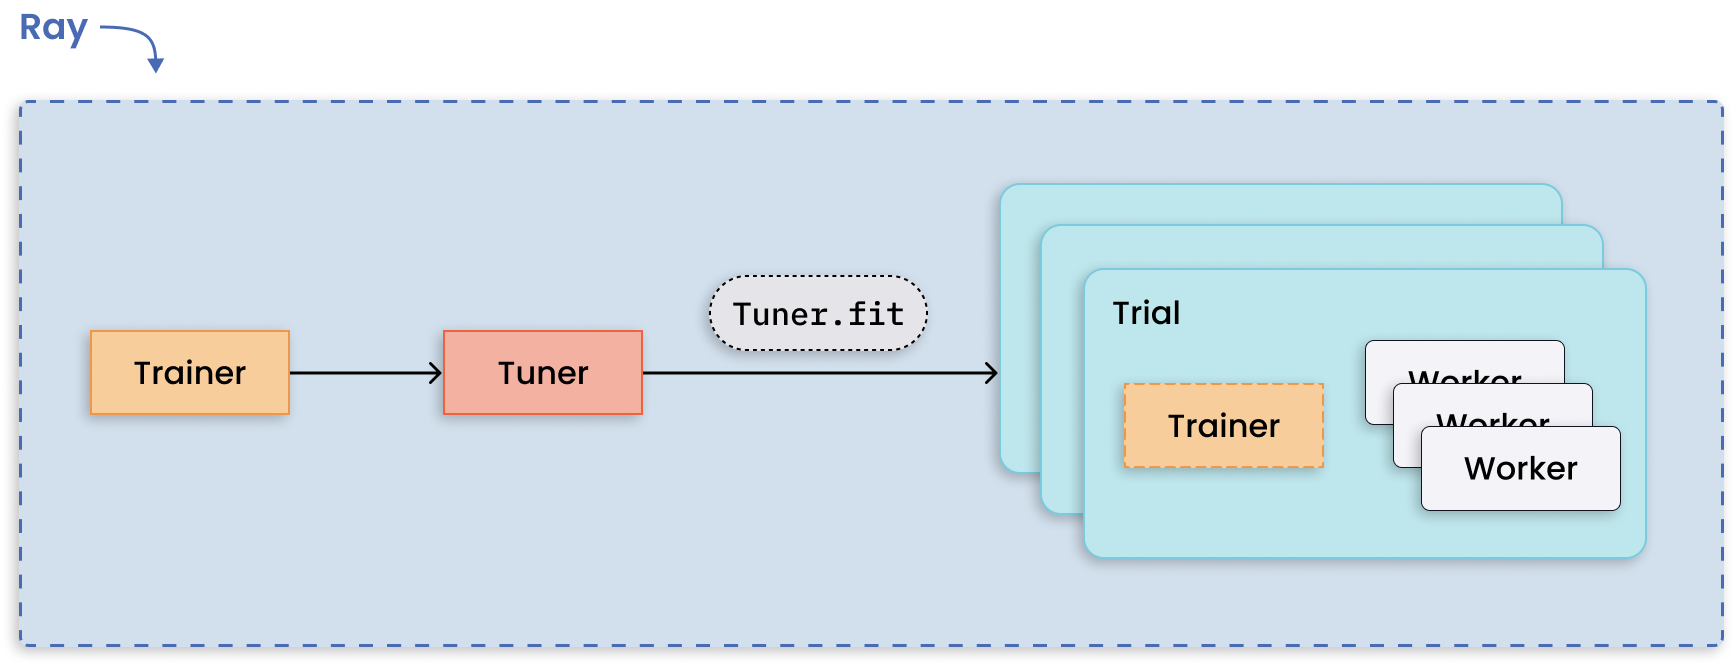
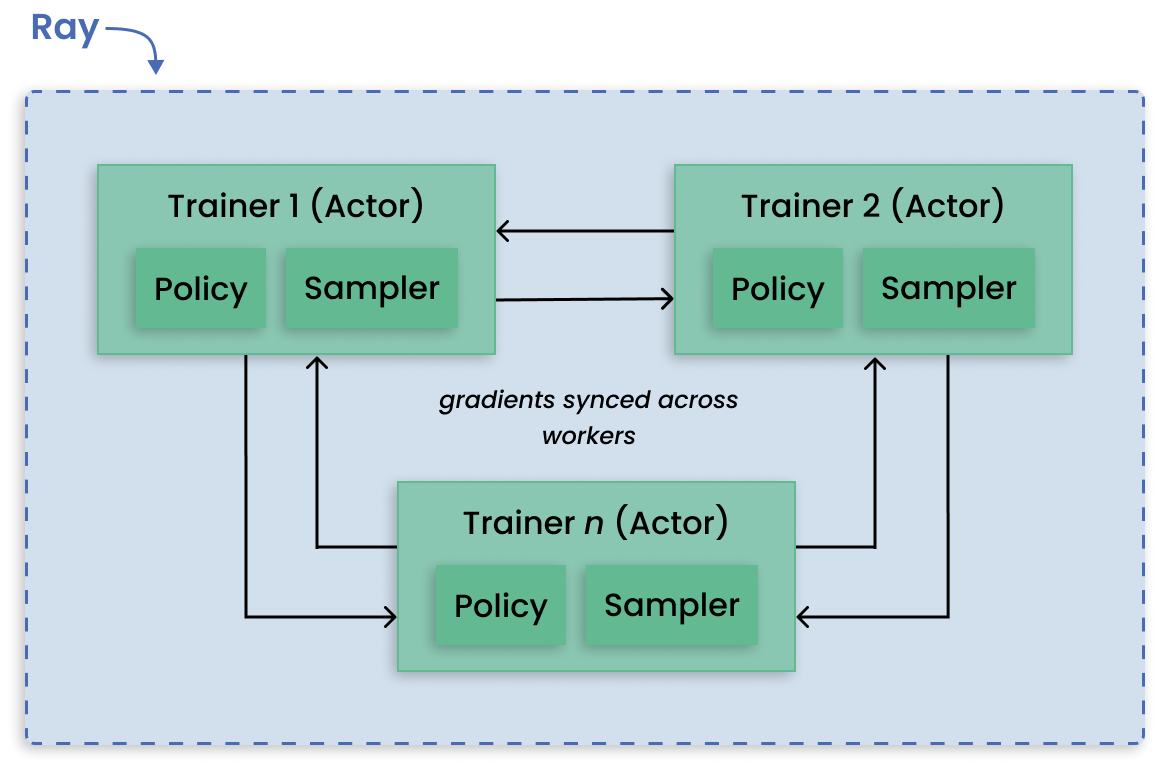
分布式调优,每个试验进行分布式训练。
了解更多关于Tune库的信息,请参阅以下讲座和用户指南。
- [指南] Ray Tune 入门
- [博客] [如何使用 Ray Tune 分布式超参数调优
- [讲座] [简单的分布式超参数优化
- [博客] 使用 🤗 Transformers 进行超参数搜索
- [图库] Ray Tune 示例图库
- 博客上更多 Ray Tune 用例
分布式训练
The Ray Train 库在简单的 Trainer API 下集成了许多分布式训练框架,
提供开箱即用的分布式编排和管理能力。
与训练多个模型相比,模型并行性将大型模型分割到多台机器上进行训练。Ray Train 内置了用于分布模型碎片并并行运行训练的抽象。
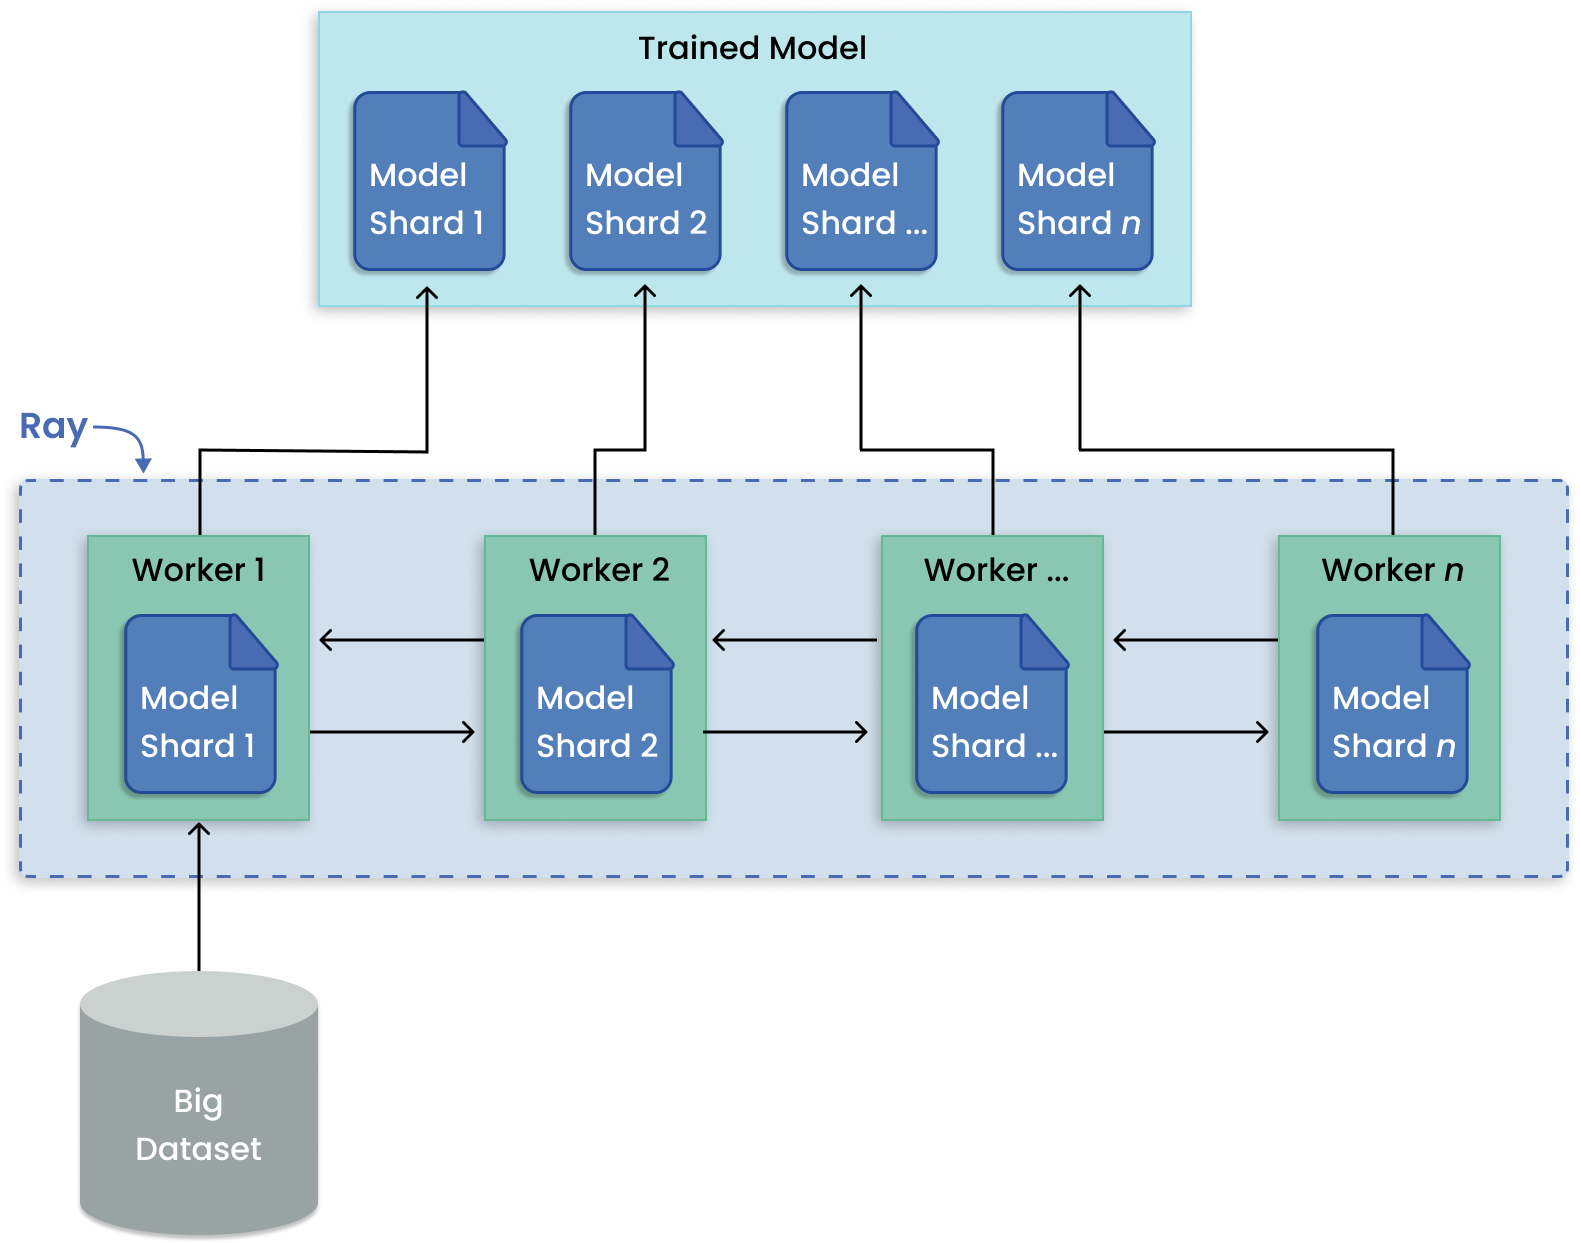
模型并行模式用于分布式大规模模型训练。
了解 Train 库的更多信息,请参阅以下讲座和用户指南。
- [讲座] Ray Train、PyTorch、TorchX 和分布式深度学习
- [博客] 在 Ray 上使用 XGBoost 进行弹性分布式训练
- [指南] Ray Train 入门
- [示例] 微调一个 🤗 Transformers 模型
- [图库] Ray 训练示例图库
- [图库] 博客上的更多训练用例
强化学习
RLlib 是一个开源的强化学习 (RL) 库,为生产级别的、高度分布式的 RL 工作负载提供支持,同时保持了统一且简单的 API,适用于各种行业应用。RLlib 被许多不同领域的行业领导者所使用,例如气候控制、工业控制、制造和物流、金融、游戏、汽车、机器人、船舶设计以及许多其他领域。
去中心化分布式近端策略优化(DD-PPO)架构。
了解以下资源以获取更多关于强化学习的信息。
- [课程] 使用 RLlib 的应用强化学习
- [博客] RLlib 简介:示例环境
- [指南] 使用 RLlib 入门
- [讨论] Riot Games 中的深度强化学习
- [[图库] RLlib 示例图库]
- [图库] 博客上更多强化学习用例
ML 平台
Ray 及其 AI 库为寻求简化其 ML 平台的团队提供统一的计算运行时。Ray 的库,如 Ray Train、Ray Data 和 Ray Serve,可用于构建端到端的 ML 工作流程,提供数据预处理功能以及 API,这些功能是作为训练的一部分,并在训练到服务的过渡中使用的。
更多关于使用 Ray 构建 ML 平台的信息,请参阅本节。
端到端机器学习工作流程
以下列出了使用 Ray AI 库实现端到端机器学习工作流程的示例。
- [示例] 使用 Ray 进行文本分类
- [示例] 使用 Ray 进行目标检测
- [示例] 表格数据上的机器学习
- [示例] 使用 Ray 进行时间序列的 AutoML
大规模工作负载编排
以下是一些利用 Ray 核心分布式 API 简化大规模工作负载编排的项目的亮点。
- [博客] 阿里巴巴集团在 Ray 上构建高可用和可扩展的在线应用
- [博客] Ray Forward 2022 会议:超大规模 Ray 应用用例
- [博客] 使用 Ray 在 CloudSort 基准测试中创下新的世界纪录
- [示例] 使用 Ray 并行化您的网络爬虫以加快速度
https://docs.ray.io/en/latest/ray-air/getting-started.html
Ray for ML 基础设施
提示:如果您正在使用 Ray 来构建一个机器学习平台,我们非常乐意听取您的意见!填写这个简短的表格来参与其中。
Ray及其AI库为寻求简化其ML平台的团队提供统一的计算运行时。
Ray 的库,如 Ray Train、Ray Data 和 Ray Serve,可用于构建端到端机器学习工作流程,提供特性和 API。
数据预处理作为训练的一部分,以及从训练过渡到服务的转变。

Why Ray for ML Infrastructure?
Ray的AI库通过为可扩展的ML提供无缝、统一和开放的体验,简化了机器学习框架、平台和工具的生态系统:
1. 从开发到产品的无缝连接:Ray的AI库减少了从开发到生产的摩擦。使用Ray及其库,相同的Python代码可以无缝地从笔记本电脑扩展到大型集群。
2. 统一 ML API 和运行时: Ray 的 API 允许在 XGBoost、PyTorch 和 Hugging Face 等流行框架之间进行切换,只需进行最少的代码更改。从训练到服务的一切都在单个运行时(Ray + KubeRay)上运行。
3. 开放和可扩展:Ray 是完全开源的,可以在任何集群、云或 Kubernetes 上运行。在可扩展的开发者 API 上构建自定义组件和集成。
基于Ray构建的示例机器学习平台
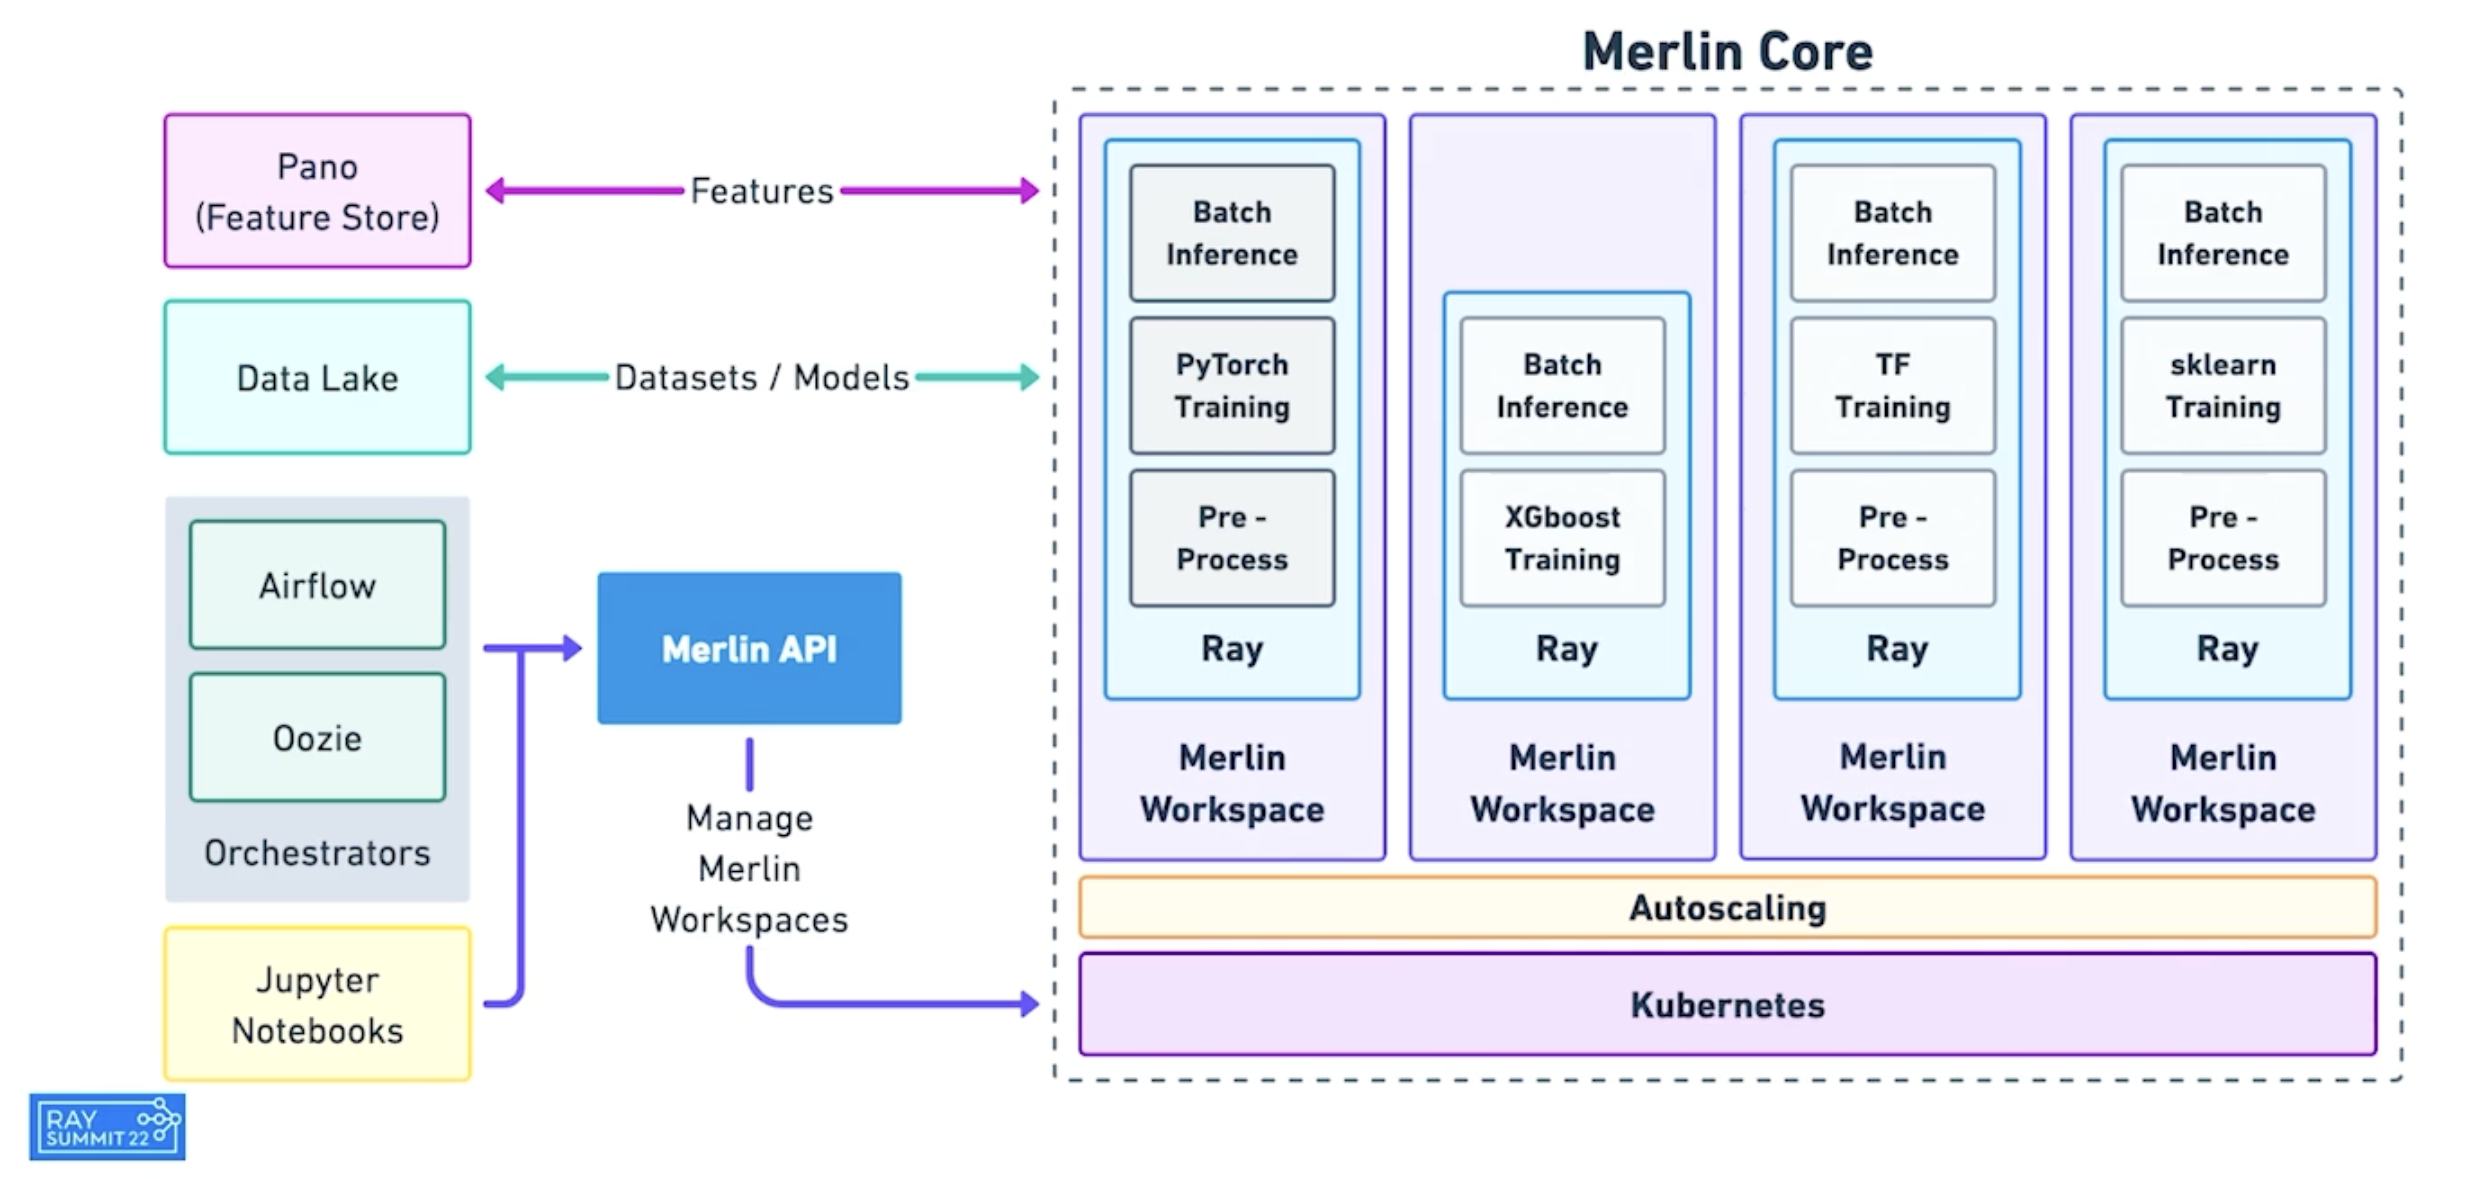
Shopify的Merlin架构基于Ray。
Spotify 使用Ray进行高级应用,包括为家庭播客个性化内容推荐,以及个性化Spotify Radio曲目排序。
如何 Ray 生态系统赋能 Spotify 的 ML 科学家和工程师。
以下亮点展示了利用 Ray 统一 API 构建更简单、更灵活的机器学习平台的公司。
- [博客] 梅林魔法 - Shopify 的新机器学习平台
- [幻灯片] 使用 Ray 进行大规模深度学习训练和调优
- [博客] Griffin: Instacart 的机器学习平台如何在一年内翻三倍
- [演讲] Predibase - 为可扩展性构建的低代码深度学习平台
- [博客] 在 GKE 上使用 Kubeflow 和 Ray 构建机器学习平台
- [讨论] Ray 峰会圆桌 - Ray 上的机器学习平台
将 Ray 部署到 ML 平台
在此,我们描述了如何在您的基础设施中使用或部署 Ray。主要有两种部署模式——挑选和选择以及现有平台内。
核心思想是 Ray 可以与您现有的基础设施和集成工具互补。
设计原则
- Ray及其库处理AI应用和服务的重型计算方面。
- Ray依赖于外部集成(例如,Tecton、MLFlow、W&B)进行存储和跟踪。
- 工作流编排器(例如,AirFlow)是一个可选组件,可用于安排重复性作业、启动新Ray集群以处理作业以及运行非Ray计算步骤。
- 可以使用Ray任务处理单个Ray应用内的任务图轻量级编排。
- Ray库可以独立使用,在现有ML平台中使用,或用于构建Ray原生ML平台。
选择您自己的库
您可以挑选并选择您想要使用的 Ray AI 库。
如果您是一名想要独立使用 Ray 库进行特定 AI 应用或服务用例的机器学习工程师,并且不需要与现有的机器学习平台集成,那么这适用于您。
例如,Alice 想要使用 RLlib 训练她工作项目中的模型。Bob 想要使用 Ray Serve 来部署他的模型管道。在这两种情况下,Alice 和 Bob 都可以独立地利用这些库,而不需要任何协调。
这个场景描述了今天大多数 Ray 库的使用情况。
在上面图表:
- 仅使用一个库 – 这表明您可以挑选和选择,不需要替换您所有的 ML 基础设施来使用 Ray。
- 您可以使用 Ray 的多种部署模式 来启动和管理 Ray 集群以及 Ray 应用程序。
- Ray AI 库可以从外部存储系统(如 Amazon S3 / Google Cloud Storage)读取数据,并将结果存储在那里。
现有机器学习平台集成
您可能已经拥有一个现有的机器学习平台,但希望使用 Ray 的某些机器学习库子集。例如,一位机器学习工程师希望在组织购买的机器学习平台(例如 SageMaker、Vertex)中使用 Ray。
Ray 可以通过集成现有的管道/工作流程编排器、存储和跟踪服务来补充现有的机器学习平台,而无需替换您的整个机器学习平台。
在上面的图中:
- 一个工作流编排器,例如 AirFlow、Oozie、SageMaker Pipelines 等,负责调度和创建 Ray 集群以及运行 Ray 应用和服务。Ray 应用可能是一个更大编排工作流的一部分(例如,Spark ETL,然后在 Ray 上进行训练)。
- 轻量级任务图的编排可以在 Ray 内完全处理。外部工作流程编排器可以很好地集成,但只有在运行非 Ray 步骤时才需要。
- Ray 集群也可以用于交互式使用(例如,Jupyter 笔记本,Google Colab,Databricks 笔记本等)。
- Ray Train、Data 和 Serve 提供与 Feast 等特征存储的集成,以用于训练和提供服务。
- Ray Train and Tune 提供与跟踪服务(如 MLFlow 和 Weights & Biases)的集成。
使用案例
https://docs.ray.io/en/latest/ray-overview/examples.html
通过建议一个示例来帮助我们改进我们的示例。告诉我们您想拥有的示例。
- Object Detection Batch Inference with PyTorch FasterRCNN_ResNet50 Beginner. Data. PyTorch.Computer Vision ray-team
- Image Classification Batch Inference with Hugging Face Vision Transformer Beginner. Data. Transformers.Computer Vision ray-team
- Tabular Data Training and Batch Inference with XGBoost Beginner. Data. XGBoost. ray-team
- Distributed Data Processing with Data-Juicer Beginner. Data. Data-Juicer.Large Language Models Generative AI community** Contributed by the Ray Community*💪 ✨
- Serve ML Models Beginner. Serve. PyTorch.Computer Vision ray-team
- Serve a Stable Diffusion Model Beginner. Serve.Computer Vision Generative AI ray-team
- Serve a Large Language Model (LLM) Beginner. Serve.Generative AI Large Language Models Natural Language Processing ray-team
- Serve a Text Classification Model Beginner. Serve.Natural Language Processing ray-team
- Serve an Object Detection Model Beginner. Serve.Computer Vision ray-team
- Serve an Inference Model on AWS NeuronCores Using FastAPI Intermediate. Serve.Natural Language Processing ray-team
- Serve an Inference with Stable Diffusion Model on AWS NeuronCores Using FastAPI Intermediate. Serve.Computer Vision Generative AI ray-team
- Serve a model on Intel Gaudi Accelerator Intermediate. Serve. PyTorch.Generative AI Large Language Models ray-team
- Scale a Gradio App with Ray Serve Intermediate. Serve.Generative AI Large Language Models Natural Language Processing ray-team
- Serve a Text Generator with Request Batching Intermediate. Serve.Generative AI Large Language Models Natural Language Processing ray-team
- Serve a Chatbot with Request and Response Streaming Intermediate. Serve.Generative AI Large Language Models Natural Language Processing ray-team
- Serving models with Triton Server in Ray Serve Intermediate. Serve.Computer Vision Generative AI ray-team
- Serve a Java App Advanced. Serve. ray-team
- Train an image classifier with PyTorch Beginner. Train. PyTorch.Computer Vision ray-team
- Train an image classifier with Lightning Beginner. Train. Lightning.Computer Vision ray-team
- Train a text classifier with Hugging Face Accelerate Beginner. Train. Accelerate. PyTorch. Hugging Face.Large Language Models Natural Language Processing ray-team
- Train an image classifier with TensorFlow Beginner. Train. TensorFlow.Computer Vision ray-team
- Train with Horovod and PyTorch Beginner. Train. Horovod. ray-team
- Train ResNet model with Intel Gaudi Beginner. Train. PyTorch.Computer Vision community** Contributed by the Ray Community*💪 ✨
- Train BERT model with Intel Gaudi Beginner. Train. Transformers.Natural Language Processing community** Contributed by the Ray Community*💪 ✨
- Train a text classifier with DeepSpeed Intermediate. Train. DeepSpeed. PyTorch.Large Language Models Natural Language Processing ray-team
- Fine-tune a personalized Stable Diffusion model Intermediate. Train. PyTorch.Computer Vision Generative AI ray-team
- Finetune Stable Diffusion and generate images with Intel Gaudi Intermediate. Train. Accelerate. Transformers.Computer Vision Generative AI community** Contributed by the Ray Community*💪 ✨
- Train a text classifier with PyTorch Lightning and Ray Data Intermediate. Train. Lightning.Natural Language Processing ray-team
- Train a text classifier with Hugging Face Transformers Intermediate. Train. Transformers.Natural Language Processing ray-team
- Fine-tune Llama-2-7b and Llama-2-70b with Intel Gaudi Intermediate. Train. Accelerate. Transformers.Natural Language Processing Large Language Models community** Contributed by the Ray Community*💪 ✨
- Pre-train Llama-2 with Intel Gaudi Intermediate. Train. Accelerate. Transformers. DeepSpeed.Natural Language Processing Large Language Models community** Contributed by the Ray Community*💪 ✨
- Fine-tune Llama3.1 with AWS Trainium Advanced. Train. PyTorch. AWS Neuron.Natural Language Processing Large Language Models community** Contributed by the Ray Community*💪 ✨
- Fine-tune a Llama-2 text generation model with DeepSpeed and Hugging Face Accelerate Advanced. Train. Accelerate. DeepSpeed. Hugging Face.Natural Language Processing Large Language Models ray-team
- Fine-tune a GPT-J-6B text generation model with DeepSpeed and Hugging Face Transformers Advanced. Train. Hugging Face. DeepSpeed.Natural Language Processing Large Language Models Generative AI ray-team
- Fine-tune a vicuna-13b text generation model with PyTorch Lightning and DeepSpeed Advanced. Train. Lightning. DeepSpeed.Large Language Models Generative AI ray-team
- Fine-tune a dolly-v2-7b text generation model with PyTorch Lightning and FSDP Advanced. Train. Lightning.Large Language Models Generative AI Natural Language Processing ray-team
- Train a tabular model with XGBoost Beginner. Train. XGBoost. ray-team
2025-03-29(六)


 2014
2014

 被折叠的 条评论
为什么被折叠?
被折叠的 条评论
为什么被折叠?
 到【灌水乐园】发言


