保姆级教程:实现在mac电脑上获取windows电脑分享的网络文件夹

请添加图片描述
演示系统:win10 + Sonoma 14.4.3
限制条件:两台设备需要在同一局域网内,即同一网络环境。

+——+——+——+——+——+——+——+——+——+——+——+——+——+——+——+——+——

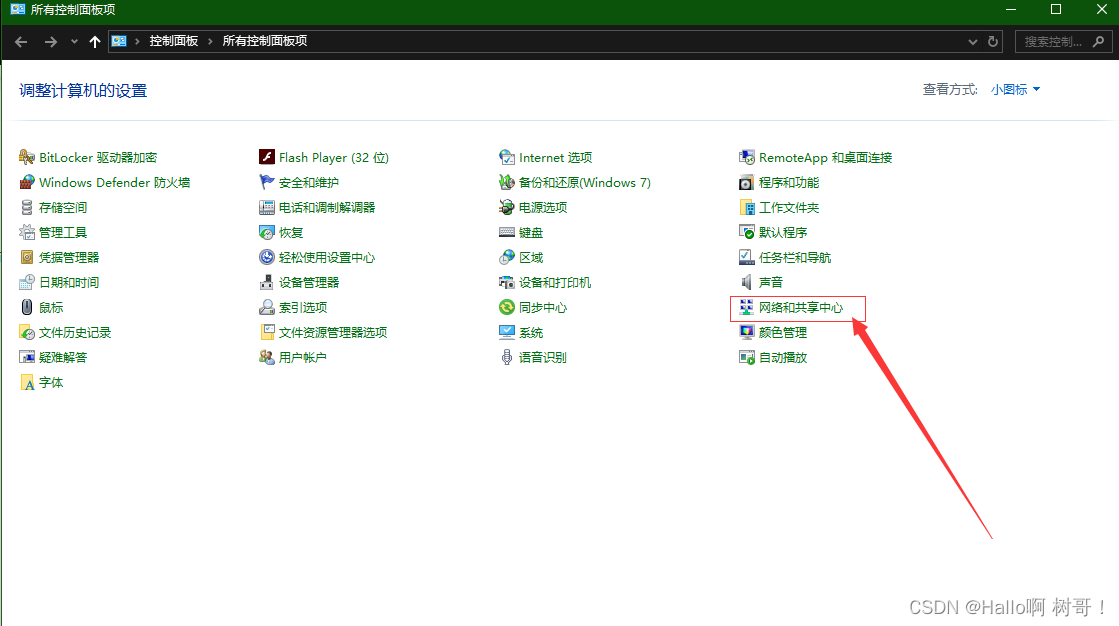
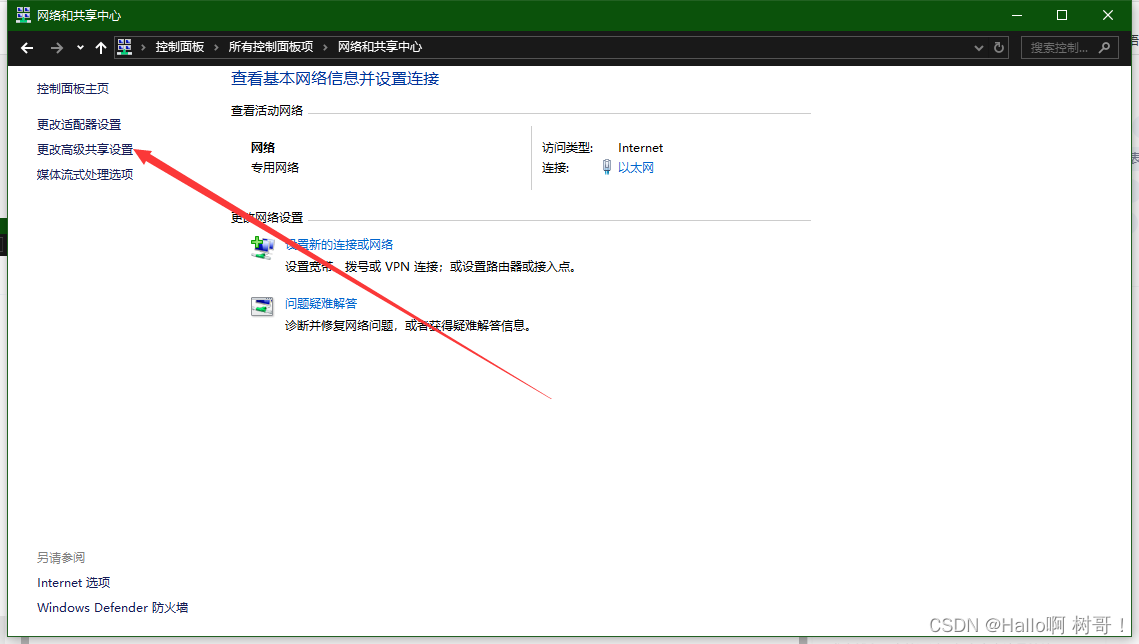
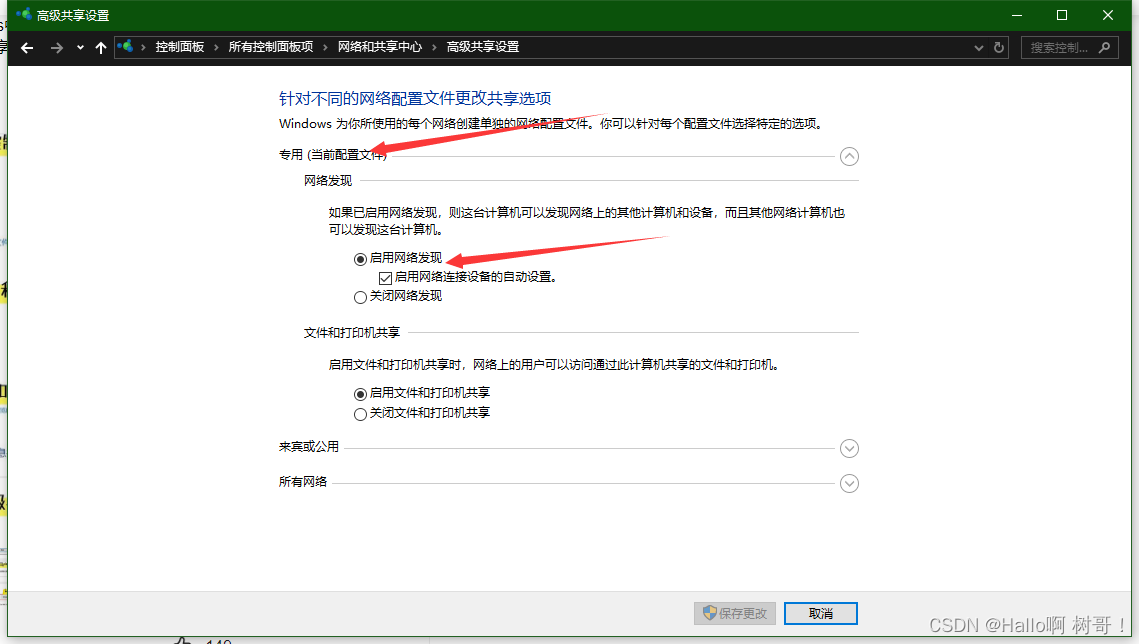
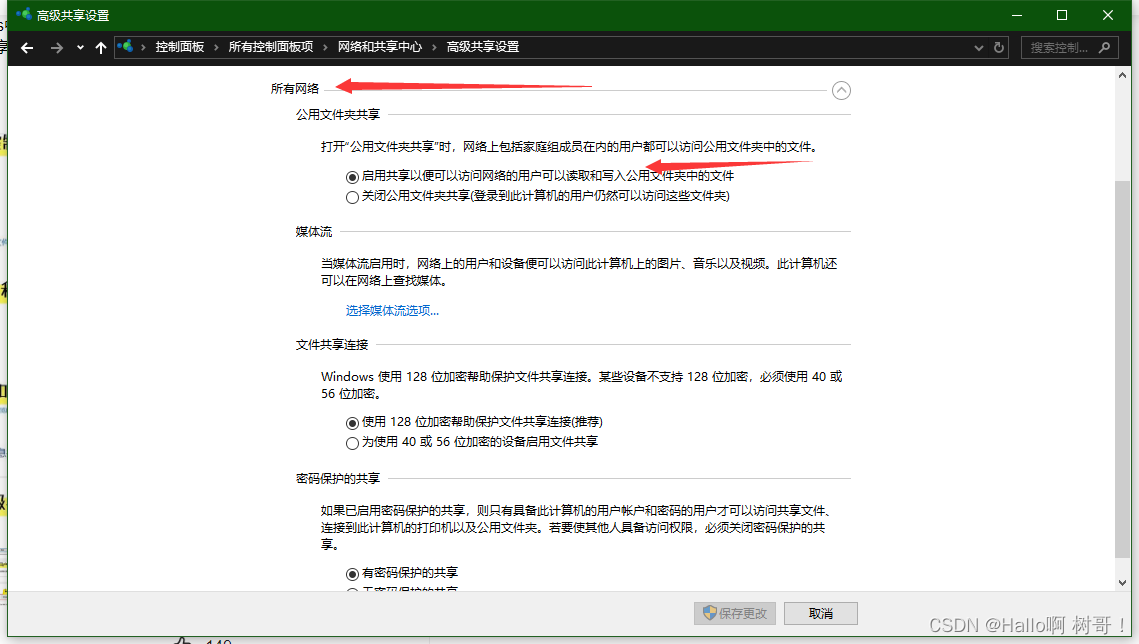
第一步:打开控制面板 -> 找到网络和共享中心 -> 选择更改高级共享设置 -> 分别在专用和所有网络的都开启共享的设置 - > 点击保存
在这里插入图片描述
在这里插入图片描述
在这里插入图片描述
在这里插入图片描述

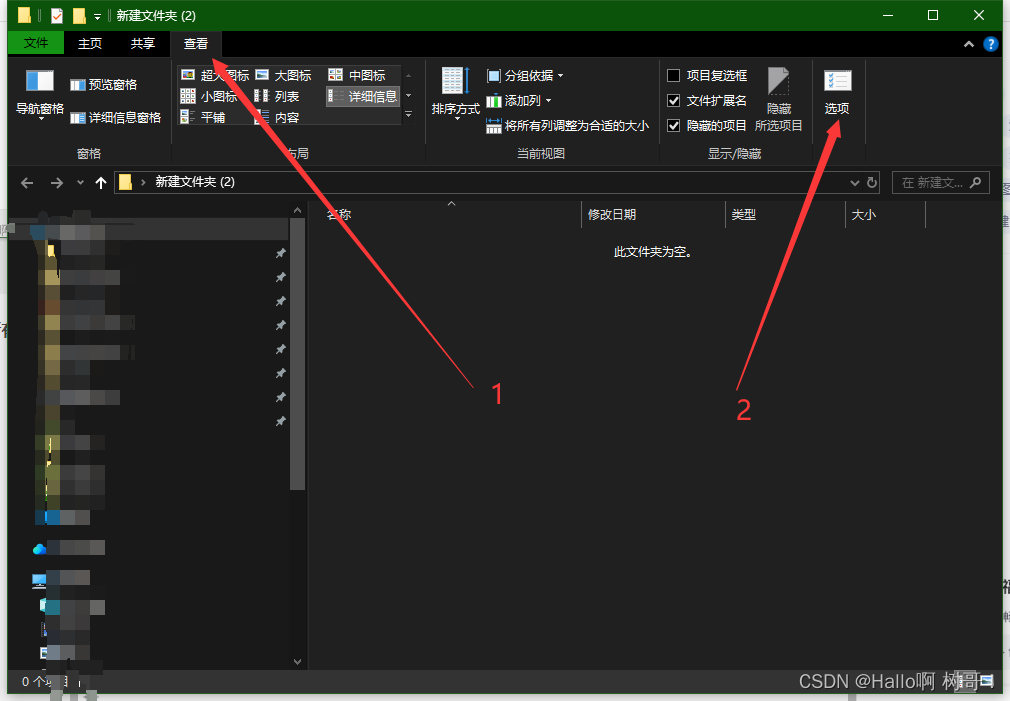
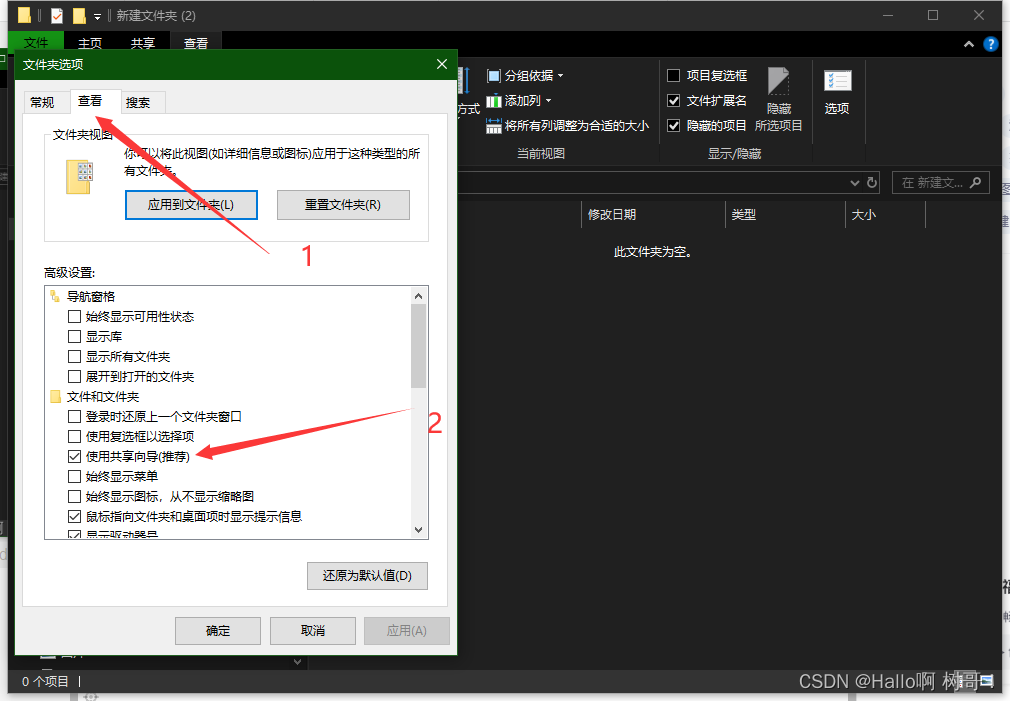
第二步:打开任意一个文件夹 -> 点击最上面的查看 -> 点击最右边的选项 -> 点击查看进入分页 - > 找到并勾选《使用共享向导》-> 点击保存
在这里插入图片描述
在这里插入图片描述
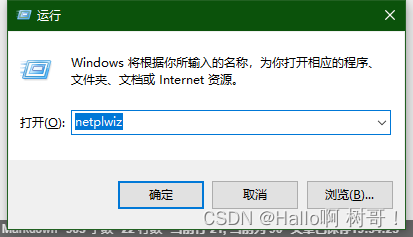
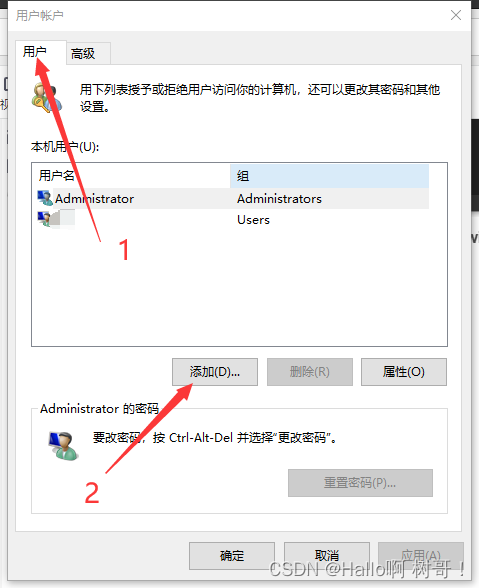
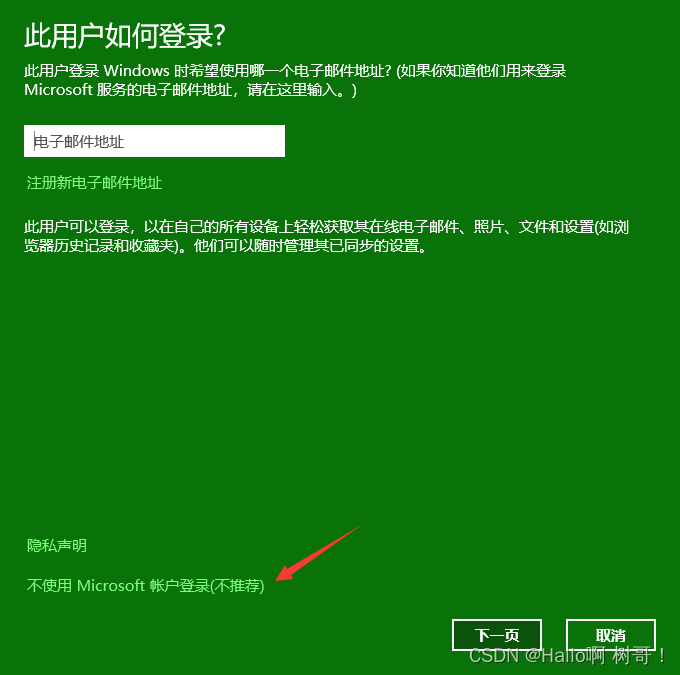
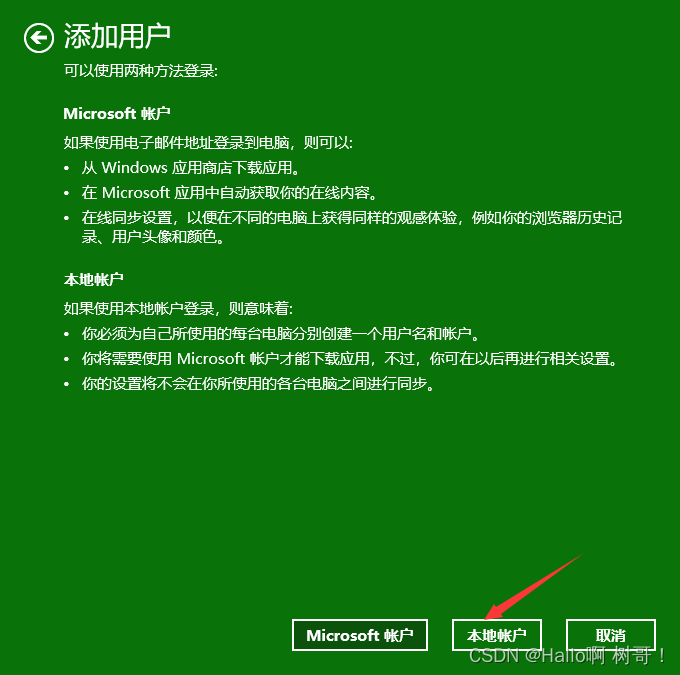
**第三步:使用快捷键win + r 打开运行窗口 -> 输入指令netplwiz -> 点击确定 -> 先点击用户再点击添加 - > 选择不使用Microsoft账户登录 -> 点击本地账户 -> 输入对应的用户名和密码 -> 点击添加后就会发现我们除了Administrator还有一个user用户了,添加成功 **
在这里插入图片描述
在这里插入图片描述
在这里插入图片描述
在这里插入图片描述
在这里插入图片描述

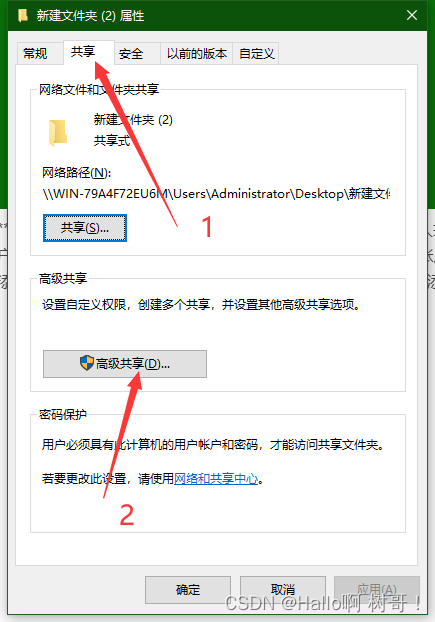
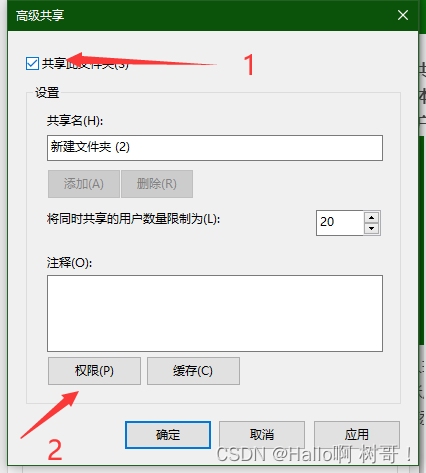
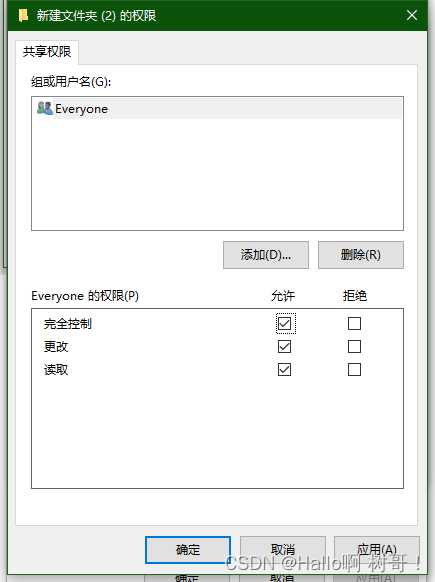
第四步:选择你要共享的文件夹目录并打开属性窗口 -> 点击共享后打开高级共享 -> 点击共享此文件夹后点击权限按钮 -> 选择对应的权限后点击确定
在这里插入图片描述
在这里插入图片描述在这里插入图片描述
第五步:在mac电脑上打开访达窗口 -> 点击右侧网络按钮并双击 -> 选中我们的共享文件夹 -> 找到右上角点击连接身份 -> 输入我们创建的角色账号和密码点击连接 -> 完成连接,现在可以访问到了

  • 2
    点赞
  • 1
    收藏
    觉得还不错? 一键收藏
  • 打赏
    打赏
  • 0
    评论
好的,下面是一个基于Python的BBS论坛保姆教程,适用于Windows操作系统。 首先,你需要安装Python和一些必要的库。推荐使用Anaconda或Miniconda,因为它们包含了常用的Python库。在命令行中输入以下命令来安装Flask和SQLAlchemy: ``` pip install Flask pip install SQLAlchemy ``` 接下来,你需要创建一个Flask应用程序。在你的工作目录中创建一个名为`app.py`的文件,并输入以下代码: ```python from flask import Flask, render_template, request, redirect, url_for from flask_sqlalchemy import SQLAlchemy app = Flask(__name__) app.config['SQLALCHEMY_DATABASE_URI'] = 'sqlite:///bbs.db' db = SQLAlchemy(app) class Post(db.Model): id = db.Column(db.Integer, primary_key=True) title = db.Column(db.String(80)) content = db.Column(db.Text) author = db.Column(db.String(50)) def __repr__(self): return '<Post %r>' % self.title @app.route('/') def index(): posts = Post.query.all() return render_template('index.html', posts=posts) @app.route('/post/<int:id>') def post(id): post = Post.query.get(id) return render_template('post.html', post=post) @app.route('/new_post', methods=['GET', 'POST']) def new_post(): if request.method == 'POST': title = request.form['title'] content = request.form['content'] author = request.form['author'] post = Post(title=title, content=content, author=author) db.session.add(post) db.session.commit() return redirect(url_for('index')) return render_template('new_post.html') if __name__ == '__main__': app.run(debug=True) ``` 这个应用程序使用了Flask和SQLAlchemy,定义了一个名为`Post`的数据库模型,并创建了三个路由函数。`index`函数会渲染主页,`post`函数会渲染帖子页面,`new_post`函数会渲染新帖子页面,并将新帖子添加到数据库中。 接下来,你需要创建模板。在你的工作目录中创建一个名为`templates`的文件夹,并在其中创建三个HTML文件:`index.html`、`post.html`和`new_post.html`。 `index.html`模板: ```html <!doctype html> <html> <head> <title>BBS</title> </head> <body> <h1>BBS</h1> <ul> {% for post in posts %} <li><a href="{{ url_for('post', id=post.id) }}">{{ post.title }}</a> by {{ post.author }}</li> {% endfor %} </ul> <a href="{{ url_for('new_post') }}">New Post</a> </body> </html> ``` `post.html`模板: ```html <!doctype html> <html> <head> <title>{{ post.title }}</title> </head> <body> <h1>{{ post.title }}</h1> <p>{{ post.content }}</p> <p>by {{ post.author }}</p> <a href="{{ url_for('index') }}">Back to Index</a> </body> </html> ``` `new_post.html`模板: ```html <!doctype html> <html> <head> <title>New Post</title> </head> <body> <h1>New Post</h1> <form method="post"> <label for="title">Title:</label> <input type="text" id="title" name="title"><br><br> <label for="content">Content:</label> <textarea id="content" name="content"></textarea><br><br> <label for="author">Author:</label> <input type="text" id="author" name="author"><br><br> <input type="submit" value="Submit"> </form> <a href="{{ url_for('index') }}">Back to Index</a> </body> </html> ``` 最后,你需要创建一个SQLite数据库。在命令行中输入以下命令: ``` python from app import db db.create_all() exit() ``` 现在你可以运行应用程序了。在命令行中输入以下命令: ``` python app.py ``` 然后在浏览器中访问`http://localhost:5000`即可。

“相关推荐”对你有帮助么?

  • 非常没帮助
  • 没帮助
  • 一般
  • 有帮助
  • 非常有帮助
提交
评论
添加红包

请填写红包祝福语或标题

红包个数最小为10个

红包金额最低5元

当前余额3.43前往充值 >
需支付:10.00
成就一亿技术人!
领取后你会自动成为博主和红包主的粉丝 规则
hope_wisdom
发出的红包

打赏作者

Hallo啊 树哥!

你的鼓励将是我创作的最大动力

¥1 ¥2 ¥4 ¥6 ¥10 ¥20
扫码支付:¥1
获取中
扫码支付

您的余额不足,请更换扫码支付或充值

打赏作者

实付
使用余额支付
点击重新获取
扫码支付
钱包余额 0

抵扣说明:

1.余额是钱包充值的虚拟货币,按照1:1的比例进行支付金额的抵扣。
2.余额无法直接购买下载,可以购买VIP、付费专栏及课程。

余额充值