


目前,许多Android应用都使用了沉浸式效果,即状态栏颜色与应用的导航栏(或是自定义导航栏)一致。
这次做的应用中,需要实现这种效果。费了好多时间没弄通,直到看到这篇文章:
http://blog.csdn.net/ys408973279/article/details/49994407
根据文章以及附带的github工程,总算是搞通了。
同时整理一下遇到的问题:
1.首先,在代码中设置状态栏透明
if (Build.VERSION.SDK_INT >= Build.VERSION_CODES.KITKAT) {
    Window window = getWindow();
    // Translucent status bar
    window.setFlags(
            WindowManager.LayoutParams.FLAG_TRANSLUCENT_STATUS,
            WindowManager.LayoutParams.FLAG_TRANSLUCENT_STATUS);
}
第一次使用setFlags方法,之前都是使用的addFlag,
后来测试,发现与如下写法相同
window.addFlags(WindowManager.LayoutParams.FLAG_TRANSLUCENT_STATUS);//透明状态栏之前查的资料,一般还有
window.addFlags(WindowManager.LayoutParams.FLAG_TRANSLUCENT_NAVIGATION);//透明导航栏这样一句话,不过这次使用时,没用系统导航栏,发现添加这句会有问题,所以不加这句
2.修改系统主题为无导航栏
<style name="AppTheme" parent="Theme.AppCompat.Light.NoActionBar">
</style>
或者设置Theme.AppCompat.NoActionBar也可以
3.修改布局文件
主要是需要在布局文件中,添加
android:fitsSystemWindows="true"这个属性的实质是应该是根据系统状态栏的高度,给控件添加一个paddingTop属性,参详的文章里有详细说明
至于添加位置,如果使用的是自定义导航栏,则自定义导航栏布局中添加该属性即可
由于是padding,所以会遇到一些问题
比如我想实现这种布局
布局文件如下:
<?xml version="1.0" encoding="utf-8"?>
<LinearLayout xmlns:android="http://schemas.android.com/apk/res/android"
    xmlns:tools="http://schemas.android.com/tools"
    android:layout_width="match_parent"
    android:layout_height="match_parent"
    android:orientation="vertical"
    tools:context="com.ice.zhuosimeiju.base.BaseFragmentActivity">

    <RelativeLayout
        android:layout_width="match_parent"
        android:layout_height="wrap_content"
        android:background="@color/colorLightBlue"
        android:fitsSystemWindows="true"
        android:minHeight="?attr/actionBarSize"
        android:orientation="horizontal">


            <TextView
                android:id="@+id/title_bar_name"
                android:layout_width="wrap_content"
                android:layout_height="wrap_content"
                android:text="家"
                android:paddingTop="16dp"
                android:paddingBottom="16dp"
               <span style="color:#ff0000;"> android:layout_centerInParent="true"</span>
                android:textColor="@color/colorWhite"
                android:textSize="@dimen/large_char" />

            <ImageButton
                android:id="@+id/btn_title"
                android:layout_toEndOf="@id/title_bar_name"
                android:layout_width="wrap_content"
                android:layout_height="wrap_content"
               <span style="color:#ff0000;"> android:layout_centerVertical="true"</span>
                android:background="@color/colorLightBlue"
                android:padding="16dp"
                android:src="@drawable/icon_home_003" />


        <ImageView
            android:id="@+id/title_bar_menu"
            android:layout_width="wrap_content"
            android:layout_height="wrap_content"
            android:onClick="showPopup"
       <span style="color:#ff0000;">     android:layout_centerVertical="true"</span>
            android:padding="16dp"
            android:layout_alignParentEnd="true"
            android:src="@drawable/icon_home_004" />


    </RelativeLayout>

    <LinearLayout
        android:id="@+id/content"
        android:layout_width="wrap_content"
        android:layout_height="wrap_content"
        android:orientation="vertical" />
</LinearLayout>
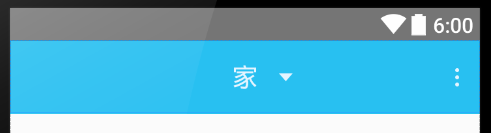
看起来没问题,设置为了居中,但是实际效果如下

或许看起来没什么大问题,但是对比下图就会发现问题

分析后发现,原因主要是,在RelativeLayout中的控件设置android:layout_centerInParent="true"后,会将padding的部分算在一起,进行居中,即从状态栏上边缘到蓝色下边缘中居中,这样android:fitsSystemWindows属性也就没起到作用了。
解决方法的话,是在RelativeLayout中再嵌套一个布局,该子布局不用设置居中,这样该子布局即可享受android:fitsSystemWindows的作用,空出状态栏的部分,然后再子布局中放入所需的控件,这时在设置居中,即可如上方第二幅图一样,正常显示了。文字描述的不好,直接看代码。
修改后的布局如下:
<?xml version="1.0" encoding="utf-8"?>
<LinearLayout xmlns:android="http://schemas.android.com/apk/res/android"
    xmlns:tools="http://schemas.android.com/tools"
    android:layout_width="match_parent"
    android:layout_height="match_parent"
    android:orientation="vertical"
    tools:context="com.ice.zhuosimeiju.base.BaseFragmentActivity">

    <RelativeLayout
        android:layout_width="match_parent"
        android:layout_height="wrap_content"
        android:background="@color/colorLightBlue"
        android:fitsSystemWindows="true"
        android:minHeight="?attr/actionBarSize">

        <span style="color:#ff0000;"><RelativeLayout
            android:layout_width="match_parent"
            android:layout_height="wrap_content"></span>

            <TextView
                android:id="@+id/title_bar_name"
                android:layout_width="wrap_content"
                android:layout_height="wrap_content"
                android:layout_centerInParent="true"
                android:paddingBottom="16dp"
                android:paddingTop="16dp"
                android:text="家"
                android:textColor="@color/colorWhite"
                android:textSize="@dimen/large_char" />

            <ImageButton
                android:id="@+id/btn_title"
                android:layout_width="wrap_content"
                android:layout_height="wrap_content"
                android:layout_toRightOf="@id/title_bar_name"
                android:background="@color/colorLightBlue"
                android:layout_centerInParent="true"
                android:padding="16dp"
                android:src="@drawable/icon_home_003" />


            <ImageView
                android:id="@+id/title_bar_menu"
                android:layout_width="wrap_content"
                android:layout_height="wrap_content"
                android:layout_alignParentRight="true"
                android:layout_centerInParent="true"
                android:onClick="showPopup"
                android:padding="16dp"
                android:src="@drawable/icon_home_004" />

       <span style="color:#ff0000;"> </RelativeLayout></span>
    </RelativeLayout>

    <LinearLayout
        android:id="@+id/content"
        android:layout_width="wrap_content"
        android:layout_height="wrap_content"
        android:orientation="vertical" />
</LinearLayout>
这样,通过这几步,即可实现沉浸式效果了。


 189
189

 被折叠的 条评论
为什么被折叠?
被折叠的 条评论
为什么被折叠?
 到【灌水乐园】发言


