


背景:
- automl框架:基于超参数搜索技术
- AutoGluon:依赖融合多个无需超参数搜索的模型
主要技术:
- stacking:
- 同一份数据训练多个不同类型的模型,这些模型可以是KNN、tree、核方法等
- 最后进入到一个线性模型得到最终的输出,就是对输出做加权求和
- K-则交叉Bagging:
- 对数据集做K折
- 相同的初始参数,训练多次,对每次的误差求平均后作为这些初始参数的最终误差
- 为了最大化利用数据集,可以有效避免过拟合和欠拟合
- 多层Stacking:
- 加深模型,将多个模型输出的数据,合并起来,再做一次Stacking。在上面再训练多个模型,最后用一个线性模型做输出
代码:GitHub - awslabs/autogluon: AutoGluon: AutoML for Image, Text, and Tabular Data
官网教程:https://auto.gluon.ai/stable/index.html
安装
python3 -m pip install -U pip
python3 -m pip install -U setuptools wheel
python3 -m pip install autogluon
# cpu 版
python3 -m pip install -U "mxnet<2.0.0"
# gpu版
# Here we assume CUDA 10.1 is installed.  You should change the number
# according to your own CUDA version (e.g. mxnet_cu100 for CUDA 10.0).
python3 -m pip install -U "mxnet_cu101<2.0.0"
加载数据集
from autogluon.tabular import TabularDataset, TabularPredictor
train_data = TabularDataset('https://autogluon.s3.amazonaws.com/datasets/Inc/train.csv')
subsample_size = 500  # subsample subset of data for faster demo, try setting this to much larger values
train_data = train_data.sample(n=subsample_size, random_state=0)
label = 'class'
save_path = 'agModels-predictClass'  # specifies folder to store trained models
predictor = TabularPredictor(label=label, path=save_path).fit(train_data)
测试
test_data = TabularDataset('https://autogluon.s3.amazonaws.com/datasets/Inc/test.csv')
y_test = test_data[label]  # values to predict
test_data_nolab = test_data.drop(columns=[label])  # delete label column to prove we're not cheating

predictor = TabularPredictor.load(save_path)  # unnecessary, just demonstrates how to load previously-trained predictor from file
y_pred = predictor.predict(test_data_nolab)
perf = predictor.evaluate_predictions(y_true=y_test, y_pred=y_pred, auxiliary_metrics=True)
输出结果
Evaluation: accuracy on test data: 0.8397993653393387
Evaluations on test data:
{
"accuracy": 0.8397993653393387,
"balanced_accuracy": 0.7437076677780596,
"mcc": 0.5295565206264157,
"f1": 0.6242496998799519,
"precision": 0.7038440714672441,
"recall": 0.5608283002588438}
通过leaderboard查看各个学习器
predictor.leaderboard(test_data, silent=True)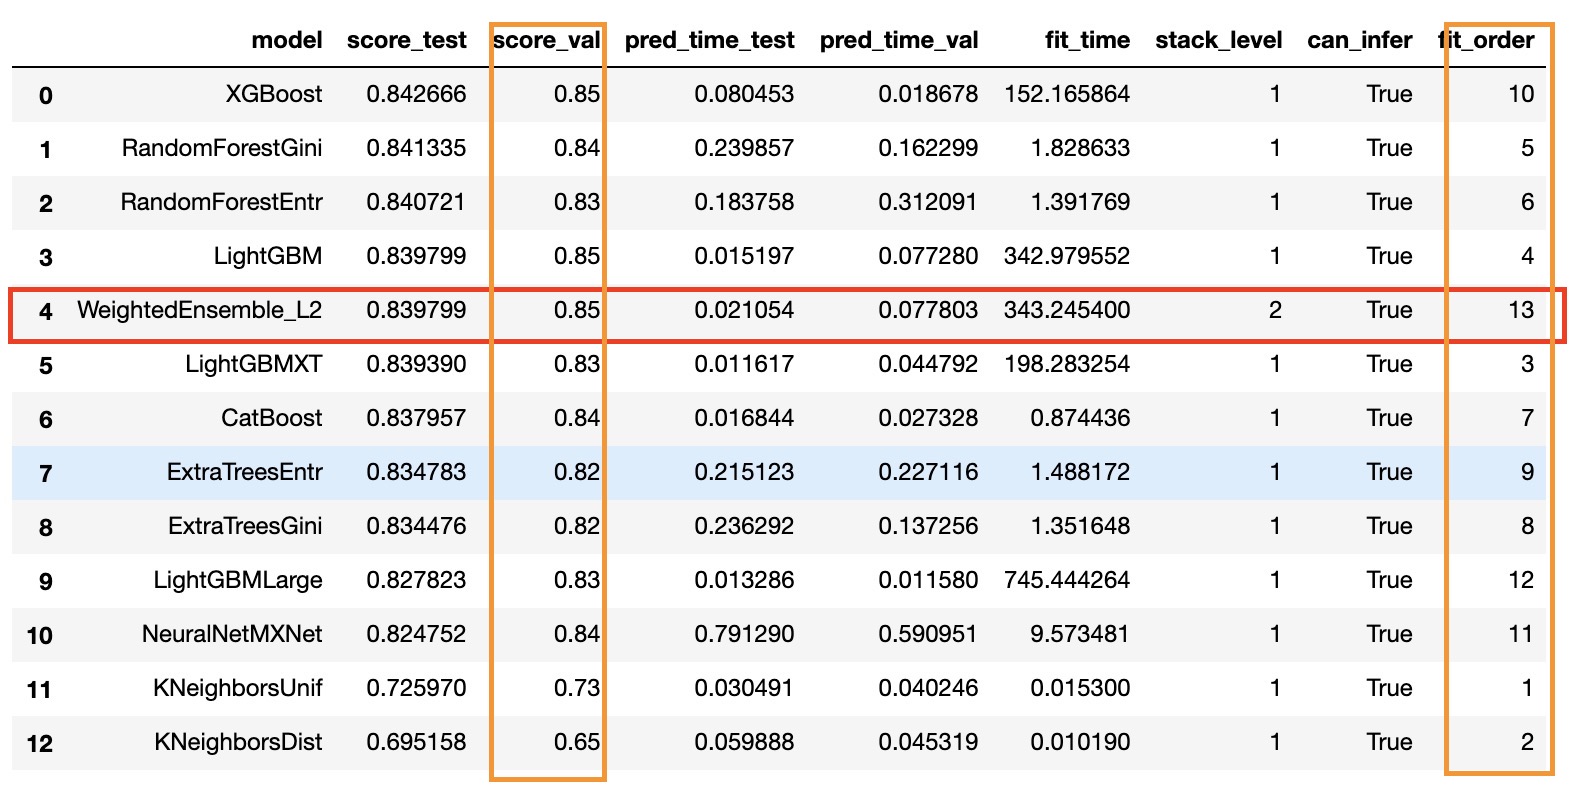
参考:
AutoGluon-教程1-简单的入门模型_愿航的博客-CSDN博客_autogluon
automl框架:AutoGluon介绍_钢铁峡的博客-CSDN博客_autogluon


 1017
1017


 被折叠的 条评论
为什么被折叠?
被折叠的 条评论
为什么被折叠?
 到【灌水乐园】发言


