SpringBoot源码分析之解析application.properties配置文件


回顾前章

说明:本章在之前章节《SringBoot到Spring源码分析之Environment环境装配》的基础上进行继续源码分析。但是本章内容不需要强依赖前面文章,可以单独阅读。

这里先简单总结前面环境对象装配的主要的过程和内容如下:

1、根据SpringApplication对象webApplicationType属性实例化环境对象StandardServletEnvironment。

2、通过环境对象构造器的方式初始化了所有系统环境变量、JDK系统变量、Servlet上下文参数、Servlet配置参数等信息。这些初始化的数据通过Map数据KV结构存根对象(StubPropertySource),按固定的顺序保存到CopyOnWriteArrayList集合中,保存的数据结构类似List<Map<String, Object>>,其中里面的Map的key为环境类型,value为对应环境的信息封装对象。

3、实例化ApplicationConversionService对象,通过构造器方式默认初始化了130多个类型转换器以及格式化组件,这里思考下为什么要在这一步初始化类型转换器和格式化组件。

4、通过单独函数的方式解析main方法参数,如果有的话。

5、尝试解析Active Profiles配置,实际这里不会解析到。

6、将MutablePropertySources封装为ConfigurationPropertySourcesPropertySource。

7、发布环境对象准备完成事件,这一步很关键,也是本章继续分析的重点,因为整个application.properties/yml配置文件就是通过事件回调的方式去解析的。

8、绑定spring.main开头的配置到SpringApplication对象对应的属性中。

9、根据根据第6步解析的spring.main.web-application-type配置值进行判断是否需要重新变换环境对象。如果spring.main.web-application-type有配置的话。

10、解除前面的MutablePropertySources封装

11、整个环境对象装配完成。

下面是前面章节涉及的顶层调用代码:

private ConfigurableEnvironment prepareEnvironment(SpringApplicationRunListeners listeners,
                                       ApplicationArguments applicationArguments) {


   //1、根据SpringApplication对象webApplicationType属性实例化环境对象StandardServletEnvironment。
   //2、通过环境对象构造器的方式初始化了所有系统环境变量、JDK系统变量、Servlet上下文参数、Servlet配置参数等信息。这些初始化的数据通过Map数据KV结构存根对象(StubPropertySource),按固定的顺序保存到CopyOnWriteArrayList集合中,保存的数据结构类似List<Map<String, Object>>,其中里面的Map的key为环境类型,value为对应环境的信息封装对象。
   ConfigurableEnvironment environment = getOrCreateEnvironment();


   //3、实例化ApplicationConversionService对象,通过构造器方式默认初始化了130多个类型转换器已经格式化组件。
   //4、通过单独函数的方式解析main方法参数,如果有的话。
   //5、尝试解析Active Profiles配置,实际这里不会解析到。
   configureEnvironment(environment, applicationArguments.getSourceArgs());


   //6、将MutablePropertySources封装为ConfigurationPropertySourcesPropertySource
   ConfigurationPropertySources.attach(environment);


   //7、发布环境对象准备完成事件,这一步很关键,也是本章继续分析的重点,因为整个application.properties或application.yml配置文件就是通过事件回调的方式去解析的。
   listeners.environmentPrepared(environment);


   //8、绑定spring.main开头的配置到SpringApplication对象对应的属性中。
   bindToSpringApplication(environment);


   if (!this.isCustomEnvironment) {
      //9、根据根据第6步解析的spring.main.web-application-type配置值进行判断是否需要重新变换环境对象。如果spring.main.web-application-type有配置的话。
      environment = new EnvironmentConverter(getClassLoader()).convertEnvironmentIfNecessary(environment,
            deduceEnvironmentClass());
   }


   //10、解除前面的MutablePropertySources封装
   ConfigurationPropertySources.attach(environment);


   //11、整个环境对象装配完成。
   return environment;
}

再谈事件监听器

我们本章重点分析第7步骤,其它步骤配合前面的《SringBoot到Spring源码分析之Environment环境装配》章节有详细的关键代码截图。第7步骤主要是获取环境准备完成事件回调通知。获取事件监听器原理是读取classpath下所有的META-INF/spring.factories文件,根据事件监听器接口信息匹配逻辑如下:

1、如果实现SmartApplicationListener接口:通过接口全路径名称 + 调用SmartApplicationListener#supportsEventType子类实现方法 + 调用SmartApplicationListener#supportsSourceType子类实现方法结果均为true。

2、如果没有实现SmartApplicationListener接口:直接判断是否实现了传入的接口来匹配,也就是说判断是否是ApplicationListener接口的子类,例如这里的ApplicationListener接口。如果直接实现ApplicationListener接口而没有实现SmartApplicationListener接口的方式,在实现方法中需要自己去判断事件类型来处理相应的事件。例如像下面这样:

@Override
public void onApplicationEvent(ApplicationEvent event) {
   if (event instanceof ApplicationStartingEvent) {
      onApplicationStartingEvent((ApplicationStartingEvent) event);
   }
   else if (event instanceof ApplicationEnvironmentPreparedEvent) {
      onApplicationEnvironmentPreparedEvent((ApplicationEnvironmentPreparedEvent) event);
   }
   else if (event instanceof ApplicationPreparedEvent) {
      onApplicationPreparedEvent((ApplicationPreparedEvent) event);
   }
   else if (event instanceof ContextClosedEvent
         && ((ContextClosedEvent) event).getApplicationContext().getParent() == null) {
      onContextClosedEvent();
   }
   else if (event instanceof ApplicationFailedEvent) {
      onApplicationFailedEvent();
   }
}


ApplicationEnvironmentPreparedEvent事件监听器

下面是我们通过断点看到找到Springboot web起步依赖默认的环境准备完成事件监听器如下:


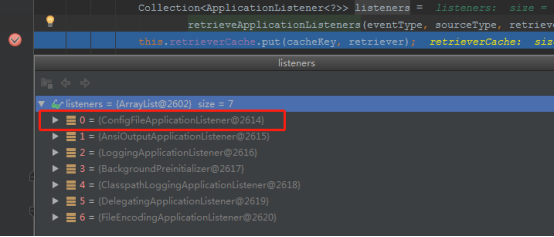
我们通过断点看到的信息是已经通过Order接口排好序之后的,执行过程也是根据这个顺序来的。下面简单介绍下这默认7个事件监听器:

  • ConfigFileApplicationListener: 解析application.properties/yml以及application-profile.properties/yml配置文件核心事件监听器,也是本章的重点分析对象。

  • AnsiOutputApplicationListener: 根据spring.output.ansi.enabled配置值配置日志打印色彩模式。

  • LoggingApplicationListener: 解析application.properties/yml配置文件logging开头的配置,并将配置信息初始化日志到系统。

  • BackgroundPreinitializer:这个监听器不处理当前的事件。

  • ClasspathLoggingApplicationListener:纯日志打印,启动过程中控制台debug级别的日志关键字“Application started with classpath”相关的信息就是这个监听器打印的。

  • DelegatingApplicationListener:application.properties/yml配置文件context.listener.classes配置的自定义监听器的代理执行者。主要工作是执行自定义配置的事件监听器。

  • FileEncodingApplicationListener:将application.properties/yml配置文件spring.mandatory-file-encoding配置跟System.getProperty("file.encoding")值进行忽略大小写匹配,如果匹配不上,直接报错(throw new IllegalStateException("The Java Virtual Machine has not been configured to use the desired default character encoding (" + desired + ")."))。


ConfigFileApplicationListener监听器源码分析

通过上面的列举可以看出最核心的监听器便是ConfigFileApplicationListener。下面开始核心分析这个类关键源码:

public class ConfigFileApplicationListener implements EnvironmentPostProcessor, SmartApplicationListener, Ordered {


   @Override
   public void onApplicationEvent(ApplicationEvent event) {
      if (event instanceof ApplicationEnvironmentPreparedEvent) {
         //环境准备完成事件,开始解析application.properties配置文件
         onApplicationEnvironmentPreparedEvent((ApplicationEnvironmentPreparedEvent) event);
      }
      
      //暂不关注这里
      if (event instanceof ApplicationPreparedEvent) {
         onApplicationPreparedEvent(event);
      }
   }


   private void onApplicationEnvironmentPreparedEvent(ApplicationEnvironmentPreparedEvent event) {
      //从META-INF/spring.factories缓存获取EnvironmentPostProcessor配置的实现类
      List<EnvironmentPostProcessor> postProcessors = loadPostProcessors();
      //把当前类对象也添加进去
      postProcessors.add(this);
      //排序
      AnnotationAwareOrderComparator.sort(postProcessors);
      for (EnvironmentPostProcessor postProcessor : postProcessors) {
         //调用postProcessEnvironment方法处理
        postProcessor.postProcessEnvironment(event.getEnvironment(), event.getSpringApplication());
      }
   }


}

配合断点可以跟踪到SpringBoot Web起步依赖中默认配置的EnvironmentPostProcessor实现类有3个,将ConfigFileApplicationListener自己也添加进去后一共有4个,排序后截图如下:

下面我们按顺序分析每个EnvironmentPostProcessor#postProcessEnvironment方法子类的实现逻辑:

SystemEnvironmentPropertySourceEnvironmentPostProcessor源码分析:

关键源码如下:

public class SystemEnvironmentPropertySourceEnvironmentPostProcessor implements EnvironmentPostProcessor, Ordered {


   @Override
   public void postProcessEnvironment(ConfigurableEnvironment environment, SpringApplication application) {
      //public static final String SYSTEM_ENVIRONMENT_PROPERTY_SOURCE_NAME = "systemEnvironment";
      String sourceName = StandardEnvironment.SYSTEM_ENVIRONMENT_PROPERTY_SOURCE_NAME;
      //从MutablePropertySources对象CopyOnWriteArrayList类型集合中通过找到name为systemEnvironment存根对象StubPropertySource
      PropertySource<?> propertySource = environment.getPropertySources().get(sourceName);
      if (propertySource != null) {
         //将存根对象替换为实际能够工作的PropertySource
         replacePropertySource(environment, sourceName, propertySource);
      }
   }


   @SuppressWarnings("unchecked")
   private void replacePropertySource(ConfigurableEnvironment environment, String sourceName,
         PropertySource<?> propertySource) {
      //拿出实际变量数据
      Map<String, Object> originalSource = (Map<String, Object>) propertySource.getSource();
      //实例化实际能够工作的PropertySource OriginAwareSystemEnvironmentPropertySource
      SystemEnvironmentPropertySource source = new OriginAwareSystemEnvironmentPropertySource(sourceName,
            originalSource);
      //替换
      environment.getPropertySources().replace(sourceName, source);
   }


...省略其它非关键源码
}

核心逻辑:

1、将name为systemEnvironment的系统环境变量存根占位符StubPropertySource对象替换为OriginAwareSystemEnvironmentPropertySource对象。

备注:StubPropertySource对象的getProperty(String name)固定返回null,也就是说StubPropertySource对象是不能正常工作的,前面只是为了定义优先级顺序临时使用了一个不能工作的占位符对象,这里把它替换为可以正常工作的对象。


SpringApplicationJsonEnvironmentPostProcessor源码分析

关键源码如下:

public class SpringApplicationJsonEnvironmentPostProcessor implements EnvironmentPostProcessor, Ordered {


   @Override
   public void postProcessEnvironment(ConfigurableEnvironment environment, SpringApplication application) {
      //拿出前面加载的所有类型参数/属性数据
      MutablePropertySources propertySources = environment.getPropertySources();
      //流式过滤处理,处理逻辑:
      //  1、获取属性name为spring.application.json或SPRING_APPLICATION_JSON的值,封装为JsonPropertyValue对象
      //  2、对JsonPropertyValue对象非null判断
      //  3、对JsonPropertyValue对象的
      propertySources.stream().map(JsonPropertyValue::get).filter(Objects::nonNull).findFirst()
            .ifPresent((v) -> processJson(environment, v));
   }


   private void processJson(ConfigurableEnvironment environment, JsonPropertyValue propertyValue) {
      //根据引入的JSON解析依赖找到可用的JSON解析工具类,例如:JacksonJsonParser
      JsonParser parser = JsonParserFactory.getJsonParser();
      //将json字符串转为Map
      Map<String, Object> map = parser.parseMap(propertyValue.getJson());
      if (!map.isEmpty()) {
         //将扁平化后的参数保存到环境对象CopyOnWriteArrayList集合中,name:spring.application.json,value:内部类JsonPropertySource
        //flatten作用是将Map中值是集合或Map类的转为扁平化,
        // 例如:     map.put("zkNode","10.73.123.338,10.73.123.339")
        // 扁平化后:  map.put("zkNode[0]","10.73.123.338")
        //           map.put("zkNode[1]","10.73.123.339")
         addJsonPropertySource(environment, new JsonPropertySource(propertyValue, flatten(map)));
      }
   }
private static class JsonPropertySource extends MapPropertySource implements OriginLookup<String> {


   private final JsonPropertyValue propertyValue;


   JsonPropertySource(JsonPropertyValue propertyValue, Map<String, Object> source) {
      super("spring.application.json", source);
      this.propertyValue = propertyValue;
   }


   @Override
   public Origin getOrigin(String key) {
      return this.propertyValue.getOrigin();
   }


}


...省略其它非关键源码
}

核心逻辑概况:

1、从环境对象中获取name为spring.application.json或SPRING_APPLICATION_JSON的值。

2、将json字符串值解析到Map中,并进行扁平化处理。

3、将得到的Map保存到环境对象中,其中name为spring.application.json,value为:内部类SpringApplicationJsonEnvironmentPostProcessor$JsonPropertySource。


CloudFoundryVcapEnvironmentPostProcessor源码分析

关键源码如下:

public class CloudFoundryVcapEnvironmentPostProcessor
      implements EnvironmentPostProcessor, Ordered, ApplicationListener<ApplicationPreparedEvent> {


   @Override
   public void postProcessEnvironment(ConfigurableEnvironment environment, SpringApplication application) {
      //通过判断是否存在变量为VCAP_APPLICATION或VCAP_SERVICES来识别是否需要激活Cloud Foundry平台
      //如果激活则解析Cloud Foundry平台相关配置,保存到环境对象中
      if (CloudPlatform.CLOUD_FOUNDRY.isActive(environment)) {
         Properties properties = new Properties();
         JsonParser jsonParser = JsonParserFactory.getJsonParser();
         addWithPrefix(properties, getPropertiesFromApplication(environment, jsonParser), "vcap.application.");
         addWithPrefix(properties, getPropertiesFromServices(environment, jsonParser), "vcap.services.");
         MutablePropertySources propertySources = environment.getPropertySources();
         if (propertySources.contains(CommandLinePropertySource.COMMAND_LINE_PROPERTY_SOURCE_NAME)) {
            propertySources.addAfter(CommandLinePropertySource.COMMAND_LINE_PROPERTY_SOURCE_NAME,
                  new PropertiesPropertySource("vcap", properties));
         }
         else {
            propertySources.addFirst(new PropertiesPropertySource("vcap", properties));
         }
      }
   }


...省略其它非关键源码
}

核心逻辑概况:

1、通过判断是否存在变量为VCAP_APPLICATION或VCAP_SERVICES来识别是否需要激活Cloud Foundry平台。

2、如果激活则解析Cloud Foundry平台相关配置,保存到环境对象中。name为vcap,value为Properties对象。

ConfigFileApplicationListener#postProcessEnvironment源码分析

这个类方法是本章重点,这个类方法核心工作是解析application.properties/yml配置文件。在分析配置文件解析源码前,我们先回顾一下springboot几个关键配置的使用规则:

  • spring.config.name:如果你不喜欢application.properties作为配置文件名称,可以通过这个参数重新指定一个文件名称。使用方式如下:

java -jar myproject.jar --spring.config.name=myproject

这样解析配置时就会尝试去找myproject.properties或myproject.yml配置文件了。官方参考文档地址:

https://docs.spring.io/spring-boot/docs/current/reference/html/spring-boot-features.html#boot-features-external-config-application-property-files


  • spring.config.location:springboot默认查找配置文件目录列表顺序如下:

file:./config/


file:./


classpath:/config/


classpath:/

通过spring.config.location配置可以自行指定查找目录以及顺序,官方参考文档地址参考前面给出的。

  • spring.config.additional-location:在默认查找配置文件目录列表顺序基础上新增自己的目录列表顺序,这个新增列表顺序优先级高于默认的列表顺序,官方参考文档地址参考前面给出的。


  • spring.profiles.active:告诉springboot当前激活的profile是哪个环境,通过这个值可以找到特定环境配置文application-{profile}.properties/yml,如果没用配置默认为default(application-default.properties/yml)。

  • spring.profiles.include:指定要包含的其它profile文件,这样会把除了spring.profiles.active以外其它相关的application-{spring.profiles.include}.properties包含进来。


  • 除了上面给出的通过配置文件的方式配置外,还可以通过实例化SpringApplication设置profile相关的配置,这种属于编程式设置配置。


备注:相同配置项时,application-{profile}.properties配置文件优先级高于application.properties。

简单了解关键使用规则后,我们开始思考一个问题,如果让我们自己去写这块代码,大概的思路应该是怎样的的?下面笔者给出个人能想到的大概逻辑:

1、首先判定是否配置spring.config.location,如果配置了则获取解析这个配置值,否则解析默认的目录得到一个字符串泛型有序集合,集合元素为相对路径。

2、判定是否配置spring.config.additional-location,如果配置了则添加了前面得到的有序集合的最前面,这里建议使用LinkedList,因为它实现队列接口,可以通过操作队列的方式操作顺序。

3、判定是否配置了spring.config.name,如果配置了则获取并解析配置值,否则使用默认值application,然后拼接到前面解析的集合中,得到配置文件搜索路径集合。

4、由于properties和yml后缀配置文件文件格式不一样,所以它们解析逻辑是不一致的,所以需要根据查找的配置文件后缀进行不同解析类解析,分开两个解析类。

5、解析完application.properties配置文件后再根据spring.profiles.active和spring.profiles.include的配置集合继续解析其它的application-{profile}.properties配置文件。

6、解析过程要注意相同配置项带profile特定配置文件优先级高于application.properties。

7、将解析好的配置信息保存到Map结构的PropertySource中,保存到环境对象PropertySources属性中。

这里说明下当前分析的springboot版本为2.1.0.RELEASE,带着思路在分析源码过程中验证自己的逻辑,下面关键源码如下:

@Override
public void postProcessEnvironment(ConfigurableEnvironment environment,
      SpringApplication application) {
   addPropertySources(environment, application.getResourceLoader());
}


protected void addPropertySources(ConfigurableEnvironment environment,
      ResourceLoader resourceLoader) {
//添加一个随机数据源,配置文件可以通过${random.*}的方式获取不同类型随机值
   RandomValuePropertySource.addToEnvironment(environment);
//实例化加载对象,调用load加载方法
   new Loader(environment, resourceLoader).load();
}


//构造器逻辑
Loader(ConfigurableEnvironment environment, ResourceLoader resourceLoader) {
   this.environment = environment;
//实例化占位符
   this.placeholdersResolver = new PropertySourcesPlaceholdersResolver(
         this.environment);
//实例化资源加载器
   this.resourceLoader = (resourceLoader != null) ? resourceLoader
         : new DefaultResourceLoader();
//获取配置的配置资源加载器,这里默认获取到properties、yml两个格式的加载器
   this.propertySourceLoaders = SpringFactoriesLoader.loadFactories(
         PropertySourceLoader.class, getClass().getClassLoader());
}


public void load() {
   this.profiles = new LinkedList<>();
   this.processedProfiles = new LinkedList<>();
   this.activatedProfiles = false;
   this.loaded = new LinkedHashMap<>();
//初始化profile,这里两个逻辑分支:1、获取前面环境对象中是否存在profile相关配置,如果存在获取否则初始化默认的profile,其中会初始化一个null占位符
   initializeProfiles();
   while (!this.profiles.isEmpty()) {
      Profile profile = this.profiles.poll();
      if (profile != null && !profile.isDefaultProfile()) {
         addProfileToEnvironment(profile.getName());
      }
    //加载配置,注意这里传入的filterFactory以及consumer消费者,后面用到时再回来分析
   //这里会将所有加载的配置保存到Loader类的Map<Profile, MutablePropertySources> loaded属性中
load(profile, this::getPositiveProfileFilter,
            addToLoaded(MutablePropertySources::addLast, false));
    //记录已经处理过的profile  
this.processedProfiles.add(profile);
   }


//将处理过的active profile集合设置到环境对象中this.environment.setActiveProfiles(names);
   resetEnvironmentProfiles(this.processedProfiles);
//这里load前面已经处理过,因为前面固定set了个null到this.profiles中
   load(null, this::getNegativeProfileFilter,
         addToLoaded(MutablePropertySources::addFirst, true));
   
//将解析好的Loader类的Map<Profile, MutablePropertySources> loaded属性添加到环境对象中
addLoadedPropertySources();
}


private void initializeProfiles() {
   // The default profile for these purposes is represented as null. We add it
   // first so that it is processed first and has lowest priority.
  //这里null目前分析是个位置占位符,但个人觉得这种设计很不清晰,不过这行代码上面专门给出了注释说明
this.profiles.add(null);
   Set<Profile> activatedViaProperty = getProfilesActivatedViaProperty();
   this.profiles.addAll(getOtherActiveProfiles(activatedViaProperty));
   // Any pre-existing active profiles set via property sources (e.g.
   // System properties) take precedence over those added in config files.
   addActiveProfiles(activatedViaProperty);
   if (this.profiles.size() == 1) { // only has null profile
      for (String defaultProfileName : this.environment.getDefaultProfiles()) {
         Profile defaultProfile = new Profile(defaultProfileName, true);
         this.profiles.add(defaultProfile);
      }
   }
}


private void load(Profile profile, DocumentFilterFactory filterFactory,
      DocumentConsumer consumer) {
//getSearchLocations获取spring.config.additional-location和spring.config.location配置,如果没有则使用默认的目录顺序
//遍历配置的或默认的配置文件查找目录
   getSearchLocations().forEach((location) -> {


      boolean isFolder = location.endsWith("/");


//getSearchNames逻辑是获取spring.config.name配置,如果没有则使用默认名称application
      Set<String> names = isFolder ? getSearchNames() : NO_SEARCH_NAMES;


//遍历每一个spring.config.name配置,如果有的话,否则只有一个元素,默认值application,然后调用load进行加载
      names.forEach(
            (name) -> load(location, name, profile, filterFactory, consumer));
   });
}


private void load(String location, String name, Profile profile,
      DocumentFilterFactory filterFactory, DocumentConsumer consumer) {
//如果前面location不是目录而是直接指定到具体配置文件名称的话,这里的name就为null,就会进入这个判断
   if (!StringUtils.hasText(name)) {
//遍历properties和yml格式加载器
      for (PropertySourceLoader loader : this.propertySourceLoaders) {
    //匹配文件后缀是否符合,符合则加载     
if (canLoadFileExtension(loader, location)) {
            load(loader, location, profile,
                  filterFactory.getDocumentFilter(profile), consumer);
            return;
         }
      }
   }


//如果location配置是目录,则走这里逻辑
   Set<String> processed = new HashSet<>();
//也是一样遍历properties和yml格式加载器
   for (PropertySourceLoader loader : this.propertySourceLoaders) {
    //然后再遍历每个加载器支持的后缀数组,比如yml支持解析yml和yaml两个后缀  
for (String fileExtension : loader.getFileExtensions()) {
//如果没有处理过这个文件后缀
         if (processed.add(fileExtension)) {
//加载处理,这里最终会走前面的load方法,所有我们只分析这个方法
            loadForFileExtension(loader, location + name, "." + fileExtension,
                  profile, filterFactory, consumer);
         }
      }
   }
}


private void loadForFileExtension(PropertySourceLoader loader, String prefix,
      String fileExtension, Profile profile,
      DocumentFilterFactory filterFactory, DocumentConsumer consumer) {
//这里通过前面传入的filterFactory获取2个DocumentFilter ,源码在后面给出
   DocumentFilter defaultFilter = filterFactory.getDocumentFilter(null);
   DocumentFilter profileFilter = filterFactory.getDocumentFilter(profile);
//如果不是前面初始化时null占位符,则判定为带profile特定配置文件
   if (profile != null) {
      // Try profile-specific file & profile p in profile file (gh-340)
//拼接为application-{profile}.properties类似的格式文件名
      String profileSpecificFile = prefix + "-" + profile + fileExtension;


//加载application-default.properties配置文件
      load(loader, profileSpecificFile, profile, defaultFilter, consumer);
//加载application-{profile}.properties配置文件
      load(loader, profileSpecificFile, profile, profileFilter, consumer);
      // Try profile specific ps in files we've already processed
      //重新加载一遍前面处理过的profile配置文件,这块还没搞清楚为啥这么做,初步猜测是处理相同配置项优先级的问题吧
for (Profile processedProfile : this.processedProfiles) {
         if (processedProfile != null) {
            String previouslyLoaded = prefix + "-" + processedProfile
                  + fileExtension;
            load(loader, previouslyLoaded, profile, profileFilter, consumer);
         }
      }
   }
   // Also try the profile-specific p (if any) of the normal file
//解析非profile配置文件
   load(loader, prefix + fileExtension, profile, profileFilter, consumer);
}


private void load(PropertySourceLoader loader, String location, Profile profile,
      DocumentFilter filter, DocumentConsumer consumer) {
   try {
//尝试获取配置文件
      Resource resource = this.resourceLoader.getResource(location);
      if (resource == null || !resource.exists()) {
         if (this.logger.isTraceEnabled()) {
            StringBuilder description = getDescription(
                  "Skipped missing config ", location, resource, profile);
            this.logger.trace(description);
         }
         return;
      }
      if (!StringUtils.hasText(
            StringUtils.getFilenameExtension(resource.getFilename()))) {
         if (this.logger.isTraceEnabled()) {
            StringBuilder description = getDescription(
                  "Skipped empty config extension ", location, resource,
                  profile);
            this.logger.trace(description);
         }
         return;
      }
      String name = "applicationConfig: [" + location + "]";
//解析为Document集合,相关源码后面给出
      List<Document> documents = loadDocuments(loader, name, resource);
      if (CollectionUtils.isEmpty(documents)) {
         if (this.logger.isTraceEnabled()) {
            StringBuilder description = getDescription(
                  "Skipped unloaded config ", location, resource, profile);
            this.logger.trace(description);
         }
         return;
      }
      List<Document> loaded = new ArrayList<>();
      for (Document document : documents) {
//根据前面传入的过滤工厂判断是否执行
         if (filter.match(document)) {
//保存到this.profiles
            addActiveProfiles(document.getActiveProfiles());
            addIncludedProfiles(document.getIncludeProfiles());
            loaded.add(document);
         }
      }
      Collections.reverse(loaded);
      if (!loaded.isEmpty()) {
//这里主要处理解析好的配置属性,传个消费者消费,
// 消费逻辑就是将属性添加到Loader类的Map<Profile, MutablePropertySources> loaded属性中
         loaded.forEach((document) -> consumer.accept(profile, document));
         if (this.logger.isDebugEnabled()) {
            StringBuilder description = getDescription("Loaded config file ",
                  location, resource, profile);
            this.logger.debug(description);
         }
      }
   }
   catch (Exception ex) {
      throw new IllegalStateException("Failed to load property "
            + "source from location '" + location + "'", ex);
   }
}


private List<Document> loadDocuments(PropertySourceLoader loader, String name,
        Resource resource) throws IOException {
      DocumentsCacheKey cacheKey = new DocumentsCacheKey(loader, resource);
      List<Document> documents = this.loadDocumentsCache.get(cacheKey);
      if (documents == null) {
      //核心是这里d调用的相关后缀格式解析器,例如PropertiesPropertySourceLoader
        List<PropertySource<?>> loaded = loader.load(name, resource);
        documents = asDocuments(loaded);
        this.loadDocumentsCache.put(cacheKey, documents);
      }
      return documents;
    }
    
    
    //下面是PropertiesPropertySourceLoader 源码
public class PropertiesPropertySourceLoader implements PropertySourceLoader {


  private static final String XML_FILE_EXTENSION = ".xml";


  @Override
  public String[] getFileExtensions() {
  //支持解析的格式
    return new String[] { "properties", "xml" };
  }


  @Override
  public List<PropertySource<?>> load(String name, Resource resource)
      throws IOException {
    Map<String, ?> properties = loadProperties(resource);
    if (properties.isEmpty()) {
      return Collections.emptyList();
    }
    return Collections
        .singletonList(new OriginTrackedMapPropertySource(name, properties));
  }


  @SuppressWarnings({ "unchecked", "rawtypes" })
  private Map<String, ?> loadProperties(Resource resource) throws IOException {
    String filename = resource.getFilename();
    if (filename != null && filename.endsWith(XML_FILE_EXTENSION)) {
      return (Map) PropertiesLoaderUtils.loadProperties(resource);
    }
    //委托给OriginTrackedPropertiesLoader去解析
    //OriginTrackedPropertiesLoader(resource).load()有兴趣自行分析
    return new OriginTrackedPropertiesLoader(resource).load();
  }


}

后面给出前面提到的filterFactory以及消费者源码:

private DocumentFilter getPositiveProfileFilter(Profile profile) {
     //返回匿名函数
      return (Document document) -> {
      //主要逻辑是根据不同profile参数判断profile是否正确
        if (profile == null) {
          return ObjectUtils.isEmpty(document.getProfiles());
        }
        return ObjectUtils.containsElement(document.getProfiles(),
            profile.getName())
            && this.environment
                .acceptsProfiles(Profiles.of(document.getProfiles()));
      };
    }
    
    private DocumentConsumer addToLoaded(
        BiConsumer<MutablePropertySources, PropertySource<?>> addMethod,
        boolean checkForExisting) {
        //返回匿名函数
      return (profile, document) -> {
        if (checkForExisting) { // false
          for (MutablePropertySources merged : this.loaded.values()) {
            if (merged.contains(document.getPropertySource().getName())) {
              return;
            }
          }
        }
        //从解析好的document.getPropertySource()合并添加到this.loaded中
        MutablePropertySources merged = this.loaded.computeIfAbsent(profile,
            (k) -> new MutablePropertySources());
        addMethod.accept(merged, document.getPropertySource());
      };
    }
    
    public void addLast(PropertySource<?> propertySource) {
    removeIfPresent(propertySource);
    this.propertySourceList.add(propertySource);
  }

总结:这里核心逻辑跟我们前面推导的类似,但是有一点个人还没完全搞清楚,就是前面多个重复调用的load方法,目前猜测是处理相同配置项的优先级问题,但还没完全证实,如果后面有清晰的目的思路再重新写一遍来解释,目前我们只需要了解大致思路,保证如果让我们去写这块代码也是有思路去实现的即可。

长按扫码关注

Java软件编程之家

  • 6
    点赞
  • 16
    收藏
    觉得还不错? 一键收藏
  • 1
    评论

“相关推荐”对你有帮助么?

  • 非常没帮助
  • 没帮助
  • 一般
  • 有帮助
  • 非常有帮助
提交
评论 1
添加红包

请填写红包祝福语或标题

红包个数最小为10个

红包金额最低5元

当前余额3.43前往充值 >
需支付:10.00
成就一亿技术人!
领取后你会自动成为博主和红包主的粉丝 规则
hope_wisdom
发出的红包
实付
使用余额支付
点击重新获取
扫码支付
钱包余额 0

抵扣说明:

1.余额是钱包充值的虚拟货币,按照1:1的比例进行支付金额的抵扣。
2.余额无法直接购买下载,可以购买VIP、付费专栏及课程。

余额充值