


参考资料:
Camera2官方API
Camera 官方API
Camera API 指南
Android.Camera2相机超详细讲解
Android实战技巧之三十三:android.hardware.camera2使用指南
需求
现在的手机拍照的质量越来越好了,照片也越来越大。这样给开发就带来了一个苦恼,就是需要上传的图片文件太大,而且下载也太耗流量了。所以我们需要控制一下拍摄的照片的大小,而且还有一点就是一些APP或应用场景对图片的宽高比和大小都是有要求的,比如1:1、2:1、大小不超过20kb、1M这样的要求,但是让用户使用自己手机拍照后,再去修图实在太麻烦了(不是每个人都会安装美图秀秀之类的修图软件的O(∩_∩)O~~~,而且增加了操作步骤还是跨应用的,不够优雅),所以我们现在就可以学习怎么在自己的应用中打开自己的自定义相机,然后在拍照的时候配置我们需要的图片的大小和尺寸。
如果需要使用Android系统自带的相机拍摄照片或者记录视频,可以查看这里Taking Photos Simply 和 Recording Videos Simply
官方API
我们使用android.hardware.camera2(Android5.0,API21及以上)来实现自定义相机的功能,不使用Camera(API21以下,不包括API21)。
实现
谷歌demo参考 —— Android Camera2 Basic Sample
1、先设置权限
请求相机权限
<uses-permission android:name="android.permission.CAMERA" />如果你的应用用到了相机,又不想让GooglePlay阻止你安装到哪些没有相机的Android应用上,你就需要加上下面这句
<uses-feature android:name="android.hardware.camera" android:required="false" />关于uses-feature的使用可以看官方介绍 ,或者自行百度“AndroidManifest.xml清单中uses-feature的使用”
如果你要保存图片到SD卡,请加上下面的权限
<uses-permission android:name="android.permission.WRITE_EXTERNAL_STORAGE" />如果要用自定义的相机去捕获视频的话,还需要下面的权限
<uses-permission android:name="android.permission.RECORD_AUDIO" />如果你想在你拍摄的照片上加上位置信息,你还需要加上下面的权限
<uses-permission android:name="android.permission.ACCESS_FINE_LOCATION" />
<!-- Needed only if your app targets Android 5.0 (API level 21) or higher. -->
<uses-feature android:name="android.hardware.location.gps" />
2、Camera2的使用
camera2的使用可以参考camera2的API
camera2这个包通过摄像头设备不间断的捕获图像,我们可以通过SurfaceView或TextureView(通过其SurfaceTexture)来预览这些图像,然后通过发送(拍照)请求去捕获单个的帧生成图片,通过发送摄影(开始、结束)请求去捕获一定时间段内的帧(图像)生成视频。
参考博客中有camera2执行拍照的示意流程图,如下:
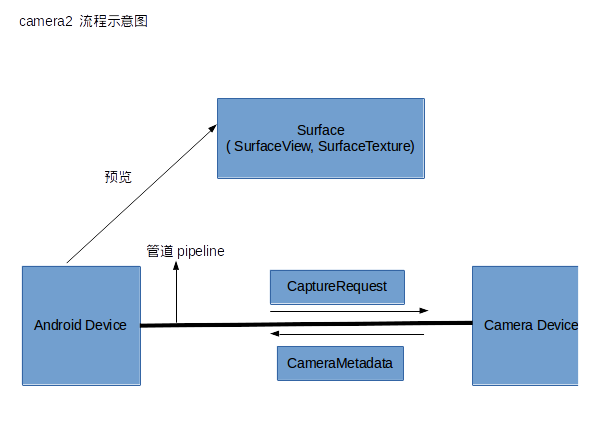
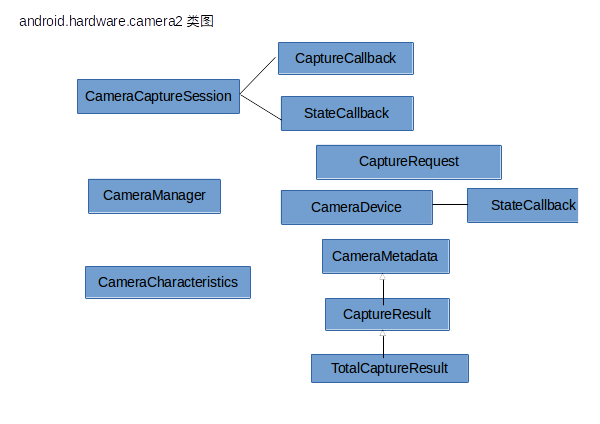
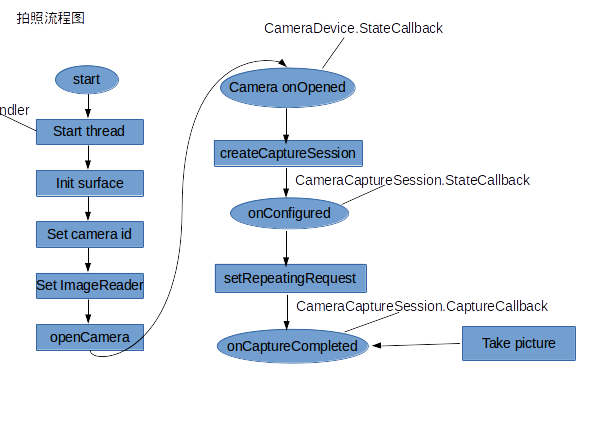
这些图只是为了方便自己理解,各位码友如果要看这些图的介绍可以去这两篇blog
Android.Camera2相机超详细讲解
Android实战技巧之三十三:android.hardware.camera2使用指南
3、写代码
3-1、自定义TextureView
定义一个自适应的TextureView(从官方demo中copy的),在布局文件中使用
public class AutoFitTextureView extends TextureView {

    private int mRatioWidth = 0;
    private int mRatioHeight = 0;

    public AutoFitTextureView(Context context) {
        this(context, null);
    }

    public AutoFitTextureView(Context context, AttributeSet attrs) {
        this(context, attrs, 0);
    }

    public AutoFitTextureView(Context context, AttributeSet attrs, int defStyle) {
        super(context, attrs, defStyle);
    }

    /**
     * Sets the aspect ratio for this view. The size of the view will be measured based on the ratio
     * calculated from the parameters. Note that the actual sizes of parameters don't matter, that
     * is, calling setAspectRatio(2, 3) and setAspectRatio(4, 6) make the same result.
     *
     * @param width  Relative horizontal size
     * @param height Relative vertical size
     */
    public void setAspectRatio(int width, int height) {
        if (width < 0 || height < 0) {
            throw new IllegalArgumentException("Size cannot be negative.");
        }
        mRatioWidth = width;
        mRatioHeight = height;
        requestLayout();
    }

    @Override
    protected void onMeasure(int widthMeasureSpec, int heightMeasureSpec) {
        super.onMeasure(widthMeasureSpec, heightMeasureSpec);
        int width = MeasureSpec.getSize(widthMeasureSpec);
        int height = MeasureSpec.getSize(heightMeasureSpec);
        if (0 == mRatioWidth || 0 == mRatioHeight) {
            setMeasuredDimension(width, height);
        } else {
            if (width < height * mRatioWidth / mRatioHeight) {
                setMeasuredDimension(width, width * mRatioHeight / mRatioWidth);
            } else {
                setMeasuredDimension(height * mRatioWidth / mRatioHeight, height);
            }
        }
    }

}
3-2、定义相机界面
定义一个ZCameraActivity作为相机界面,布局文件如下
<?xml version="1.0" encoding="utf-8"?>
<RelativeLayout xmlns:android="http://schemas.android.com/apk/res/android"
    xmlns:app="http://schemas.android.com/apk/res-auto"
    xmlns:tools="http://schemas.android.com/tools"
    android:layout_width="match_parent"
    android:layout_height="match_parent"
    tools:context="com.cnbs.camera2demo.ZCameraActivity">

    <com.cnbs.camera2demo.AutoFitTextureView
        android:id="@+id/texture"
        android:layout_width="wrap_content"
        android:layout_height="wrap_content"
        android:layout_alignParentStart="true"
        android:layout_alignParentTop="true" />

    <FrameLayout
        android:id="@+id/control_top"
        android:layout_width="match_parent"
        android:layout_height="20dp"
        android:layout_alignParentTop="true"
        android:layout_alignParentStart="true"
        android:background="@color/colorGray">

        <ImageView
            android:id="@+id/camera_flash"
            android:layout_width="20dp"
            android:layout_height="20dp"
            android:layout_marginLeft="20dp"
            android:layout_gravity="start|center_vertical"
            android:src="@mipmap/camera_flash_off" />

        <TextView
            android:id="@+id/quality_picture"
            android:layout_width="40dp"
            android:layout_height="20dp"
            android:drawableEnd="@mipmap/arrow_down"
            android:layout_gravity="center"
            android:gravity="center"
            android:text="100 "
            android:textSize="12dp"
            android:textColor="@color/colorWhite"
            android:src="@mipmap/camera_flash_off" />

        <TextView
            android:id="@+id/rate_picture"
            android:layout_width="40dp"
            android:layout_height="20dp"
            android:drawableEnd="@mipmap/arrow_down"
            android:layout_gravity="end|center_vertical"
            android:layout_marginRight="20dp"
            android:gravity="center"
            android:text="1:1 "
            android:textSize="12dp"
            android:textColor="@color/colorWhite"
            android:src="@mipmap/camera_flash_off" />

    </FrameLayout>

    <FrameLayout
        android:id="@+id/control_bottom"
        android:layout_width="match_parent"
        android:layout_height="60dp"
        android:layout_alignParentBottom="true"
        android:layout_alignParentStart="true"
        android:background="@color/colorGray">

        <ImageView
            android:id="@+id/pictures"
            android:layout_width="40dp"
            android:layout_height="40dp"
            android:layout_marginLeft="20dp"
            android:layout_gravity="start|center_vertical"
            android:src="@mipmap/picture_default" />

        <ImageView
            android:id="@+id/take_picture"
            android:layout_width="40dp"
            android:layout_height="40dp"
            android:layout_gravity="center"
            android:src="@mipmap/picasa_off" />

        <ImageView
            android:id="@+id/b_f_camera"
            android:layout_width="40dp"
            android:layout_height="40dp"
            android:layout_marginRight="20dp"
            android:layout_gravity="end|center_vertical"
            android:src="@mipmap/B_amp_F_camera" />
    </FrameLayout>

</RelativeLayout>
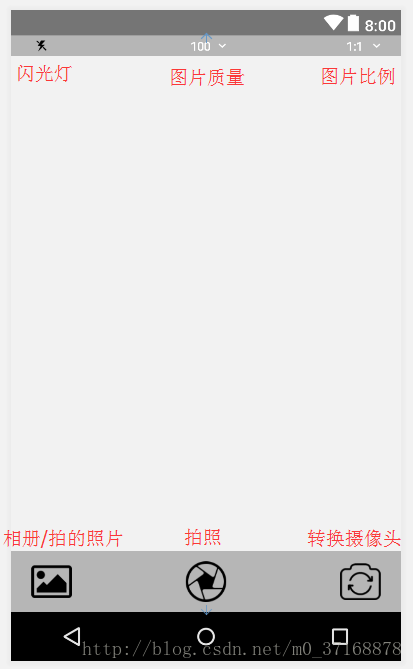
UI效果如图:
3-3、打开相机
补充
文中涉及到一些可能不常用的类、方法或者资源,都在这里补充说明一下。
1、HandlerThread
我们对Handler 和 Thread都比较熟悉了,一般都是用来处理子线程和主线程之间的通信问题;但是HandlerThread我们用到的比较少, 可能不太熟悉,其实 HandlerThread 是谷歌官方提供的用来处理子线程与子线程之间的通信问题的类。特点是:
- HandlerThread本质上是一个线程类,它继承了Thread;
- HandlerThread有自己的内部Looper对象,可以进行looper循环;
- 通过获取HandlerThread的looper对象传递给Handler对象,可以在handleMessage方法中执行异步任务。
- 创建HandlerThread后必须先调用HandlerThread.start()方法,Thread会先调用run方法,创建Looper对象。
参考文章:
Thread、Handler和HandlerThread关系何在?
Android 多线程之HandlerThread 完全详解
HandlerThread谷歌官方API
2、布局使用的图标
文章中布局使用的图标都是在这个图标库网站下载的 https://www.easyicon.net/


 4367
4367

 被折叠的 条评论
为什么被折叠?
被折叠的 条评论
为什么被折叠?
 到【灌水乐园】发言


