


简介
Canvas 为 Tkinter 提供了绘图功能. 其提供的图形组件包括 线形, 圆形, 图片, 甚至其他控件. Canvas 控件为绘制图形图表, 编辑图形, 自定义控件提供了可能.
示例:
from Tkinter import *
root=Tk()
# 界面大小300x300
root.geometry('300x300')
# 在界面中画出一个200*200的画布,画布颜色白色
cv=Canvas(root,bg='white',width=200,height=200)

# 在画布中画出一个矩形,fill为矩形填充的颜色,outline边界颜色且width宽度
cv.create_rectangle(50,50,150,150,fill='blue',outline='green',width=2)
#在矩形中在画出一个矩形,dash为虚线
cv.create_rectangle(80,80,120,120,fill='black',outline='purple',dash=10)
#stipple看似网格
rt=cv.create_rectangle(0,0,50,50,fill='black',outline='purple',stipple='gray12')
cv.pack()
#coords将某部分移动到另一区域
cv.coords(rt,150,150,200,200)
root.mainloop()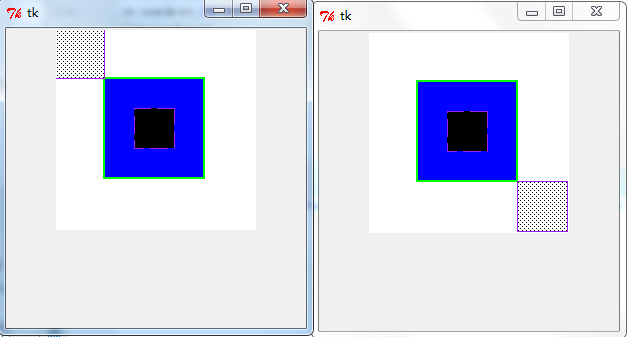
move函数功能同coords
from Tkinter import *
root = Tk()
root.geometry('300x300')
# 创建一个Canvas,设置其背景色为白色
cv = Canvas(root,bg = 'white',width=200,height=200)
# 创建两个同样的rectangle,比较移动前后的不同
rt1 = cv.create_rectangle(
    50,50,110,110,
    tags = ('r1','r2','r3'))
cv.create_rectangle(
    50,50,110,110,
    tags = ('r1','r2','r3'))
# 移动rt1,坐标以左上角点为原点,向右(x)和向下(y)正方向,
cv.move(rt1,20,-50)
cv.pack()
root.mainloop()
delete删除已有的画图
scale缩放
event事件
from Tkinter import *
root = Tk()
# 创建一个Canvas,设置其背景色为白色
cv = Canvas(root,bg = 'white')
# 创建三个rectangle
rt1 = cv.create_rectangle(
    10,10,110,110,
    width = 8,
    tags = ('r1','r2','r3'))
def printRect(event):
    print 'rectangle'
# 绑定item与事件,单击
cv.tag_bind('r2','<Button-1>',printRect)
cv.pack()
root.mainloop()
# 只有点击到矩形的边框时才会触发事件
from Tkinter import *
root = Tk()
# 创建一个Canvas,设置其背景色为白色
cv = Canvas(root,bg = 'white')
# 创建三个rectangle
rt1 = cv.create_rectangle(
10,10,110,110,
width = 8,
tags = ('r1','r2','r3'))
def printRect(event):
print 'rectangle'
def printLine(event):
print 'line'
# 绑定item与左键事件
cv.tag_bind('r1','<Button-1>',printRect)
# 绑定item与右键事件
cv.tag_bind('r2','<Button-3>',printLine)
cv.pack()
root.mainloop()
图形绘制:
from Tkinter import *
root=Tk()
root.geometry('300x300')
cv=Canvas(root,bg='red',width=200,height=200)
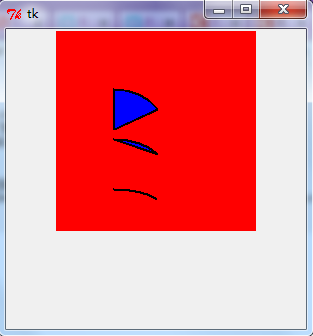
# 使用三种样式,分别创建了扇形、弓形和弧形
d={1:PIESLICE,2:CHORD,3:ARC}
for i in d:
# 使用start/extent指定起始角度与偏移角度
cv.create_arc(10,10+50*i,110,110+30*i,style=d[i],fill='blue',width=2,start=30,extent=60)
cv.pack()
root.mainloop()
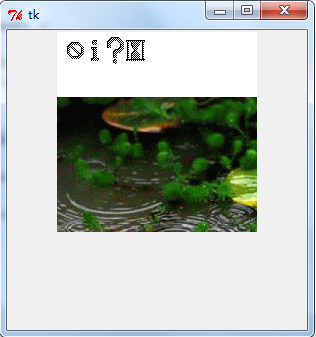
绘制位图与GIF图:
from Tkinter import  *
root=Tk()
root.geometry('300x300')
cv=Canvas(root,bg='white',width=200,height=200)
d={1:'error',2:'info',3:'question',4:'hourglass'}
for i in d:
    cv .create_bitmap((20*i,20),bitmap=d[i])

img=PhotoImage(file='D:/temp/1.gif')
#创建gif图
cv.create_image((200,200),image=img)
cv.pack()

root.mainloop()
直线:
from Tkinter import *
root=Tk()
root.geometry('600x600')
cv=Canvas(root,bg='white',width=500,height=500)
d=[(0,'none'),(1,'first'),(2,'last'),(3,'both')]
d1=[(0,'none','bevel'),(1,'first','miter'),(2,'last','round'),(3,'both','round')]
for i in d:
    # 设置直线是否使用箭头
    cv.create_line((10,10+i[0]*10,110,110+i[0]*10),# 设置直线的起始、终点
                   arrow=i[1],arrowshape='40 40 10')#设置箭头的形状(填充长度,箭头长度,箭头宽度

for i in d1:
    cv.create_line((160,10+i[0]*10,260,260+i[0]*10), # 设置直线的起始、终点
                   arrow=i[1],# 设置直线是否使用箭头
                   arrowshape='8 10 3',# 设置箭头的形状(填充长度,箭头长度,箭头宽度
                   joinstyle=i[2])


cv.pack()
root.mainloop()
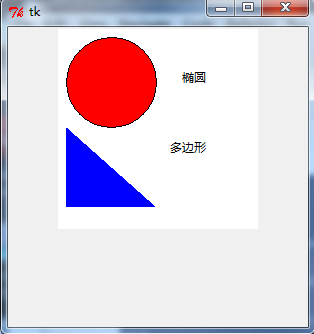
其他:
from Tkinter import *
root=Tk()
root.geometry('300x300')
cv=Canvas(root,bg='white',width=200,height=200)
#椭圆
cv.create_oval((10,10,100,100),fill='red')
#三角形
cv.create_polygon((10,100,10,180,100,180),fill='blue')
#文字
cv.create_text((150,50),text='椭圆',anchor=E)
cv.create_text((150,120),text='多边形',anchor=E)

cv.pack()
root.mainloop()
创建组件:
from Tkinter import *
root = Tk()
# 创建一个Canvas,设置其背景色为白色
cv = Canvas(root,bg = 'white')
# 创建一个Button对象,默认设置为居中对齐
def printWindow():
    print 'window'
bt = Button(cv,text = 'ClickMe',command = printWindow)
#修改button在canvas上的对齐方式
cv.create_window((10,10),window = bt,anchor = W)
# 新创建的line对象与button有重叠
cv.create_line(10,10,20,20)
# 新创建的line不在button之上,即没有重叠
cv.create_line(30,30,100,100)
cv.pack()
root.mainloop()
交互式绘图:
from Tkinter import *

canvas_width = 500
canvas_height = 150

def paint( event ):
   python_green = "#476042"
   x1, y1 = ( event.x - 1 ), ( event.y - 1 )
   x2, y2 = ( event.x + 1 ), ( event.y + 1 )
   w.create_oval( x1, y1, x2, y2, fill = python_green )

master = Tk()
master.title( "Painting using Ovals" )
w = Canvas(master,
           width=canvas_width,
           height=canvas_height)
w.pack(expand = YES, fill = BOTH)
w.bind( "<B1-Motion>", paint )

message = Label( master, text = "Press and Drag the mouse to draw" )
message.pack( side = BOTTOM )

mainloop()
来源:http://blog.csdn.net/liuxu0703/article/details/60602773


 1618
1618

 被折叠的 条评论
为什么被折叠?
被折叠的 条评论
为什么被折叠?
 到【灌水乐园】发言


