


目录
前面两章介绍了线程基础及线程Dump日志分析,Java线程<一> _ 介绍、Java线程<二> _ Thread Dump日志分析。本章详细介绍线程间通信及数据传输及代码实例。
一、构造线程
当我们创建线程的时候,如下代码所示。
Thread createThread = new Thread(new CreateThread(threadLocal), "CreateThread");java.lang.Thread中初始化线程实际调用init()方法,该方法设置了线程所需的属性,如线程组、优先级、是否是Daemon线程等信息。如下代码是摘自init()初始化的部分代码。注意:一个新构造的线程是由其父线程进行空间分配。
// 初始化线程
private void init(ThreadGroup g, Runnable target, String name,
                  long stackSize, AccessControlContext acc,
                  boolean inheritThreadLocals) {
    if (name == null) {
        throw new NullPointerException("name cannot be null");
    }

    // 设置线程名称
    this.name = name;

    // 获取父线程,即:当前线程
    Thread parent = currentThread();
    SecurityManager security = System.getSecurityManager();
    if (g == null) {
        /* Determine if it's an applet or not */

        /* If there is a security manager, ask the security manager
           what to do. */
        if (security != null) {
            g = security.getThreadGroup();
        }

        /* If the security doesn't have a strong opinion of the matter
           use the parent thread group. */
        if (g == null) {
            g = parent.getThreadGroup();
        }
    }

    /* checkAccess regardless of whether or not threadgroup is
       explicitly passed in. */
    g.checkAccess();

    /*
     * Do we have the required permissions?
     */
    if (security != null) {
        if (isCCLOverridden(getClass())) {
            security.checkPermission(SUBCLASS_IMPLEMENTATION_PERMISSION);
        }
    }

    g.addUnstarted();

    // 创建线程的属性设置为父线程对应的属性
    this.group = g;
    this.daemon = parent.isDaemon();
    this.priority = parent.getPriority();
    // 获取该线程的类加载器
    if (security == null || isCCLOverridden(parent.getClass()))
        this.contextClassLoader = parent.getContextClassLoader();
    else
        this.contextClassLoader = parent.contextClassLoader;
    this.inheritedAccessControlContext =
            acc != null ? acc : AccessController.getContext();
    this.target = target;
    setPriority(priority);
    // 将父线程的ThreadLocal.ThreadLocalMap复制给新线程,可继承的ThreadLocal
    if (inheritThreadLocals && parent.inheritableThreadLocals != null)
        this.inheritableThreadLocals =
                ThreadLocal.createInheritedMap(parent.inheritableThreadLocals);
    /* Stash the specified stack size in case the VM cares */
    // 设置线程的堆栈大小
    this.stackSize = stackSize;

    /* Set thread ID */
    // 分配一个线程ID
    tid = nextThreadID();
}
二、启动线程
start()方法的含义:当前线程(父线程)同步通知JVM,只要线程规划器空闲,则立即调用start()来启动线程。
三、等待/通知机制
1. 等待/通知机制
等待/通知机制是指,一个线程A调用了对象O的wait()方法进入等待状态,而另一个线程B调用了对象O的notify()或者notifyAll()方法,线程A收到通知后从对象O的wait()方法返回,进而执行后续操作。上述两个线程通过对象O来完成交互,而对象上的wait()和notify/notifyAll()用来完成等待方和通知方之间的交互工作。
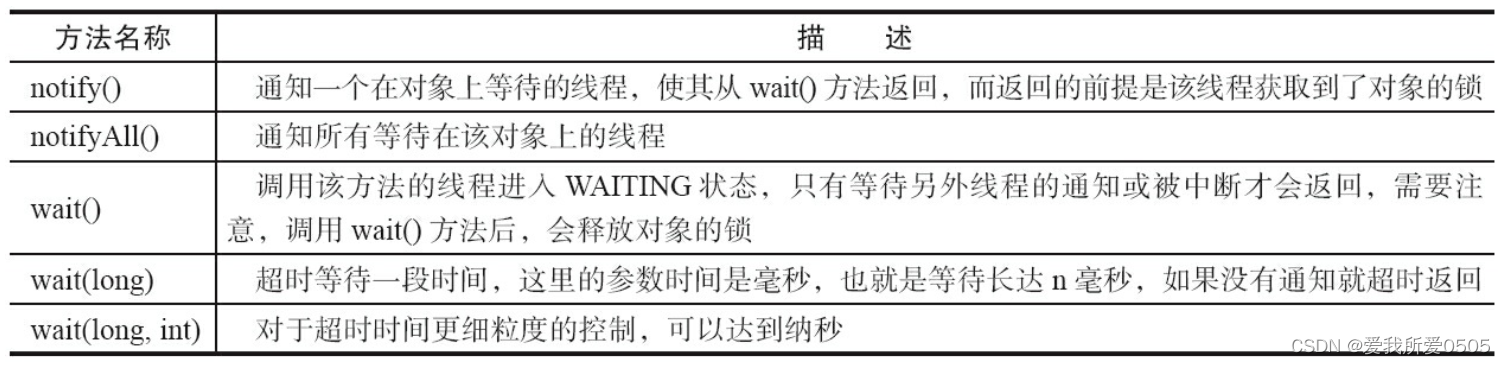
wait()、notify/notifyAll()方法都是java.lang.Object类中的方法,如上表所示的方法。一个对象拥有一个同步队列和一个等待队列。使用注意问题:
- 调用wait()、notify/notifyAll()时,先对调用对象加锁;
- 调用wait()后,当前线程状态由RUNNING变为WAITING,释放锁,该线程放入等待队列中;
- 调用notify/notifyAll()后,等待线程状态由WAITING变为BLOCKED,等待线程从等待队列移到同步队列中,当前线程释放锁后等待线程从wait()返回;
- 从wait()返回必须获取对象的锁。
2. 代码实例
package com.thread;

import java.text.SimpleDateFormat;
import java.util.Date;

/**
 * @description 测试线程wait()、notify()
 * @author TCM
 * @version 1.0
 * @date 2022/4/5 13:42
 **/
public class WaitAndNotifyTest {

    public static boolean flag = true;
    public static Object lock = new Object();
    public static SimpleDateFormat dateFormat = new SimpleDateFormat("HH:mm:ss");

    public static void main(String[] args) throws InterruptedException {
        Thread waitThread = new Thread(new WaitThread(), "WaitThread");
        waitThread.start();

        Thread.sleep(1000);

        Thread notifyThread = new Thread(new NotifyThread(), "NotifyThread");
        notifyThread.start();
    }


    public static class WaitThread implements Runnable {

        @Override
        public void run() {
            // lock加锁
            synchronized (lock) {
                while (flag) {
                    try {
                        System.out.println(Thread.currentThread() + " flag is true. wait @" + dateFormat.format(new Date()));

                        /*
                         * 调用lock的wait():
                         * a. 当前线程释放lock对象的锁对象;
                         * b. 当前线程由RUNNING变为WAITING状态;
                         * c. 当前线程进入等待队列中。
                         */
                        lock.wait();
                    } catch (InterruptedException e) {
                        e.printStackTrace();
                    }
                }
                // 业务处理
                System.out.println(Thread.currentThread() + " flag is false. running @" + dateFormat.format(new Date()));
            }
        }

    }

    public static class NotifyThread implements Runnable {

        @Override
        public void run() {
            // lock加锁
            synchronized (lock) {
                try {
                    System.out.println(Thread.currentThread() + " flag is true. notify @" + dateFormat.format(new Date()));

                    /*
                     * 调用lock的notify():
                     * a. 等待线程状态由WAITING变为BLOCKED;
                     * b. 等待线程从等待队列移到同步队列中;
                     * c. 当前线程释放锁后等待线程从wait()返回。
                     */
                    lock.notifyAll();
                    flag = false;
                    Thread.sleep(5000);
                } catch (InterruptedException e) {
                    e.printStackTrace();
                }
            }

            // 业务处理,再次获取lock对象的锁
            synchronized (lock) {
                System.out.println(Thread.currentThread() + " hold lock again. sleep @" + dateFormat.format(new Date()));
            }
        }

    }

}
以上代码执行结果,如下所示。第三、四行可能执行结果互换。
Thread[WaitThread,5,main] flag is true. wait @19:09:12
Thread[NotifyThread,5,main] flag is true. notify @19:09:13
Thread[NotifyThread,5,main] hold lock again. sleep @19:09:18
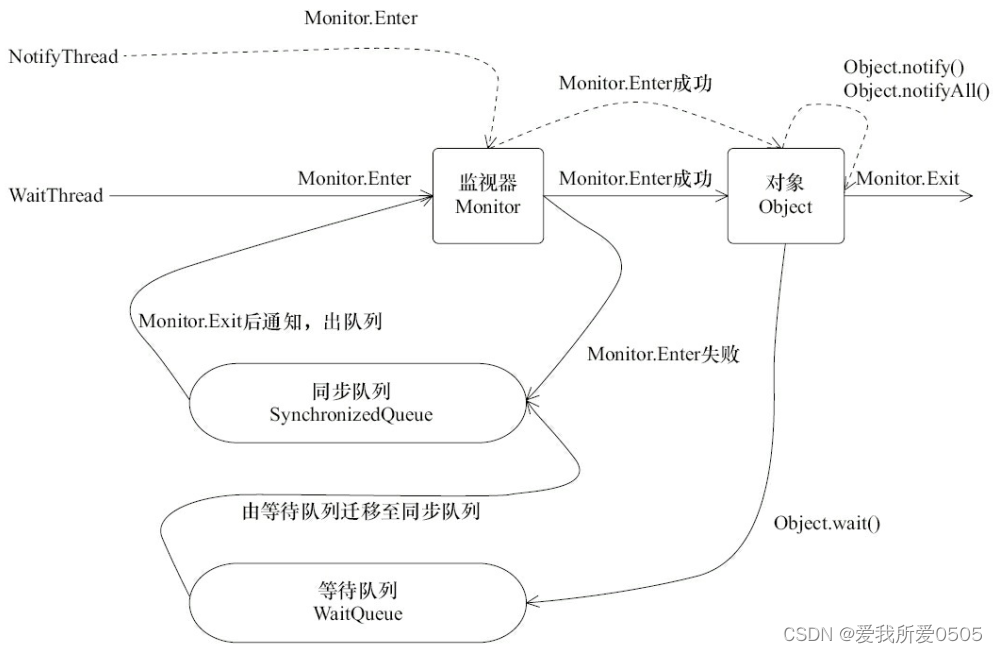
Thread[WaitThread,5,main] flag is false. running @19:09:18如下图所示,是代码实例执行的过程。
- 1):WaitThread首先获取了对象的锁;
- 2):调用对象的wait()方法,从而放弃了锁并进入了对象的等待队列WaitQueue中,进入等待状态;
- 3):NotifyThread随后获取了对象的锁,并调用对象的notify()方法,将WaitThread从WaitQueue移到SynchronizedQueue中,此时WaitThread的状态变为阻塞状态;
- 4):NotifyThread释放了锁之后,WaitThread与NotifyThread进行锁竞争;
- 5):NotifyThread再次获取到锁执行业务处理。
四、管道输入/输出流
管道输入/输出流的作用是线程之间的数据传输,内存为传输媒介。其分类为:
- 字节:PipedOutputStream、PipedInputStream
- 字符:PipedReader、PipedWriter
package com.thread;

import java.io.IOException;
import java.io.PipedReader;
import java.io.PipedWriter;
/**
 * @description 线程间数据传输 - 管道测试
 * @author TCM
 * @version 1.0
 * @date 2022/4/5 13:51
 **/
public class PipedTest {

    public static void main(String[] args) throws IOException {
        PipedWriter out = new PipedWriter();
        PipedReader in = new PipedReader();
        // 输出流连接输入流,否则报异常
        out.connect(in);

        Thread printThread = new Thread(new PrintThread(in), "PrintThread");
        printThread.start();
        int receive = 0;
        try {
            while ((receive = System.in.read()) != -1) {
                out.write(receive);
            }
        } catch (IOException e) {
            e.printStackTrace();
        }
    }


    public static class PrintThread implements Runnable {
        private PipedReader in;

        public PrintThread(PipedReader in){
            this.in = in;
        }

        @Override
        public void run() {
            int receive = 0;
            try {
                while ((receive = in.read()) != -1) {
                    System.out.print((char) receive);
                }
            } catch (IOException e) {
                e.printStackTrace();
            }
        }

    }


}
运行该实例,输入字符串,如下所示:
test thread piped
test thread piped
注意:Piped类型的流,则必须要提前绑定,即:out.connect(in),否则会抛出异常。
五、参考资料
Java线程<一> _ 介绍_爱我所爱0505的博客-CSDN博客
Java线程<二> _ Thread Dump日志分析_爱我所爱0505的博客-CSDN博客_java 线程日志分析
InheritableThreadLocal——父线程传递本地变量到子线程的解决方式及分析_代码小司机的博客-CSDN博客_threadlocal传递到子线程


 1955
1955


 被折叠的 条评论
为什么被折叠?
被折叠的 条评论
为什么被折叠?
 到【灌水乐园】发言


