


二. Git基础命令
1. 获取 Git 仓库
在 Linux 上:
cd /home/user/my_projec

# 之后执行:
git init
该命令将创建一个名为 .git 的子目录,这个子目录含有初始化的 Git 仓库中所有的必须文件,这些文件是 Git 仓库的骨干。
可以通过 git add 命令来指定所需的文件来进行追踪,然后执行 git commit :
git add *.c
git add LICENSE
git commit -m 'initial project version'
克隆仓库的命令是 git clone 。 比如,要克隆 Git 的链接库 libgit2,可以用下面的命令:
git clone https://github.com/libgit2/libgit2
如果你想在克隆远程仓库的时候,自定义本地仓库的名字,你可以通过额外的参数指定新的目录名:
git clone https://github.com/libgit2/libgit2 mylibgit
2. 记录每次更新到仓库
2.1 检查当前文件状态
git status 命令查看哪些文件处于什么状态
$ git status
On branch master
Your branch is up to date with 'origin/master'.
在项目创建一个README
$ echo 'My Project' > README
$ git status
On branch master
Your branch is up-to-date with 'origin/master'.
Untracked files:
  (use "git add <file>..." to include in what will be committed)
        README
nothing added to commit but untracked files present (use "git add" to track)
在状态报告中可以看到新建的 README 文件出现在 Untracked files 下面
2.2 跟踪新文件
git add 开始跟踪一个文件。
$ git add README
$ git status
On branch master
Your branch is up-to-date with 'origin/master'.
Changes to be committed:
  (use "git restore --staged <file>..." to unstage)

    new file:   README
只要在 Changes to be committed 这行下面的,就说明是已暂存状态。
2.3 暂存已修改的文件
修改了一个名为 CONTRIBUTING.md 的已被跟踪的文件(已经通过git add添加)
$ git status
On branch master
Your branch is up-to-date with 'origin/master'.
Changes to be committed:
  (use "git reset HEAD <file>..." to unstage)

    new file:   README

Changes not staged for commit:
  (use "git add <file>..." to update what will be committed)
  (use "git checkout -- <file>..." to discard changes in working directory)

    modified:   CONTRIBUTING.md
文件 CONTRIBUTING.md 出现在 Changes not staged for commit 这行下面,说明已跟踪文件的内容发生了变化,但还没有放到暂存区。
要暂存这次更新,需要运行 git add 命令。
$ git add CONTRIBUTING.md
$ git status
On branch master
Your branch is up-to-date with 'origin/master'.
Changes to be committed:
  (use "git reset HEAD <file>..." to unstage)

    new file:   README
    modified:   CONTRIBUTING.md
现在两个文件都已暂存,下次提交时就会一并记录到仓库。
如果你再次更改CONTRIBUTING.md
$ vim CONTRIBUTING.md
$ git status
On branch master
Your branch is up-to-date with 'origin/master'.
Changes to be committed:
  (use "git reset HEAD <file>..." to unstage)

    new file:   README
    modified:   CONTRIBUTING.md

Changes not staged for commit:
  (use "git add <file>..." to update what will be committed)
  (use "git checkout -- <file>..." to discard changes in working directory)

    modified:   CONTRIBUTING.md
现在 CONTRIBUTING.md 文件同时出现在暂存区和非暂存区。此时提交,CONTRIBUTING.md 的版本是你最后一次运行 git add 命令时的那个版本,而不是你运行 git commit 时,在工作目录中的当前版本。
运行了 git add 之后又作了修订的文件,需要重新运行 git ad
$ git add CONTRIBUTING.md
$ git status
On branch master
Your branch is up-to-date with 'origin/master'.
Changes to be committed:
  (use "git reset HEAD <file>..." to unstage)

    new file:   README
    modified:   CONTRIBUTING.md
使用git status -s 命令或 git status --short 命令,将得到一种格式更为紧凑的输出。
$ git status -s
 M README
MM Rakefile
A  lib/git.rb
M  lib/simplegit.rb
?? LICENSE.txt
新添加的未跟踪文件前面有 ?? 标记,
新添加到暂存区中的文件前面有 A 标记,
修改过的文件前面有 M 标记。
2.4 忽略文件
可以创建一个名为 .gitignore 的文件,列出要忽略的文件的模式。 来看一个实际的 .gitignore 例子:
$ cat .gitignore
*.[oa]
*~
第一行告诉 Git 忽略所有以 .o 或 .a 结尾的文件。
第二行告诉 Git 忽略所有名字以波浪符(~)结尾的文件
文件 .gitignore 的格式规范如下:
所有空行或者以 # 开头的行都会被 Git 忽略。
可以使用标准的 glob 模式匹配,它会递归地应用在整个工作区中。
匹配模式可以以(/)开头防止递归。
匹配模式可以以(/)结尾指定目录。
要忽略指定模式以外的文件或目录,可以在模式前加上叹号(!)取反。
Tip
GitHub 有一个十分详细的针对数十种项目及语言的 .gitignore 文件列表, 你可以在 https://github.com/github/gitignore 找到它。
2.5 查看已暂存和未暂存的修改
git diff查看修改了什么位置
假如再次修改 README 文件后暂存,然后编辑 CONTRIBUTING.md 文件后先不暂存, 运行 status 命令将会看到:
$ git status
On branch master
Your branch is ahead of 'origin/master' by 1 commit.
  (use "git push" to publish your local commits)

Changes to be committed:
  (use "git restore --staged <file>..." to unstage)
        modified:   README

Changes not staged for commit:
  (use "git add <file>..." to update what will be committed)
  (use "git restore <file>..." to discard changes in working directory)
        modified:   CONTRIBUTING.md
要查看尚未暂存的文件更新了哪些部分,不加参数直接输入 git diff:
$ git diff
diff --git a/CONTRIBUTING.md b/CONTRIBUTING.md
index bd69548..07960d1 100644
--- a/CONTRIBUTING.md
+++ b/CONTRIBUTING.md
@@ -1,3 +1,4 @@
 1111
 2222# test line
-3333
\ No newline at end of file
+3333
+test git diff
git diff --staged 命令,比对已暂存文件与最后一次提交的文件差异
$ git diff --staged
diff --git a/README b/README
index 1cdf98d..27a0f72 100644
--- a/README
+++ b/README
@@ -1,2 +1,3 @@
 My Project
 test git diff
+test git diff
暂存 CONTRIBUTING.md 后再编辑,可以使用 git status 查看已被暂存的修改或未被暂存的修改。 如果我们的环境(终端输出)看起来如下:
$ git add CONTRIBUTING.md
$ echo '# test line' >> CONTRIBUTING.md
$ git status
On branch master
Your branch is up-to-date with 'origin/master'.
Changes to be committed:
  (use "git reset HEAD <file>..." to unstage)

    modified:   CONTRIBUTING.md

Changes not staged for commit:
  (use "git add <file>..." to update what will be committed)
  (use "git checkout -- <file>..." to discard changes in working directory)

    modified:   CONTRIBUTING.md
现在运行 git diff 看暂存前后的变化:
$ git diff
diff --git a/CONTRIBUTING.md b/CONTRIBUTING.md
index 07960d1..1f9b843 100644
--- a/CONTRIBUTING.md
+++ b/CONTRIBUTING.md
@@ -2,3 +2,4 @@
 2222# test line
 3333
 test git diff
+# test line
git diff --cached 查看已经暂存起来的变化( --staged 和 --cached 是同义词):
$ git diff --cached
diff --git a/CONTRIBUTING.md b/CONTRIBUTING.md
index bd69548..07960d1 100644
--- a/CONTRIBUTING.md
+++ b/CONTRIBUTING.md
@@ -1,3 +1,4 @@
 1111
 2222# test line
-3333
\ No newline at end of file
+3333
+test git diff
diff --git a/README b/README
index 1cdf98d..27a0f72 100644
--- a/README
+++ b/README
@@ -1,2 +1,3 @@
 My Project
 test git diff
+test git diff
2.6 提交更新
先用 git status 看下,你所需要的文件是不是都已暂存起来了, 然后再运行提交命令 git commit
$ git commit
这样会启动你选择的文本编辑器来输入提交说明。
编辑器会显示类似下面的文本信息(本例选用 Vim 的屏显方式展示):
# Please enter the commit message for your changes. Lines starting
# with '#' will be ignored, and an empty message aborts the commit.
# On branch master
# Your branch is up-to-date with 'origin/master'.
#
# Changes to be committed:
#	new file:   README
#	modified:   CONTRIBUTING.md
#
~
~
~
".git/COMMIT_EDITMSG" 9L, 283C
可以在 commit 命令后添加 -m 选项,将提交信息与命令放在同一行,如下所示:
$ git commit -m "fix bug "
[master 4794ffe] fix bug
 2 files changed, 2 insertions(+)
 create mode 100644 README
2.7 跳过使用暂存区域
git commit -a ,加上-a选项,Git 就会自动把所有已经跟踪过的文件暂存起来一并提交,从而跳过 git add 步骤:
$ git status
On branch master
Your branch is up-to-date with 'origin/master'.
Changes not staged for commit:
 (use "git add <file>..." to update what will be committed)
 (use "git checkout -- <file>..." to discard changes in working directory)

   modified:   CONTRIBUTING.md

no changes added to commit (use "git add" and/or "git commit -a")
$ git commit -a -m 'added new benchmarks'
[master 83e38c7] added new benchmarks
1 file changed, 5 insertions(+), 0 deletions(-)
2.8 移除文件
git rm
如果只是简单地从工作目录中手工删除文件,运行 git status 时就会在 “Changes not staged for commit” 部分(也就是 未暂存清单)看到:
$ rm PROJECTS.md
$ git status
On branch master
Your branch is up-to-date with 'origin/master'.
Changes not staged for commit:
  (use "git add/rm <file>..." to update what will be committed)
  (use "git checkout -- <file>..." to discard changes in working directory)

        deleted:    PROJECTS.md

no changes added to commit (use "git add" and/or "git commit -a")
直接使用git rm
$ git rm PROJECTS.md
rm 'PROJECTS.md'
$ git status
On branch master
Your branch is up-to-date with 'origin/master'.
Changes to be committed:
  (use "git reset HEAD <file>..." to unstage)

    deleted:    PROJECTS.md
如果要删除之前修改过或已经放到暂存区的文件,则必须使用强制删除选项 -f(译注:即 force 的首字母)。
当你忘记添加 .gitignore 文件,不小心把一个很大的日志文件或一堆 .a 这样的编译生成文件添加到暂存区时,这一做法尤其有用。 为达到这一目的,使用 --cached 选项:
$ git rm --cached README
git rm 命令后面可以列出文件或者目录的名字,也可以使用 glob 模式。
$ git rm log/\*.log
注意到星号 * 之前的反斜杠 \, 因为 Git 有它自己的文件模式扩展匹配方式,所以我们不用 shell 来帮忙展开。 此命令删除 log/ 目录下扩展名为 .log 的所有文件。 类似的比如:
$ git rm \*~
该命令会删除所有名字以 ~ 结尾的文件。
2.9 移动文件
git mv file_from file_to
$ git mv README.md README
$ git status
On branch master
Your branch is up-to-date with 'origin/master'.
Changes to be committed:
  (use "git reset HEAD <file>..." to unstage)

    renamed:    README.md -> README
其实,运行 git mv 就相当于运行了下面三条命令:
$ mv README.md README
$ git rm README.md
$ git add README
## 3. 查看提交历史
git log 命令

使用一个非常简单的 “simplegit” 项目作为示例。 运行下面的命令获取该项目:
```shell
$ git clone https://github.com/schacon/simplegit-progit
当你在此项目中运行 git log 命令时,可以看到下面的输出:
$ git log
commit ca82a6dff817ec66f44342007202690a93763949
Author: Scott Chacon <schacon@gee-mail.com>
Date:   Mon Mar 17 21:52:11 2008 -0700

    changed the version number

commit 085bb3bcb608e1e8451d4b2432f8ecbe6306e7e7
Author: Scott Chacon <schacon@gee-mail.com>
Date:   Sat Mar 15 16:40:33 2008 -0700

    removed unnecessary test

commit a11bef06a3f659402fe7563abf99ad00de2209e6
Author: Scott Chacon <schacon@gee-mail.com>
Date:   Sat Mar 15 10:31:28 2008 -0700

    first commit
不传入任何参数的默认情况下,git log 会按时间先后顺序列出所有的提交,最近的更新排在最上面.
有许多选项可以帮助你搜寻你所要找的提交.
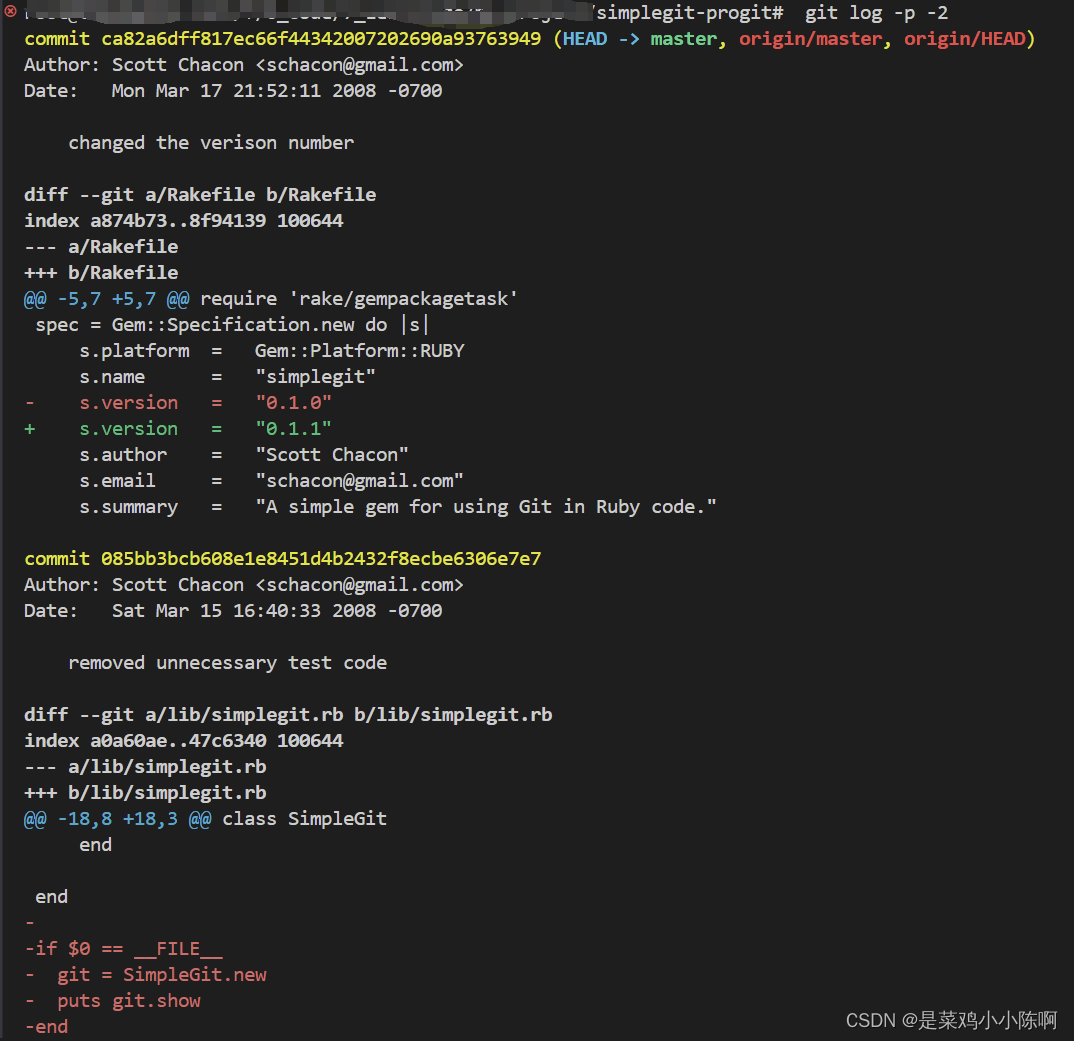
git log -p (或 --patch ),显示每次提交所引入的差异(按 补丁 的格式输出)。
git log -p -2,使用 -2 选项来只显示最近的两次提交
git log -p -2
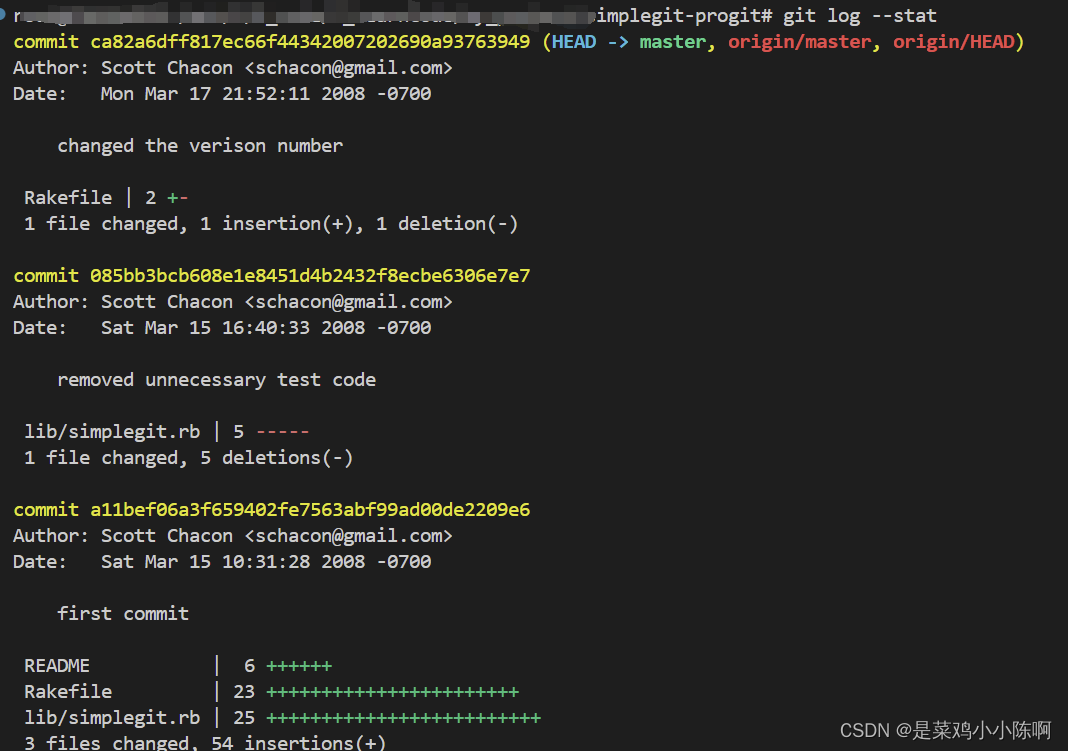
git log --stat 每次提交的简略统计信息。
git log --stat
git log --pretty。 这个选项可以使用不同于默认格式的方式展示提交历史。另外还有 short,full 和 fuller 选项,它们展示信息的格式基本一致,但是详尽程度不一:
git log --pretty=oneline

format ,可以定制记录的显示格式。 这样的输出对后期提取分析格外有用——因为你知道输出的格式不会随着 Git 的更新而发生改变:
git log 的常用选项 列出了我们目前涉及到的和没涉及到的选项,以及它们是如何影响 log 命令的输出的:
Table 2. git log 的常用选项
选项	说明
-p

按补丁格式显示每个提交引入的差异。

--stat

显示每次提交的文件修改统计信息。

--shortstat

只显示 --stat 中最后的行数修改添加移除统计。

--name-only

仅在提交信息后显示已修改的文件清单。

--name-status

显示新增、修改、删除的文件清单。

--abbrev-commit

仅显示 SHA-1 校验和所有 40 个字符中的前几个字符。

--relative-date

使用较短的相对时间而不是完整格式显示日期(比如“2 weeks ago”)。

--graph

在日志旁以 ASCII 图形显示分支与合并历史。

--pretty

使用其他格式显示历史提交信息。可用的选项包括 oneline、short、full、fuller 和 format(用来定义自己的格式)。

--oneline

--pretty=oneline --abbrev-commit 合用的简写。
2.10 版本回退
通过git log,查看自己想要回退到哪个提交
commit a9b55f629eff36d87c491f678e6bd8d36d109d2f (HEAD -> master, origin/master)
git reset --hard ,回退到此处提交
git reset --hard a9b55f629eff36d87c491f678e6bd8d36d109d2f
推送到远程
git push -f
此时远程仓库的版本则是该commit的内容
4. 撤消操作
git commit --amend。这个命令会将暂存区中的文件提交。
例如,你提交后发现忘记了暂存某些需要的修改,可以像下面这样操作:
$ git commit -m 'initial commit'
$ git add forgotten_file
$ git commit --amend
最终你只会有一个提交——第二次提交将代替第一次提交的结果。
4.1 取消暂存的文件
git reset HEAD … 来取消暂存
4.2 撤消对文件的修改
git checkout –
参考如下:
Changes not staged for commit:
  (use "git add <file>..." to update what will be committed)
  (use "git checkout -- <file>..." to discard changes in working directory)

    modified:   CONTRIBUTING.md
它非常清楚地告诉如何撤消之前所做的修改。 让我们来按照提示执行:
$ git checkout -- CONTRIBUTING.md
$ git status
On branch master
Changes to be committed:
  (use "git reset HEAD <file>..." to unstage)

    renamed:    README.md -> README
4.3 Important
请务必记得 git checkout – 是一个危险的命令。 你对那个文件在本地的任何修改都会消失——Git 会用最近提交的版本覆盖掉它。 除非你确实清楚不想要对那个文件的本地修改了,否则请不要使用这个命令。
5. 远程仓库的使用
5.1 查看远程仓库
git remote ,查看你已经配置的远程仓库服务器
$ git clone https://github.com/schacon/ticgit
Cloning into 'ticgit'...
remote: Reusing existing pack: 1857, done.
remote: Total 1857 (delta 0), reused 0 (delta 0)
Receiving objects: 100% (1857/1857), 374.35 KiB | 268.00 KiB/s, done.
Resolving deltas: 100% (772/772), done.
Checking connectivity... done.
$ cd ticgit
$ git remote
origin
git remote -v,会显示需要读写远程仓库使用的 Git 保存的简写与其对应的 URL。
$ git remote -v
origin	https://github.com/schacon/ticgit (fetch)
origin	https://github.com/schacon/ticgit (push)
5.2 添加远程仓库
git remote add 添加一个新的远程 Git 仓库,同时指定一个方便使用的简写:
$ git remote
origin
$ git remote add pb https://github.com/paulboone/ticgit
$ git remote -v
origin	https://github.com/schacon/ticgit (fetch)
origin	https://github.com/schacon/ticgit (push)
pb	https://github.com/paulboone/ticgit (fetch)
pb	https://github.com/paulboone/ticgit (push)
现在你可以在命令行中使用字符串 pb 来代替整个 URL。
$ git fetch pb
remote: Counting objects: 43, done.
remote: Compressing objects: 100% (36/36), done.
remote: Total 43 (delta 10), reused 31 (delta 5)
Unpacking objects: 100% (43/43), done.
From https://github.com/paulboone/ticgit
 * [new branch]      master     -> pb/master
 * [new branch]      ticgit     -> pb/ticgit
从远程仓库中抓取与拉取,从远程仓库中获得数据,可以执行:
$ git fetch <remote>
5.3 推送到远程仓库
git push
将 master 分支推送到 origin 服务器时(克隆时通常会自动帮你设置好那两个名字)
$ git push origin master
git remote show ,查看某一个远程仓库的更多信息
$ git remote show origin
* remote origin
  Fetch URL: https://github.com/schacon/ticgit
  Push  URL: https://github.com/schacon/ticgit
  HEAD branch: master
  Remote branches:
    master                               tracked
    dev-branch                           tracked
  Local branch configured for 'git pull':
    master merges with remote master
  Local ref configured for 'git push':
    master pushes to master (up to date)
5.4 远程仓库的重命名与移除
git remote rename,修改一个远程仓库的简写名
$ git remote rename pb paul
$ git remote
origin
paul
git remote remove 或 git remote rm, 移除
$ git remote remove paul
$ git remote
origin
6. 打标签
6.1 列出标签
git tag (可带上可选的 -l 选项 --list):
$ git tag
v1.0
v2.0
按照特定的模式查找标签。
例如,Git 自身的源代码仓库包含标签的数量超过 500 个。 如果只对 1.8.5 系列感兴趣,可以运行:
$ git tag -l "v1.8.5*"
v1.8.5
v1.8.5-rc0
v1.8.5-rc1
v1.8.5-rc2
v1.8.5-rc3
v1.8.5.1
v1.8.5.2
v1.8.5.3
v1.8.5.4
v1.8.5.5
6.2 创建标签
Git 支持两种标签:轻量标签(lightweight)与附注标签(annotated)。
轻量标签很像一个不会改变的分支——它只是某个特定提交的引用。
附注标签是存储在 Git 数据库中的一个完整对象, 它们是可以被校验的,其中包含打标签者的名字、电子邮件地址、日期时间, 此外还有一个标签信息,并且可以使用 GNU Privacy Guard (GPG)签名并验证。 通常会建议创建附注标签,这样你可以拥有以上所有信息。
6.2.1 附注标签
git tag -a
-m 选项指定了一条将会存储在标签中的信息。
如果没有为附注标签指定一条信息,Git 会启动编辑器要求你输入信息。
$ git tag -a v1.0 -m "my version 1.0"
$ git tag
v1.0
$ git show v1.0
tag v1.0
Tagger: ****************
Date:   Sun Mar 31 00:02:30 2024 +0800

my version 1.0

commit a9b55f629eff36d87c491f678e6bd8d36d109d2f (HEAD -> master, tag: v1.0, origin/master)
Author: ****************
Date:   Fri Mar 29 16:18:44 2024 +0800
6.2.2 轻量标签
轻量标签本质上是将提交校验和存储到一个文件中——没有保存任何其他信息。 创建轻量标签,不需要使用 -a、-s 或 -m 选项,只需要提供标签名字
git tag v1.0-xx
git tag
v1.0
v1.0-xx
如果在标签上运行 git show,不会看到额外的标签信息。 命令只会显示出提交信息.
6.3 后期打标签
你也可以对过去的提交打标签。 假设提交历史是这样的:
$ git log --pretty=oneline
15027957951b64cf874c3557a0f3547bd83b3ff6 Merge branch 'experiment'
a6b4c97498bd301d84096da251c98a07c7723e65 beginning write support
0d52aaab4479697da7686c15f77a3d64d9165190 one more thing
6d52a271eda8725415634dd79daabbc4d9b6008e Merge branch 'experiment'
0b7434d86859cc7b8c3d5e1dddfed66ff742fcbc added a commit function
4682c3261057305bdd616e23b64b0857d832627b added a todo file
166ae0c4d3f420721acbb115cc33848dfcc2121a started write support
9fceb02d0ae598e95dc970b74767f19372d61af8 updated rakefile
964f16d36dfccde844893cac5b347e7b3d44abbc commit the todo
8a5cbc430f1a9c3d00faaeffd07798508422908a updated readme
现在,假设在 v1.2 时你忘记给项目打标签,也就是在 “updated rakefile” 提交。 你可以在之后补上标签。 要在那个提交上打标签,你需要在命令的末尾指定提交的校验和(或部分校验和):
$ git tag -a v1.2 9fceb02
可以看到你已经在那次提交上打上标签了:
$ git tag
v0.1
v1.2
v1.3
v1.4
v1.4-lw
v1.5
$ git show v1.2
tag v1.2
Tagger: Scott Chacon <schacon@gee-mail.com>
Date:   Mon Feb 9 15:32:16 2009 -0800

version 1.2
commit 9fceb02d0ae598e95dc970b74767f19372d61af8
Author: Magnus Chacon <mchacon@gee-mail.com>
Date:   Sun Apr 27 20:43:35 2008 -0700

    updated rakefile
6.4 共享标签
git push origin
$ git push origin v1.5
Counting objects: 14, done.
Delta compression using up to 8 threads.
Compressing objects: 100% (12/12), done.
Writing objects: 100% (14/14), 2.05 KiB | 0 bytes/s, done.
Total 14 (delta 3), reused 0 (delta 0)
To git@github.com:schacon/simplegit.git
 * [new tag]         v1.5 -> v1.5
如果想要一次性推送很多标签,也可以使用带有 --tags 选项的 git push 命令。
$ git push origin --tags
Counting objects: 1, done.
Writing objects: 100% (1/1), 160 bytes | 0 bytes/s, done.
Total 1 (delta 0), reused 0 (delta 0)
To git@github.com:schacon/simplegit.git
 * [new tag]         v1.4 -> v1.4
 * [new tag]         v1.4-lw -> v1.4-lw
6.5 删除标签
git tag -d 。 例如,可以使用以下命令删除一个轻量标签:
$ git tag -d v1.4-lw
Deleted tag 'v1.4-lw' (was e7d5add)
注意上述命令并不会从任何远程仓库中移除这个标签,必须用 git push :refs/tags/ 来更新你的远程仓库:
第一种变体是
git push <remote> :refs/tags/<tagname>
第二种更直观的删除远程标签的方式是:
git push origin --delete <tagname>
6.6 检出标签
git checkout 命令
虽然这会使你的仓库处于“分离头指针(detached HEAD)”的状态——这个状态有些不好的副作用
7. Git 别名
不想每次都输入完整的 Git 命令,可以通过 git config 文件来轻松地为每一个命令设置一个别名。 这里有一些例子你可以试试:
$ git config --global alias.co checkout
$ git config --global alias.br branch
$ git config --global alias.ci commit
$ git config --global alias.st status
这意味着,当要输入 git commit 时,只需要输入 git ci。 随着你继续不断地使用 Git,可能也会经常使用其他命令,所以创建别名时不要犹豫。
在创建你认为应该存在的命令时这个技术会很有用。 例如,为了解决取消暂存文件的易用性问题,可以向 Git 中添加你自己的取消暂存别名:
$ git config --global alias.unstage 'reset HEAD --'
这会使下面的两个命令等价:
$ git unstage fileA
$ git reset HEAD -- fileA
这样看起来更清楚一些。 通常也会添加一个 last 命令,像这样:
$ git config --global alias.last 'log -1 HEAD'
这样,可以轻松地看到最后一次提交:
$ git last
commit 66938dae3329c7aebe598c2246a8e6af90d04646
Author: Josh Goebel <dreamer3@example.com>
Date:   Tue Aug 26 19:48:51 2008 +0800

    test for current head

    Signed-off-by: Scott Chacon <schacon@example.com>
可以看出,Git 只是简单地将别名替换为对应的命令。 然而,你可能想要执行外部命令,而不是一个 Git 子命令。 如果是那样的话,可以在命令前面加入 ! 符号。 如果你自己要写一些与 Git 仓库协作的工具的话,那会很有用。 我们现在演示将 git visual 定义为 gitk 的别名:
$ git config --global alias.visual '!gitk'


 1475
1475


 被折叠的 条评论
为什么被折叠?
被折叠的 条评论
为什么被折叠?
 到【灌水乐园】发言


