


提示:文章写完后,目录可以自动生成,如何生成可参考右边的帮助文档
目录
前言
本次课设实现的身份证图像分拣技术主要采用了python+卷积核提取图像特征+感知哈希算法比较汉明距离的方式,实现了四种方法从三张测试图像中找出身份证图像,分别是锐化卷积提取图像特征识别,感知哈希算法比较相似度识别,锐化卷积+感知哈希算法识别,prewitt算子+感知哈希算法识别。基本流程是先对模板图像进行卷积提取特征,再对测试图像进行卷积提取特征,然后特征矩阵相减求和用于近似测试图像与模板图像之间的距离,取三张测试图像中距离最近的输出即为目标图像。感知哈希算法则是对模板图像和测试图像分别按照一定的哈希算法的得到一组二进制数字,再求两者之间的汉明距离,取三张测试图像中距离最近的输出即为目标图像。
提示:以下是本篇文章正文内容,下面案例可供参考
一、总体设计
1.1 系统功能
(1)利用锐化卷积核提取特征分拣身份证正面图像;
(2)利用感知哈希算法比较图像相似度分拣身份证正面图像;
(3)锐化卷积+感知哈希算法分拣身份证正面图像;
(4)prewitt算子+感知哈希算法分拣身份证正面图像。
算法实现:首先读入模板图像,对模板图像进行卷积操作提取图像的特征,然后读入测试图像,同样进行卷积提取特征特征,然后将特征矩阵相减求和来近似两个图像之间的距离,其中最小的一个可认为是与模板图像最接近的,即分拣的目标图像。采用锐化卷积核是对图像进行锐化操作,也就是让图像的边缘更加锐利,这样做对于噪声较多的图像分拣会存在错误,因此再卷积提取主要特征后再对其用感知哈希算法计算汉明距离得到最接近的一张。为了对比算子不同对卷积分拣操作的影响,用prewitt算子对图像卷积分拣身份证正面图象,但测试发现仅用prewitt算子错误率较高,所以结合感知哈希算法实现。
1.2 程序模块图

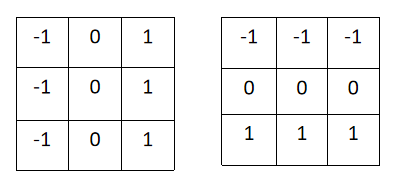
1.3 程序所用算子
(1)3x3锐化卷积核

(2)3x3 prewitt 算子
二、代码实现
2.1 main函数
主函数在控制台获取图像的读取方式,以及四种身份证分拣方法。
import ImgClassify
from matplotlib import pyplot as plt
import time

# 按间距中的绿色按钮以运行脚本。
if __name__ == '__main__':

    # # 高斯滤波卷积核
    # kernel2 = np.array([[1, 2, 1],
    #                     [2, 4, 2],
    #                     [1, 2, 1]])
    # kernel2 = kernel2*(1/16)
    # print(kernel2)

    print("图像选择的方式:< 1 >自定义输入  < 2 >使用原始图像")
    imgChoose = int(input("图像选择的方式:"))
    # 获取模板图像
    tempImg = ImgClassify.getTempImg()
    # 获取测试图像
    testImg1, testImg2, testImg3 = ImgClassify.getTestimage(imgChoose)
    plt.rcParams['font.sans-serif'] = ['SimHei']  # 显示中文标签
    plt.rcParams['axes.unicode_minus'] = False  # 这两行需要手动设置
    plt.figure("图像展示")
    plt.subplot(2, 3, 2)
    plt.axis('off');plt.imshow(tempImg);plt.title("模板图像")
    plt.subplot(2, 3, 4)
    plt.axis('off');plt.imshow(testImg1);plt.title("测试图像1")
    plt.subplot(2, 3, 5)
    plt.axis('off');plt.imshow(testImg2);plt.title("测试图像2")
    plt.subplot(2, 3, 6)
    plt.axis('off');plt.imshow(testImg3);plt.title("测试图像3")
    plt.show()
    while 1:
        print("1:锐化卷积提取特征识别",'\t\t\t',"2:感知哈希算法比较相似度识别")
        print("3:锐化卷积+感知哈希算法识别",'\t',"4.prewitt算子+感知哈希算法识别")
        choose = int(input("请输入你的选择:"))
        if choose == 1:
            start = time.perf_counter()
            # 对模板图像利用锐化卷积核提取特征的结果
            tempResult = ImgClassify.imgConvolve(tempImg)
            plt.figure("卷积后的模板图像")
            plt.axis('off')
            plt.imshow(tempResult)
            plt.show()
            ImgClassify.onlyConvolve(tempResult,testImg1,testImg2,testImg3)
            end = time.perf_counter()
            print("程序运行时间:",end - start,'\n')
        elif choose == 2:
            start = time.perf_counter()
            # 只用相似度比较
            ImgClassify.Similarity(tempImg, testImg1, testImg2, testImg3)
            end = time.perf_counter()
            print("程序运行时间:", end - start,'\n')
        elif choose == 3:
            start = time.perf_counter()
            # 卷积+感知哈希算法
            tempResult = ImgClassify.imgConvolve(tempImg)
            ImgClassify.conv_dHash(tempResult,testImg1,testImg2,testImg3)
            end = time.perf_counter()
            print("程序运行时间:", end - start,'\n')
        elif choose == 4:
            # prewitt算子卷积 + 感知哈希算法
            start = time.perf_counter()
            # 对模板图像利用Prewitt算子提取特征的结果
            tempResult = ImgClassify.Prewitt(tempImg)
            # plt.figure("卷积后的模板图像")
            # plt.axis('off')
            # plt.imshow(tempResult)
            # plt.show()
            ImgClassify.prw_dHash(tempResult,testImg1,testImg2,testImg3)
            end = time.perf_counter()
            print("程序运行时间:",end - start,'\n')
        else:
            print("无此选择,结束!")
            break
2.2 读取图像
用于读取模板图像和测试图像,可以选择读入自定义图像和读入模板图像两种方式,并修改其大小,加快卷积的速度。
# 获取模板图像
def getTempImg():
    tempImg_path = "./data/ZXR.jpg"
    tempImg = mp.imread(tempImg_path)
    # tempImg = cv2.resize(tempImg, dsize=(512, 512))
    tempImg = changeSize(tempImg)
    return tempImg

# 获取测试图像
def getTestimage(imgChoose):
    if imgChoose == 1:
        print("请依次输入三张测试图像的路径(务必包含一张身份证正面图像)")
        test1_path = str(input("请输入测试图像1路径:"))
        test2_path = str(input("请输入测试图像2路径:"))
        test3_path = str(input("请输入测试图像3路径:"))
        test1 = mp.imread(test1_path)
        test2 = mp.imread(test2_path)
        test3 = mp.imread(test3_path)
    if imgChoose == 2:
        test1 = mp.imread("./data/House.jpg")
        test2 = mp.imread("./data/SFZ.jpg")
        test3 = mp.imread("./data/HKB.jpg")
    testImg1 = changeSize(test1)
    testImg2 = changeSize(test2)
    testImg3 = chan
最低0.47元/天 解锁文章


 4777
4777


 被折叠的 条评论
为什么被折叠?
被折叠的 条评论
为什么被折叠?
 到【灌水乐园】发言


