


文章目录
1.NanopcT4 系统烧写详细操作步骤
1)准备一张 8G 或以上容量的 SDHC 卡;
2)下载并解压 固件文件 rk3399-eflasher-friendlydesktop-bionic-4.4- arm64-20200324.img.zip 和 工具 win32diskimager;
3)在 Windows 下以管理员身份运行 win32diskimager,在界面上选择你的SD 卡盘符,选择解压后的 EFlasher 固件,点击 Write 按钮烧写到 SD 卡; 或者在 Linux 下使用 dd 命令将 rk3399-eflasher-friendlydesktop-bionic-4.4-arm64-20200324.img 写入 SD 卡;
4)将 SD 卡从电脑端弹出,插入 NanoPC-T4 的 microSD 卡槽;
5)长按 NanoPC-T4 上的 Power 键直到板上的 PWR 灯亮,系统会从 SD 卡启动, 并自动启动 EFlasher 烧写工具,你有多种途径可以操作 EFlasher:
方法 1: 连接 LCD 或 HDMI 显示屏,在图形界面上操作 EFlasher,如果屏幕不支持触摸,则需要使用 USB 鼠标来操作;
方法 2: 将开发板通过网线接入局域网,通过 ssh 登录开发板,然后输入命令 eflasher,根据命令行的提示进行操作;(注: ssh 登录的用户是 root,密码为 fa,开发板 IP 可查看路由器后台获得)
方法 3: 通过调试串口登录到串口终端,在终端上输入命令 eflasher 来操作;
方法 4: 连接一个 lcd2usb 配件到 NanoPC-T4 上,按配件上面的 K1 键可以选择要烧写的系统,然后按 K2 键确定烧写,烧写进度会在 lcd2usb 上显示;
6)烧写完成后,轻按 Power 键关机,从 NanoPC-T4 端弹出 SD 卡;
7)长按 Power 开机,会从 eMMC 启动你刚刚烧写的系统;
2.vim 使用与 gcc 使用
1)使用 vim 编写 Hello world 程序。
#include <iostream>
using namespace std;
int main()
{
	cout << “Hello world” << endl; return 0;
}
2)将 Hello word 程序保存为 hello.cpp 后,终端执行: g++ -o hello hello.cpp 进行程序编译
./hello 运行生成的程序
可以看到执行结果:Hello world
3)利用 vim 中替换的操作::%s/world/vim
执行上述操作,将输出改为 Hello vim
3.makefile 使用
利用 vim 编写以下程序:
1)ex2-2.c 程序如下:
#include <stdio.h>
#include "f2.h"
main()
{
	printf("Hello world!\n");
	f2();
}
2)f2.h 程序如下:
#include <stdio.h>
void f2(void);
3)f2.c 程序如下:
#include <stdio.h>
void f2()
{
	printf("This is printed by f2!\n");
}
4)Makefile 程序如下:
ex2-2:ex2-2.o f2.o
	gcc ex2-2.o f2.o -o ex2-2
ex2-2.o:ex2-2.c f2.h
	gcc -c ex2-2.c
f2.o:f2.c f2.h
	gcc -c f2.c

clean:
	rm -f ex2-2*.o
	rm -r f2.o
	rm -r ex2-2
创建好上述 4 个文件后,用 shell 命令:make 进行编译。文件夹中生成ex2-2.o、f2.o、ex2-2 三个文件,输入./ex2-2 查看程序运行效果。输入 make clean 可以自动清除生成文件。
4.GPIO 引脚查看与连接
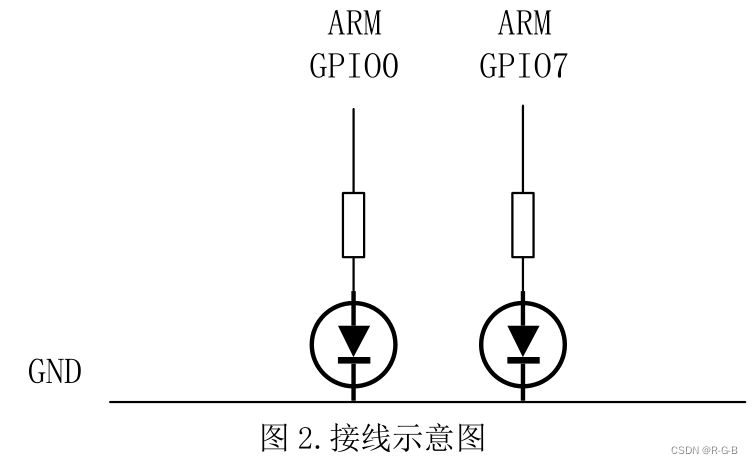
查看 Nanopc-T4 官方网站,查看 Nanopc-T4 的接口布局,如图 1 所示, GPIO 引脚定义对应 ARM 板实物,如图 1 所示,第一排 GPIO 引脚从左到右为Pin2、4、6 依次往下排,第二排为 Pin1、3、5 依次往下排。在 ARM 板终端输入 gpio readall,查看 wPi 与 Physical 对应的关系(GPIO0 引脚为 ARM 针脚11,GPIO7 引脚为 ARM 针脚 7),进行硬件的 GPIO 连接,接线图如图 2 所示。
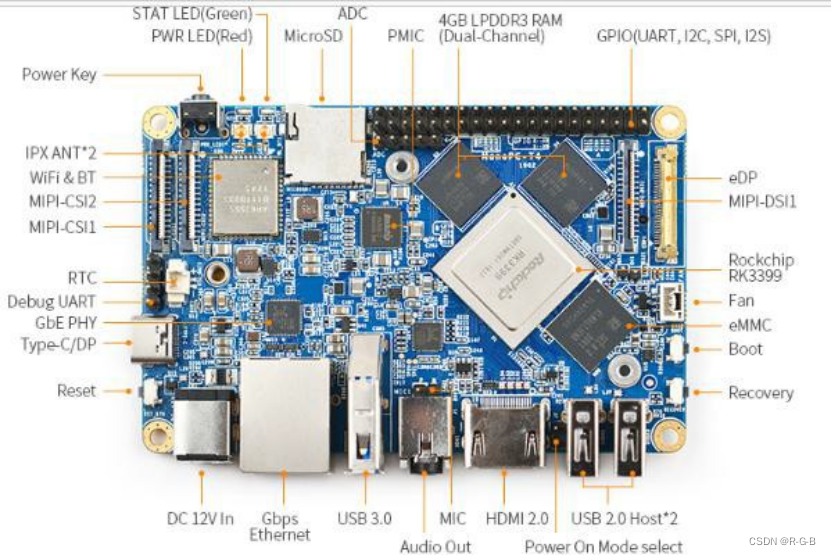
图 1. NanopcT4
5.使用vim 编写 LED 灯闪烁c 语言程序test1.c
#include <wiringPi.h>
int main(void)
{
	wiringPiSetup();
	pinMode(7, OUTPUT);
	for (;;)
	{
		digitalWrite(7, HIGH);
		delay(500);
		digitalWrite(7, LOW);
		delay(500);
	}
}
将上述程序编写并保存后,进行编译并运行:
gcc -Wall -o test1 test1.c -lwiringPi -lwiringPiDev -lpthread -lrt - lm -lcrypt
sudo ./test1
6.使用vim 编写 LED 灯闪烁shell 脚本程序test2.sh
LED=0
gpio mode $LED out
while true; do
	gpio write $LED 1
	sleep 0.5
	gpio write $LED 0
	sleep 0.5
done
终端输入 sudo source test2.sh 并运行脚本
7.在ARM 上实现人脸检测
在终端输入 sudo qtcreator,使用权限打开 QT,ARM 对 GPIO 的控制需要权限,点击左侧”Welcome”→”Projects”→”New Project”;弹出窗口, 选择”Application”→”Qt Widgets Application”点击”Choose…”;新建工程,输入 Name(工程名)和 Create in(路径),一直点击”Next”,最后点击”Finish”;新建工程成功,左侧工程目录有文件和文件夹都是工程文件, 双击打开 pro 文件,将 opencv 库添加到 QT 工程中,添加内容为:
NCLUDEPATH += /usr/local/include \
			  /usr/local/include/opencv4
LIBS += /usr/local/lib/libopencv*
LIBS += -lwiringPi \
	    -lwiringPiDev \
		-lpthread \
		-lrt \

		-lm \
		-lcrypt
双击打开 Forms 下的 mainwindow.ui,左侧为控件列表,中间部分为 QT 运行后界面,在左侧控件列表中找到”Label”和”Push Button”,使用控件可以用拖拽的方式将控件放到中间界面,界面和控件的大小均可使用鼠标直接拉伸, 也可以在右小角的属性列表中调节。本实验需要一个”Label” 控件和两个”Push Button”,将三个控件拖拽到界面中后,调节大小和位置,然后通过QT 控件创建控件相关槽函数,具体操作如下:
右键点击第一个放入的”Push Button”,选择”Go to slot…”→”OK” 后会转到一个函数, 回到 mainwindow.ui , 右键点击第二个放入的”Push Button”,选择”Go to slot…”→”OK”同样会转到一个函数。
修改和添加其它功能函数:
右 键 点 击 Headers, 选 择 ”Add New…”→”C++ Header File”→”Choose…”,在 Name 输入:dnnfacedetect.h ,Path 默认不变, 点击 ”Next”→”Finish”, 打开 dnnfacedetect.h 文件,在 ”#define DNNFACEDETECT_H“和”#endif // DNNFACEDETECT_H“添加以下代码:
#include <opencv2/opencv.hpp>
#include <opencv2/dnn/dnn.hpp>
#include <iostream>
#include <QFileDialog>
#include <QLabel>
#include <opencv2/core/core.hpp>
#include <opencv2/highgui/highgui.hpp>
#include <opencv2/imgproc.hpp>
#include <string>
#include <wiringPi.h>
#include <sys/time.h>
using namespace std;
using namespace cv;
struct M
{
	Mat frameR; bool markR;
};
class dnnfacedetect
{
private:
	string _modelbinary, _modeldesc; dnn::Net _net;
public:
	//构造函数 传入模型文件

	dnnfacedetect();
	dnnfacedetect(string modelBinary, string modelDesc);
	~dnnfacedetect();
	//置信阈值
	float confidenceThreshold; double inScaleFactor; size_t inWidth;
	size_t inHeight; Scalar meanVal;
	//初始化DNN网络bool initdnnNet();
	//人脸检测
	//vector<Mat> detect(Mat frame); M detect(Mat frame);
};
双击打开 mainwindow.h 文件,将文件内容修改和添加成以下内容:
#ifndef MAINWINDOW_H
#define MAINWINDOW_H
#include <QMainWindow>
#include "dnnfacedetect.h"
QT_BEGIN_NAMESPACE
namespace Ui { class MainWindow; }
QT_END_NAMESPACE
class MainWindow : public QMainWindow
{
	Q_OBJECT
public:
	MainWindow(QWidget* parent = nullptr);
	~MainWindow(); private slots:
	void on_pushButton_clicked();
	void on_pushButton_2_clicked();
private:
	Ui::MainWindow* ui;
	QImage cvMat_to_QImage(const cv::Mat& mat);
	VideoCapture cap;
	Mat frame;
	Mat pic;
	QImage image;
	bool mark;
	M checkR;
	int cameraMark;
};
#endif // MAINWINDOW_H
双击打开 main.cpp 文件修改成以下内容:
#include "mainwindow.h"
#include <QApplication>
int main(int argc, char* argv[])
{
	wiringPiSetup();
	pinMode(7, OUTPUT);
	pinMode(0, OUTPUT);
	digitalWrite(7, LOW);
	digitalWrite(0, LOW);
	QApplication a(argc, argv);
	MainWindow w;
	w.show();
	return a.exec();
}
右 键 点 击 Sources, 选 择 ”Add New…”→”C++ Source
File”→”Choose…”,在 Name 输入:dnnfacedetect.cpp ,Path 默认不变, 点击”Next”→”Finish”,打开 dnnfacedetect.cpp 文件添加以下代码:
#include "dnnfacedetect.h"
dnnfacedetect::dnnfacedetect()
{
	dnnfacedetect("", "");
}
//构造函数
dnnfacedetect::dnnfacedetect(string modelBinary, string modelDesc)
{
	_modelbinary = modelBinary;
	_modeldesc = modelDesc;
	//初始化置信阈值confidenceThreshold = 0.6;
	inScaleFactor = 0.5;
	inWidth = 300;
	inHeight = 300;
	meanVal = Scalar(104.0, 177.0, 123.0);
}
dnnfacedetect::~dnnfacedetect()
{
	_net.~Net();
}

//初始化dnnnet
bool dnnfacedetect::initdnnNet()
{
	_net = dnn::readNetFromTensorflow(_modelbinary, _modeldesc);

	_net.setPreferableBackend(dnn::DNN_BACKEND_OPENCV);
	_net.setPreferableTarget(dnn::DNN_TARGET_CPU);
	return !_net.empty();
}
//人脸检测
M dnnfacedetect::detect(Mat frame)
{
	Mat tmpsrc = frame;
	M reu;
	reu.markR = false;
	vector<Mat> dsts = vector<Mat>();
	// 修改通道数
	if (tmpsrc.channels() == 4)
		cvtColor(tmpsrc, tmpsrc, COLOR_BGRA2BGR);
	// 输入数据调整
	Mat inputBlob = dnn::blobFromImage(tmpsrc, inScaleFactor, Size(inWidth, inHeight), meanVal, false, false);
	_net.setInput(inputBlob, "data");

	//人脸检测
	Mat detection = _net.forward("detection_out");

	Mat detectionMat(detection.size[2], detection.size[3], CV_32F, detection.ptr<float>());

	//检测出的结果进行绘制和存放到dsts中
	for (int i = 0; i < detectionMat.rows; i++) {
		//置值度获取
		float confidence = detectionMat.at<float>(i, 2);
		//如果大于阈值说明检测到人脸
		if (confidence > confidenceThreshold) {
			reu.markR = true;
			//计算矩形
			int xLeftBottom = static_cast<int>(detectionMat.at<float>(i, 3) * tmpsrc.cols);
			int yLeftBottom = static_cast<int>(detectionMat.at<float>(i, 4) * tmpsrc.rows);
			int xRightTop = static_cast<int>(detectionMat.at<float>(i, 5) * tmpsrc.cols);
			int yRightTop = static_cast<int>(detectionMat.at<float>(i, 6) * tmpsrc.rows);
			//生成矩形
			Rect rect((int)xLeftBottom, (int)yLeftBottom,

				(int)(xRightTop - xLeftBottom), (int)(yRightTop - yLeftBottom));

			//截出图矩形存放到dsts数组中Mat tmp = tmpsrc(rect); dsts.push_back(tmp);

			//在原图上用红框画出矩形
			rectangle(frame, rect, Scalar(0, 0, 255));
		}
	}
	cv::resize(frame, reu.frameR, Size(640, 480), 0, 0, INTER_LINEAR);
	return reu;
}
双击打开 mainwindow.cpp 文件修改成以下内容:
#include "mainwindow.h"
#include "ui_mainwindow.h"
MainWindow::MainWindow(QWidget* parent)
	: QMainWindow(parent)
	, ui(new Ui::MainWindow)
{
	ui->setupUi(this);
}

MainWindow::~MainWindow()
{
	delete ui;
}
/********************Mat转QImage函数*********************/
QImage MainWindow::cvMat_to_QImage(const cv::Mat& mat)
{
	switch (mat.type())
	{
		// 8-bit, 4 channel case CV_8UC4:
		{
			QImage image(mat.data, mat.cols, mat.rows, mat.step, QImage::Format_RGB32);
			return image;
		}
		// 8-bit, 3 channel case CV_8UC3:
		{
			QImage image(mat.data, mat.cols, mat.rows, mat.step, QImage::Format_RGB888);
			return image.rgbSwapped();

		}
		// 8-bit, 1 channel case CV_8UC1:
		{
			static QVector<QRgb> sColorTable;
			// only create our color table once if (sColorTable.isEmpty())
			{
				for (int i = 0; i < 256; ++i) sColorTable.push_back(qRgb(i, i, i));
			}
			QImage image(mat.data, mat.cols, mat.rows, mat.step, QImage::Format_Indexed8);
			image.setColorTable(sColorTable);
			return image;
		}
	default:
		qDebug("Image format is not supported: depth=%d and %d channels\n", mat.depth(), mat.channels());
		break;
	}
	return QImage();
}
/*********************开始按键************************/
void MainWindow::on_pushButton_clicked()
{
	cameraMark = 10;
	cap.open(cameraMark);
	mark = true;
	if (!cap.open(cameraMark))
	{
		ui->label->setText("camera error");
		digitalWrite(7, HIGH);
		delay(500);
		digitalWrite(7, LOW);
		delay(500);
		digitalWrite(7, HIGH);
		delay(500);
		digitalWrite(7, LOW);
		return;
	}
	digitalWrite(0, LOW);
	digitalWrite(7, HIGH);
	namedWindow("test");
	while (mark)
	{
		cap >> frame;
		cv::resize(frame, pic, Size(640, 480), 0, 0, INTER_LINEAR);
		image = cvMat_to_QImage(pic);
		ui->label->setPixmap(QPixmap::fromImage(image));
		ui->label->update();
		waitKey(5);
	}
}
/*********************检测按键************************/
void MainWindow::on_pushButton_2_clicked()
{
	string ModelBinary = ".pb";
	string ModelDesc = ".pbtxt";
	if (mark == false)
	{
		return;
	}
	mark = false;
	destroyWindow("test");
	cap.release();
	//初始化
	dnnfacedetect fdetect = dnnfacedetect(ModelBinary, ModelDesc);
	if (!fdetect.initdnnNet())
	{
		ui->label->setText("初始化DNN人脸检测失败!");
		digitalWrite(7, HIGH);
		delay(500);
		digitalWrite(7, LOW);
		delay(500);
		digitalWrite(7, HIGH);
		delay(500);
		digitalWrite(7, LOW);
		return;
	}
	if (!frame.empty()) {
		checkR = fdetect.detect(frame);
		if (checkR.markR == true)
		{
			digitalWrite(7, LOW);
			digitalWrite(0, HIGH);
		}
		image = cvMat_to_QImage(checkR.frameR);
		ui->label->setPixmap(QPixmap::fromImage(image));

	}
	//waitKey(5);
}
将文件 opencv_face_detector.pbtxt 和 opencv_face_detector_uint8.pb复制粘贴到 ARM 中,将路径添加到检测按键的函数中。
将 USB 相机插在 ARM 板上,建议使用 USB3.0 的接口,然后点击 QT 中左下第二个运行程序。
注意时间戳问题,系统时间要修改为当前时间使用指令 sudo date -s ‘20201213 21:14:50’(当前时间)对系统时间进行修改。
按键 1 为开始采集图像,按键 2 为图像人脸检测。


 637
637


 被折叠的 条评论
为什么被折叠?
被折叠的 条评论
为什么被折叠?
 到【灌水乐园】发言


